win10+vs2015编译caffe的cpu debug版本、部署matcaffe
一、编译caffe
1、安装python-3.5.2-amd64.exe https://www.python.org/ftp/python/3.5.2/python-3.5.2-amd64.exe
2、安装matlab2016
3、安装vs2015
4、安装git
5、新建D:\Projects,进入该文件夹,下载源码
git clone:git clone https://github.com/BVLC/caffe.git
6、进入caffe文件夹
cd caffe
7、切换分支
git checkout windows
8、修改scripts\build_win.cmd ,高亮为修改内容
@echo off

@setlocal EnableDelayedExpansion

:: Default values

if DEFINED APPVEYOR (

    echo Setting Appveyor defaults

    if NOT DEFINED MSVC_VERSION set MSVC_VERSION=

    if NOT DEFINED WITH_NINJA set WITH_NINJA=

    if NOT DEFINED CPU_ONLY set CPU_ONLY=

    if NOT DEFINED CUDA_ARCH_NAME set CUDA_ARCH_NAME=Auto

    if NOT DEFINED CMAKE_CONFIG set CMAKE_CONFIG=Release

    if NOT DEFINED USE_NCCL set USE_NCCL=

    if NOT DEFINED CMAKE_BUILD_SHARED_LIBS set CMAKE_BUILD_SHARED_LIBS=

    if NOT DEFINED PYTHON_VERSION set PYTHON_VERSION=

    if NOT DEFINED BUILD_PYTHON set BUILD_PYTHON=

    if NOT DEFINED BUILD_PYTHON_LAYER set BUILD_PYTHON_LAYER=

    if NOT DEFINED BUILD_MATLAB set BUILD_MATLAB=

    if NOT DEFINED PYTHON_EXE set PYTHON_EXE=python

    if NOT DEFINED RUN_TESTS set RUN_TESTS=

    if NOT DEFINED RUN_LINT set RUN_LINT=

    if NOT DEFINED RUN_INSTALL set RUN_INSTALL=

    :: Set python 2.7 with conda as the default python

    if !PYTHON_VERSION! EQU  (

        set CONDA_ROOT=C:\Miniconda-x64

    )

    :: Set python 3.5 with conda as the default python

    if !PYTHON_VERSION! EQU  (

        set CONDA_ROOT=C:\Miniconda35-x64

    )

    set PATH=!CONDA_ROOT!;!CONDA_ROOT!\Scripts;!CONDA_ROOT!\Library\bin;!PATH!

    :: Check that we have the right python version

    !PYTHON_EXE! --version

    :: Add the required channels

    conda config --add channels conda-forge

    conda config --add channels willyd

    :: Update conda

    conda update conda -y

    :: Download other required packages

    conda install --yes cmake ninja numpy scipy protobuf==3.1. six scikit-image pyyaml pydotplus graphviz

    if ERRORLEVEL   (

      echo ERROR: Conda update or install failed

      exit /b

    )

    :: Install cuda and disable tests if needed

    if !WITH_CUDA! ==  (

        call %~dp0\appveyor\appveyor_install_cuda.cmd

        set CPU_ONLY=

        set RUN_TESTS=

        set USE_NCCL=

    ) else (

        set CPU_ONLY=

    )

    :: Disable the tests in debug config

    if "%CMAKE_CONFIG%" == "Debug" (

        echo Disabling tests on appveyor with config == %CMAKE_CONFIG%

        set RUN_TESTS=

    )

    :: Disable linting with python  until we find why the script fails

    if !PYTHON_VERSION! EQU  (

        set RUN_LINT=

    )

) else (

    :: Change the settings here to match your setup

    :: Change MSVC_VERSION to  to use VS

    if NOT DEFINED MSVC_VERSION set MSVC_VERSION=

    :: Change to  to use Ninja generator (builds much faster)
if NOT DEFINED WITH_NINJA set WITH_NINJA=
:: Change to to build caffe without CUDA support
if NOT DEFINED CPU_ONLY set CPU_ONLY=
    :: Change to generate CUDA code for one of the following GPU architectures

    :: [Fermi  Kepler  Maxwell  Pascal  All]

    if NOT DEFINED CUDA_ARCH_NAME set CUDA_ARCH_NAME=Auto

    :: Change to Debug to build Debug. This is only relevant for the Ninja generator the Visual Studio generator will generate both Debug and Release configs
if NOT DEFINED CMAKE_CONFIG set CMAKE_CONFIG=
Debug

    :: Set to  to use NCCL

    if NOT DEFINED USE_NCCL set USE_NCCL=

    :: Change to  to build a caffe.dll

    if NOT DEFINED CMAKE_BUILD_SHARED_LIBS set CMAKE_BUILD_SHARED_LIBS=

    :: Change to  if using python 3.5 (only 2.7 and 3.5 are supported)
if NOT DEFINED PYTHON_VERSION set PYTHON_VERSION=
    :: Change these options for your needs.

    if NOT DEFINED BUILD_PYTHON set BUILD_PYTHON=

    if NOT DEFINED BUILD_PYTHON_LAYER set BUILD_PYTHON_LAYER=
if NOT DEFINED BUILD_MATLAB set BUILD_MATLAB=
    :: If python is on your path leave this alone

    if NOT DEFINED PYTHON_EXE set PYTHON_EXE=python

    :: Run the tests

    if NOT DEFINED RUN_TESTS set RUN_TESTS=

    :: Run lint

    if NOT DEFINED RUN_LINT set RUN_LINT=

    :: Build the install target
if NOT DEFINED RUN_INSTALL set RUN_INSTALL=
)

:: Set the appropriate CMake generator

:: Use the exclamation mark ! below to delay the

:: expansion of CMAKE_GENERATOR

if %WITH_NINJA% EQU  (

    if "%MSVC_VERSION%"=="" (

        set CMAKE_GENERATOR=Visual Studio   Win64

    )

    if "%MSVC_VERSION%"=="" (

        set CMAKE_GENERATOR=Visual Studio   Win64

    )

    if "!CMAKE_GENERATOR!"=="" (

        echo ERROR: Unsupported MSVC version

        exit /B

    )

) else (

    set CMAKE_GENERATOR=Ninja

)

echo INFO: ============================================================

echo INFO: Summary:

echo INFO: ============================================================

echo INFO: MSVC_VERSION               = !MSVC_VERSION!

echo INFO: WITH_NINJA                 = !WITH_NINJA!

echo INFO: CMAKE_GENERATOR            = "!CMAKE_GENERATOR!"

echo INFO: CPU_ONLY                   = !CPU_ONLY!

echo INFO: CUDA_ARCH_NAME             = !CUDA_ARCH_NAME!

echo INFO: CMAKE_CONFIG               = !CMAKE_CONFIG!

echo INFO: USE_NCCL                   = !USE_NCCL!

echo INFO: CMAKE_BUILD_SHARED_LIBS    = !CMAKE_BUILD_SHARED_LIBS!

echo INFO: PYTHON_VERSION             = !PYTHON_VERSION!

echo INFO: BUILD_PYTHON               = !BUILD_PYTHON!

echo INFO: BUILD_PYTHON_LAYER         = !BUILD_PYTHON_LAYER!

echo INFO: BUILD_MATLAB               = !BUILD_MATLAB!

echo INFO: PYTHON_EXE                 = "!PYTHON_EXE!"

echo INFO: RUN_TESTS                  = !RUN_TESTS!

echo INFO: RUN_LINT                   = !RUN_LINT!

echo INFO: RUN_INSTALL                = !RUN_INSTALL!

echo INFO: ============================================================

:: Build and exectute the tests

:: Do not run the tests with shared library

if !RUN_TESTS! EQU  (

    if %CMAKE_BUILD_SHARED_LIBS% EQU  (

        echo WARNING: Disabling tests with shared library build

        set RUN_TESTS=

    )

)

if NOT EXIST build mkdir build

pushd build

:: Setup the environement for VS x64

set batch_file=!VS%MSVC_VERSION%0COMNTOOLS!..\..\VC\vcvarsall.bat

call "%batch_file%" amd64

:: Configure using cmake and using the caffe-builder dependencies

:: Add -DCUDNN_ROOT=C:/Projects/caffe/cudnn-8.0-windows10-x64-v5./cuda ^

:: below to use cuDNN

cmake -G"!CMAKE_GENERATOR!" ^

      -DBLAS=Open ^

      -DCMAKE_BUILD_TYPE:STRING=%CMAKE_CONFIG% ^

      -DBUILD_SHARED_LIBS:BOOL=%CMAKE_BUILD_SHARED_LIBS% ^

      -DBUILD_python:BOOL=%BUILD_PYTHON% ^

      -DBUILD_python_layer:BOOL=%BUILD_PYTHON_LAYER% ^

      -DBUILD_matlab:BOOL=%BUILD_MATLAB% ^

      -DCPU_ONLY:BOOL=%CPU_ONLY% ^

      -DCOPY_PREREQUISITES:BOOL= ^

      -DINSTALL_PREREQUISITES:BOOL= ^

      -DUSE_NCCL:BOOL=!USE_NCCL! ^

      -DCUDA_ARCH_NAME:STRING=%CUDA_ARCH_NAME% ^

      "%~dp0\.."

if ERRORLEVEL  (

  echo ERROR: Configure failed

  exit /b

)

:: Lint

if %RUN_LINT% EQU  (

    cmake --build . --target lint  --config %CMAKE_CONFIG%

)

if ERRORLEVEL  (

  echo ERROR: Lint failed

  exit /b

)

:: Build the library and tools

cmake --build . --config %CMAKE_CONFIG%

if ERRORLEVEL  (

  echo ERROR: Build failed

  exit /b

)

:: Build and exectute the tests

if !RUN_TESTS! EQU  (

    cmake --build . --target runtest --config %CMAKE_CONFIG%

    if ERRORLEVEL  (

        echo ERROR: Tests failed

        exit /b

    )

    if %BUILD_PYTHON% EQU  (

        if %BUILD_PYTHON_LAYER% EQU  (

            :: Run python tests only in Release build since

            :: the _caffe module is _caffe-d is debug

            if "%CMAKE_CONFIG%"=="Release" (

                :: Run the python tests

                cmake --build . --target pytest

                if ERRORLEVEL  (

                    echo ERROR: Python tests failed

                    exit /b

                )

            )

        )

    )

)

if %RUN_INSTALL% EQU  (

    cmake --build . --target install --config %CMAKE_CONFIG%

)

popd

@endlocal
9、编译caffe
scripts\build_win.cmd
编译过程中需要下载依赖包libraries_v140_x64_py35_1.1.0.tar.bz2依赖包,速度极慢,所以提前下载https://github.com/willyd/caffe-builder/releases
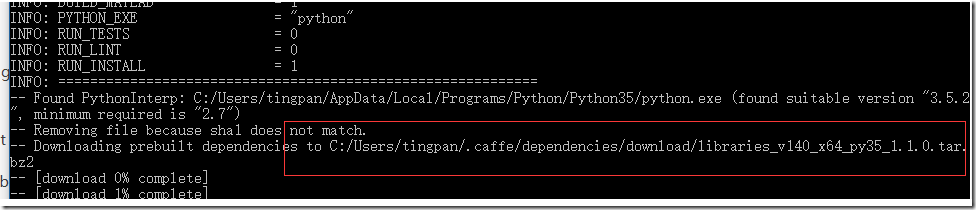
先停止编译,将下载好的依赖包放到对应目录下,并且到上一级目录,将libraries_v140_x64_py35_1.1.0文件夹删除。
重新编译,等待编译成功。
10、生成的工程在caffe/build/目录下,可用VS2015打开Caffe.sln。
11、对着ALL_BUILD,右键,生成。
二、matcaffe部署及测试
1、将生成的matcaffe接口:D:\Projects\caffe\matlab\+caffe\private\Debug\caffe_.mexw64拷贝到private目录下;
2、测试
(1)打开matlab,将工作目录切换至D:\Projects\caffe;
(2)输入如下代码
>> cd d:

>> cd Projects

>> cd caffe

>> addpath('matlab')

>> caffe.set_mode_cpu();

>> fprintf(['Caffe Version = ', caffe.version(), '\n']);

Caffe Version = 1.0.

>>
win10+vs2015编译caffe的cpu debug版本、部署matcaffe的更多相关文章
- vs2015编译caffe
有些时候,需要在python3的环境下import caffe,需要用vs2015在python3的环境下,编译pycaffe. microsoft的windows版本的caffe,依赖的库Nuget ...
- win10 + VS2015 编译 ARPACK
step 1: 下载ARPACK , mingw-w64-install 和 mingw-get-inst-20120426.exe: step 2: 安装 MinGW-64默认安装路径即可. ste ...
- win10+vs2015编译nanogui
!!版权声明:本文为博主原创文章,版权归原文作者和博客园共有,谢绝任何形式的 转载!! 作者:mohist 说明: A.OS : win10 1909 ,没有配置OpenGL开发环境的 经历. B. ...
- Win10+VS2015+EF6.0+MySQL5.6+MVC环境部署和排错
本来已经好几个月不弄专业了,今天一哥们问我问题的时候重新捣鼓了一下,就做个文档供后来人参考吧~ 1.首先安装MySQL 5.6 安装很简单我就不说了,你参考下:http://jingyan.baidu ...
- win10 编译好的CPU版本caffe 配置自己的图像分类C++DEMO
VC++目录 包含目录 F:\caffewindows\scripts\build\include F:\caffewindows\scripts\build F:\vs2015\VC\include ...
- [Caffe]Win10+VS2015+CUDA8.0+cudnn5.1环境配置
百度:win10 caffe vs2015 编译caffe.sln工程参见->这里 caffe训练参见->这里 参见->这里 Windows+VS2013爆详细Caffe编译安装教程
- Windows下 VS2015编译RocksDB
VS2015编译RocksDB RocksDB 是一个来自 facebook 的可嵌入式的支持持久化的 key-value 存储系统,也可作为 C/S 模式下的存储数据库,但主要目的还是嵌入式.Roc ...
- 实践详细篇-Windows下使用VS2015编译安装Caffe环境(CPU ONLY)
学习深度学习背景 最近在做一款抢票软件,由于12306经常检测账号状态,抢票抢着抢着就需要重新登录了,然后登录是需要验证码的.所以我最开始是想到了使用java基于感知哈希算法pHash做相似度匹配识别 ...
- Win7 下用 VS2015 编译最新 openssl(1.0.2j)包含32、64位debug和release版本的dll、lib(8个版本)
Win7 64位系统下通过VS2015编译好的最新的OpenSSL(1.0.2j)所有八个版本的链接库, 包含以下八个版本: 1.32位.debug版LIB: 2.32位.release版LIB: 3 ...
随机推荐
- 20175317 《Java程序设计》第五周学习总结
20175317 <Java程序设计>第五周学习总结 教材学习内容总结 第五周我学习了教材第六章的内容,了解了接口的知识,学到了以下内容: 明白了什么是接口 学会了如何实现接口 了解了接口 ...
- 实现android"转盘抽奖"小项目后感想
我这次做的小项目是android的转盘抽奖,因为这个小项目中有进程的调度,加锁等细节,而我们组的竞赛系统中也有这样的问题.通过这次的实践我发现了自己的好多问题也学到了很多. 个人问题: 1.自己的动手 ...
- 『TensorFlow』降噪自编码器设计
背景简介 TensorFlow实现讲解 设计新思路: 1.使用类来记录整个网络: 使用_init_()属性来记录 网络超参数 & 网络框架 & 训练过程 使用一个隐式方法初始化网络参数 ...
- UPX脱壳全程分析(转)
[文章标题]: UPX脱壳全程分析 [保护方式]: 本地验证 [使用工具]: OllyDBG [作者声明]: 只是感兴趣,没有其他目的.失误之处敬请诸位大侠赐教! ------------------ ...
- vim 插件 -- ctags
vim ctags 插件实现代码跳转的功能.希望在一个项目中快速的找到函数,变量,宏等定义的地方. 下载 http://ctags.sourceforge.net/ 安装 tar -jxvf ctag ...
- Nginx的使用(三)把nginx和php-cgi.exe注册成windows服务
1.创建windows服务用到一个小工具WinSW:https://github.com/kohsuke/winsw/releases(下载 .exe 文件即可,根据系统选择,Win 10 选择 .N ...
- 常用模块Part(1)
collections模块 time模块 random模块 os模块 sys模块 collections模块 这个模块实现了一些很好的数据结构,它们能帮助你解决各种实际问题 在这里主要介绍几种数据结构 ...
- JavaScript下实现交换数组元素上下移动例子
// 交换数组元素 var swapItems = function(arr, index1, index2) { arr[index1] = arr.splice(index2, ...
- Edge 浏览器 调用
ShellExecute(0, 'open', PChar('Microsoft-Edge:' + Edit1.Text), nil, nil, SW_SHOW);
- 基于Verilog的串口发送程序
一.模块框图及基本思路 tx_bps_module:波特率时钟产生模块 tx_control_module:串口发送的核心控制模块 tx_module:前两个模块的组合 control_module: ...