Spring Security构建Rest服务-1202-Spring Security OAuth开发APP认证框架之重构3种登录方式
SpringSecurityOAuth核心源码解析
蓝色表示接口,绿色表示类
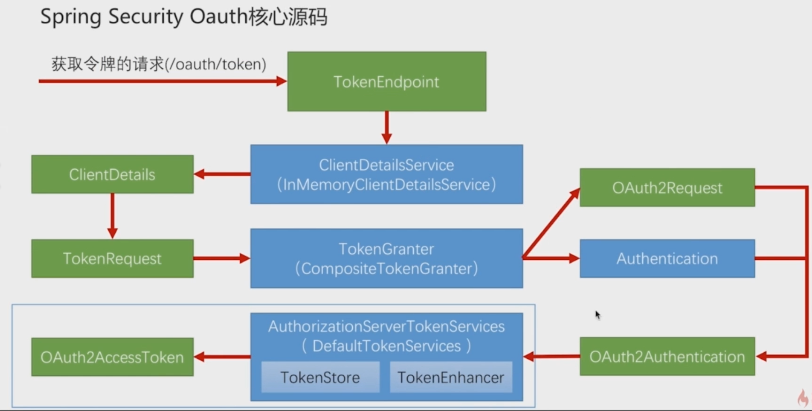
1,TokenEndpoint 整个入口点,相当于一个controller,不同的授权模式获取token的地址都是 /oauth/token ,通过grant_type 参数标识不同的授权类型,这个类就是判断授权类型 grant_type的。
2,TokenEndpoint收到请求后先调用 ClientDetailsService 读取第三方应用的信息。client_id、client_secret 来获取不同的第三方应用信息,封装在ClientDetails里;TokenEndpoint还会创建一个TokenRequest 的对象 ,封装了请求grant_type等信息,将ClientDetails放在TokenRequest 里
3,TokenRequest 会调用TokenGranter (令牌授权者)四种授权模式的实现,根据请求的grant_type 挑一种令牌生成的逻辑,都会产生OAuth2Request(整合了ClientDetails+TokenRequest) 、 Authentication(封装授权用户的信息,通过UserDetailsService获取),这两个对象整合起来生成 OAuth2Authentication 对象(包装了哪个第三方应用在请求哪个用户授权,授权模式,授权参数等信息),
4,OAuth2Authentication 最后传给AuthorizationServerTokenServices(认证服务器令牌服务)的默认实现,生成一个令牌。AuthorizationServerTokenServices 里还有TokenStore用来处理令牌的存取,TokenEnhancer 令牌增强器。
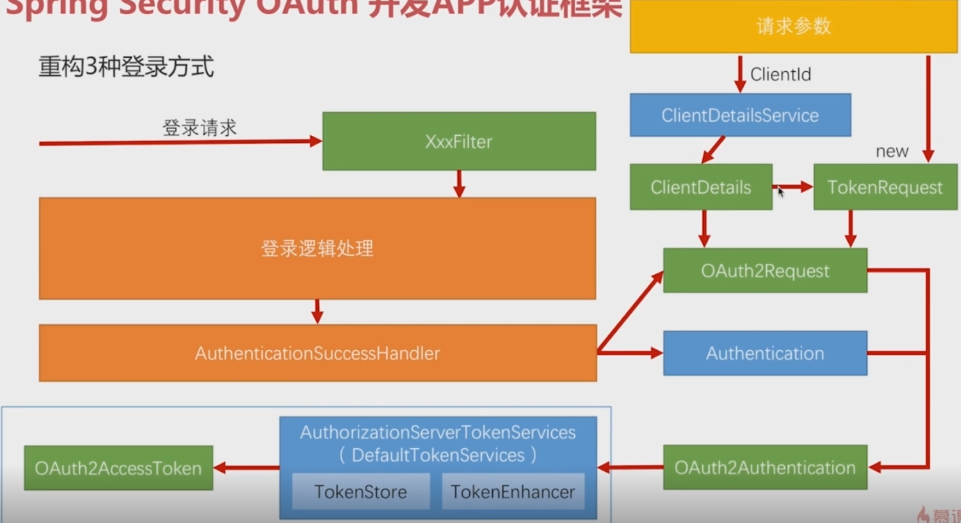
重构三种登录方式
要做的就是在登录成功后,按照Spring Security OAuth 生成 access_token 的逻辑,生成自己的token。
分析:
逆着推,要想有OAuth2AccessToken ------>AuthorizationServerTokenServices(spring已提供默认实现)------>OAuth2Authentication对象--------->Authentication(登录成功后会有这个对象)、OAuth2Request。
所以只需要构建OAuth2Request即可。
OAuth2Request-------->ClientDetails( 封装第三方应用的信息)------------>ClientDetailsService------------>接收ClientId 构建ClientDetails-------------->请求参数
--------->TokenRequest-------->根据ClientDetails信息new出来
此部分代码都是app项目里的
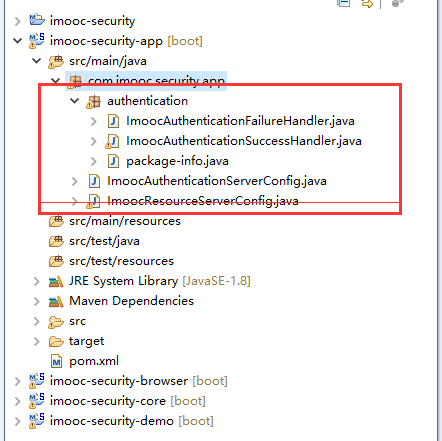
其中一部分是从BasicAuthenticationFilter 类里copy一段代码,这个类是处理Basic登录用的,copy一段获取请求头信息的
ImoocAuthenticationSuccessHandler:
/**

 * 认证成功后做的处理

 * ClassName: ImoocAuthenticationSuccessHandler

 * @Description:  认证成功后做的处理

 * @author lihaoyang

 * @date 2018年3月1日

 */

@Component("imoocAuthenticationSuccessHandler")

public class ImoocAuthenticationSuccessHandler

        //spring默认的登录成功处理器,实现了AuthenticationSuccessHandler接口,适配登录后 重定向和返回json两种用这个实现

        extends SavedRequestAwareAuthenticationSuccessHandler

        //返回json用这个实现

        /*implements AuthenticationSuccessHandler*/{

    private Logger logger = LoggerFactory.getLogger(getClass());

    //springmvc启动会自动注册一个ObjectMapper

    @Autowired

    private ObjectMapper objectMapper;

    @Autowired

    private SecurityProperties securityProperties;

    @Autowired

    private ClientDetailsService clientDetailsService;

    @Autowired

    private AuthorizationServerTokenServices authorizationServerTokenServices;

    @Override

    public void onAuthenticationSuccess(HttpServletRequest request, HttpServletResponse response,

            Authentication authentication) throws IOException, ServletException {

        logger.info("登录成功");

        //获取请求头里Authorization信息

        String header = request.getHeader("Authorization");

        //没有client信息

        if (header == null || !header.startsWith("Basic ")) {

            throw new UnapprovedClientAuthenticationException("请求头中无client信息");

        }

            /**

             * 构造OAuth2Request 第一步,从请求头获取clientId

             */

            //base64解码获取clientId、clientSecret

            String[] tokens = extractAndDecodeHeader(header, request);

            assert tokens.length == 2;

            String clientId = tokens[0];

            String clientSecret = tokens[1];

            /**

             * 构造OAuth2Request 第二步,根据clientId 获取ClientDetails对象

             */

            ClientDetails clientDetails = clientDetailsService.loadClientByClientId(clientId);

            if(clientDetails == null){

                throw new UnapprovedClientAuthenticationException("clientId对应的配置信息不存在,clientId:"+clientId);

            }else if(!StringUtils.equals(clientDetails.getClientSecret(), clientSecret)){

                throw new UnapprovedClientAuthenticationException("clientSecret不匹配,clientId:"+clientId);

            }

            /**

             * 构造OAuth2Request 第三步,new TokenRequest

             * 第一个参数是个map,放的是每个授权模式特有的参数,springsecurity会根据这些参数构建Authentication

             * 我们这里已获取到了Authentication,弄个空的map就可

             */

            TokenRequest tokenRequest = new TokenRequest(MapUtils.EMPTY_MAP, clientId, clientDetails.getScope(), "custom");

            /**

             * 构造OAuth2Request 第四步,创建 OAuth2Request

             */

            OAuth2Request oAuth2Request = tokenRequest.createOAuth2Request(clientDetails);

            /**

             * 构造OAuth2Request 第五步,创建 OAuth2Authentication

             */

            OAuth2Authentication oAuth2Authentication = new OAuth2Authentication(oAuth2Request, authentication);

            /**

             * 构造OAuth2Request 第六步,authorizationServerTokenServices创建 OAuth2AccessToken

             */

            OAuth2AccessToken accessToken = authorizationServerTokenServices.createAccessToken(oAuth2Authentication);

            response.setContentType("application/json;charset=UTF-8");

            response.getWriter().write(objectMapper.writeValueAsString(accessToken));

    }

    /**

     * base64解码请求头 Basic aW1vb2M6aW1vb2NzZWNyZXQ=

     * Decodes the header into a username and password.

     *

     * @throws BadCredentialsException if the Basic header is not present or is not valid

     * Base64

     */

    private String[] extractAndDecodeHeader(String header, HttpServletRequest request)

            throws IOException {

        //Basic aW1vb2M6aW1vb2NzZWNyZXQ= 截取Basic后的

        byte[] base64Token = header.substring(6).getBytes("UTF-8");

        byte[] decoded;

        try {

            //解码后格式   用户名:密码

            decoded = Base64.decode(base64Token);

        }

        catch (IllegalArgumentException e) {

            throw new BadCredentialsException(

                    "Failed to decode basic authentication token");

        }

        String token = new String(decoded, "UTF-8");

        int delim = token.indexOf(":");

        if (delim == -1) {

            throw new BadCredentialsException("Invalid basic authentication token");

        }

        //返回的数组是   [用户名(就是client_id),clientSecret] 其实就是配置的

        /**

         * security.oauth2.client.clientId = imooc

            security.oauth2.client.clientSecret = imoocsecret

         */

        return new String[] { token.substring(0, delim), token.substring(delim + 1) };

    }

}
ImoocResourceServerConfig:安全配置
/**

 * 资源服务器,和认证服务器在物理上可以在一起也可以分开

 * ClassName: ImoocResourceServerConfig

 * @Description: TODO

 * @author lihaoyang

 * @date 2018年3月13日

 */

@Configuration

@EnableResourceServer

public class ImoocResourceServerConfig extends ResourceServerConfigurerAdapter{

    //自定义的登录成功后的处理器

    @Autowired

    private AuthenticationSuccessHandler imoocAuthenticationSuccessHandler;

    //自定义的认证失败后的处理器

    @Autowired

    private AuthenticationFailureHandler imoocAuthenticationFailureHandler;

    //读取用户配置的登录页配置

    @Autowired

    private SecurityProperties securityProperties;

    @Autowired

    private SmsCodeAuthenticationSecurityConfig smsCodeAuthenticationSecurityConfig;

    @Override

    public void configure(HttpSecurity http) throws Exception {

        http

        //----------表单认证相关配置---------------

        .formLogin()

            .loginPage(SecurityConstants.DEFAULT_UNAUTHENTICATION_URL) //处理用户认证BrowserSecurityController

            .loginProcessingUrl(SecurityConstants.DEFAULT_LOGIN_PROCESSING_URL_FORM)

            .successHandler(imoocAuthenticationSuccessHandler)//自定义的认证后处理器

            .failureHandler(imoocAuthenticationFailureHandler) //登录失败后的处理

            .and()

        //-----------授权相关的配置 ---------------------

        .authorizeRequests()

            // /authentication/require:处理登录,securityProperties.getBrowser().getLoginPage():用户配置的登录页

            .antMatchers(SecurityConstants.DEFAULT_UNAUTHENTICATION_URL,

            securityProperties.getBrowser().getLoginPage(),//放过登录页不过滤,否则报错

            SecurityConstants.DEFAULT_LOGIN_PROCESSING_URL_MOBILE,

            SecurityConstants.SESSION_INVALID_PAGE,

            SecurityConstants.DEFAULT_VALIDATE_CODE_URL_PREFIX+"/*").permitAll() //验证码

            .anyRequest()        //任何请求

            .authenticated()    //都需要身份认证

        .and()

            .csrf().disable() //关闭csrf防护

        .apply(smsCodeAuthenticationSecurityConfig);//把短信验证码配置应用上

    }

}
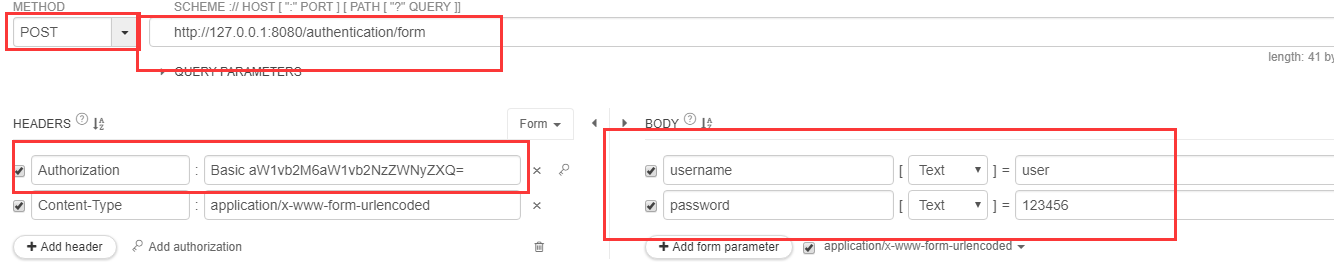
启动demo项目,demo项目此时依赖app项目,此时做的是表单登录的处理
访问表单登录:添加Authorization信息,username配置的cilentId:imooc ,password配置的clientSecret:imoocsecret
#第三方应用client_id
security.oauth2.client.clientId = imooc
#注意clientSecret 大写
security.oauth2.client.clientSecret = imoocsecret
响应token:
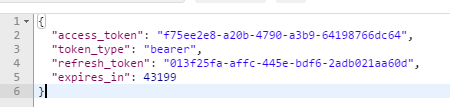
{
"access_token": "f75ee2e8-a20b-4790-a3b9-64198766dc64",
"token_type": "bearer",
"refresh_token": "013f25fa-affc-445e-bdf6-2adb021aa60d",
"expires_in": 43199
}
拿着token 访问用户信息请求 http://127.0.0.1:8080/user/me,header加上

响应:
{

"password": null,

"username": "user",

"authorities":[

{

"authority": "ROLE_USER"

},

{

"authority": "admin"

}

],

"accountNonExpired": true,

"accountNonLocked": true,

"credentialsNonExpired": true,

"enabled": true,

"userId": "user"

}
至此可以通过通过用户名密码获取token,拿着token访问用户信息了!
具体代码放在了github https://github.com/lhy1234/spring-security
Spring Security构建Rest服务-1202-Spring Security OAuth开发APP认证框架之重构3种登录方式的更多相关文章
- Spring Security构建Rest服务-1300-Spring Security OAuth开发APP认证框架之JWT实现单点登录
基于JWT实现SSO 在淘宝( https://www.taobao.com )上点击登录,已经跳到了 https://login.taobao.com,这是又一个服务器.只要在淘宝登录了,就能直接访 ...
- Spring Security构建Rest服务-1203-Spring Security OAuth开发APP认证框架之短信验证码登录
浏览器模式下验证码存储策略 浏览器模式下,生成的短信验证码或者图形验证码是存在session里的,用户接收到验证码后携带过来做校验. APP模式下验证码存储策略 在app场景下里是没有cookie信息 ...
- Spring Security构建Rest服务-1201-Spring Security OAuth开发APP认证框架之实现服务提供商
实现服务提供商,就是要实现认证服务器.资源服务器. 现在做的都是app的东西,所以在app项目写代码 认证服务器: 新建 ImoocAuthenticationServerConfig 类,@Ena ...
- Spring Security构建Rest服务-1200-SpringSecurity OAuth开发APP认证框架
基于服务器Session的认证方式: 前边说的用户名密码登录.短信登录.第三方登录,都是普通的登录,是基于服务器Session保存用户信息的登录方式.登录信息都是存在服务器的session(服务器的一 ...
- Spring Security构建Rest服务-1205-Spring Security OAuth开发APP认证框架之Token处理
token处理之二使用JWT替换默认的token JWT(Json Web Token) 特点: 1,自包含:jwt token包含有意义的信息 spring security oauth默认生成的t ...
- Spring Security构建Rest服务-1204-Spring Security OAuth开发APP认证框架之Token处理
token处理之一基本参数配置 处理token时间.存储策略,客户端配置等 以前的都是spring security oauth默认的token生成策略,token默认在org.springframe ...
- Spring Cloud构建微服务架构(三)消息总线
注:此文不适合0基础学习者直接阅读,请先完整的将作者关于微服务的博文全部阅读一遍,如果还有疑问,可以再来阅读此文,地址:http://blog.csdn.net/sosfnima/article/d ...
- 构建微服务:Spring boot
构建微服务:Spring boot 在上篇文章构建微服务:Spring boot 提高篇中简单介绍了一下spring data jpa的基础性使用,这篇文章将更加全面的介绍spring data jp ...
- Spring Cloud构建微服务架构(二)服务消费者
Netflix Ribbon is an Inter Process Communication (IPC) cloud library. Ribbon primarily provides clie ...
随机推荐
- Unable to load tag handler class "com.showId.Id.ShowId" for tag "ShowId:ShowId"] with root cause错误的解决方案
严重: Servlet.service() for servlet [jsp] in context with path [/Biaoqian] threw exception [/1.jsp (l ...
- NATAPP打穿内网
前一篇博文写了ngrok作为内网穿透工具现在开始开始学习另外一种内 网穿透natapp(他也是基于ngrok的一种高速内网穿透服务)多的介绍就 不说了,开始进入正题. 第一步:先登录natapp官网( ...
- 基于SceneControl的三维GIS开发
在ArcGIS体系中,三维开发包括两种:基于Scene的三维开发和基于Globe的三维开发. 由上图可以看出,两种开发的接口都很相似,掌握了Scene开发会相对容易的过渡到Globe开发中. 正如上图 ...
- struts2 的特征
web.xml <filter> <filter-name>struts2</filter-name> <filter-class>org.apache ...
- Restful风格wcf调用4——权限认证
写在前面 在前面的三篇文章,已经介绍了restful风格wcf,如何实现增删改查以及文件的上传下载操作.本篇文章将介绍一下,调用restful的权限认证的内容.在调用的接口,为了安全,总会需要对请求进 ...
- Nvidia显卡驱动下载
https://www.nvidia.cn/Download/index.aspx?lang=cn https://blog.csdn.net/weixin_39643690/article/deta ...
- jmeter 5.0版本更新说明(个人做个记录)
变化 此页面仅详细说明了当前版本中所做的更改. 先前更改的历史记录中详细介绍了早期更改. 5.0版 摘要 新的和值得注意的 不兼容的变化 Bug修复 改进 非功能性变化 已知问题和解决方法 谢 ...
- # 20155204 2016-2017-2 《Java程序设计》第五周学习总结
20155204 2016-2017-2 <Java程序设计>第五周学习总结 教材学习内容总结 Java中所有错误都会被打包为对象,运用try.catch,可以在错误发生时显示友好的错误信 ...
- 自己动手绘制ToolBar
VC MFC工具栏(CToolBar)控件 工具栏 工具栏控件在控件面板里没有对应的选项(图标),但有一个工具栏控件类CToolBar,所以我们如果要创建一个工具栏控件并显示在窗口里的话,只能用代码来 ...
- PAT甲 1009. Product of Polynomials (25) 2016-09-09 23:02 96人阅读 评论(0) 收藏
1009. Product of Polynomials (25) 时间限制 400 ms 内存限制 65536 kB 代码长度限制 16000 B 判题程序 Standard 作者 CHEN, Yu ...