react-native中的navigator
第一步安装相关插件
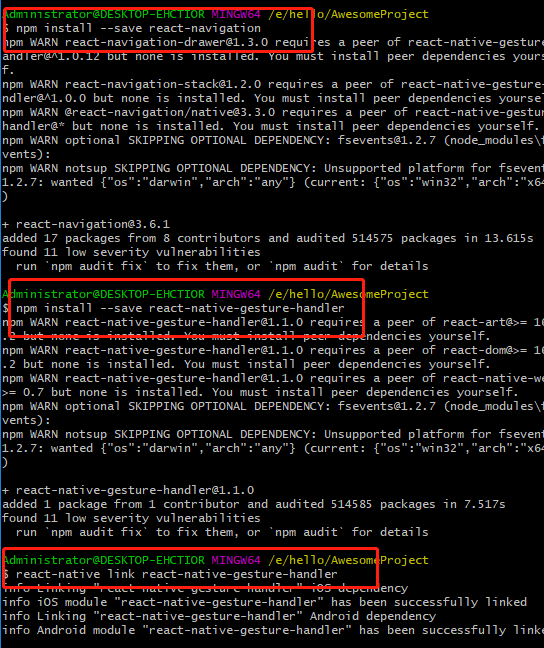
添加一些依赖


package com.awesomeproject;

import com.facebook.react.ReactActivity;

import com.facebook.react.ReactActivityDelegate;

import com.facebook.react.ReactRootView;

import com.swmansion.gesturehandler.react.RNGestureHandlerEnabledRootView;

public class MainActivity extends ReactActivity {

    /**

     * Returns the name of the main component registered from JavaScript.

     * This is used to schedule rendering of the component.

     */

    @Override

    protected String getMainComponentName() {

        return "AwesomeProject";

    }

     @Override

	  protected ReactActivityDelegate createReactActivityDelegate() {

	    return new ReactActivityDelegate(this, getMainComponentName()) {

	      @Override

	      protected ReactRootView createRootView() {

	       return new RNGestureHandlerEnabledRootView(MainActivity.this);

	      }

	    };

	 	}

}
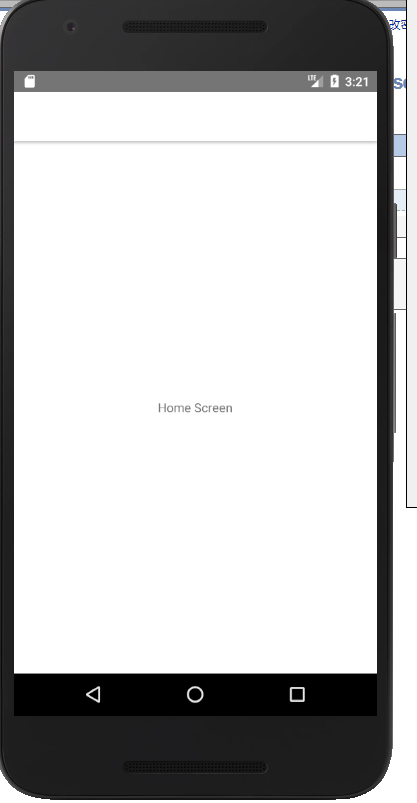
在app.js中添加
import React from "react";

import { View, Text } from "react-native";

import { createStackNavigator, createAppContainer } from "react-navigation";

class HomeScreen extends React.Component {

  render() {

    return (

      <View style={{ flex: 1, alignItems: "center", justifyContent: "center" }}>

        <Text>Home Screen</Text>

      </View>

    );

  }

}

const AppNavigator = createStackNavigator({

  Home: {

    screen: HomeScreen

  }

});

export default createAppContainer(AppNavigator);
项目运行为
In React Native, the component exported from App.js is the entry point (or root component) for your app -- it is the component from which every other
component descends. It's often useful to have more control over the component at the root of your app than you would get from exporting the result of
createAppContainer, so let's export a component that just renders our AppNavigator stack navigator.
Adding a second route
The component doesn't accept any props -- all configuration is specified in the options parameter to the
AppNavigator createStackNavigator function. We left the options blank, so it just uses the default configuration. To see an example
of using the options object, we will add a second screen to the stack navigator.
import React from "react";

import { View, Text } from "react-native";

import { createStackNavigator, createAppContainer } from "react-navigation";

class HomeScreen extends React.Component {

  render() {

    return (

      <View style={{ flex: 1, alignItems: "center", justifyContent: "center" }}>

        <Text>Home Screen</Text>

      </View>

    );

  }

}

class DetailsScreen extends React.Component {

  render() {

    return (

      <View style={{ flex: 1, alignItems: "center", justifyContent: "center" }}>

        <Text>Details Screen</Text>

      </View>

    );

  }

}

const AppNavigator = createStackNavigator(

  {

    Home: HomeScreen,

    Details: DetailsScreen

  },

  {

    initialRouteName: "Home"

  }

);

export default createAppContainer(AppNavigator);
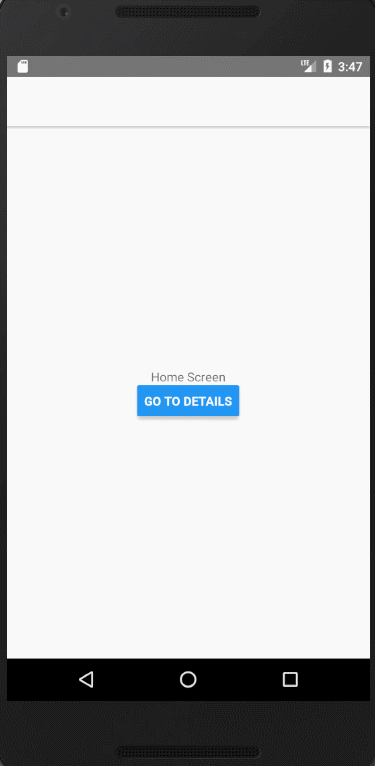
运行项目,发现没有变

我们想要的是点击或者怎么样进入详情页
看下面代码
import React from 'react';

import { View, Text, Button } from 'react-native';

import { createAppContainer, createStackNavigator, StackActions, NavigationActions } from 'react-navigation'; // Version can be specified in package.json

class HomeScreen extends React.Component {

  render() {

    return (

      <View style={{ flex: 1, alignItems: 'center', justifyContent: 'center' }}>

        <Text>Home Screen</Text>

        <Button

          title="Go to Details"

          onPress={() => {

            this.props.navigation.dispatch(StackActions.reset({

              index: 0,

              actions: [

                NavigationActions.navigate({ routeName: 'Details' })

              ],

            }))

          }}

        />

      </View>

    );

  }

}

class DetailsScreen extends React.Component {

  render() {

    return (

      <View style={{ flex: 1, alignItems: 'center', justifyContent: 'center' }}>

        <Text>Details Screen</Text>

      </View>

    );

  }

}

const AppNavigator = createStackNavigator({

  Home: {

    screen: HomeScreen,

  },

  Details: {

    screen: DetailsScreen,

  },

}, {

    initialRouteName: 'Home',

});

export default createAppContainer(AppNavigator);
运行效果如下
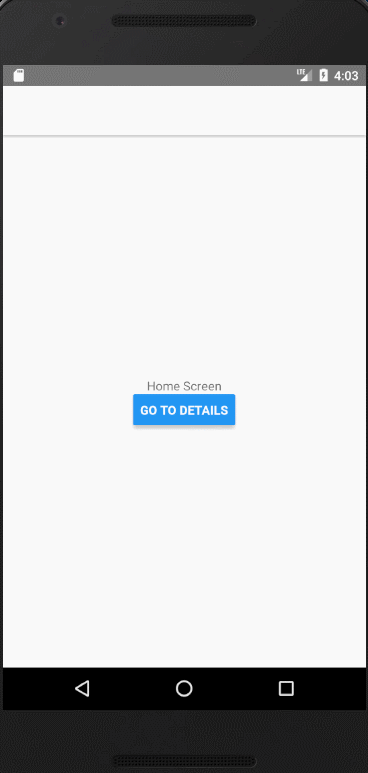
我们会发现,只是点击进去了详情,但是不能从详情页返回
要从详情返回可以
We'll do something similar to the latter, but rather than using a document global we'll use the navigation
prop that is passed down to our screen components.
import React from 'react';

import { Button, View, Text } from 'react-native';

import { createStackNavigator, createAppContainer } from 'react-navigation'; // Version can be specified in package.json

class HomeScreen extends React.Component {

  render() {

    return (

      <View style={{ flex: 1, alignItems: 'center', justifyContent: 'center' }}>

        <Text>Home Screen</Text>

        <Button

          title="Go to Details"

          onPress={() => this.props.navigation.navigate('Details')}

        />

      </View>

    );

  }

}

class DetailsScreen extends React.Component {

  render() {

    return (

      <View style={{ flex: 1, alignItems: 'center', justifyContent: 'center' }}>

        <Text>Details Screen</Text>

      </View>

    );

  }

}

const RootStack = createStackNavigator(

  {

    Home: HomeScreen,

    Details: DetailsScreen,

  },

  {

    initialRouteName: 'Home',

  }

);

const AppContainer = createAppContainer(RootStack);

export default class App extends React.Component {

  render() {

    return <AppContainer />;

  }

}
效果如下

如果我们要进入深一级的详情呢?
import React from 'react';

import { Button, View, Text } from 'react-native';

import { createStackNavigator, createAppContainer } from 'react-navigation'; // Version can be specified in package.json

class HomeScreen extends React.Component {

  render() {

    return (

      <View style={{ flex: 1, alignItems: 'center', justifyContent: 'center' }}>

        <Text>Home Screen</Text>

        <Button

          title="Go to Details"

          onPress={() => this.props.navigation.navigate('Details')}

        />

      </View>

    );

  }

}

class DetailsScreen extends React.Component {

  render() {

    return (

      <View style={{ flex: 1, alignItems: 'center', justifyContent: 'center' }}>

        <Text>Details Screen</Text>

        <Button

          title="Go to Details... again"

          onPress={() => this.props.navigation.navigate('Details')}

        />

      </View>

    );

  }

}

const RootStack = createStackNavigator(

  {

    Home: HomeScreen,

    Details: DetailsScreen,

  },

  {

    initialRouteName: 'Home',

  }

);

const AppContainer = createAppContainer(RootStack);

export default class App extends React.Component {

  render() {

    return <AppContainer />;

  }

}
效果图如下,我们会发现进入详情页again,页面没有刷新
如果我们想多次进入详情页呢?
import React from 'react';

import { Button, View, Text } from 'react-native';

import { createStackNavigator, createAppContainer } from 'react-navigation'; // Version can be specified in package.json

class HomeScreen extends React.Component {

  render() {

    return (

      <View style={{ flex: 1, alignItems: 'center', justifyContent: 'center' }}>

        <Text>Home Screen</Text>

        <Button

          title="Go to Details"

          onPress={() => this.props.navigation.navigate('Details')}

        />

      </View>

    );

  }

}

class DetailsScreen extends React.Component {

  render() {

    return (

      <View style={{ flex: 1, alignItems: 'center', justifyContent: 'center' }}>

        <Text>Details Screen</Text>

        {/* Look here! We "push" the Details route */}

        <Button

          title="Go to Details... again"

          onPress={() => this.props.navigation.push('Details')}

        />

      </View>

    );

  }

}

const RootStack = createStackNavigator(

  {

    Home: HomeScreen,

    Details: DetailsScreen,

  },

  {

    initialRouteName: 'Home',

  }

);

const AppContainer = createAppContainer(RootStack);

export default class App extends React.Component {

  render() {

    return <AppContainer />;

  }

}
运行效果如下:

我们会发现,点击进入详情页again页面是有继续刷新
那如果我们想做返回的功能呢?我们上面的页面进入详情页就不能返回主页面了
import React from 'react';

import { Button, View, Text } from 'react-native';

import { createAppContainer, createStackNavigator } from 'react-navigation'; // Version can be specified in package.json

class HomeScreen extends React.Component {

  render() {

    return (

      <View style={{ flex: 1, alignItems: 'center', justifyContent: 'center' }}>

        <Text>Home Screen</Text>

        <Button

          title="Go to Details"

          onPress={() => this.props.navigation.navigate('Details')}

        />

      </View>

    );

  }

}

class DetailsScreen extends React.Component {

  render() {

    return (

      <View style={{ flex: 1, alignItems: 'center', justifyContent: 'center' }}>

        <Text>Details Screen</Text>

        <Button

          title="Go to Details... again"

          onPress={() => this.props.navigation.push('Details')}

        />

        <Button

          title="Go to Home"

          onPress={() => this.props.navigation.navigate('Home')}

        />

        <Button

          title="Go back"

          onPress={() => this.props.navigation.goBack()}

        />

      </View>

    );

  }

}

const RootStack = createStackNavigator(

  {

    Home: {

      screen: HomeScreen,

    },

    Details: {

      screen: DetailsScreen,

    },

  },

  {

    initialRouteName: 'Home',

  }

);

const AppContainer = createAppContainer(RootStack);

export default class App extends React.Component {

  render() {

    return <AppContainer />;

  }

}

本文学自官网:https://reactnavigation.org/docs/en/navigating.html
react-native中的navigator的更多相关文章
- 在 React Native 中使用 Redux 架构
前言 Redux 架构是 Flux 架构的一个变形,相对于 Flux,Redux 的复杂性相对较低,而且最为巧妙的是 React 应用可以看成由一个根组件连接着许多大大小小的组件的应用,Redux 也 ...
- React Native 中 CSS 的使用
首先声明,此文原作者为黎 跃春 React Native中CSS 内联样式 对象样式 使用Stylesheet.Create 样式拼接 导出样式对象 下面的代码是index.ios.js中的代码: / ...
- react native中的欢迎页(解决首加载白屏)
参照网页: http://blog.csdn.net/fengyuzhengfan/article/details/52712829 首先是在原生中写一些方法,然后通过react native中js去 ...
- React Native中的网络请求fetch和简单封装
React Native中的网络请求fetch使用方法最为简单,但却可以实现大多数的网络请求,需要了解更多的可以访问: https://segmentfault.com/a/1190000003810 ...
- [转] 「指尖上的魔法」 - 谈谈 React Native 中的手势
http://gold.xitu.io/entry/55fa202960b28497519db23f React-Native是一款由Facebook开发并开源的框架,主要卖点是使用JavaScrip ...
- [转] 在React Native中使用ART
http://bbs.reactnative.cn/topic/306/%E5%9C%A8react-native%E4%B8%AD%E4%BD%BF%E7%94%A8art 前半个月捣腾了一下Rea ...
- react native中使用echarts
开发平台:mac pro node版本:v8.11.2 npm版本:6.4.1 react-native版本:0.57.8 native-echarts版本:^0.5.0 目标平台:android端收 ...
- react native中一次错误排查 Error:Error: Duplicate resources
最近一直在使用react native中,遇到了很多的坑,同时也学习到了一些移动端的开发经验. 今天在做一个打包的测试时,遇到了一个问题,打包过程中报错“Error:Error: Duplicate ...
- 在React Native中,使用fetch网络请求 实现get 和 post
//在React Native中,使用fetch实现网络请求 /* fetch 是一个封装程度更高的网络API, 使用了Promise * Promise 是异步编程的一种解决方案 * Promise ...
- 《React Native 精解与实战》书籍连载「React Native 中的生命周期」
此文是我的出版书籍<React Native 精解与实战>连载分享,此书由机械工业出版社出版,书中详解了 React Native 框架底层原理.React Native 组件布局.组件与 ...
随机推荐
- React 避免重渲染
组件的重新渲染 我们可以在 React 组件中的 props 和 state 存放任何类型的数据,通过改变 props 和 state,去控制整个组件的状态.当 props 和 state 发生变化时 ...
- 1、通过eureka创建注册中心
第一个demo(用户需要调用电影服务) 1.创建项目 new starter project 勾选上Eureka Server 2.编写application.yml #配置端口 server: po ...
- ps -aux返回超时的可能原因
在我的环境上出现了 ps -aux返回超时的问题. 执行到 ……root 19342 0.0 0.0 0 0 ? S< Mar12 0:00 [kworker/34:1H] 这里,然后就卡住了. ...
- html5 表單屬性
新的 form 属性: autocomplete novalidate 新的 input 属性: autocomplete autofocus form form overrides (formact ...
- react用构造函数创建组件
有两种方法,一种是通过构造函数创建,一种是通过class创建 1.构造函数创建组件 用function+组件名的方式创建,创建好了,在render里面以标签的形式一丢就可以啦!但是这种方式必须要ret ...
- 学习 Spring (四) Bean 的生命周期
Spring入门篇 学习笔记 定义 --> 初始化 --> 使用 --> 销毁 初始化 实现 org.springframework.beans.factory.Initializi ...
- 离线安装Python包hickle,easydict
安装hickle source: https://github.com/telegraphic/hickle 1. cd to your downloaded hickle directory 2. ...
- ES系列十五、ES常用Java Client API
一.简介 1.先看ES的架构图 二.ES支持的客户端连接方式 1.REST API http请求,例如,浏览器请求get方法:利用Postman等工具发起REST请求:java 发起httpClien ...
- 自己实现strchr函数与strstr函数
char* my_strchr(char* str, int i) { if (NULL == str) { return NULL; } while ('\0' != *str && ...
- springMVC整理03--处理数据模型 & 试图解析器 & @ResponseBody & HttpEntity
1.处理模型数据 SpringMVC 中的模型数据是非常重要的,因为 MVC 中的控制(C)请求处理业务逻辑来生成数据模型(M),而视图(V)就是为了渲染数据模型的数据.当有一个查询的请求,控制器(C ...