Chapter 8 The Simplest Plug-in Solution
This chapter introduces the simplest plug-in solution that are applicable to the four major components. This solution involves the following aspects:
1) Combine the dex of all plugins to solve the problem of loading plug-in's class.
2) Declare the four major components of the plugin in the host app’s AndroidManifest file. It’s a nuisance for hundreds of activities in the plug-in.
3) Merge all the resources in the plug-in into the host's resources in one time. Of course, this may result in conflict of resource ids.
8.1 Declaring Components in a Plug-in in Android Manifest
As we mentioned earlier, the four major components in the plug-in are just ordinary classes that the system does not recognize at all.
To make the host app to recognize them, you must declare the four major components in the host app's AndroidManifest.xml.
Then there is the simplest plug-in solution in history. The four components in the plug-in are declared in the host app.
Look at the example ZeusStudy1.0, as shown in the figure below. Plugin1 has a TestService1 component
.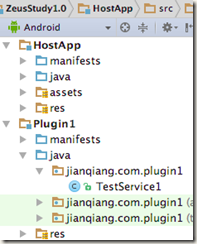
Figure 8-1 Project structure of Plugin1
Correspondingly, in the Host app’s AndroidManifest file, the statement is as follows:
<service android:name="jianqiang.com.plugin1.TestService1" />
8.2 Combine the dex
Host app loads classes in plug-ins, there are two methods to make it. [1]
1.Use the class of plug-in’s ClassLoader;
2.Combine the dexs of host app and plug-in.
The second one is simpler.
Once the plug-in dex is merged into the host's dex, then the ClassLoader corresponding to the host App loads all the classes in the plug-in as follows:
public final class BaseDexClassLoaderHookHelper {
public static void patchClassLoader(ClassLoader cl, File apkFile, File optDexFile)
throws IllegalAccessException, NoSuchMethodException, IOException, InvocationTargetException, InstantiationException, NoSuchFieldException {
// Obtain BaseDexClassLoader : pathList
Object pathListObj = RefInvoke.getFieldObject(DexClassLoader.class.getSuperclass(), cl, "pathList");
// Obtain PathList: Element[] dexElements
Object[] dexElements = (Object[]) RefInvoke.getFieldObject(pathListObj, "dexElements");
// Element type
Class<?> elementClass = dexElements.getClass().getComponentType();
// Create an array to replace the original array
Object[] newElements = (Object[]) Array.newInstance(elementClass, dexElements.length + 1);
// Construct a plugin Element(File file, boolean isDirectory, File zip, DexFile dexFile) This constructor
Class[] p1 = {File.class, boolean.class, File.class, DexFile.class};
Object[] v1 = {apkFile, false, apkFile, DexFile.loadDex(apkFile.getCanonicalPath(), optDexFile.getAbsolutePath(), 0)};
Object o = RefInvoke.createObject(elementClass, p1, v1);
Object[] toAddElementArray = new Object[] { o };
// Copy the original elements
System.arraycopy(dexElements, 0, newElements, 0, dexElements.length);
// The element of the plugin is copied in
System.arraycopy(toAddElementArray, 0, newElements, dexElements.length, toAddElementArray.length);
// replace
RefInvoke.setFieldObject(pathListObj, "dexElements", newElements);
}
}
8.3 Start the Service of plug-in
Combined with the previous two parts, the host App can start a service that in plug-in.
Intent intent = new Intent();
String serviceName = "jianqiang.com.plugin1.TestService1";
intent.setClassName(this, serviceName);
startService(intent);
8.4Activity resources [2]
Not just Service, four major components can be implemented as plug-in program. Both ContentProvider and Receiver are relatively simple, you can try to implement it by yourself.
Service, ContentProvider, and Receiver just need to merge dex, because they have no resources.
The solution for Activity here is a bit complicated.
Activity is heavily dependent on resources. Therefore, if you want to implement the plug-in of the Activity, you must solve the problem of loading the resources in the plug-in.
Chapter 7 introduced the relationship between AssetManager and Resources. AssetManager has an addAssetPath method that can populate the plugin's path all at once, and then generates a "super" Resource based on this "super" AssetManager.
Save this Super Resources in the global variable PluginManager. After you find the plugin or the host resource, you can find it too.
The above logic is implemented as follows (located in MyApplication):
private static void reloadInstalledPluginResources() {
try {
AssetManager assetManager = AssetManager.class.newInstance();
Method addAssetPath = AssetManager.class.getMethod("addAssetPath", String.class);
addAssetPath.invoke(assetManager, mBaseContext.getPackageResourcePath());
addAssetPath.invoke(assetManager, pluginItem1.pluginPath);
Resources newResources = new Resources(assetManager,
mBaseContext.getResources().getDisplayMetrics(),
mBaseContext.getResources().getConfiguration());
RefInvoke.setFieldObject (mBaseContext, "mResources", newResources);
// This is the main need to replace, if you do not support the plug-in runtime update, just leave this one
RefInvoke.setFieldObject (mPackageInfo, "mResources", newResources);
mNowResources = newResources;
// Need to clean up the mTheme object, otherwise it will report an error when loading resources through inflate mode
// If the activity dynamically loads the plugin, you need to set the activity's mTheme object to null RefInvoke.setFieldObject (mBaseContext, "mTheme", null);
} catch (Throwable e) {
e.printStackTrace();
}
The plug-in Activity must implement the base class ZeusBaseActivity. In this base class, the getResource method is overridden, thereby ensuring that the plug-in Activity is fetched from the "super" Resources each time it fetches resources.
public class ZeusBaseActivity extends Activity {
@Override
public Resources getResources() {
return PluginManager.mNowResources;
}
}
Here is the code for TestActivity1 in plug-in which called Plugin1. It uses the layout xml resource called activity_test1 in the plug-in:
public class TestActivity1 extends ZeusBaseActivity {
private final static String TAG = "TestActivity1";
@Override
protected void onCreate(Bundle savedInstanceState) {
super.onCreate(savedInstanceState);
setContentView(R.layout.activity_test1);
findViewById(R.id.button1).setOnClickListener(new View.OnClickListener() {
@Override
public void onClick(View v) {
try {
Intent intent = new Intent();
String activityName = "jianqiang.com.hostapp.ActivityA";
intent.setComponent(new ComponentName("jianqiang.com.hostapp", activityName));
startActivity(intent);
} catch (Exception e) {
e.printStackTrace();
}
}
});
}
}
At this point, the simplest plug-in solution of activity is complete, and we can even jump from the plug-in activity to the activity in the host.
However, there has a fatal problem: The four major components in the plugin must be declared in the host's AndroidManifest file beforehand and cannot be added.
In fact, for most of the App, rarely use Service, Receiver and ContentProvider, so the plug-in has these three components, is also typically updated logic, and will not add new.
However, there are many activities in the plug-in, and also add new, at this moment, we cannot pre-empt in the host AndroidManifest file.
This issue will be completely resolved in Chapter 9.
8.5Summary
This chapter introduces the simplest plug-in solution. Although the plug-in can be successfully loaded, there are many problems:
1) Because the plugin and host resources are merged together, the resource ids will conflict.
2) Activity in the plug-in cannot be expected in advance, especially add new Activity1 in the plug-in.
These problems will be solved in the subsequent chapters.
[1] This section example code, please refer to https://github.com/Baobaojianqiang/ZeusStudy1.0
[2] This section example code, please refer to https://github.com/Baobaojianqiang/ZeusStudy1.1
Chapter 8 The Simplest Plug-in Solution的更多相关文章
- C++ 之 策略模式
1 会飞的鸭子 Duck 基类,包含两个成员函数 swim() 和 display():派生类 MallardDuck,RedheadDuck 和 RubberDuck,各自重写 display() ...
- (转)几种范数的解释 l0-Norm, l1-Norm, l2-Norm, … , l-infinity Norm
几种范数的解释 l0-Norm, l1-Norm, l2-Norm, - , l-infinity Norm from Rorasa's blog l0-Norm, l1-Norm, l2-Norm, ...
- 如何创建Asp.net MVC ViewModel
ASP.NET MVC View Model Patterns Since MVC has been released I have observed much confusion about how ...
- C#主要字典集合性能对比[转]
A post I made a couple days ago about the side-effect of concurrency (the concurrent collections in ...
- 2D Rotated Rectangle Collision
Introduction While working on a project for school, I found it necessary to perform a collision chec ...
- TIJ——Chapter One:Introduction to Objects
///:~容我对这个系列美其名曰"读书笔记",其实shi在练习英文哈:-) Introduction to Objects Object-oriented programming( ...
- Think Python - Chapter 18 - Inheritance
In this chapter I present classes to represent playing cards, decks of cards, and poker hands.If you ...
- Think Python - Chapter 11 - Dictionaries
Dictionaries A dictionary is like a list, but more general. In a list, the indices have to be intege ...
- Chapter 4: Spring and AOP:Spring's AOP Framework -- draft
Spring's AOP Framework Let's begin by looking at Spring's own AOP framework - a proxy-based framewor ...
随机推荐
- oracle数据入库
oracle数据入库 注意:先要处理文件中的分隔符 将数据分列 创建为标准的sql语句 1.在oracle数据库中创建要入库的表如果有该表则不用创建(注:创建字段的数据类型要符合实际逻辑 va ...
- html模板导出pdf文件
package com.crc.commonreport.util; import java.awt.Insets; import java.io.ByteArrayOutputStream; imp ...
- Linux驱动之平台设备驱动模型简析(驱动分离分层概念的建立)
Linux设备模型的目的:为内核建立一个统一的设备模型,从而有一个对系统结构的一般性抽象描述.换句话说,Linux设备模型提取了设备操作的共同属性,进行抽象,并将这部分共同的属性在内核中实现,而为需要 ...
- windows server 2012 FTP连接报530 User 用户名 cannot log in home directory inaccessible的解决方法
我最近在创建个人网站,经过了万网购买域名注册(www.lingcup.xyz ,www.lingcup.com),在主机屋购买免费云服务器(ip是49.4.142.41),域名别名解析(cname)到 ...
- angular2监听页面大小变化
一.现象 全屏页面中的图表,在很多的时候需要 resize 一把,以适应页面的大小变化 二.解决 1.引入 : import { Observable } from 'rxjs'; 2.使用(在ngO ...
- HDU 2196.Computer 树形dp 树的直径
Computer Time Limit: 1000/1000 MS (Java/Others) Memory Limit: 32768/32768 K (Java/Others)Total Su ...
- 干货 | PHP就该这么学!
前段时间和大家一起分享了一篇关于学习方法内容<大牛与搬运工的差距——学习方法的力量>.我们将学习过程分成八步,并借鉴了敏捷开发的迭代思想,以达到自我迭代学习的效果.行胜于言,理论结合实践才 ...
- laravel-debugbar安装
第一步:找到debugbar扩展包 扩展包的链接:https://packagist.org/packages/barryvdh/laravel-debugbar 第二步:安装 我测试的环境larav ...
- angularjs ng-bind-html的用法总结
angular中的$sanitize服务. 此服务依赖于ngSanitize模块.(这个模块需要加载angular-sanitize.js插件) 要学习这个服务,先要了解另一个指令: ng-bing- ...
- 别人的Linux私房菜(14)Linux账号管理和ACL权限设置
用户标识符UID.GID 用户的账号信息,主要是指UID对应.组和GID对应 检查系统中是否存在用户bin:id bin 登录shell验证账号密码的步骤:找到/etc/passwd核对是否存在账号, ...