Android--UI之Button
前言
最近一直在讲androidUI控件的使用方式,这篇博客讲解一下基本上属于用处最广泛的控件之一的Button控件。如果有过其他平台开发经验的程序员,对按钮是不会陌生的。本篇博客首先讲解一下Android的Button控件的常用事件以及事件绑定和触发,再在Button控件中通过设定属性值来实现图文混排,这个功能是在项目中常用到的。
Button控件
Button继承了TextView。它的功能就是提供一个按钮,这个按钮可以供用户点击,当用户对按钮进行操作的时候,触发相应事件,如点击,触摸。
还有一个ImageButton,它继承自Button,可以在ImageButton中显示一个图片展示给用户看,并且对其Text属性设置值的时候是无效的,其它功能与Button一样。
常用事件
一般对于一个按钮而言,用的最多的就是点击事件,Button间接继承自View,而AndroidUI中的所有事件,都是定义在View中的。在本篇博客中,示例讲解的点击事件、触摸事件,其他事件的使用方式与此类似,只是触发的时机不同而已。此处分别需要实现View.OnClickListener、View.OnTouchListener接口的方法。
- View.OnClickListener,需要实现onClick(View v)方法,其中v为当前触发事件的控件。
- View.OnTouchListener,需要实现onTouch(View v , MotionEvent event),其中v为当前触发事件的控件,event包括了触摸时的具体内容,如移动、按下等。
下面使用一个示例讲解一下事件的绑定及触发,在示例中显示两个按钮控件,一个为普通按钮,一个为填充图片的按钮,为它们绑定click事件,当点击事件触发的时候,对其尺寸进行修改,为图片按钮绑定触摸事件,当触摸的时候触发,切换图片显示。
布局代码:
 <?xml version="1.0" encoding="utf-8"?>

 <LinearLayout xmlns:android="http://schemas.android.com/apk/res/android"

     android:layout_width="match_parent"

     android:layout_height="match_parent"

     android:orientation="vertical" >

     <Button

         android:id="@+id/btnChangeSize"

         android:layout_width="wrap_content"

         android:layout_height="wrap_content"

         android:text="点击修改尺寸"

         />

     <Button

         android:id="@+id/btnChangeImg"

         android:layout_width="wrap_content"

         android:layout_height="wrap_content"

         android:background="@drawable/image1"

         />

 </LinearLayout>
实现代码:
 package com.bgxt.buttondemo;

 import android.app.Activity;

 import android.os.Bundle;

 import android.view.MotionEvent;

 import android.view.View;

 import android.view.View.OnClickListener;

 import android.view.View.OnTouchListener;

 import android.widget.Button;

 //通过实现接口,对其进行click、touch事件的支持

 public class ButtonListener extends Activity implements OnClickListener,

         OnTouchListener {

     private Button btnChangeSize;

     private Button btnChangeImg;

     private int flag = 1;

     @Override

     protected void onCreate(Bundle savedInstanceState) {

         super.onCreate(savedInstanceState);

         setContentView(R.layout.btn_listener);

         btnChangeSize = (Button) findViewById(R.id.btnChangeSize);

         btnChangeImg = (Button) findViewById(R.id.btnChangeImg);

         // 对两个按钮进行事件绑定

         btnChangeSize.setOnClickListener(this);

         btnChangeImg.setOnClickListener(this);

         btnChangeImg.setOnTouchListener(this);

     }

     @Override

     public boolean onTouch(View v, MotionEvent event) {

         // 获取触发事件的Button控件

         Button btn = (Button) v;

         if (event.getAction() == MotionEvent.ACTION_UP) {

             // 当触摸时按下,则替换展示图片为image1

             btn.setBackgroundResource(R.drawable.image1);

         } else {

             btn.setBackgroundResource(R.drawable.image2);

         }

         return false;

     }

     @Override

     public void onClick(View v) {

         Button btn = (Button) v;

         if (flag == 1

                 && btn.getWidth() == getWindowManager().getDefaultDisplay()

                         .getWidth()) {

             // 如果等于屏幕的宽度,则修改标识flag为-1

             flag = -1;

         } else if (flag == -1 && btn.getWidth() < 100) {

             flag = 1;

         }

         // 设置button控件尺寸

         btn.setWidth(btn.getWidth() + (int) (btn.getWidth() * 0.1) * flag);

         btn.setHeight(btn.getHeight() + (int) (btn.getHeight() * 0.1) * flag);

     }

 }
展示效果图:

当点击按钮的时候,按钮被放大,当放大到屏幕宽度时,开始缩小。
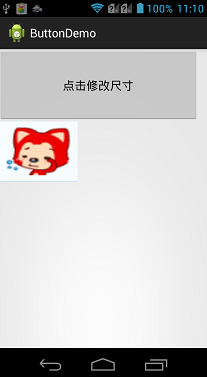
当触摸图标按钮的时候,图像改变。

图文混排
对于在实际项目中,经常会需要设置按钮展示为图文混排的效果,这样可以通过图表更直观的把按钮的功能展示给用户,又可以有简短的文字说明。虽然ImageButton也可以实现图片按钮的效果,但是对于ImageButton而言,设置Text属性是没有作用的,所以这里不讲解ImageButton的使用。对于Button控件,图文混排需要用到一个android:drawableXxx属性(Xxx为图片所在按钮的方向),这个属性配合android:text,就可以实现图文混排的效果。
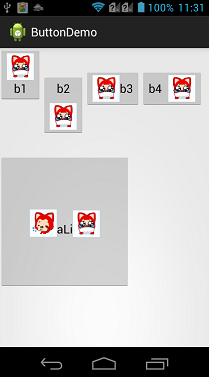
下面一个示例,分别展示了上下左右四个方位的图标按钮,并且生成一个通过Java代码动态生成图文混排按钮的。因为Button是继承自TextView的,所以通过代码设置图文混排的方式与TextView类似,都需要用到SpannableString类,关于SpannableString的详细讲解可以参见我的另外一篇博客,Android--UI之TextView,这里就不再详细讲解了。
布局代码:
 <?xml version="1.0" encoding="utf-8"?>

 <LinearLayout xmlns:android="http://schemas.android.com/apk/res/android"

     android:layout_width="match_parent"

     android:layout_height="match_parent"

     android:orientation="vertical" >

     <LinearLayout

         android:layout_width="match_parent"

         android:layout_height="150dp"

         android:orientation="horizontal" >

         <!-- 图片在上,项目中常用这样的设置 -->

         <Button

             android:layout_width="wrap_content"

             android:layout_height="wrap_content"

             android:drawableTop="@drawable/image2"

             android:text="b1" />

         <!-- 图片在下 -->

         <Button

             android:layout_width="wrap_content"

             android:layout_height="wrap_content"

             android:drawableBottom="@drawable/image2"

             android:drawablePadding="10dp"

             android:text="b2" />

         <!-- 图片在左 -->

         <Button

             android:layout_width="wrap_content"

             android:layout_height="wrap_content"

             android:drawableLeft="@drawable/image2"

             android:text="b3" />

         <!-- 图片在右 -->

         <Button

             android:layout_width="wrap_content"

             android:layout_height="wrap_content"

             android:drawablePadding="10dp"

             android:drawableRight="@drawable/image2"

             android:text="b4" />

     </LinearLayout>

     <!-- 声明一个空的按钮,用于进行代码设置 -->

     <Button android:layout_width="200dp" android:layout_height="200dp" android:id="@+id/btnSty" android:layout_marginTop="10dp"/>

 </LinearLayout>
Java实现代码:
 package com.bgxt.buttondemo;

 import android.app.Activity;

 import android.graphics.Bitmap;

 import android.graphics.BitmapFactory;

 import android.os.Bundle;

 import android.text.SpannableString;

 import android.text.Spanned;

 import android.text.style.ImageSpan;

 import android.widget.Button;

 public class ButtonStyle extends Activity {

     private Button btnSty;

     @Override

     protected void onCreate(Bundle savedInstanceState) {

         // TODO Auto-generated method stub

         super.onCreate(savedInstanceState);

         setContentView(R.layout.btn_style);

         //获取按钮控件

         btnSty=(Button)findViewById(R.id.btnSty);

         //生成SpannableString,用于图片的载体

         SpannableString spannebleLeft=new SpannableString("left");

         Bitmap bitmapleft=BitmapFactory.decodeResource(getResources(), R.drawable.image1);

         ImageSpan imageSpanLeft=new ImageSpan(ButtonStyle.this,bitmapleft);

         spannebleLeft.setSpan(imageSpanLeft,0,4,Spanned.SPAN_EXCLUSIVE_EXCLUSIVE);

         SpannableString spannebleRight=new SpannableString("right");

         Bitmap bitmapRight=BitmapFactory.decodeResource(getResources(), R.drawable.image2);

         ImageSpan imageSpanRight=new ImageSpan(ButtonStyle.this,bitmapRight);

         spannebleRight.setSpan(imageSpanRight,0,5,Spanned.SPAN_EXCLUSIVE_EXCLUSIVE);

         //把生成的SpannableString追加到按钮上

         btnSty.append(spannebleLeft);

         btnSty.append("aLi");

         btnSty.append(spannebleRight);

     }

 }
效果展示:
总结
对于实际项目而言,一般按钮的样式都会通过额外的XML样式文件包装一下,这个之后再介绍,这里只是介绍一下Button的简单使用。按钮的最多用处就是供用户点击从而触发相应时间,没有什么难点。
请支持原创,尊重原创,转载请注明出处。谢谢。

Android--UI之Button的更多相关文章
- Android经常使用UI组件 - Button
button(Button)是Android其中一个经常使用的UI组件.非常小可是在开发中最经常使用到.一般通过与监听器结合使用.从而触发一些特定事件. Button继承了TextView.它的功能就 ...
- Android UI 统一修改Button控件的样式,以及其它系统控件的默认样式
先介绍下修改原理:首先打开位于android.widget包下面的Button.java文件,这里有一句关键的代码如下: public Button(Context context, Attribut ...
- Android UI 绘制过程浅析(五)自定义View
前言 这已经是Android UI 绘制过程浅析系列文章的第五篇了,不出意外的话也是最后一篇.再次声明一下,这一系列文章,是我在拜读了csdn大牛郭霖的博客文章<带你一步步深入了解View> ...
- 【Android UI】Android开发之View的几种布局方式及实践
引言 通过前面两篇: Android 开发之旅:又见Hello World! Android 开发之旅:深入分析布局文件&又是“Hello World!” 我们对Android应用程序运行原理 ...
- 【Android UI设计与开发】第05期:引导界面(五)实现应用程序只启动一次引导界面
[Android UI设计与开发]第05期:引导界面(五)实现应用程序只启动一次引导界面 jingqing 发表于 2013-7-11 14:42:02 浏览(229501) 这篇文章算是对整个引导界 ...
- Android UI系列-----时间、日期、Toasts和进度条Dialog
您可以通过点击 右下角 的按钮 来对文章内容作出评价, 也可以通过左下方的 关注按钮 来关注我的博客的最新动态. 如果文章内容对您有帮助, 不要忘记点击右下角的 推荐按钮 来支持一下哦 如果您对文章内 ...
- [Android UI] shape和selector的结合使用
shape和selector是Android UI设计中经常用到的,比如我们要自定义一个圆角Button,点击Button有些效果的变化,就要用到shape和selector.可以这样说,shape和 ...
- android UI库
https://github.com/wasabeef/awesome-android-ui List of Android UI/UX Libraries A curated list of awe ...
- 十二、Android UI开发专题(转)
http://dev.10086.cn/cmdn/bbs/viewthread.php?tid=18736&page=1#pid89255Android UI开发专题(一) 之界面设计 近期很 ...
- Android UI -- 布局介绍(布局包括FrameLayout, LinearLayout, RelativeLayout, GridLayout)
首先介绍常用布局类 FrameLayout 最简单的布局管理器. 这个布局管理类有几个特性: 添加组件默认在左上角的. 如果添加多个组件会叠加到一起,并且都在左上角.(可以通过一gravity属性改变 ...
随机推荐
- 2019-1-18 Spark 机器学习
2019-1-18 Spark 机器学习 机器学习 模MLib板 预测 //有视频 后续会补充 1547822490122.jpg 1547822525716.jpg 1547822330358.jp ...
- linux_基本命令使用(后续更新)
安装文件上传下载快捷键 --> rz/sz yum -y install lrzsz 获取进程名.进程号以及用户ID netstat –nlpt 修改主机名(重启后永久生效)-->cent ...
- C/C++字符串相关知识使用整理
C++字符串处理有最原始的char以及string两种方式,这里对其常用的功能进行总结. #include <string>using namespace std; ]; string s ...
- Mac- appium 环境配置
一: 下载 appium : https://bitbucket.org/appium/appium.app/downloads/ 下载安装完,打开appium,安全性与隐私设置 检测提示: ...
- String常用类
一.String类String类在java.lang包中,java使用String类创建一个字符串变量,字符串变量属于对象.java把String类声明的final类,不能有类.String类对象创建 ...
- Web打印控件Lodop实现表格物流单的打印
Web打印控件Lodop实现表格物流单的打印 一.lodop打印预览效果图 LODOP.PRINT_SETUP();打印维护效果图 LODOP.PREVIEW();打印预览图 二.写在前面 最近项目用 ...
- 值得推荐的C/C++框架和库 (真的很强大)〔转〕
http://m.blog.csdn.net/article/details?id=42541419
- JavaScript基础视频教程总结(121-130章)
<!DOCTYPE html> <html> <head> <meta charset="utf-8" /> <title&g ...
- 【慕课网实战】五、以慕课网日志分析为例 进入大数据 Spark SQL 的世界
提交Spark Application到环境中运行spark-submit \--name SQLContextApp \--class com.imooc.spark.SQLContextApp \ ...
- Java 异常与反射 总结
1.异常 异常,简单来说,就是一个程序执行过程中发生的不正常情况的事件.它发生在程序的运行期间,干扰了正常的指令流程.如果没有处理异常,那么出现异常之后,程序会停止运行.异常分为运行异常和非运行异常. ...