
WebGPU 01之Hello Triangle
1. 引言
WebGPU是什么?
WebGPU与WebGL的对比?
2. 快速体验
参考:Orillusion | 专业WebGPU社区 | WebGPU小白入门(一): 零基础创建第一个WebGPU项目
# Clone the repo

git clone https://github.com/Orillusion/orillusion-webgpu-samples.git

# Go inside the folder

cd orillusion-webgpu-samples

# Start installing dependencies

npm install #or yarn add

# Run project at localhost:3000

npm run dev #or yarn run dev
在Chrome 浏览器(版本100+) 中打开localhost:3000,即可看到运行结果:
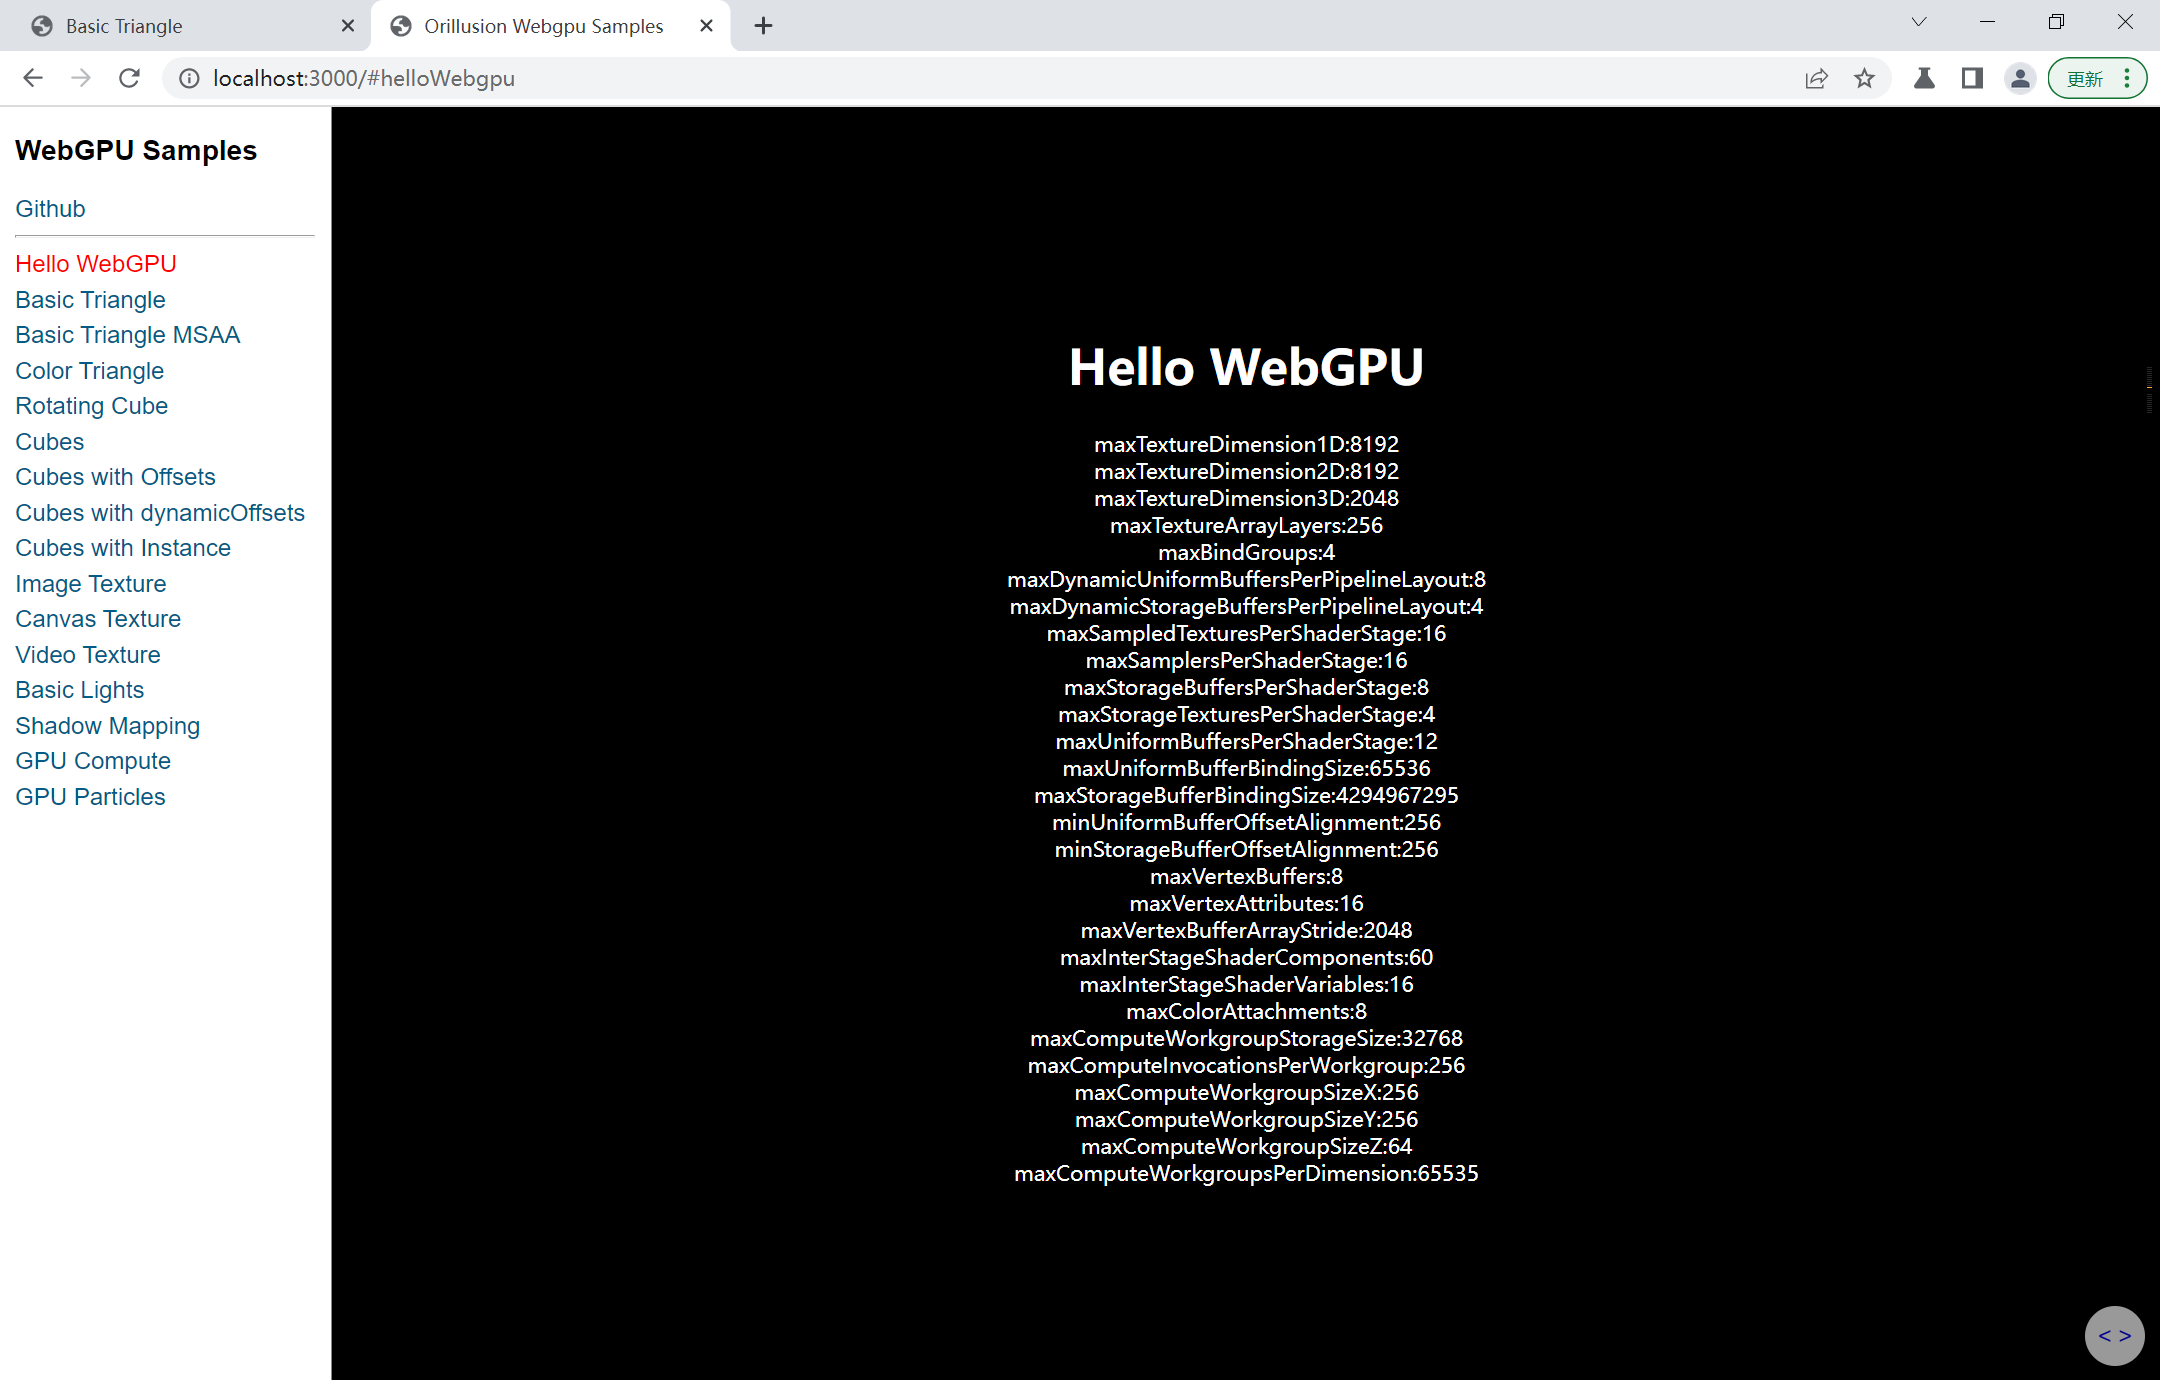
注意:
目前(2022年7月)WebGPU未正式发布,接口代码变更较快
WebGPU未正式发布,各个浏览器支持程度不同,本文使用Chrome版本号为:105.0.5153.0(正式版本)canary (64 位),下载地址:开发者专用的 Chrome Canary 版功能 - Google Chrome
部署别人写的代码终究是少了点感觉,接下来将编写一个入手案例
3. Hello Triangle
3.1 环境准备
浏览器:Chrome Canary版,版本号为:105.0.5153.0(正式版本)canary (64 位)
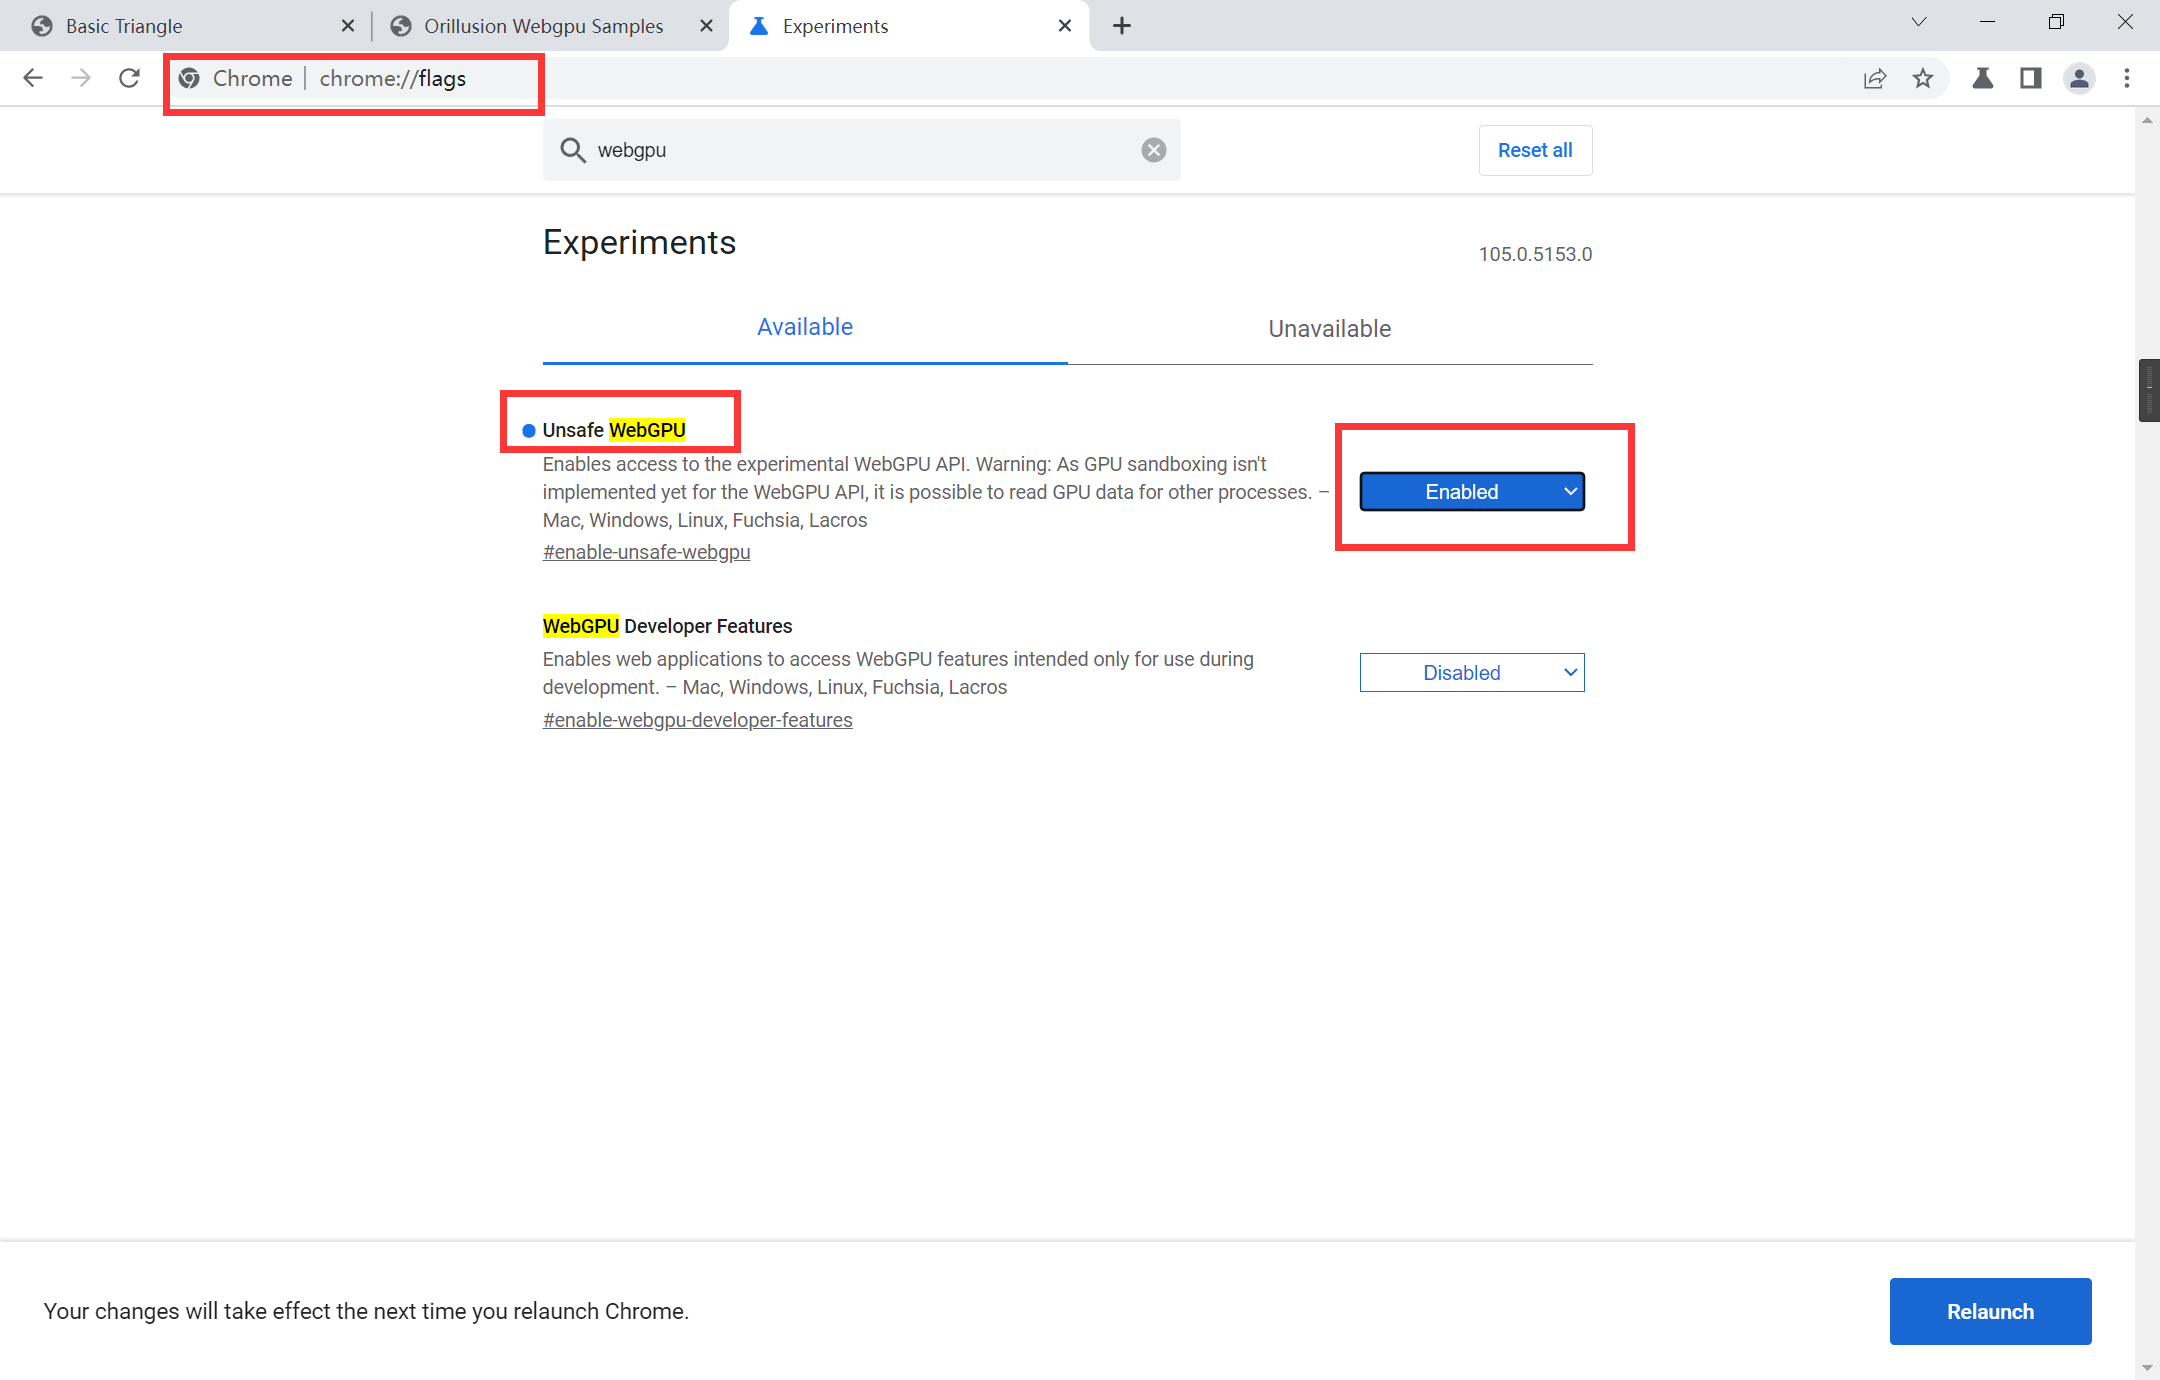
将Chrome开启WebGPU功能:
在地址栏输入 chrome://flags/ 搜索 WebGPU,将WebGPU的功能打开
3.2 基础代码
创建一个HTML文件,设置基础代码,另外,WebGPU是借助HTML中的canvas元素实现的,所以创建一个canvas元素
index.html:
<!DOCTYPE html>

<html lang="en">

<head>

    <meta charset="UTF-8">

    <meta http-equiv="X-UA-Compatible" content="IE=edge">

    <meta name="viewport" content="width=device-width, initial-scale=1.0">

    <title>Basic Triangle</title>

    <style>

        html,

        body {

            margin: 0;

            width: 100%;

            height: 100%;

            background: #000;

            color: #fff;

            display: flex;

            text-align: center;

            flex-direction: column;

            justify-content: center;

        }

        canvas {

            width: 100%;

            height: 100%;

        }

    </style>

</head>

<body>

    <canvas></canvas>

    <script src="./index.js"></script>

</body>

</html>
3.3 主要代码
同一目录下创建一个index.js文件,代码内容如下,流程讲解在下一节
index.js:
// initialize webgpu device & config canvas context

async function initWebGPU(canvas) {

    if(!navigator.gpu)

        throw new Error('Not Support WebGPU')

    const adapter = await navigator.gpu.requestAdapter({

        powerPreference: 'high-performance'

        // powerPreference: 'low-power'

    })

    if (!adapter)

        throw new Error('No Adapter Found')

    const device = await adapter.requestDevice()

    const context = canvas.getContext('webgpu')

    const format = navigator.gpu.getPreferredCanvasFormat ? navigator.gpu.getPreferredCanvasFormat() : context.getPreferredFormat(adapter)

    const devicePixelRatio = window.devicePixelRatio || 1

    canvas.width = canvas.clientWidth * devicePixelRatio

    canvas.height = canvas.clientHeight * devicePixelRatio

    const size = {width: canvas.width, height: canvas.height}

    context.configure({

        // json specific format when key and value are the same

        device, format,

        // prevent chrome warning

        alphaMode: 'opaque'

    })

    return {device, context, format, size}

}

// create a simple pipiline

async function initPipeline(device, format){

    const descriptor = {

        layout: 'auto',

        vertex: {

            module: device.createShaderModule({

                code: `@vertex

                fn main(@builtin(vertex_index) VertexIndex : u32) -> @builtin(position) vec4<f32> {

                    var pos = array<vec2<f32>, 3>(

                        vec2<f32>(0.0, 0.5),

                        vec2<f32>(-0.5, -0.5),

                        vec2<f32>(0.5, -0.5)

                    );

                    return vec4<f32>(pos[VertexIndex], 0.0, 1.0);

                }`

            }),

            entryPoint: 'main'

        },

        primitive: {

            topology: 'triangle-list' // try point-list, line-list, line-strip, triangle-strip?

        },

        fragment: {

            module: device.createShaderModule({

                code: `@fragment

                fn main() -> @location(0) vec4<f32> {

                    return vec4<f32>(1.0, 0.0, 0.0, 1.0);

                }`

            }),

            entryPoint: 'main',

            targets: [

                {

                    format: format

                }

            ]

        }

    }

    return await device.createRenderPipelineAsync(descriptor)

}

// create & submit device commands

function draw(device, context, pipeline) {

    const commandEncoder = device.createCommandEncoder()

    const view = context.getCurrentTexture().createView()

    const renderPassDescriptor = {

        colorAttachments: [

            {

                view: view,

                clearValue: { r: 0, g: 0, b: 0, a: 1.0 },

                loadOp: 'clear', // clear/load

                storeOp: 'store' // store/discard

            }

        ]

    }

    const passEncoder = commandEncoder.beginRenderPass(renderPassDescriptor)

    passEncoder.setPipeline(pipeline)

    // 3 vertex form a triangle

    passEncoder.draw(3)

    passEncoder.end()

    // webgpu run in a separate process, all the commands will be executed after submit

    device.queue.submit([commandEncoder.finish()])

}

async function run(){

    const canvas = document.querySelector('canvas')

    if (!canvas)

        throw new Error('No Canvas')

    const {device, context, format} = await initWebGPU(canvas)

    const pipeline = await initPipeline(device, format)

    // start draw

    draw(device, context, pipeline)

    // re-configure context on resize

    window.addEventListener('resize', ()=>{

        canvas.width = canvas.clientWidth * devicePixelRatio

        canvas.height = canvas.clientHeight * devicePixelRatio

        // don't need to recall context.configure() after v104

        draw(device, context, pipeline)

    })

}

run()
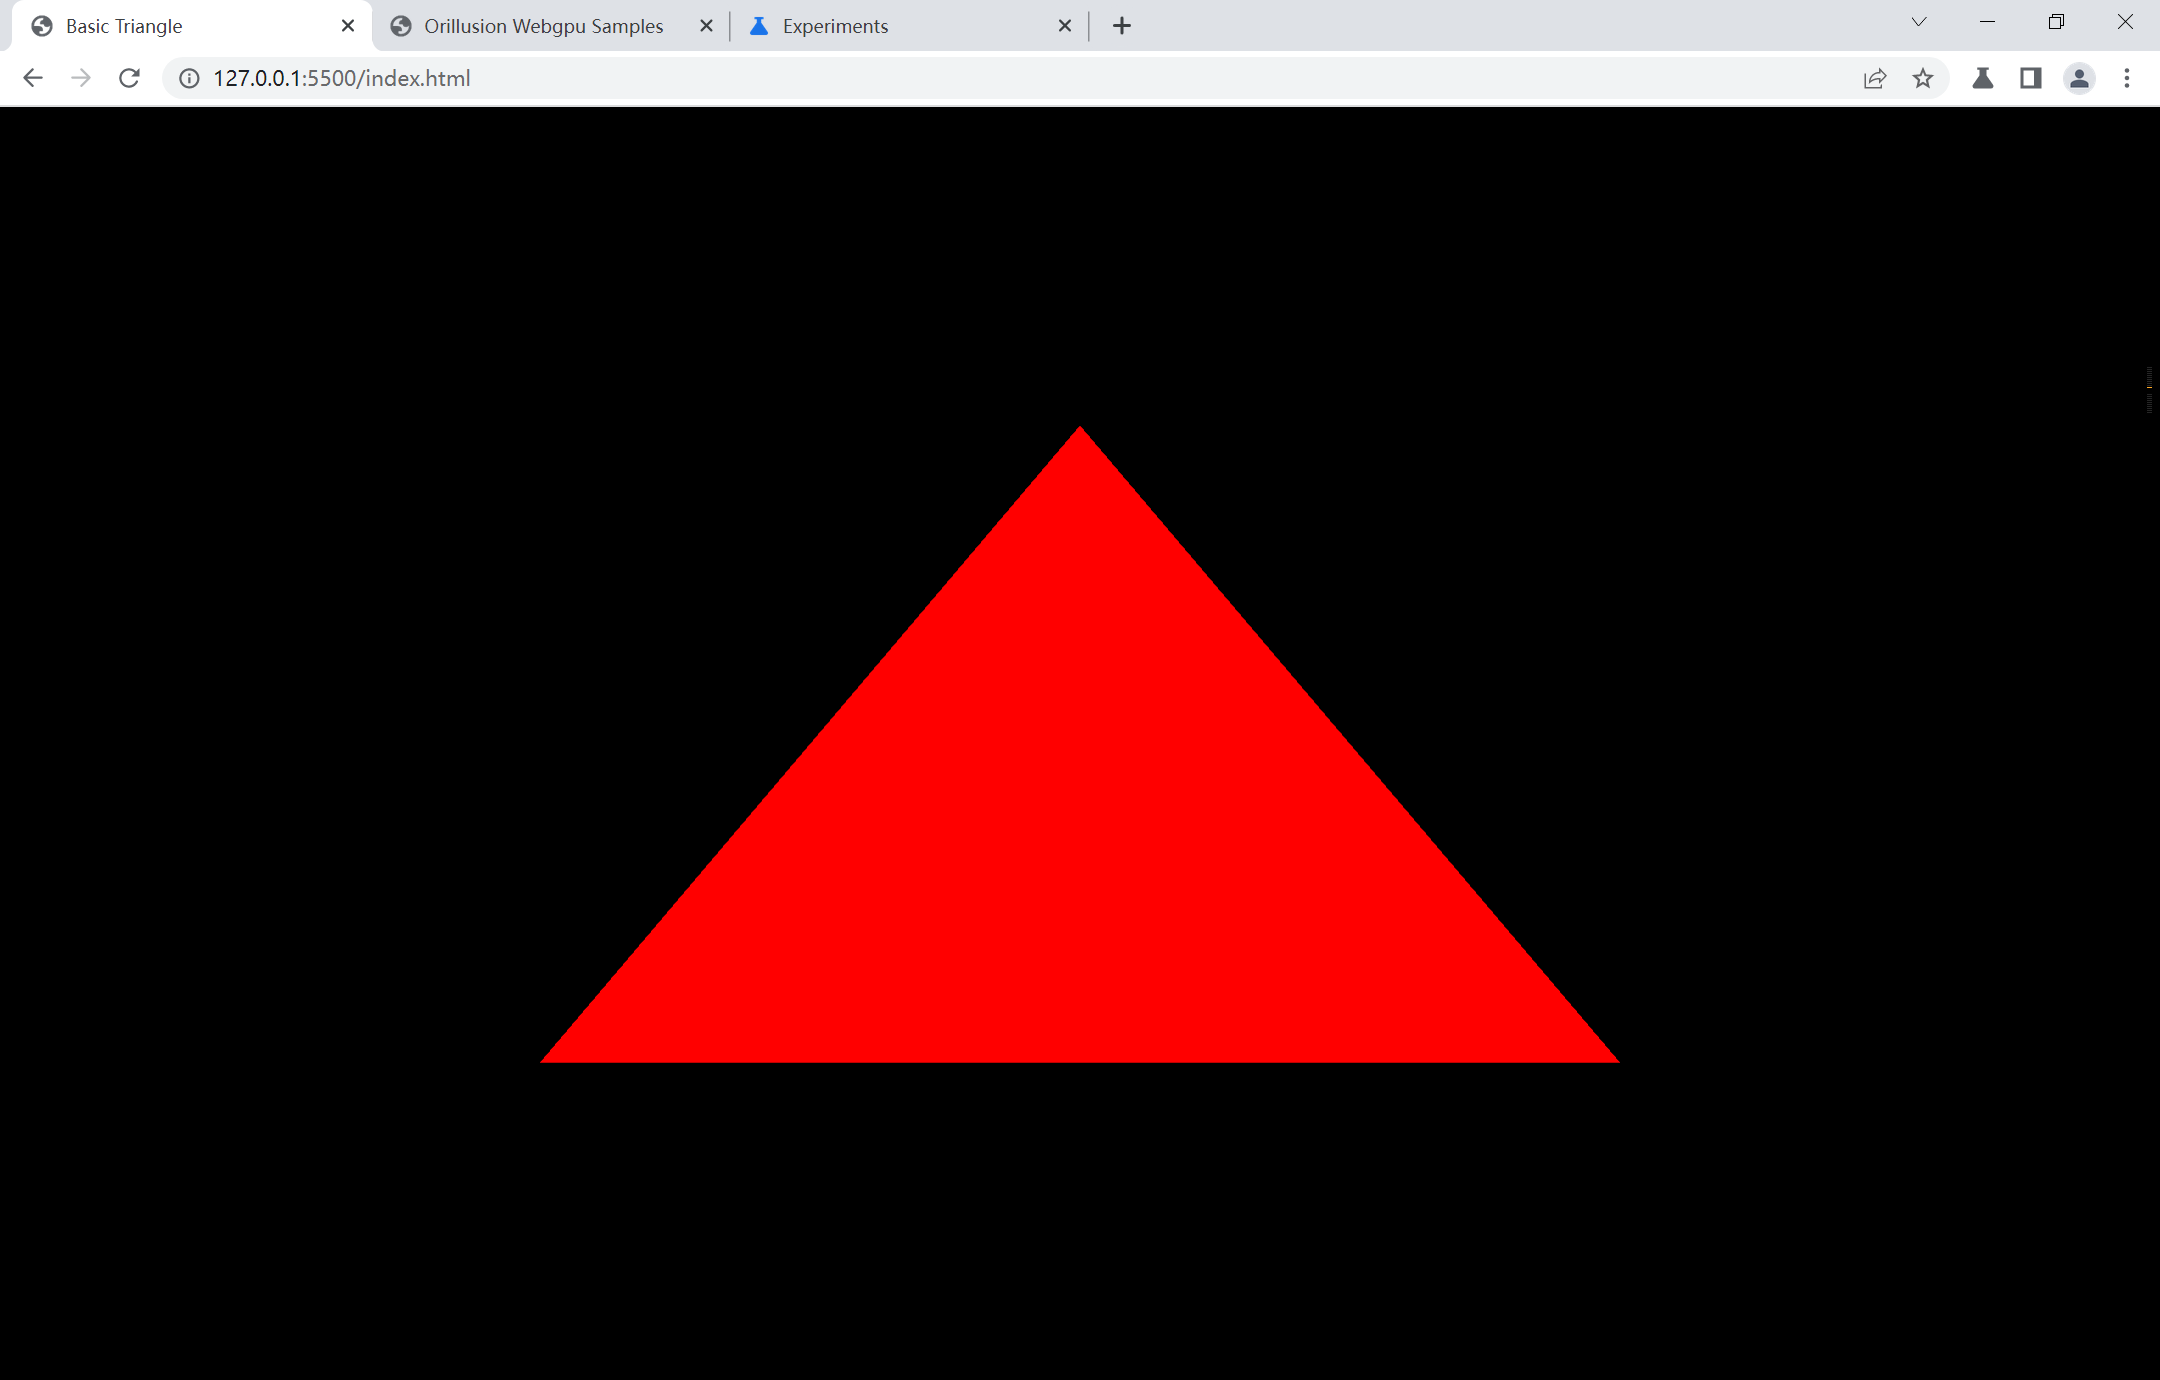
运行代码(笔者这里使用VS Code和Live Server插件),使用Chrome打开,顺利的话即可看到三角形:
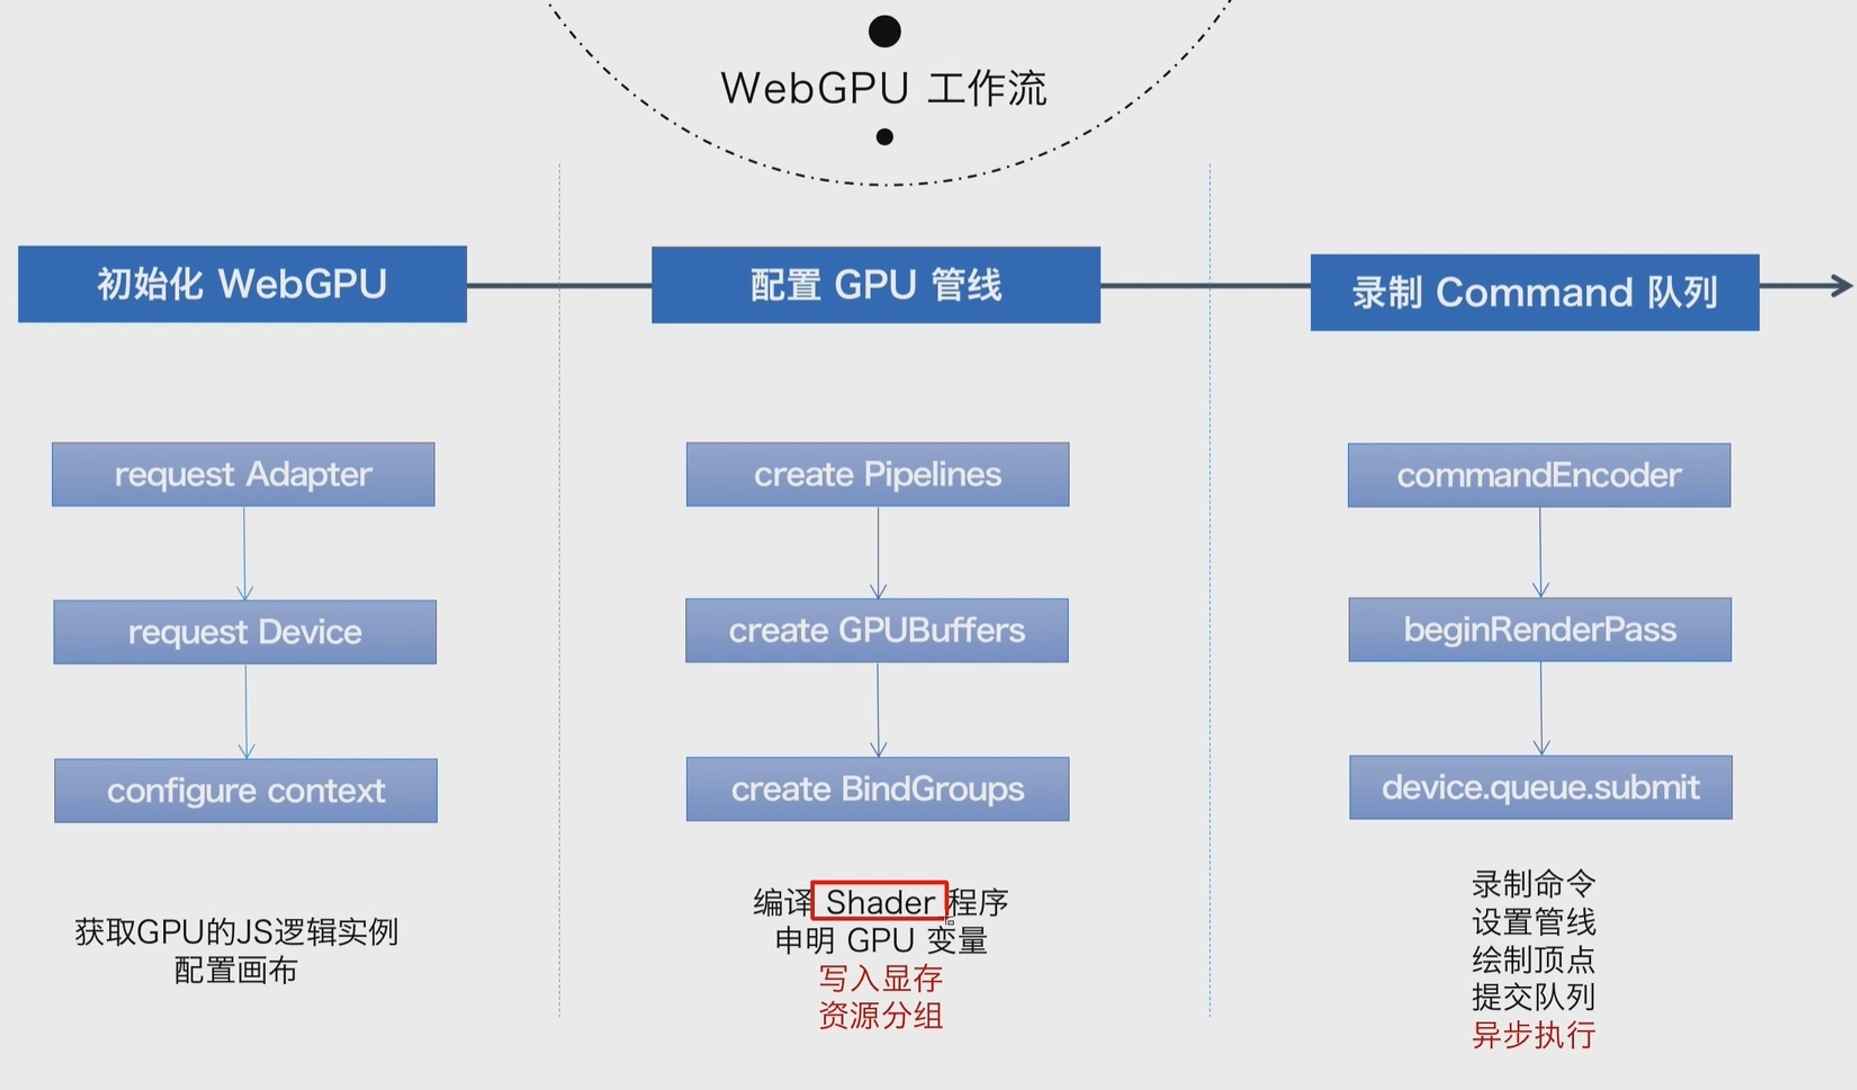
4. 运行流程
5. 参考资料
[1]WebGPU 到底是什么? - 知乎 (zhihu.com)
[2]WebGPU学习系列目录 - Wonder-YYC - 博客园 (cnblogs.com)
[3]WebGPU性能测试分析 - Wonder-YYC - 博客园 (cnblogs.com)
[4]WebGL 与 WebGPU 比对 前奏 - 四季留歌 - 博客园 (cnblogs.com)
[7]Orillusion | 专业WebGPU社区 | WebGPU小白入门(一): 零基础创建第一个WebGPU项目
[8]WebGPU小白入门(二):绘制简单三角形——1.认识渲染流程_哔哩哔哩_bilibili
WebGPU 01之Hello Triangle的更多相关文章
- OpenGL 学习笔记 01 环境配置
以下教程仅适用于Mac下的Xcode编程环境!其他的我也不会搞. 推荐教程:opengl-tutorial 本项目Github网址 OpenGL太可怕了...必需得把学的记下来,不然绝壁 ...
- 1043 - Triangle Partitioning(数学)
1043 - Triangle Partitioning PDF (English) Statistics Forum Time Limit: 0.5 second(s) Memory Limit ...
- C博客01——分支,顺序结构
C博客01--分支,顺序结构 1. 本章学习总结 1.1 思维导图 请以思维导图总结本周的学习内容. 1.2 本章学习体会及代码量体会 1.2.1 学习体会 对于C语言课程的理解,我有点吃力,不是说老 ...
- Category Theory: 01 One Structured Family of Structures
Category Theory: 01 One Structured Family of Structures 这次看来要放弃了.看了大概三分之一.似乎不能够让注意力集中了.先更新吧. 群的定义 \( ...
- Triangle leetcode java
题目: Given a triangle, find the minimum path sum from top to bottom. Each step you may move to adjace ...
- 一个由正则表达式引发的血案 vs2017使用rdlc实现批量打印 vs2017使用rdlc [asp.net core 源码分析] 01 - Session SignalR sql for xml path用法 MemCahe C# 操作Excel图形——绘制、读取、隐藏、删除图形 IOC,DIP,DI,IoC容器
1. 血案由来 近期我在为Lazada卖家中心做一个自助注册的项目,其中的shop name校验规则较为复杂,要求:1. 英文字母大小写2. 数字3. 越南文4. 一些特殊字符,如“&”,“- ...
- WebGPU学习(五): 现代图形API技术要点和WebGPU支持情况调研
大家好,本文整理了现代图形API的技术要点,重点研究了并行和GPU Driven Render Pipeline相关的知识点,调查了WebGPU的相关支持情况. 另外,本文对实时光线追踪也进行了简要的 ...
- WebGPU学习(六):学习“rotatingCube”示例
大家好,本文学习Chrome->webgpu-samplers->rotatingCube示例. 上一篇博文: WebGPU学习(五): 现代图形API技术要点和WebGPU支持情况调研 ...
- [译]Vulkan教程(01)入门
[译]Vulkan教程(01)入门 接下来我将翻译(https://vulkan-tutorial.com)上的Vulkan教程.这可能是我学习Vulkan的最好方式,但不是最理想的方式. 我会用“d ...
- WebGPU学习(九):学习“fractalCube”示例
大家好,本文学习Chrome->webgpu-samplers->fractalCube示例. 上一篇博文: WebGPU学习(八):学习"texturedCube"示 ...
随机推荐
- 【每日一题】【双指针/栈/reverse】2022年2月19日-判断是否为回文字符串
给定一个长度为 n 的字符串,请编写一个函数判断该字符串是否回文.如果是回文请返回true,否则返回false. 字符串回文指该字符串正序与其逆序逐字符一致. 数据范围:0 < n \l ...
- 【RocketMQ】主从同步实现原理
主从同步的实现逻辑主要在HAService中,在DefaultMessageStore的构造函数中,对HAService进行了实例化,并在start方法中,启动了HAService: public c ...
- Jenkins基本配置
1.Configure System (系统设置) 在系统设置这里,只需要设置最后面的一项,配置远程服务器地址,即代码最终运行的服务器地址信息,当然这里是可以配置多台远程Linux服务器的,配置完成后 ...
- 错误:org.springframework.beans.factory.BeanDefinitionStoreException:
在练习尚硅谷雷丰阳老师的SSM-CRUD整合的时候,因为使用的Thymeleaf,而不是jsp,跟着老师操作所有会出现一些错误,现在我把这些错误都整理一下,希望能帮助到有用的朋友. org.sprin ...
- Django框架模板语法传值-过滤器-标签-自定义过滤器,标签,inclusion_tag
目录 一:模版语法传值 1.模板语法两个书写方式 2.模板语法 3.测试模板语法是否可以把python支持的基本数据类型传入到前端 4.index.html 5.django模板语法取值方式 二:过滤 ...
- python内存机制
内存机制 先从较浅的层面来说,Python的内存管理机制可以从三个方面来讲 (1)垃圾回收 (2)引用计数 (3)内存池机制 一.垃圾回收: python不像C++,Java等语言一样,他们可以不用事 ...
- prometheus-添加监控linux服务器
1. prometheus-添加监控linux服务器 prometheus添加监控linux服务器 node_exporter:用于监控Linux系统的指标采集器. 常用指标: CPU 内存 硬盘 网 ...
- MQ系列9:高可用架构分析
MQ系列1:消息中间件执行原理 MQ系列2:消息中间件的技术选型 MQ系列3:RocketMQ 架构分析 MQ系列4:NameServer 原理解析 MQ系列5:RocketMQ消息的发送模式 MQ系 ...
- 蓝桥真题——最短路 & 门牌制作
题目1 最短路 标签:填空题 2019 省赛 如下图所示,G 是一个无向图,其中蓝色边的长度是 1.橘色边的长度是 2.绿色边的长度是 3. 则从 A 到 S 的最短距离是多少? 答案 由图可得,最短 ...
- AJAX容易出错地方,错误处理
myajax.js //创建路由器对象 const express=require('express'); //引入连接池模块 const pool=require('../pool.js'); ...