Sonatype Nexus3 搭建私有仓库
![]()
Nexus是Sonatype提供的仓库管理平台,Nuexus Repository OSS3能够支持Maven、npm、Docker、YUM、Helm等格式数据的存储和发布;并且能够与Jekins、SonaQube和Eclipse等工具进行集成。
Nexus支持作为宿主和代理存储库的本地Maven/Docker存储库,可以直接将这些存储库暴露给客户端工具;也可以以存储库组的方式暴露给客户端工具,存储库组是合并了多个存储库的内容的存储库,能够通过一个URL将多个存储库暴露给客户端工具,从而便于用户的使用。通过nexus自建能够有效减少访问获取镜像的时间和对带宽使用,并能够通过自有的镜像仓库共享企业自己的镜像。
SSL证书
需要 2 个域名,一个用来代理 Nexus 管理面板,另一个用做 docker 仓库,docker 需要单独的端口
Nexus 前台:registry.jonty.top
Docker 仓库:hub.jonty.top
自签名证书
我们通过Nginx代理Nexus服务,需要先生成自签名的SSL证书,通过内部DNS域名访问(无需在docker pull的时候还要带一个端口)
使用一键生成工具:ssl,两个域名都要签发证书
# 克隆仓库

git clone https://github.com/Fishdrowned/ssl.git

cd ssl

# 根据你的域名更改

/bin/bash ./gen.cert.sh hub.jonty.top
PS:如果是打算做外网仓库服务,可以直接申请一个免费的SSL证书(云厂商都提供),本文使用内网域名,使用自签名证书
[root@nexus3 ssl-master]# ls

ca.cnf  docs  flush.sh  gen.cert.sh  gen.root.sh  LICENSE  out  README.md

[root@nexus3 ssl-master]# cd out/

[root@nexus3 out]# ls

cert.key.pem  index.txt  index.txt.attr  index.txt.attr.old  index.txt.old  newcerts  root.crt  root.key.pem  serial  serial.old

[root@nexus3 out]# cd ..

[root@nexus3 ssl-master]# /bin/bash gen.cert.sh hub.jonty.top # 换成你的域名

Using configuration from ./ca.cnf

Check that the request matches the signature

Signature ok

The Subject's Distinguished Name is as follows

countryName           :PRINTABLE:'CN'

stateOrProvinceName   :ASN.1 12:'Guangdong'

localityName          :ASN.1 12:'Guangzhou'

organizationName      :ASN.1 12:'Fishdrowned'

organizationalUnitName:ASN.1 12:'hub.jonty.top'

commonName            :ASN.1 12:'*.hub.jonty.top'

Certificate is to be certified until Jul 11 08:06:41 2024 GMT (730 days)

Write out database with 1 new entries

Data Base Updated

Certificates are located in:

lrwxrwxrwx. 1 root root 44 Jul 12 16:06 /root/docker/ssl-master/out/hub.jonty.top/hub.xxx.bundle.crt -> ./20220712-1606/hub.jonty.top.bundle.crt

lrwxrwxrwx. 1 root root 37 Jul 12 16:06 /root/docker/ssl-master/out/hub.jonty.top/hub.xxx.crt -> ./20220712-1606/hub.jonty.top.crt

lrwxrwxrwx. 1 root root 15 Jul 12 16:06 /root/docker/ssl-master/out/hub.jonty.top/hub.xxx.key.pem -> ../cert.key.pem

lrwxrwxrwx. 1 root root 11 Jul 12 16:06 /root/docker/ssl-master/out/hub.jonty.top/root.crt -> ../root.crt

[root@nexus3 ssl-master]# cd out/hub.jonty.top/

[root@nexus3 hub.jonty.top]# ls

20220712-1606  hub.jonty.top.bundle.crt  hub.jonty.top.crt  hub.jonty.top.key.pem  root.crt
阿里云签发
如果有域名,可以购买Aliyun免费ssl证书,一年有效期,可以有效避免自签名证书不适用的问题
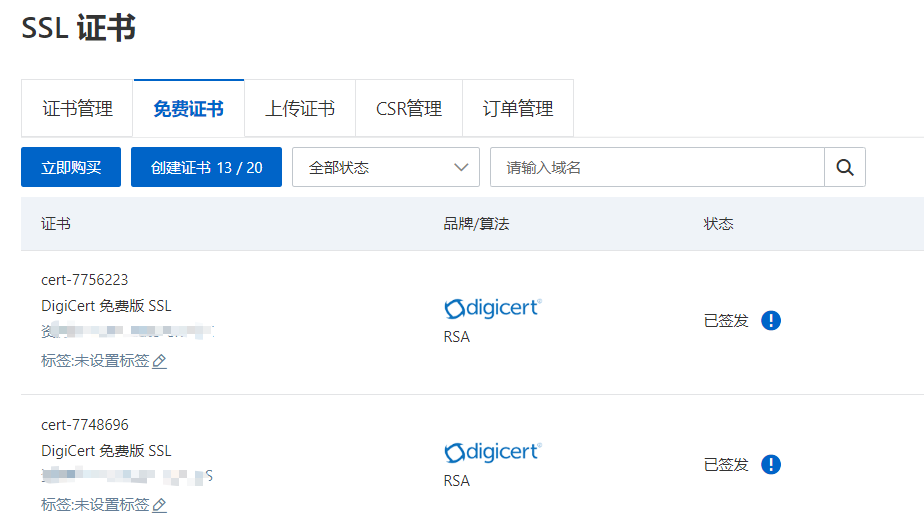
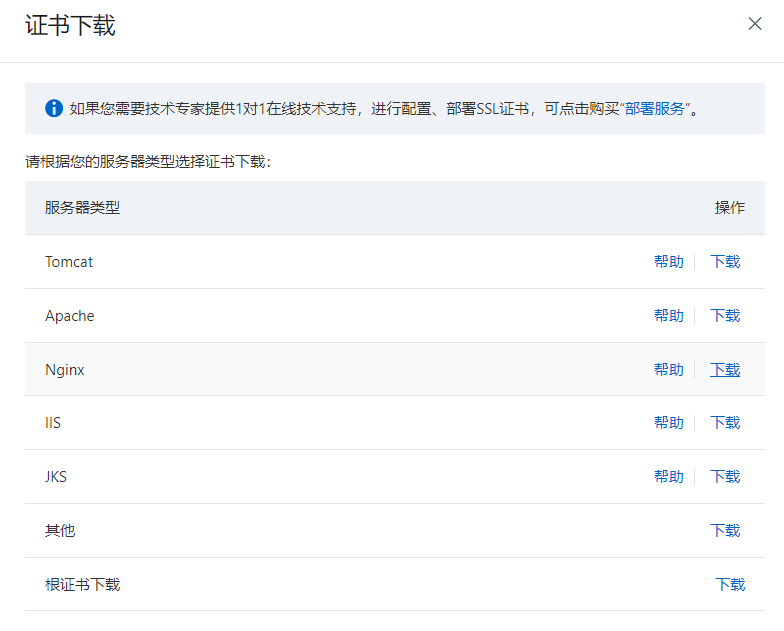
申请完成后,下载Nginx证书并上传到服务器
本地域名解析
Windows:C:\Windows\System32\drivers\etc\hosts
Linux:vi /etc/hosts
将以下解析加入,测试是否可以ping通
192.168.2.xx hub.jonty.top

192.168.2.xx registry.jonty.top
服务端和客户端都需要配置
部署
环境准备
安装Docker-Engine
[root@nexus3 ~]# docker -v

Docker version 20.10.17, build 100c701

[root@nexus3 ~]# docker compose version

Docker Compose version v2.6.0
创建数据路径并设置权限
mkdir -p $PWD/nexus3/data

chmod 777 $PWD/nexus3/data

cd $PWD/nexus3
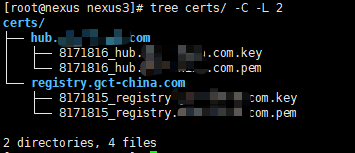
将生成的证书复制到$PWD/nexus3/certs目录下(2个域名的证书都需要)
[root@nexus3 hub.jonty.top]# cp hub.jonty.top.crt ~/nexus3/certs/

[root@nexus3 hub.jonty.top]# cp hub.jonty.top.key.pem ~/nexus3/certs/

[root@nexus3 hub.jonty.top]# cd ~/nexus3/certs/

[root@nexus3 certs]# ls

hub.jonty.top.crt hub.jonty.top.key.pem
docker-compose.yml
在~/nexus3目录下
version: "3.7"

services:

  nexus3:

    image: sonatype/nexus3:3.33.1

    container_name: nexus3

    restart: always

    privileged: true

    environment:

      - TZ=Asia/Shanghai

    volumes:

      - $PWD/data:/nexus-data

  nginx:

    image: nginx:1.21.1-alpine

    container_name: nginx

    restart: always

    environment:

      - TZ=Asia/Shanghai

    ports:

      - "80:80"

      - "443:443"

    volumes:

      - $PWD/nginx.conf:/etc/nginx/nginx.conf:ro     # nginx配置

      - $PWD/certs:/etc/nginx/certs                    # SSL证书

      - $PWD/log:/var/log/nginx

    depends_on:

      - nexus3

    logging:

      driver: "json-file"

      options:

        max-size: "5g"  # 限制日志大小
nginx.conf
在同目录下创建nginx.conf,nginx配置文件
请参考ssl
worker_processes 4;

worker_rlimit_nofile 40000;

events {

    worker_connections 8192;

}

http {

    upstream nexus3_http {

        server nexus3:8081;

    }

    server{

        listen 80;

        server_name registry.jonty.top;

        return 301 https://$server_name$request_uri;

    }

    server {

        listen 443 ssl;

        server_name registry.jonty.top;

        # SSL

        ssl_certificate /certs/registry.jonty.top/registry.jonty.top.pem;

    	ssl_certificate_key /certs/registry.jonty.top/registry.jonty.top.key;

        client_max_body_size 5000m;  # 上传大文件

		fastcgi_connect_timeout 300s;

        fastcgi_send_timeout 300s;

        fastcgi_read_timeout 300s;

        location / {

            proxy_pass http://nexus3_http;

            proxy_set_header Host $host;

            proxy_set_header X-Real-IP $remote_addr;

            proxy_set_header X-Forwarded-For $proxy_add_x_forwarded_for;

            proxy_set_header X-Forwarded-Proto $scheme;

            proxy_set_header Upgrade $http_upgrade;

            proxy_set_header Connection "Upgrade";

        }

    }

    upstream nexus_docker_get {

        server nexus3:8082;

    }

    upstream nexus_docker_put {

        server nexus3:8083;

    }

    server{

        listen 80;

        server_name hub.jonty.top;

        return 301 https://$server_name$request_uri;

    }

    server {

        listen 443 ssl;

        server_name hub.jonty.top;

        # 证书

        ssl_certificate /certs/hub.jonty.top/hub.jonty.top.pem;

        ssl_certificate_key /certs/hub.jonty.top/hub.jonty.top.key;

        ssl_protocols TLSv1.1 TLSv1.2;

        ssl_ciphers '!aNULL:kECDH+AESGCM:ECDH+AESGCM:RSA+AESGCM:kECDH+AES:ECDH+AES:RSA+AES:';

        ssl_prefer_server_ciphers on;

        ssl_session_cache shared:SSL:10m;

        client_max_body_size 5000m;

        chunked_transfer_encoding on;

        set $upstream "nexus_docker_put";

        if ( $request_method ~* 'GET') {

            set $upstream "nexus_docker_get";

        }

        location / {

                proxy_pass http://$upstream;

                proxy_set_header Host $host;

                proxy_connect_timeout 3600;

                proxy_send_timeout 3600;

                proxy_read_timeout 3600;

                proxy_set_header X-Real-IP $remote_addr;

                proxy_buffering off;

                proxy_request_buffering off;

                proxy_set_header X-Forwarded-For $proxy_add_x_forwarded_for;

                proxy_set_header X-Forwarded-Proto http;

        }

    }

}
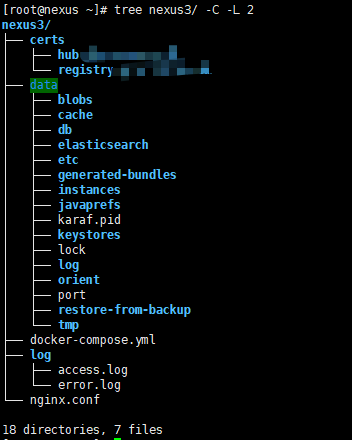
查看目录
yum install -y tree

cd nexus3

tree -C -L 2

tree -C
运行
docker-compose up -d

Nexus初始化需要3~5min,初始化完成后可访问
使用
密码配置
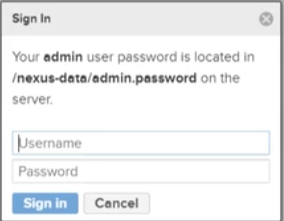
查看admin默认密码:
[root@nexus3 nexus3]# cat data/admin.password

098fb8d9-e07b-4f7f-b498-806cdce1291d
Docker存储库
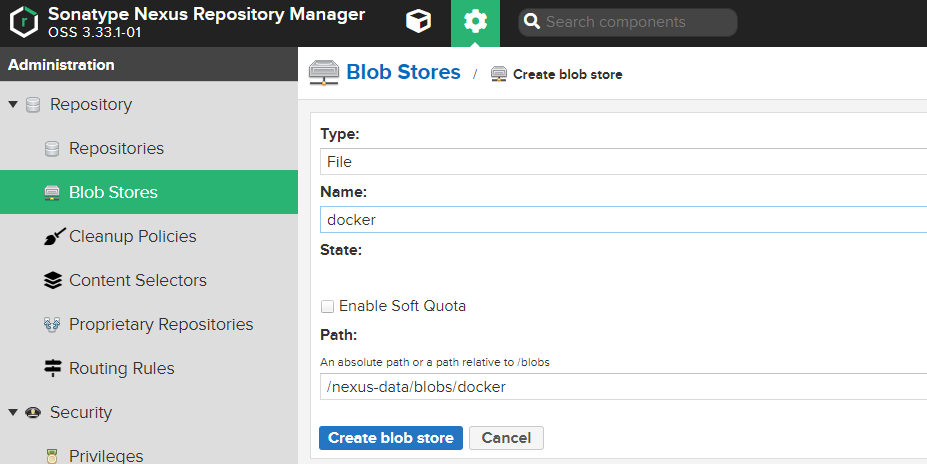
创建Blob存储
创建用于存放docker镜像文件的存储区域
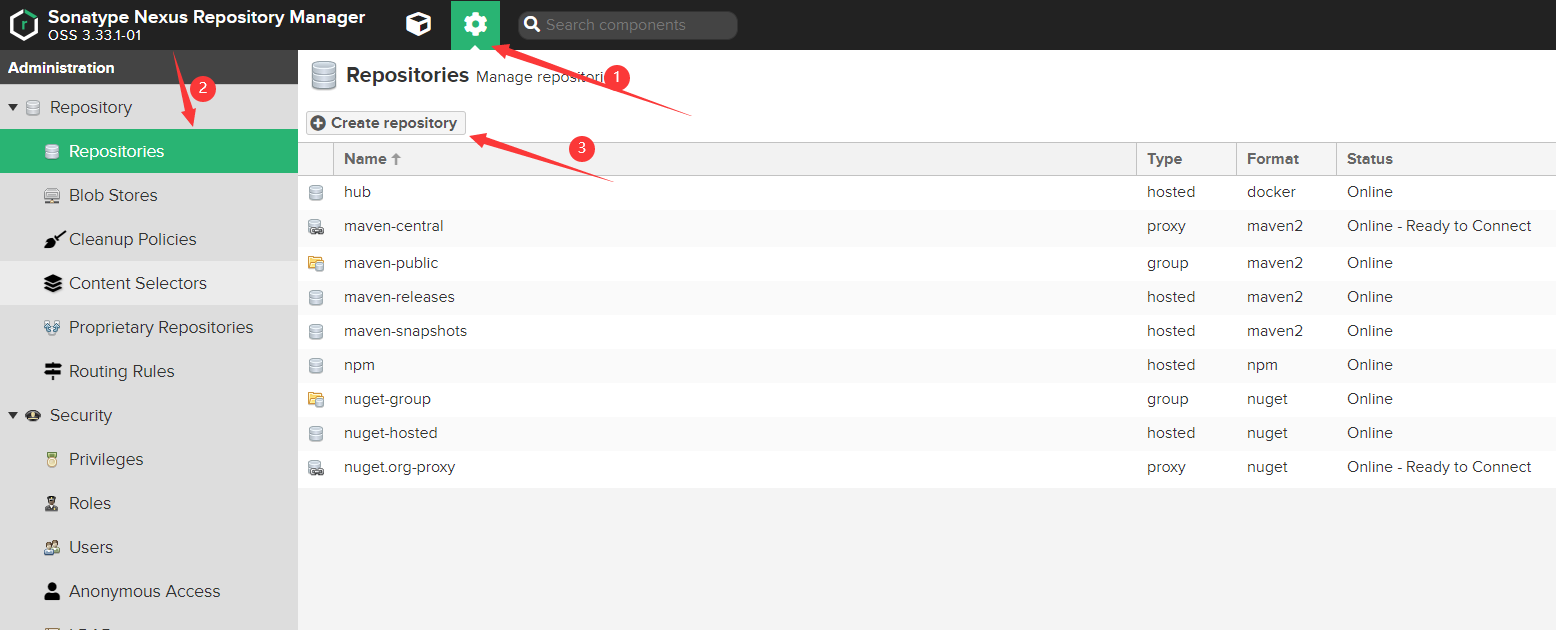
创建存储库
存储库有以下三种类型:
proxy:表示代理仓库,请求包(package)的时候,如果本地有,它就从本地提供,如果本地没有,则从代理地址下载到本地,然后提供这个包。
hosted:表示托管仓库,一般用于推送开发的包到该仓库。
group:表示仓库组,它结合了proxy和hosted,能对外提供上述两者中的包,对外的出口
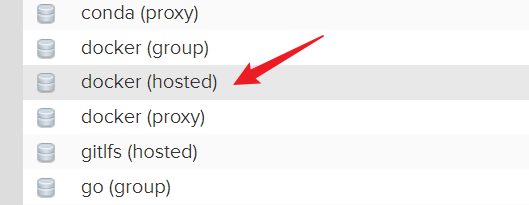
hosted:本地仓库
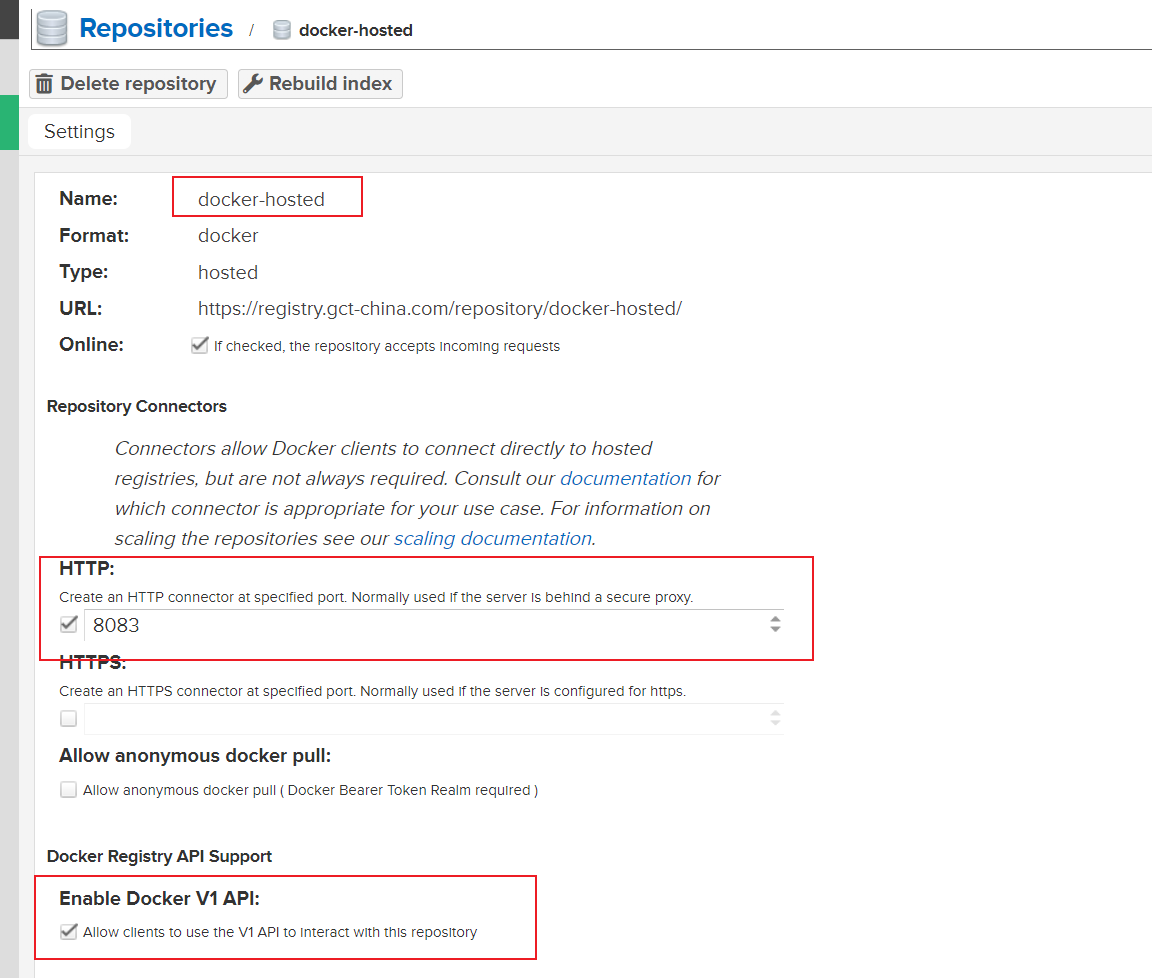
创建hosted类型,用于存储本地推送的镜像
端口设置为8083,对应nginx.conf配置nexus_docker_put
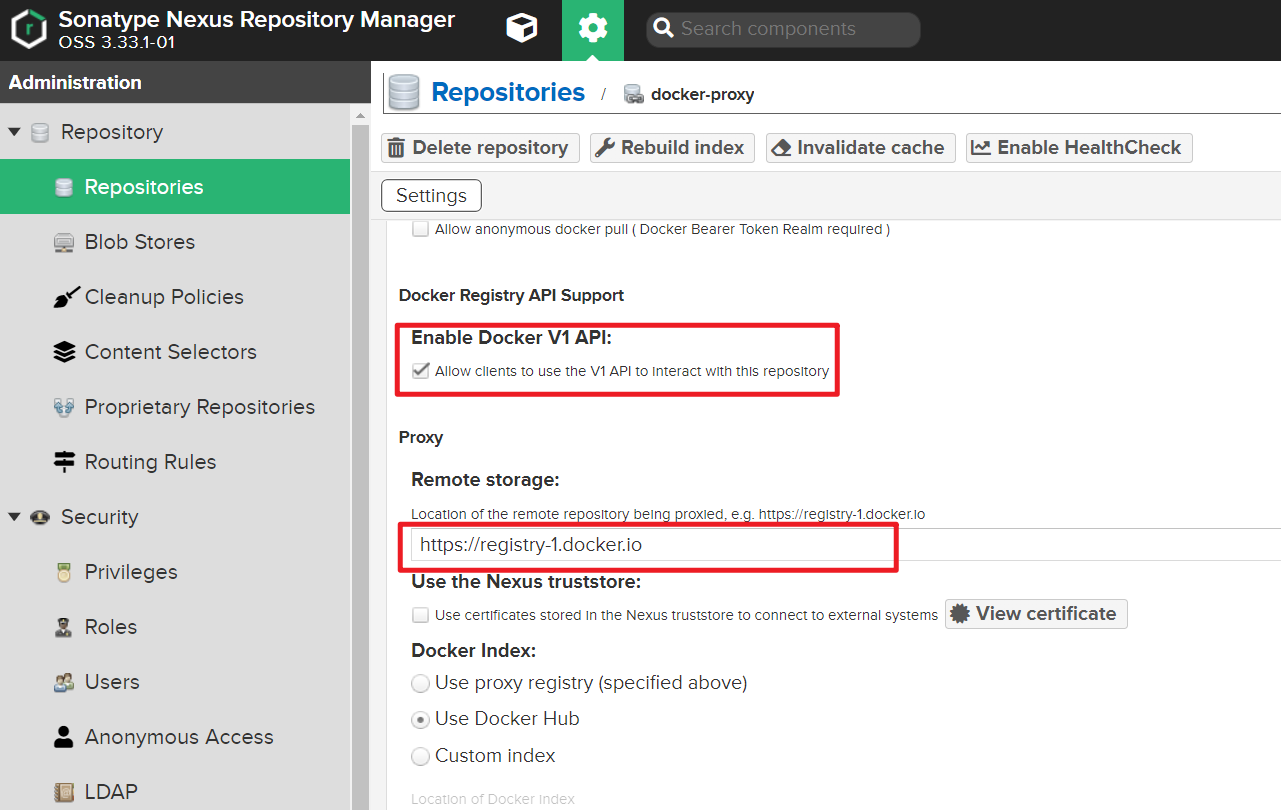
proxy :代理仓库
代理官方源:https://registry-1.docker.io
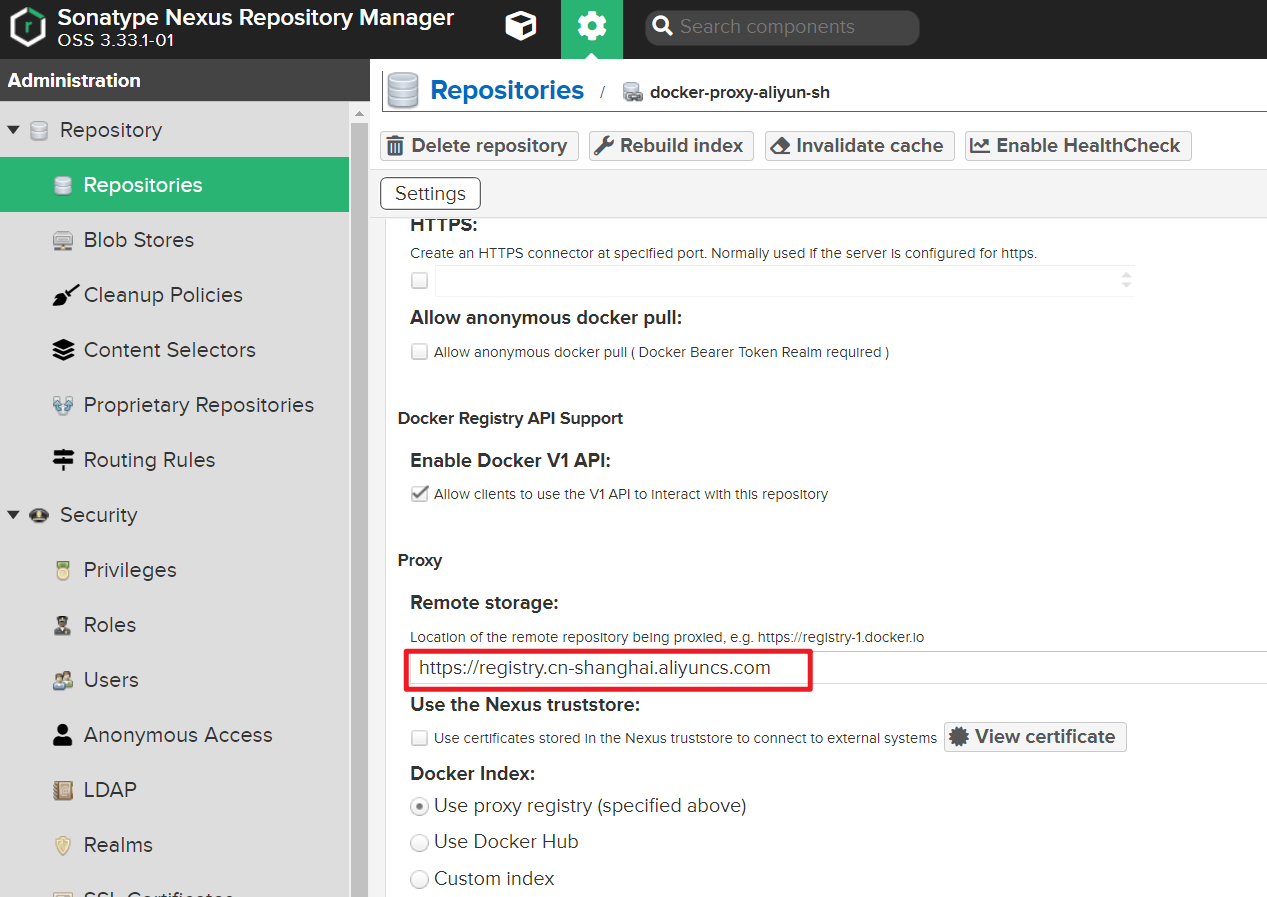
代理阿里云私有仓库(可公开拉取):
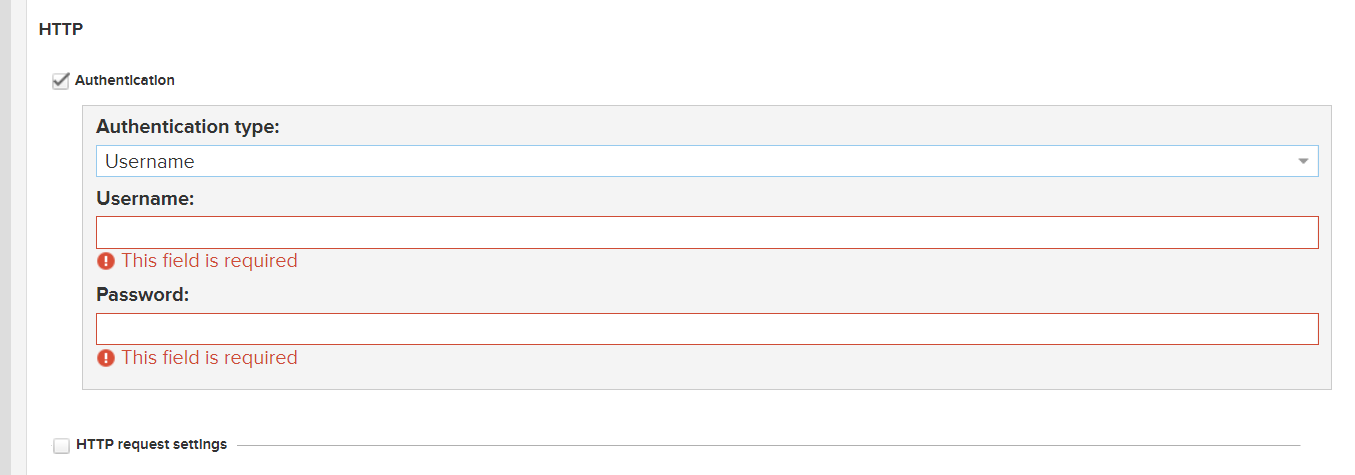
如果代理的私有库需要授权:
group : 仓库组
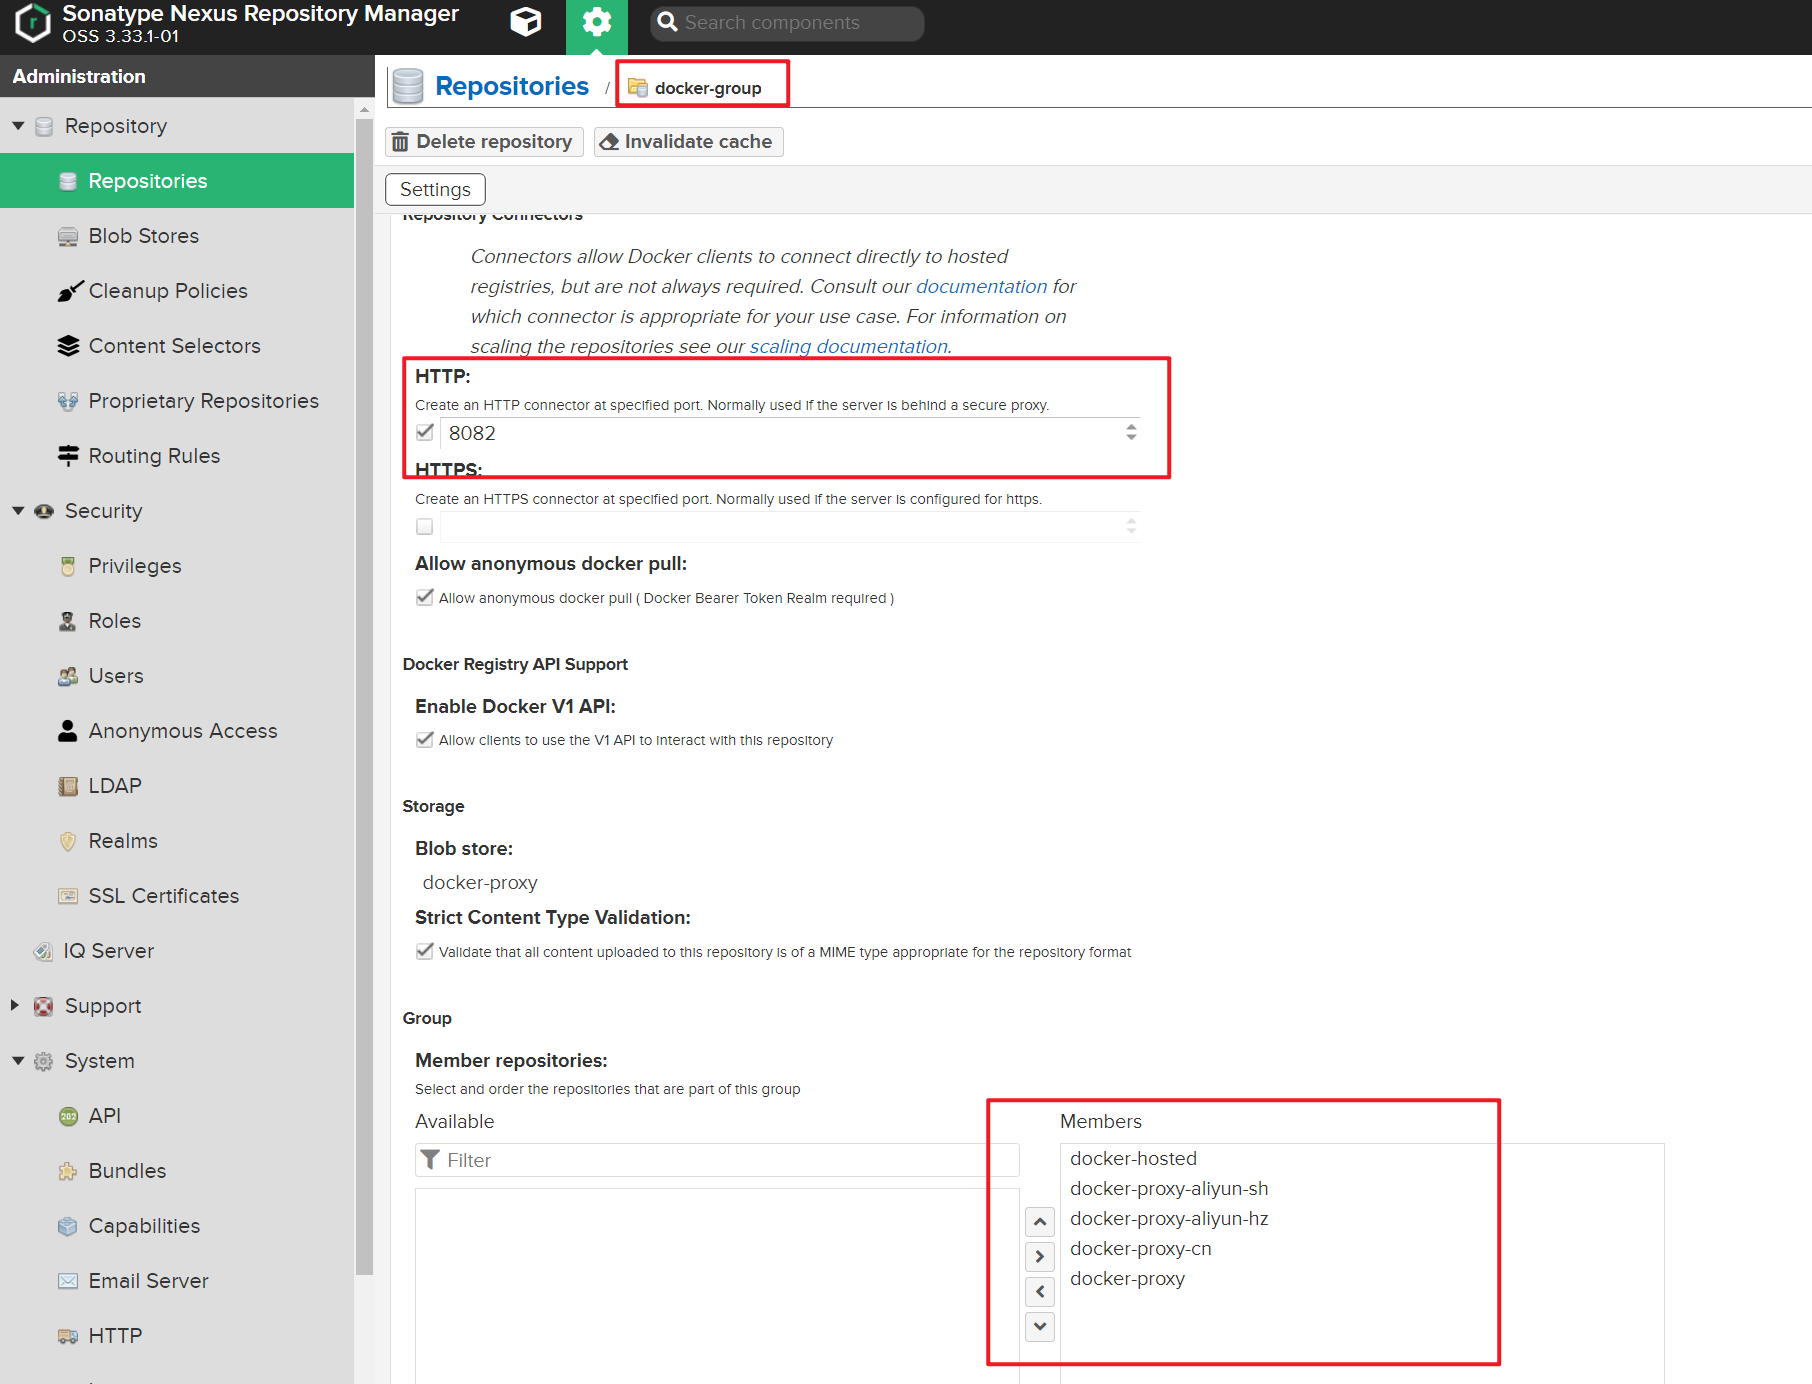
端口设置为8082,对应nginx.conf配置nexus_docker_get
编辑组成员,根据顺序可排优先级
上传docker镜像
配置授信
使用自签名证书需要配置此步骤
sudo vi /etc/docker/daemon.json
加入以下配置
{

   "insecure-registries":["https://hub.jonty.top"]

}
重启docker
sudo systemctl restart docker
docker登录私库时提示
x509: certificate signed by unknown authority
登录
[root@nexus3 nexus3]# docker login hub.jonty.top -u admin

Password:

WARNING! Your password will be stored unencrypted in /root/.docker/config.json.

Configure a credential helper to remove this warning. See

https://docs.docker.com/engine/reference/commandline/login/#credentials-store

Login Succeeded
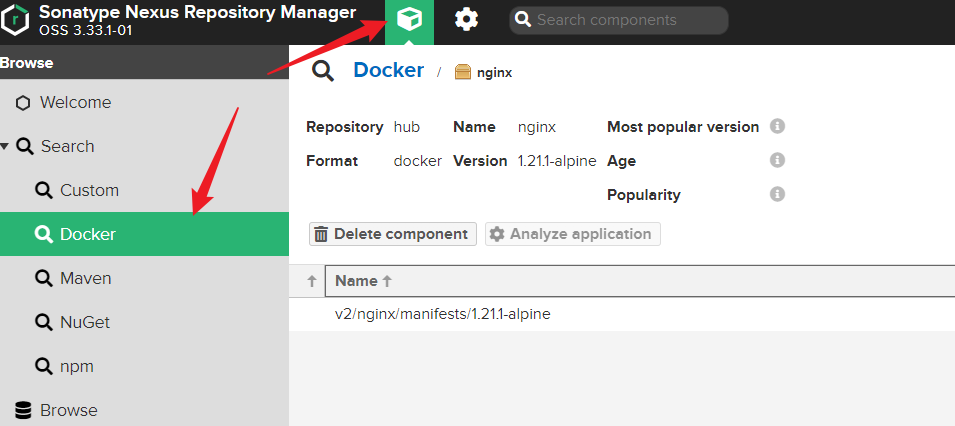
推送镜像
[root@nexus3 nexus3]# docker images

REPOSITORY        TAG             IMAGE ID       CREATED         SIZE

nginx             1.21.1-alpine   1318bf5f63b4   10 months ago   22.8MB

sonatype/nexus3   3.33.1          a0d390a200d2   10 months ago   655MB

[root@nexus3 nexus3]# docker tag nginx:1.21.1-alpine hub.jonty.top/nginx:1.21.1-alpine

[root@nexus3 nexus3]# docker push hub.jonty.top/nginx:1.21.1-alpine

The push refers to repository [hub.jonty.top/nginx]

45d993692050: Pushed

1ea998b95474: Pushed

95b99a5c3767: Pushed

fc03e3cb8568: Pushed

24934e5e6c61: Pushed

e2eb06d8af82: Pushed

1.21.1-alpine: digest: sha256:bd0aa91fe6a182db22032463c17644cd2ff3bbe415e7b84964283bba687acaa6 size: 1568
拉取镜像
[root@test ~]# cat /etc/hosts

127.0.0.1   localhost localhost.localdomain localhost4 localhost4.localdomain4

::1         localhost localhost.localdomain localhost6 localhost6.localdomain6

192.168.2.xx hub.jonty.top

192.168.2.xx registry.jonty.top

[root@test ~]# cat /etc/docker/daemon.json

{

  "insecure-registries": ["https://hub.jonty.top"]

}

[root@test ~]# docker pull hub.jonty.top/mssql:2019-latest

2019-latest: Pulling from mssql

d5fd17ec1767: Already exists

cf291b38357f: Pull complete

af7e8d6f1719: Pull complete

Digest: sha256:584a7fc7e2a378bdd4e8fe3bad36dae18e85527308193cb5c43d90863d7a7d4a

Status: Downloaded newer image for hub.jonty.top/mssql:2019-latest

hub.jonty.top/mssql:2019-latest
Gitlab-CI
[root@nexus3 ~]# cat ~/.docker/config.json

{

	"auths": {

		"https://index.docker.io/v1/": {

			"auth": "am9udHltYXg6Sm9udHlNYXgzMjE="

		},

		"hub.jonty.top": {

			"auth": "YWRtaW46Z2N0bmV4dXMz"

		}

	}

}[root@nexus3 ~]#

[root@nexus3 ~]# echo -n "admin:nexus3" | base64

YWRtaW46Z2N0bmV4dXMz
CI配置:
variables:

  DOCKER_AUTH_CONFIG: '{"auths": {"hub.jonty.top": {"auth": "YWRtaW46SGFyYm9yMTIzNDU="}}}'
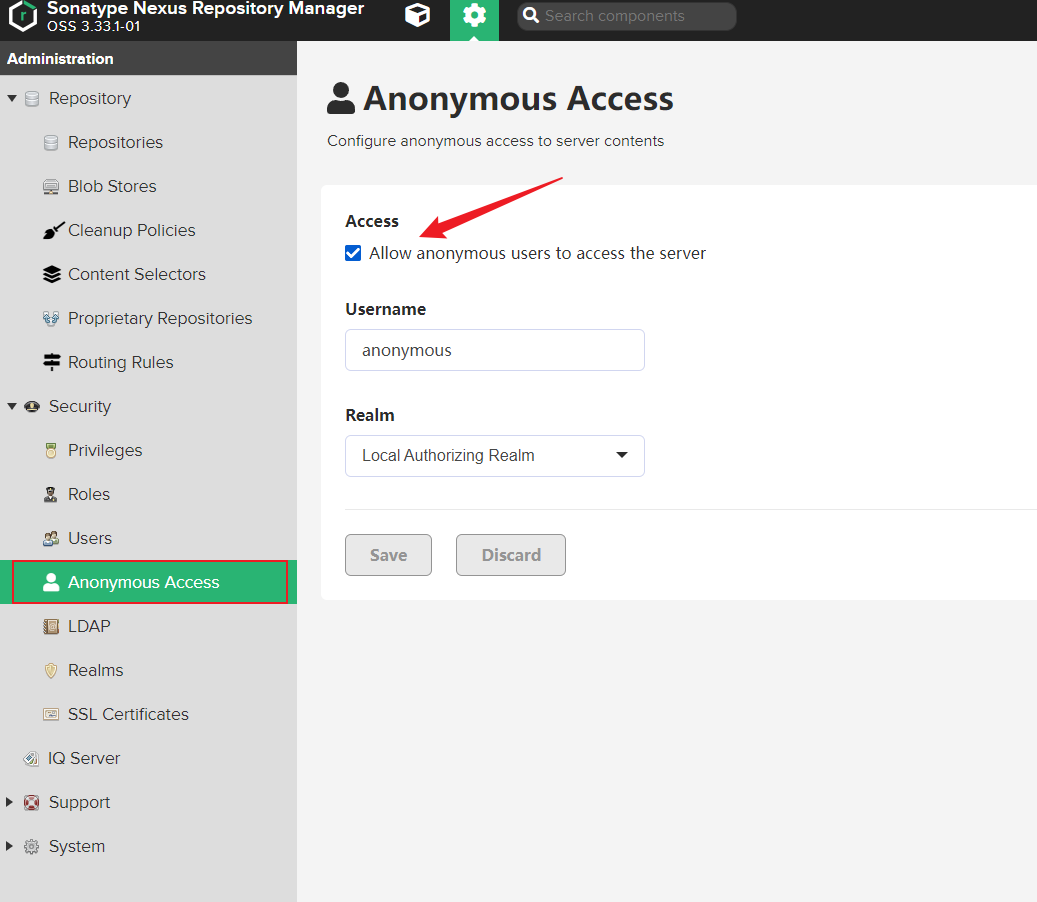
设置匿名拉取
按需开启,开启则不需要配置以上授信部分
NuGet存储库
上传nuget包
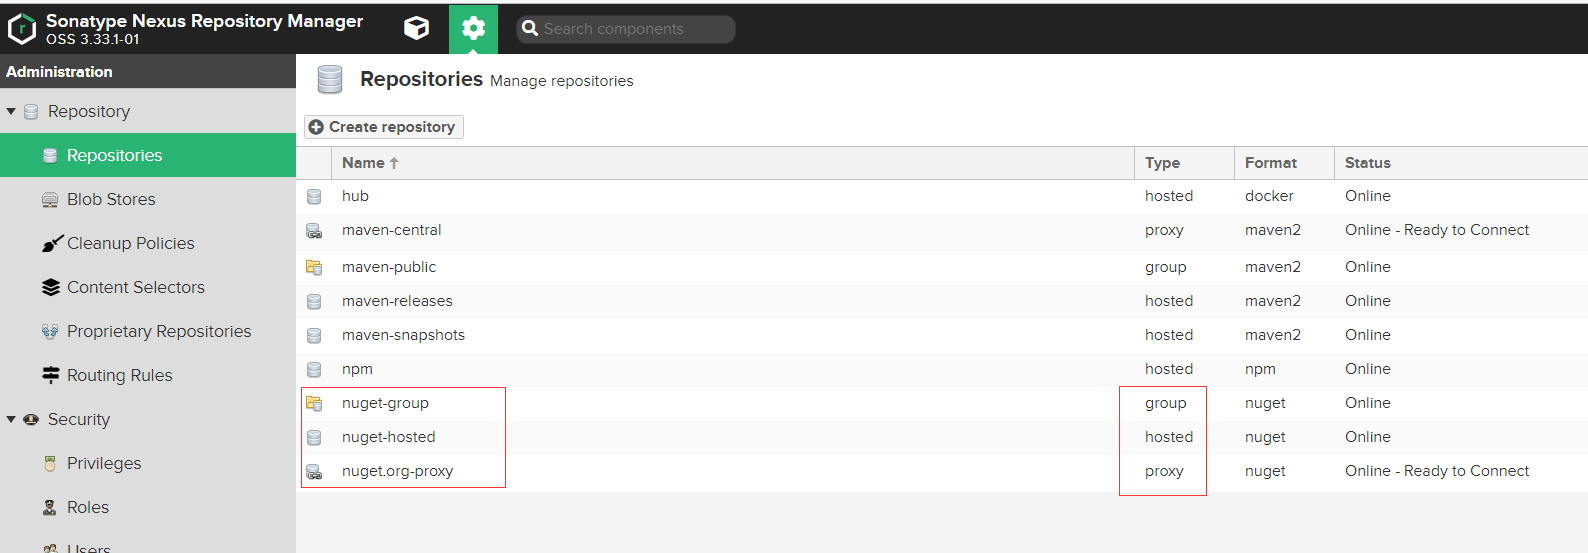
Nexus默认已经创建好了Nuget的仓库,并且是创建了3个不同类型的仓库:nuget-group,nuget-hosted,nuget.org-proxy
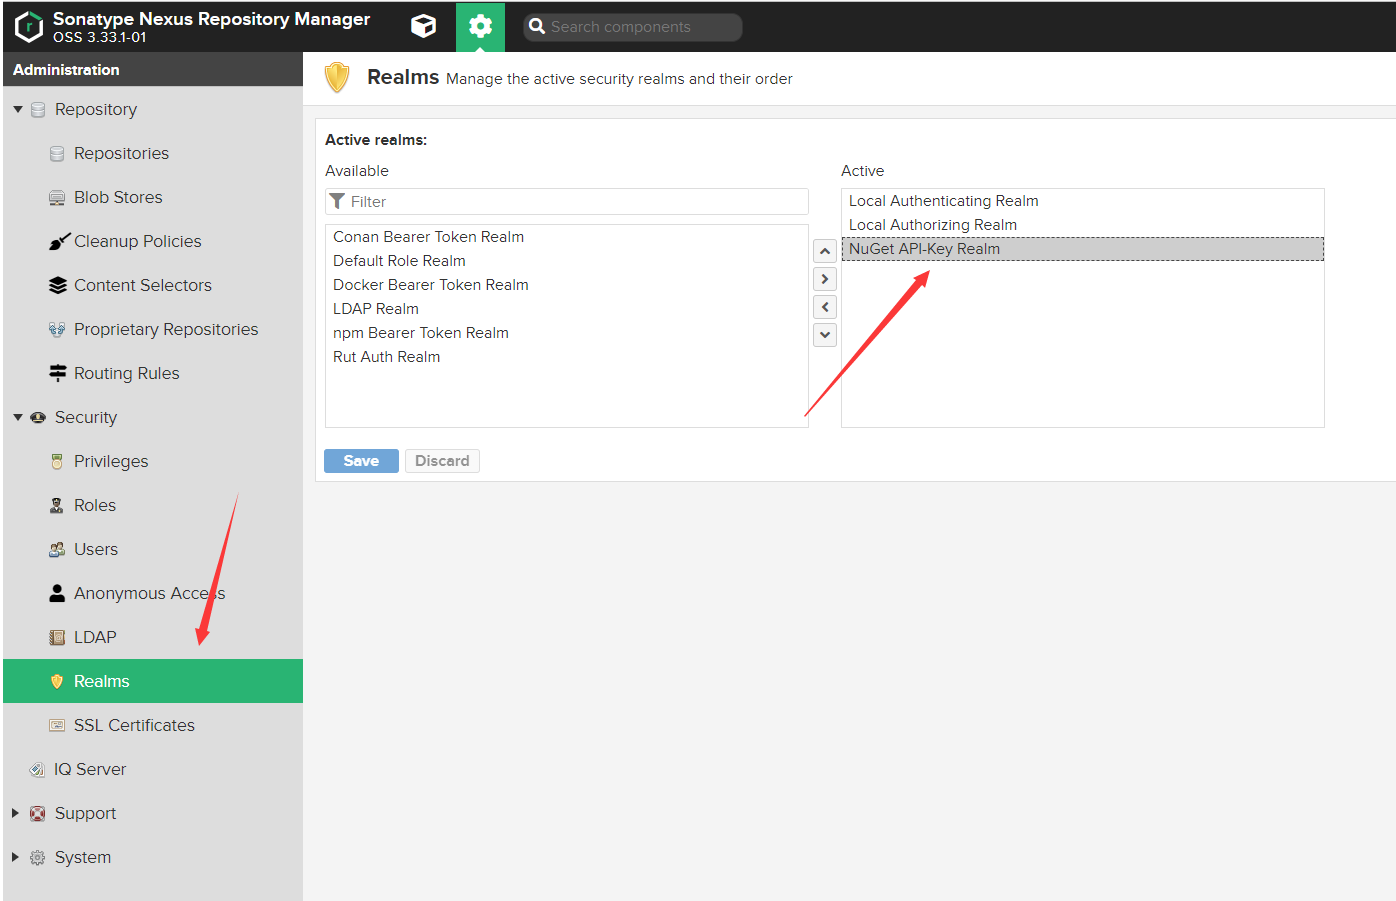
添加Nuget Realms
Nexus认证Nuget是通过Realms来认证
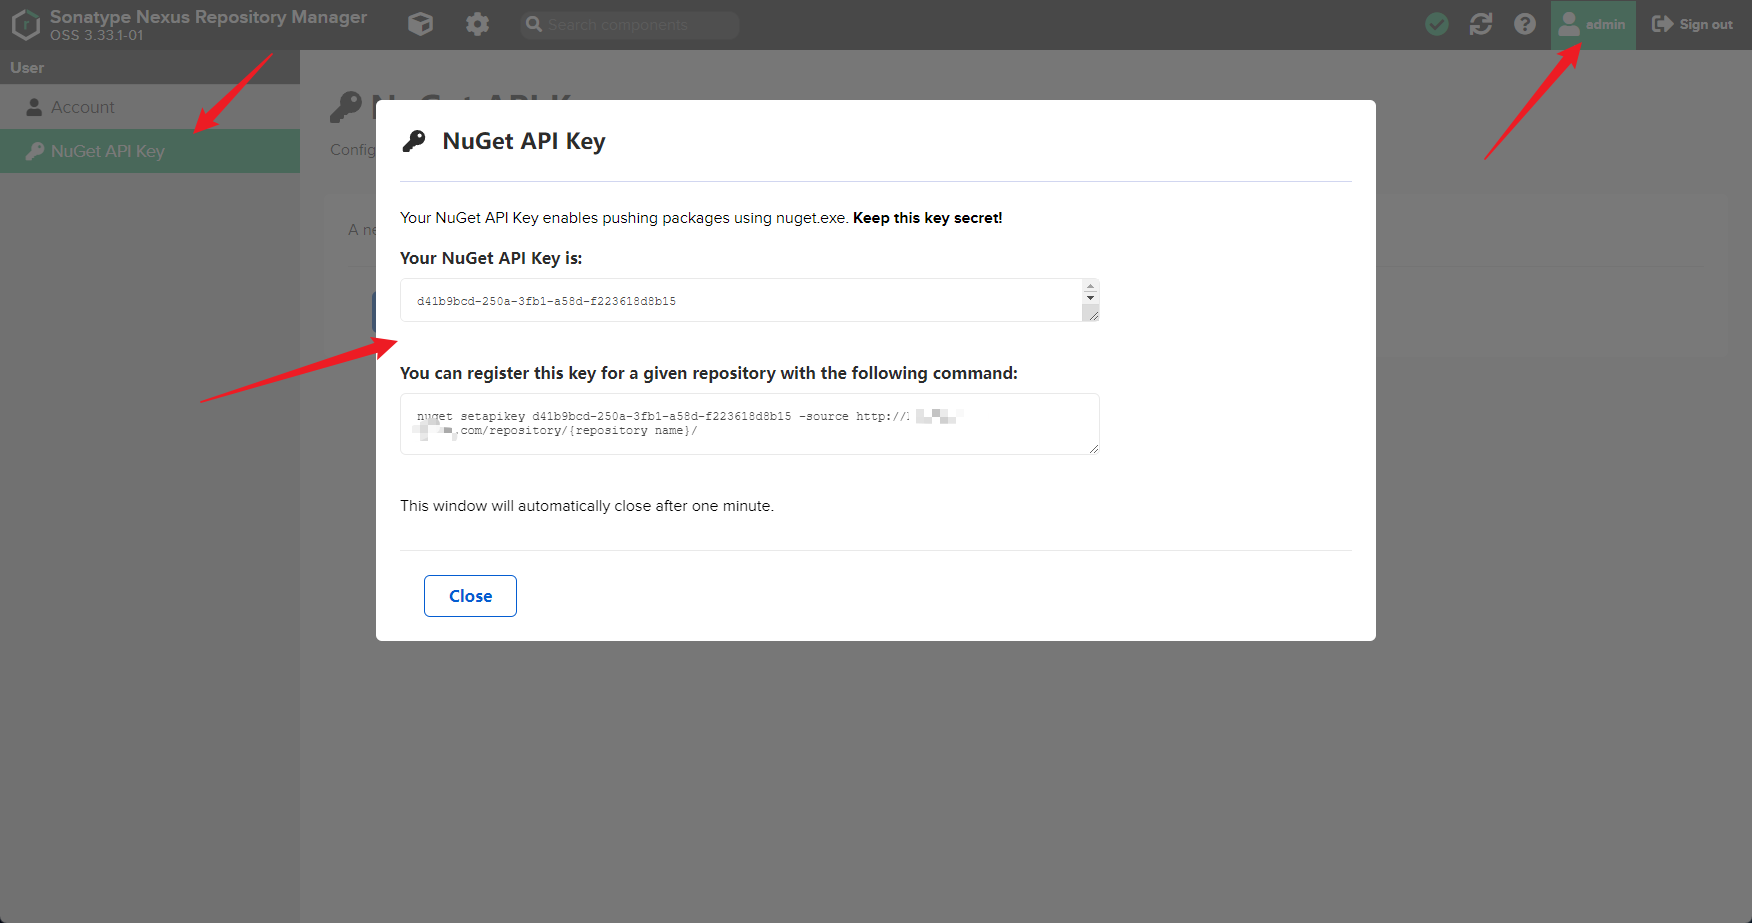
获取仓库地址以及Nuget API Key
仓库列表>复制地址

获取NuGet API Key
推送本地NuGet包
dotnet nuget push .\abp.7.2.1.nupkg -k 238d37fc-9fae-335d-a812-29c2799d8f0e --source https://registry.jonty.top/repository/nuget-hosted/

正在将 abp.7.2.1.nupkg 推送到 'https://registry.jonty.top/repository/nuget-hosted/'...

  PUT https://registry.jonty.top/repository/nuget-hosted/

  Created https://registry.jonty.top/repository/nuget-hosted/ 288 毫秒

已推送包。

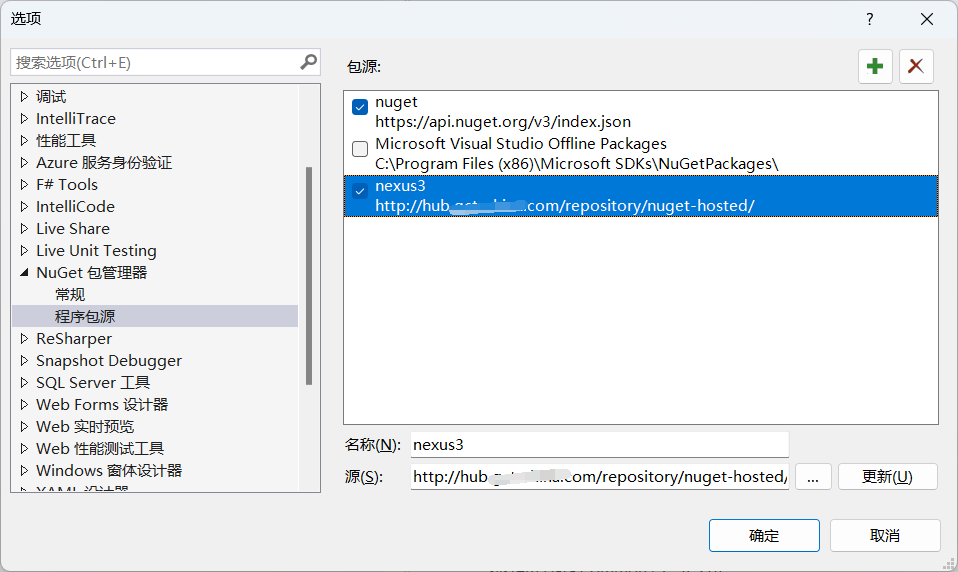
配置本地NuGet包源
在VS中添加了本地源
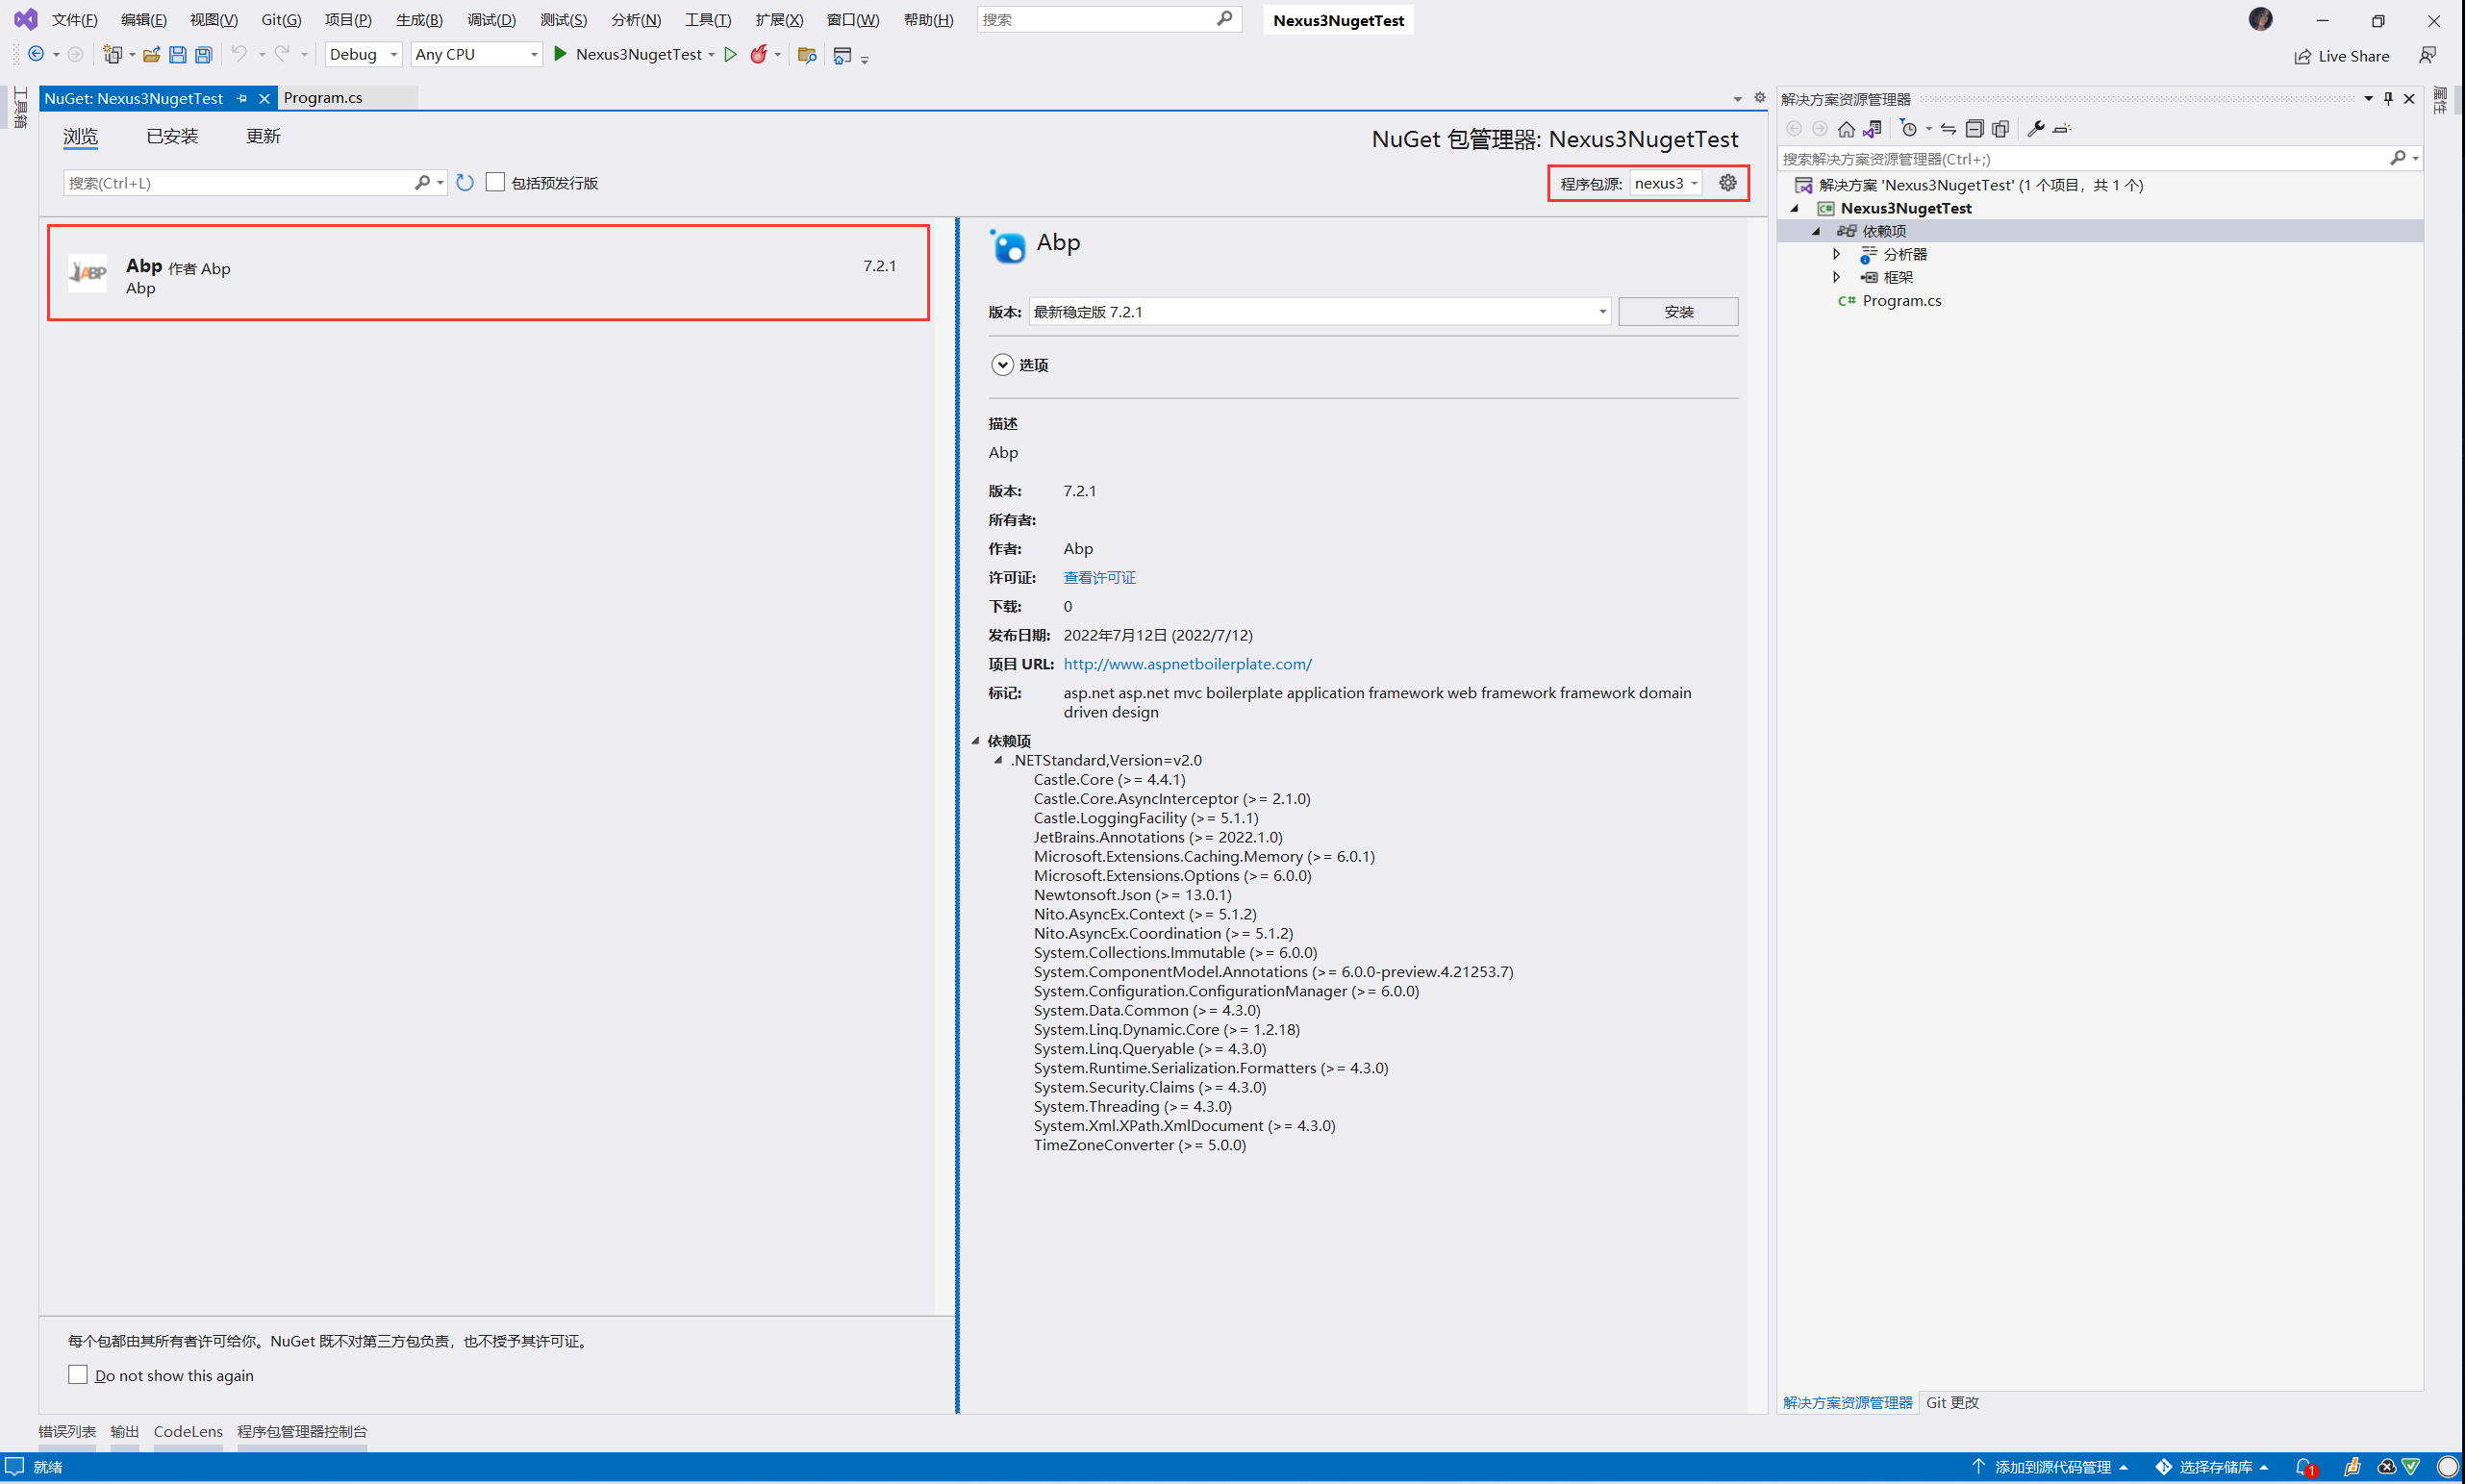
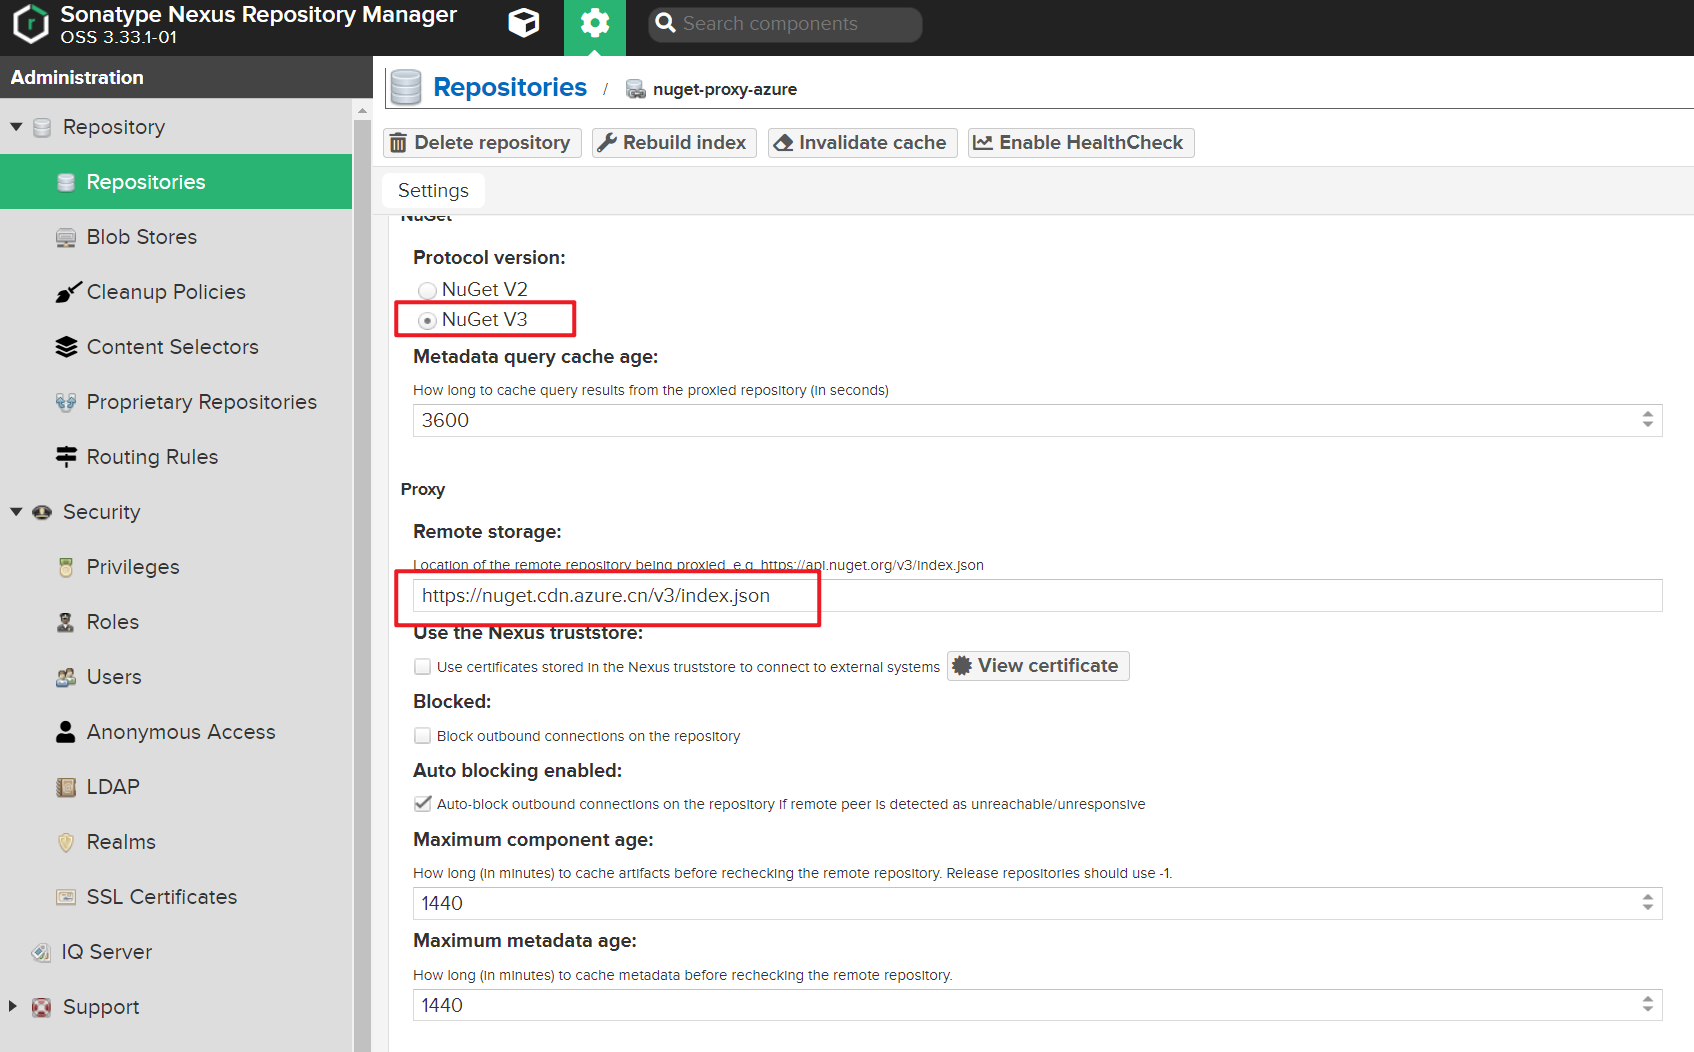
新增Nuget代理
代理公网的私有源,如Nuget、Gitlab
启用NuGet V3版本
私有源授权
添加仓库组
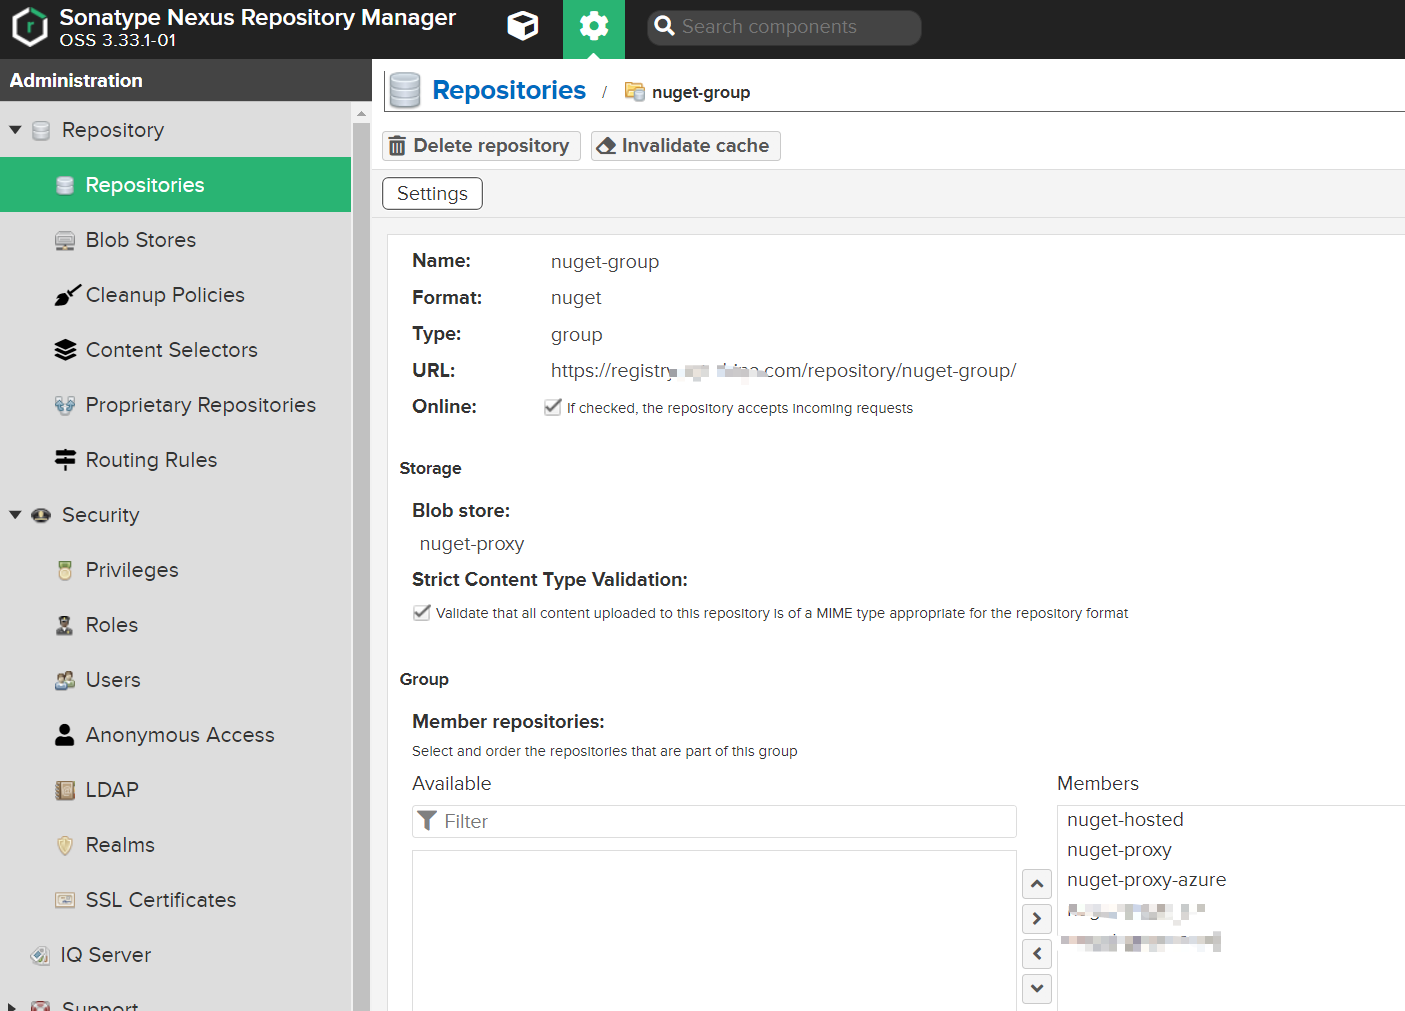
NuGet V3
正常访问nuget-group:
https://registry.jonty.top/repository/nuget-group/
使用V3版本需要添加
https://registry.jonty.top/repository/nuget-group/index.json
使用私有NuGet源
如果是代理私有库,先删除本地源
dotnet nuget list source

dotnet nuget remove source <NAME>
添加私有源
dotnet nuget add source https://registry.jonty.top/repository/nuget-group/index.json -n nexus3 -u admin -p nexus3 --store-password-in-clear-text
清空本地nuget缓存
dotnet nuget locals http-cache --clear

dotnet nuget locals global-packages --clear
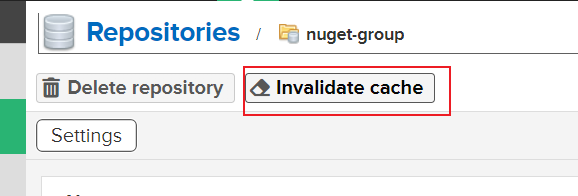
当代理的源更新后,Nexus本地缓存会导致无法找到最新包,可手动清理
NPM存储库
NPM代理
官方源:
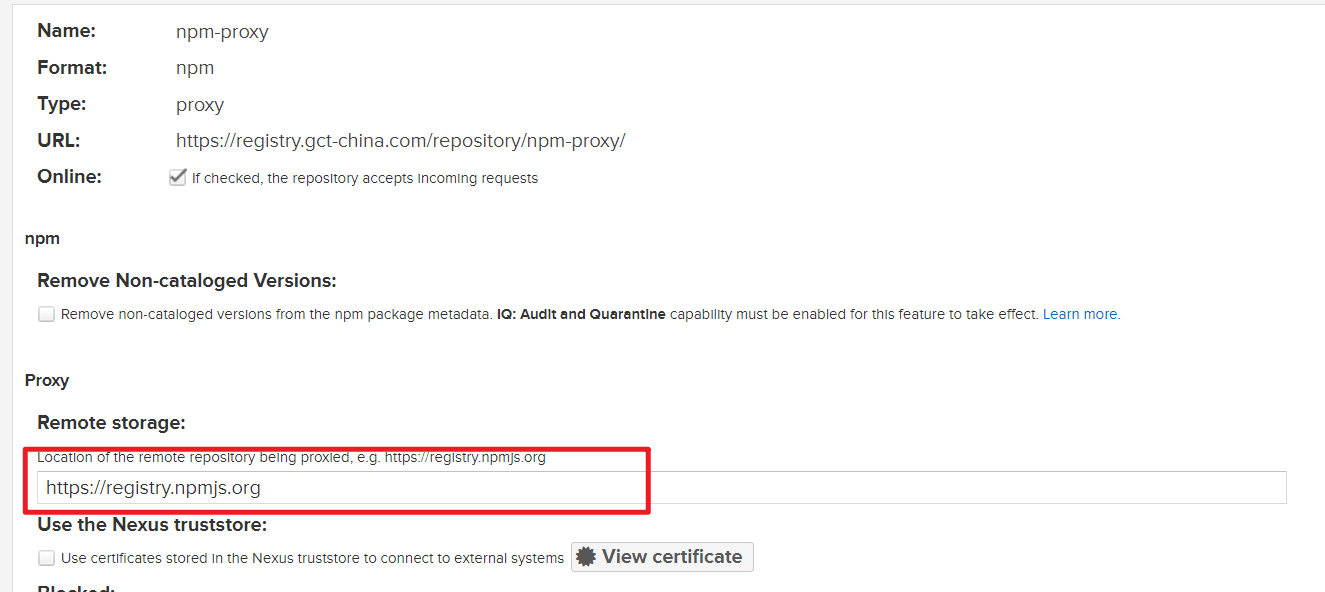
私有库授权:

NPM仓库组
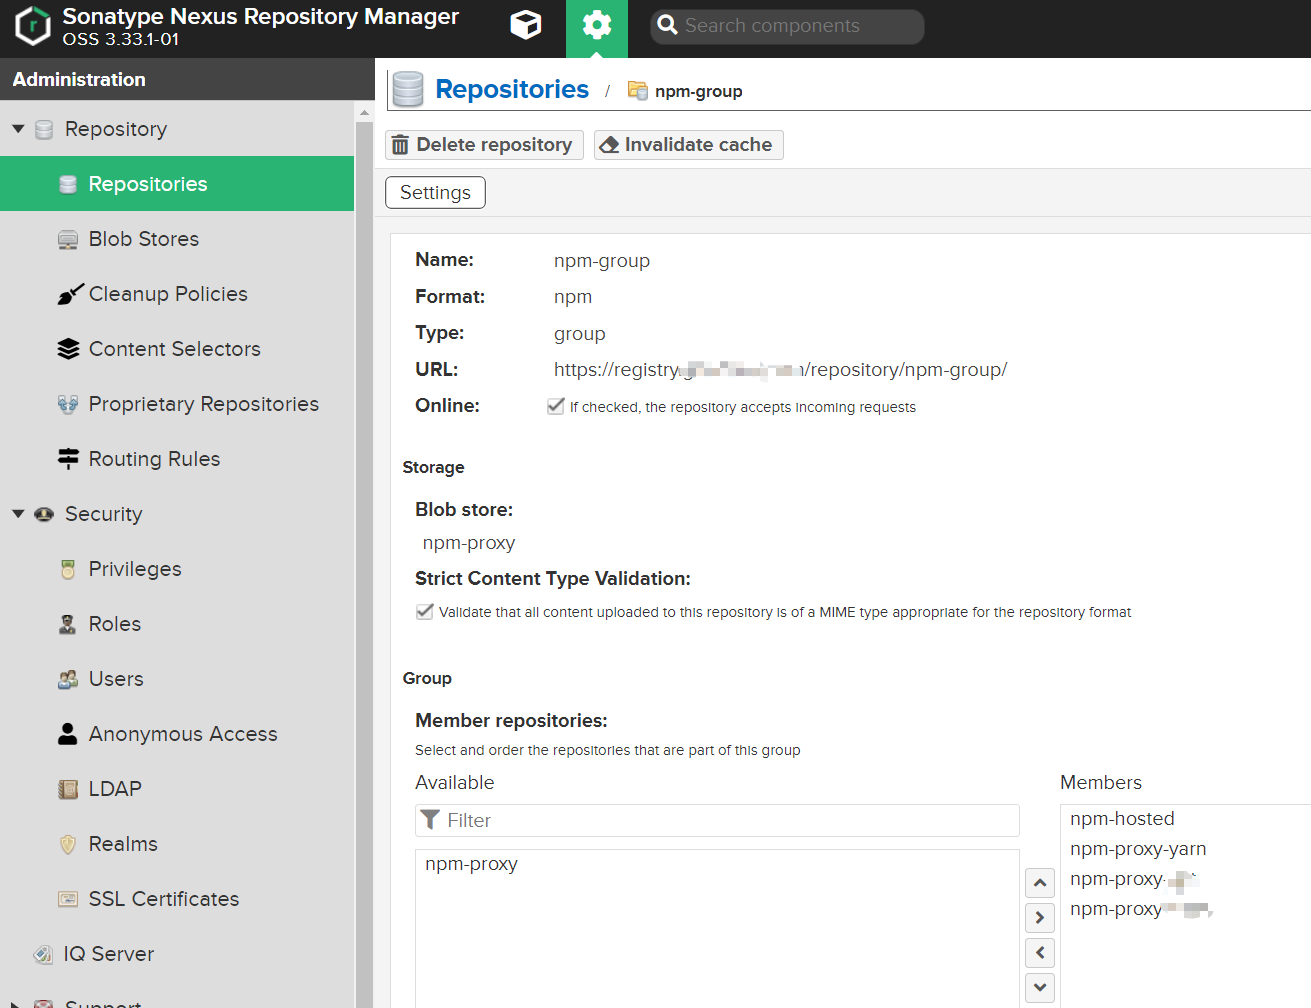
使用NPM代理
配置代理
npm i --legacy-peer-deps  -verbose

# 查看npm源

npm config get registry

# 注册私有源

npm config set registry https://registry.jonty.top/repository/npm-group

# 登录私服

npm login registry="https://registry.jonty.top/repository/npm-group/"

npm cache clean --force
npm 新版本
-g需要替换为--location=global
# 查看yarn配置

yarn config list

# 配置私有源

yarn config set registry https://registry.jonty.top/repository/npm-group/

yarn cache clean
查看密钥
查看私服密钥
[root@nexus3 ~]# cat ~/.npmrc

registry=http://registry.jonty.top/repository/npm-group/

//registry.jonty.top/repository/npm-group/:_authToken=NpmToken.72b83be3-4b24-3dd1-850f-056cd78bb513
.npmrc
@delivery:registry=https://registry.jonty.top/repository/npm-group/

//registry.jonty.top/repository/npm-group/:_authToken=NpmToken.612e0fd9-1526-3acd-9165-4e604d49a73d

always-auth=true
DevOps
目的
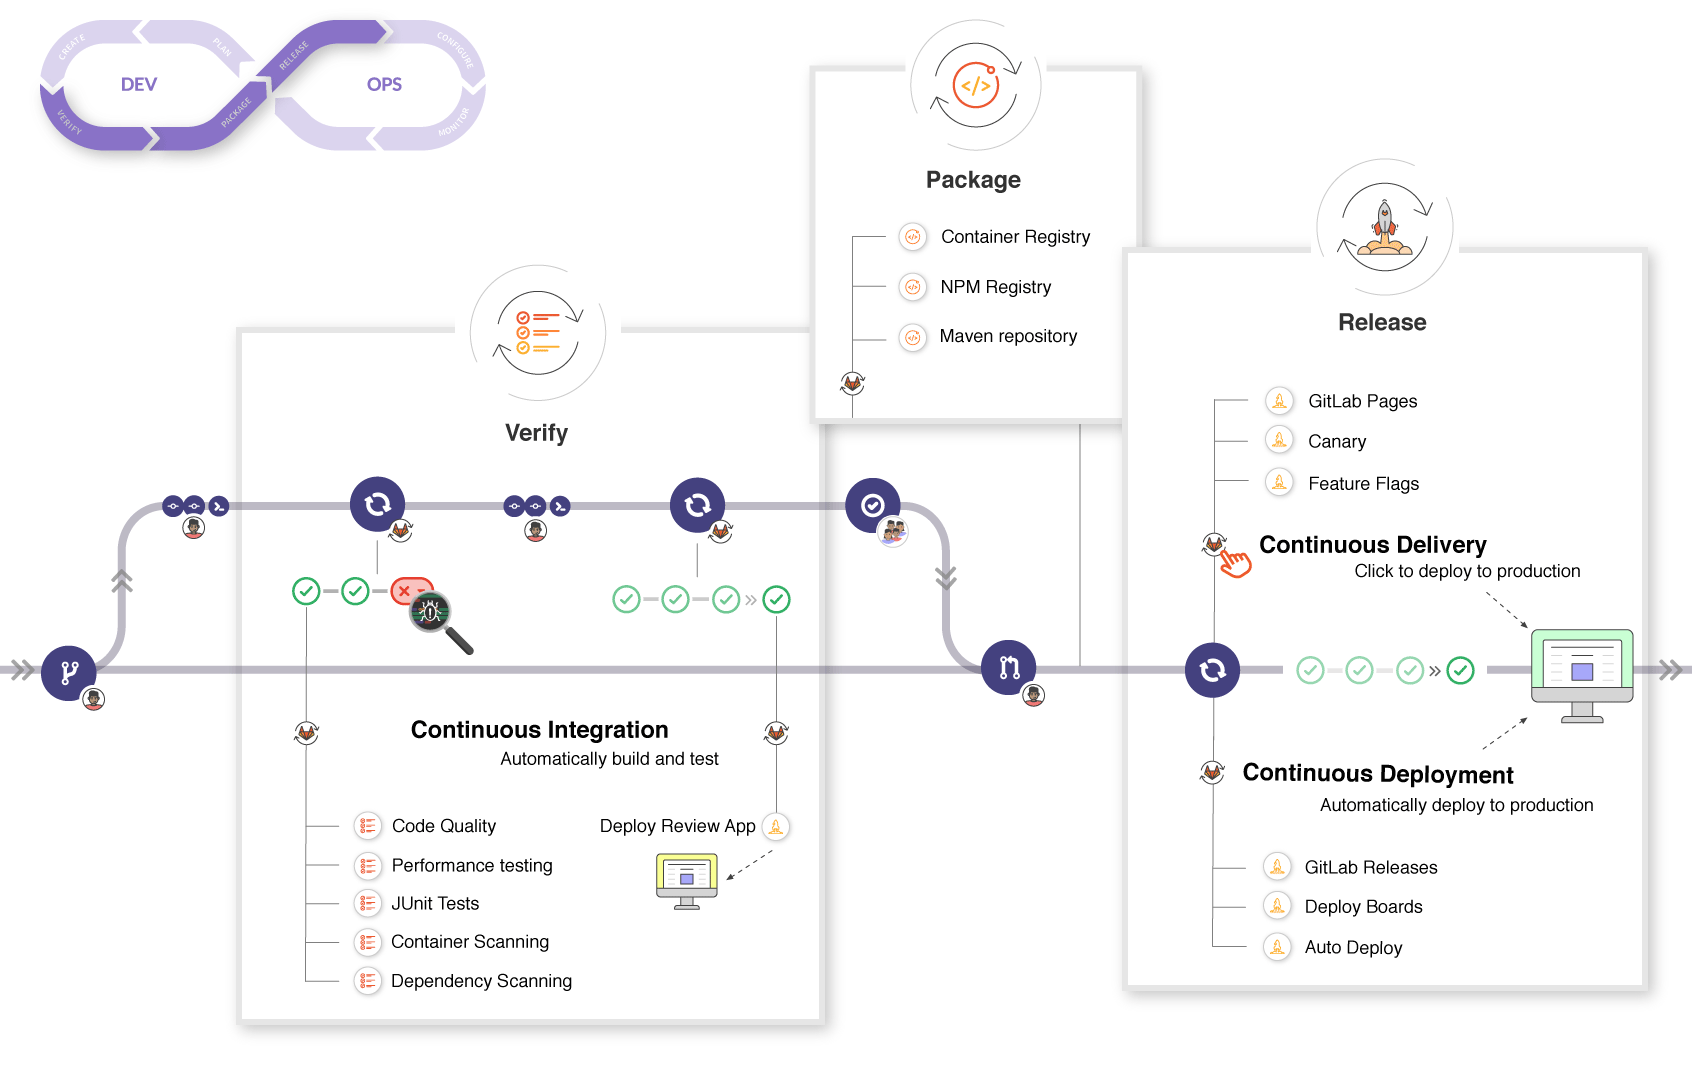
主要是配合Gitlab Runner CI/CD编译打包
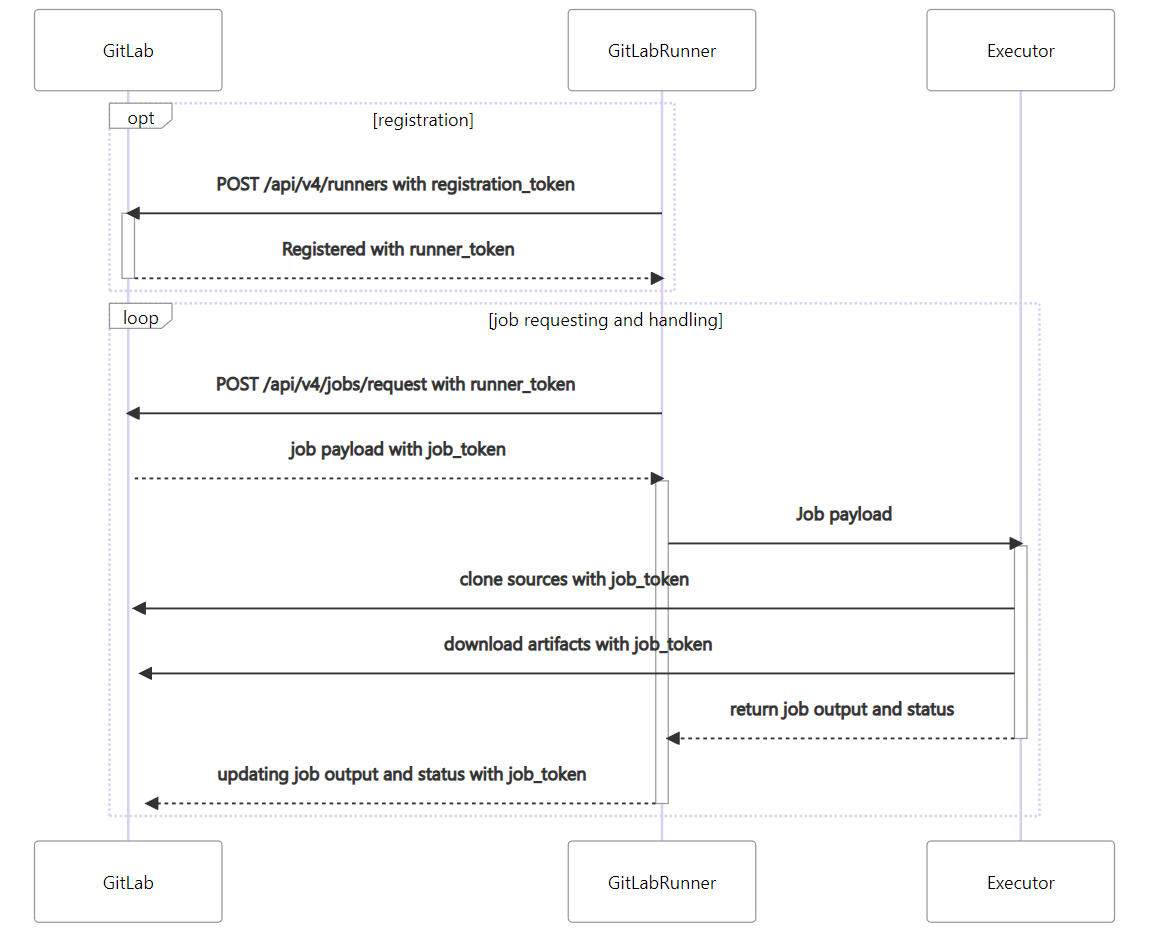
效果
后端项目从平均12min提升到3min以内,包括拉取代码、执行还原、编译打包、推送等操作
前端项目从平均大于10min(30min也很常见)提升到7min以内,restore速度很快,主要是build操作缓慢,并且随着依赖增多变得更慢
使用前

使用后

搞定~

其他问题
502 Bad Gateway
配置 nexus3 时使用 http 而非 https
no basic auth credentials
需要先 docker login 登录
401 Unauthorized
docker login -u admin -p Harbor12345 hub.haifengat.com 登录时报错

参考文档:
docker登录私库时提示 x509: certificate signed by unknown authority_舟行于无涯之海的博客-CSDN博客_docker login x509
Sonatype Nexus3 搭建私有仓库的更多相关文章
- Android业务组件化之Gradle和Sonatype Nexus搭建私有maven仓库
前言: 公司的业务组件化推进的已经差不多三四个月的时间了,各个业务组件之间的解耦工作已经基本完成,各个业务组件以module的形式存在项目中,然后项目依赖本地的module,多少有点不太利于项目的并行 ...
- Docker搭建私有仓库
1,下载仓库镜像. docker pull registry //主要用于搭建私有仓库的. 2,将宿主机端口映射到容器中去,容器的5000端口是不能更改的. docker run -d -p ...
- Docker入门之四搭建私有仓库
前面学习了下镜像和容器,今天来学习下仓库,来搭建本地私有仓库.当然可以使用远程的共有的仓库,但在企业中有的还是放在本地,所以需要搭建私有仓库. 一.搭建仓库 可以在容器中run一个仓库镜像. dock ...
- Docker 搭建私有仓库
Docker 搭建私有仓库 环境: docker 版本 :18.09.1 主机地址:192.168.1.79 1.运行并创建私有仓库 docker run -d \ -v /opt/registry: ...
- 菜鸟系列docker——搭建私有仓库harbor(6)
docker 搭建私有仓库harbor 1. 准备条件 安装docker sudo yum update sudo yum install -y yum-utils device-mapper-per ...
- [Docker]docker搭建私有仓库(ssl、身份认证)
docker搭建私有仓库(ssl.身份认证) 环境:CentOS 7.Docker 1.13.1 CentOS 7相关: https://www.cnblogs.com/ttkl/p/11041124 ...
- yum搭建私有仓库远程版
目录 一:yum安装 1.简介 1.安装 2.卸载 3.更新 4.yum安装的生命周期 二:yum搭建私有仓库(本地版) 1.下载必须的软件包(准备配置) 2.创建软件仓库 3.下载对应的软件 4.初 ...
- Linux yum搭建私有仓库
搭建yum仓库需要两种资源: rpm包 rpm包的元数据(repodata) 搭建好仓库后需要使用三种网络协议共享出来 http或https ftp 范例: 使用http协议搭建私有仓库 (本示例使用 ...
- CentOS7下使用Sonatype Nexus3搭建Docker私有仓库
相关资料: Sonatype Nexus3官方网站:https://www.sonatype.com/download-oss-sonatype Sonatype Nexus3 Docker Hub地 ...
随机推荐
- uniapp设置竖屏
//在APP.vue中的onLaunch钩子写入plus.screen.lockOrientation('portrait-primary');
- 纯CSS如何禁止用户复制网页的内容?
大家好,我是半夏,一个刚刚开始写文的沙雕程序员.如果喜欢我的文章,可以关注 点赞 加我微信:frontendpicker,一起学习交流前端,成为更优秀的工程师-关注公众号:搞前端的半夏,了解更多前端知 ...
- 对于vjudge在有些网络下无法打开的问题
因为有些网络会屏蔽vjudge,所以打开 镜像网址 不行再试试这个:最新镜像网址
- 利用shell脚本自动化备份数据库与手动备份还原数据库操作
1.在linux操作系统上手动备份数据库 mysqldump -h 服务器IP地址 -u root -p数据库密码 --databases 所要备份的数据库名称 > /路径/数据库.sql(自定 ...
- 微信access_token缓存与更新
由于Access Token有效期只有7200秒,而每天调用获取的次数只有2000次,所以需要将Access Token进行缓存来保证不触发超过最大调用次数.另外在微信公众平台中,绝大多数高级接口都需 ...
- python中 OS模块中 os.path.join() 函数用法简介
基础用法 os.path.join() 用于拼接文件的路径,可以传入多个待拼接的路径 若各个路径之间不存在 " / ", 则其会自动为各个路径之间增加连接符 " / &q ...
- 实战回忆录:从Webshell开始突破边界
正文 某授权单位的一次渗透,由于使用的php框架,某cms的上传,从实现webshell开始. 详情 添加监听,生成木马文件更改应用程序名称隐藏上线. 修改休眠时间为10秒 查看主机名whoami 抓 ...
- 利用kubernetes资源锁完成自己的HA应用
Backgroud 前一章中,对kubernetes的选举原理进行了深度剖析,下面就通过一个example来实现一个,利用kubernetes提供的选举机制完成的高可用应用. 对于此章需要提前对一些概 ...
- python小题目练习(十一)
题目:大乐透号码生成器 需求:使用Random模块模拟大乐透号码生成器,选号规则为:前区在1 ~ 35的范围内随机产生不重复 的5个号码,后区在1~ 12的范围内随机产生不重复的2个号码.效果如图8. ...
- docker实时查看日志
docker logs -f --tail=10 fo-order -f : 查看实时日志 --tail=10 : 查看最后的10条日志. fo-order: 容器名称
