SSM-learning
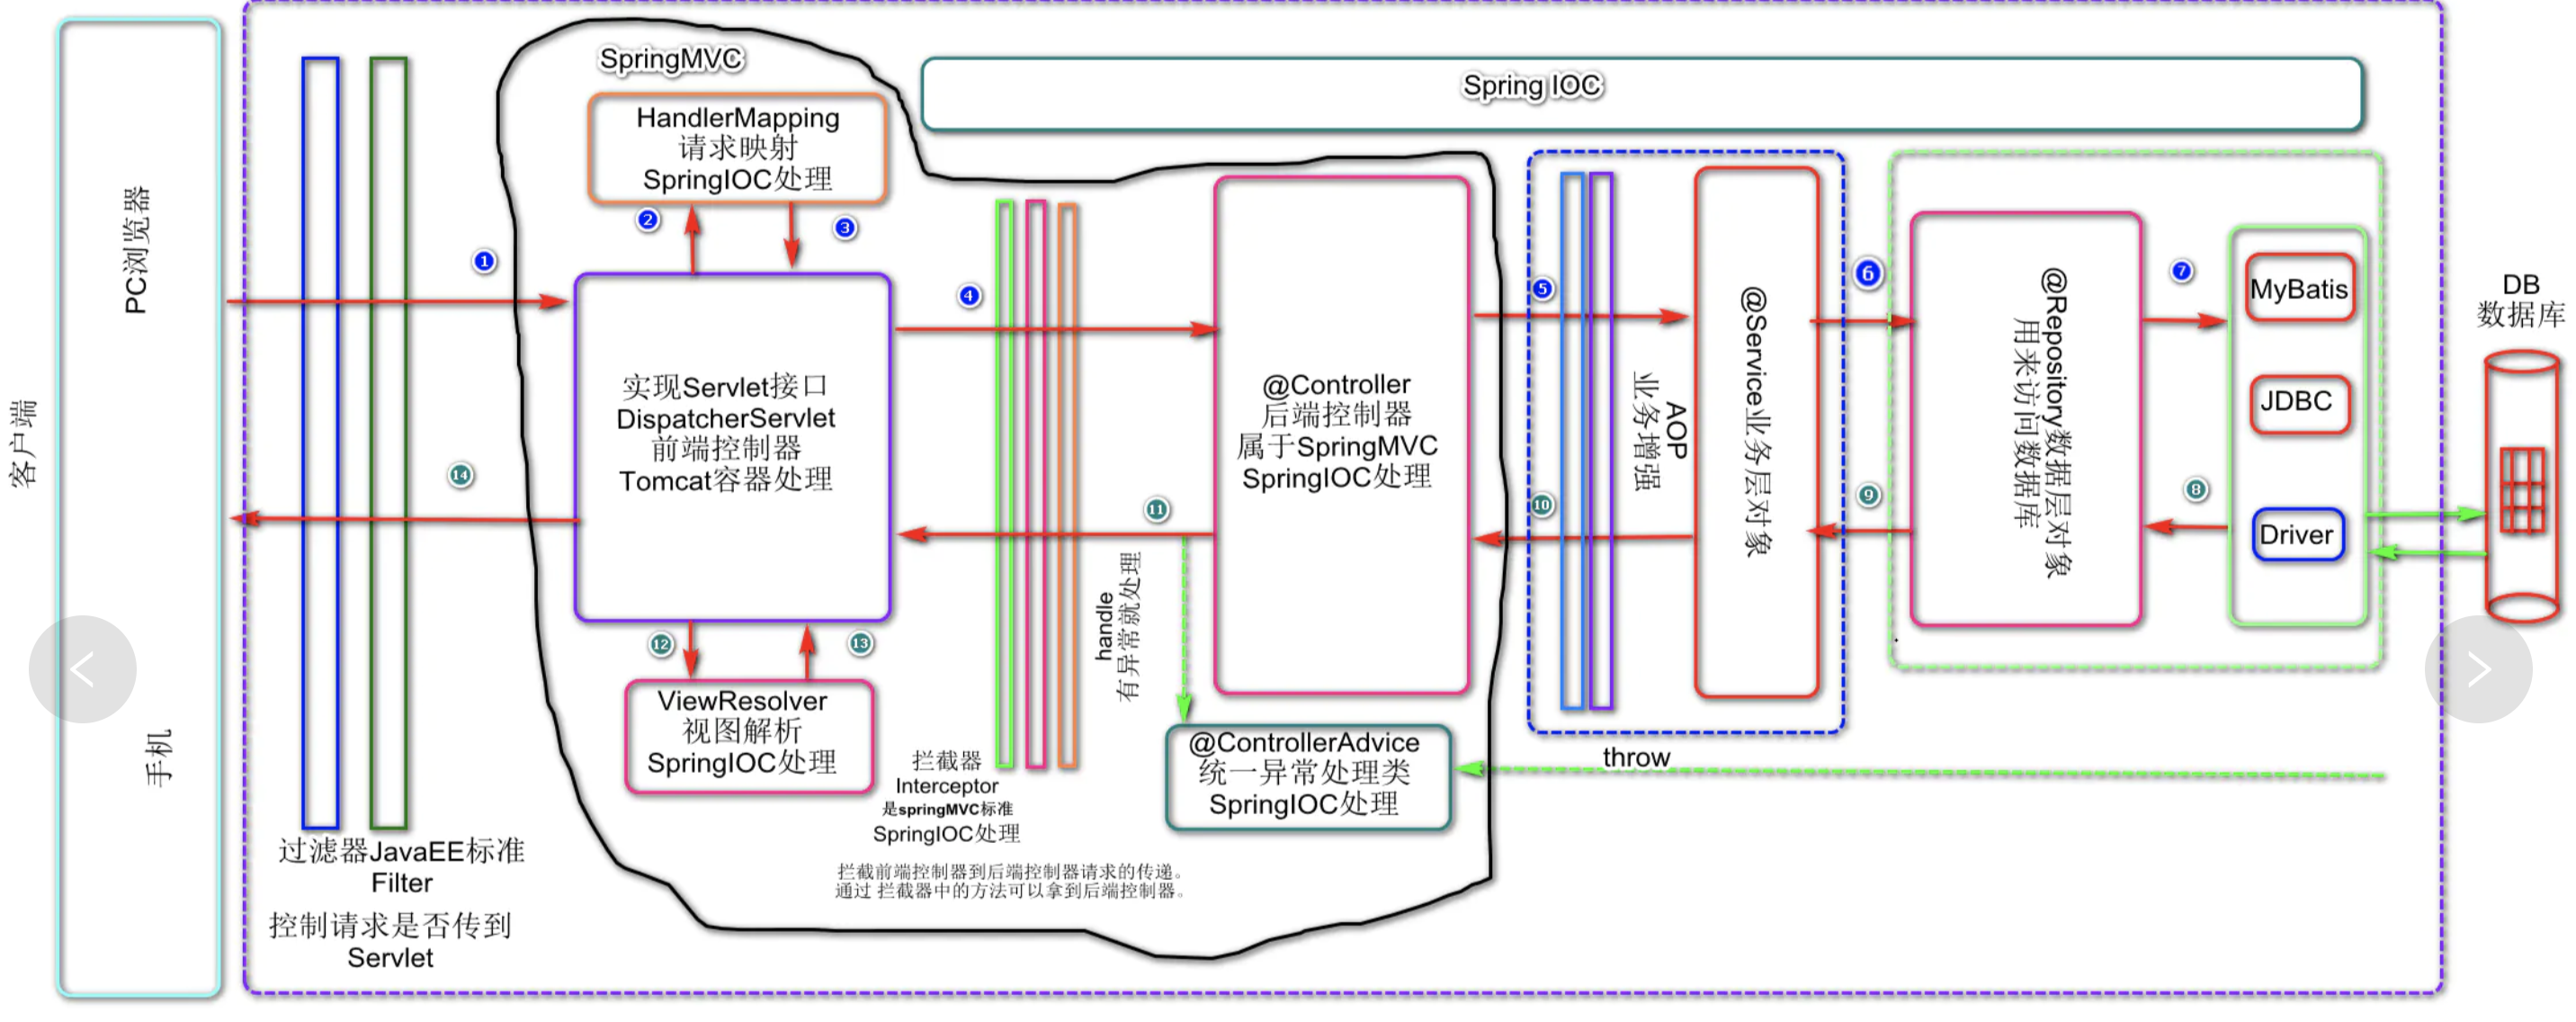
架构流程图:
第一步:建立spring框架;
包括:建立所需要的dao层,sevice层和controller层和实体类,建立spring配置文件,配置自动扫描bean
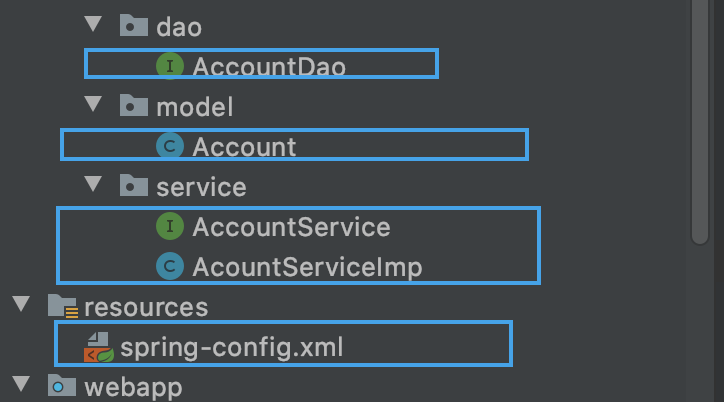
AccountDao:
@Repository

public interface AccountDao {

   @Select("select * from account where id = 1")

   Account findAll() ;

}
Account:
package com.quan.model;

import javax.annotation.Resource;

@Resource

public class Account {

    private Integer id;

    private Integer uid;

    private Double money;

    public Integer getId() {

        return id;

    }

    public void setId(Integer id) {

        this.id = id;

    }

    public Integer getUid() {

        return uid;

    }

    public void setUid(Integer uid) {

        this.uid = uid;

    }

    public Double getMoney() {

        return money;

    }

    public void setMoney(Double money) {

        this.money = money;

    }

    @Override

    public String toString() {

        return "Account{" +

                "id=" + id +

                ", uid=" + uid +

                ", money=" + money +

                '}';

    }

}
AcountService
public interface AccountService {

   Account findAll();

}
AcountServiceImp
@Service

public class AcountServiceImp  implements AccountService{

    @Autowired

    private AccountDao accountDao;

    @Override

    public Account findAll() {

       Account account =accountDao.findAll();

       System.out.println(account);

        System.out.println("springMVC-done.....");

        return account;

    }

}
spring-config.xml
<?xml version="1.0" encoding="UTF-8"?>

<beans xmlns="http://www.springframework.org/schema/beans"

       xmlns:tx="http://www.springframework.org/schema/tx"

       xmlns:context="http://www.springframework.org/schema/context"

       xmlns:mvc="http://www.springframework.org/schema/mvc"

       xmlns:aop="http://www.springframework.org/schema/aop"

       xmlns:xsi="http://www.w3.org/2001/XMLSchema-instance"

       xsi:schemaLocation="http://www.springframework.org/schema/beans

        http://www.springframework.org/schema/beans/spring-beans.xsd

        http://www.springframework.org/schema/tx

        http://www.springframework.org/schema/tx/spring-tx.xsd

        http://www.springframework.org/schema/context

        http://www.springframework.org/schema/context/spring-context.xsd

        http://www.springframework.org/schema/mvc

        http://www.springframework.org/schema/mvc/spring-mvc.xsd

            http://www.springframework.org/schema/aop

        http://www.springframework.org/schema/mvc/spring-aop.xsd

">

    <context:component-scan base-package="com.quan">

<!--        配置需要忽略的注解,controller 让spingmvc配置文件去配置-->

        <context:exclude-filter type="annotation" expression="org.springframework.stereotype.Controller"/>

    </context:component-scan>
spring的配置文件主要是,除了springMVC需要配置的扫描controller的注解,其他都需要在这里配置
建议没实现一个框架的配置,都进行简单的验证
第二部,实现springMVC配置:
配置web.xml文件,实现过滤器,核心处理器,中文乱码过滤
<!--  spring-MVC的配置,-->

  <servlet>

    <servlet-name>springmvc</servlet-name>

    <servlet-class>

      org.springframework.web.servlet.DispatcherServlet

    </servlet-class>

<!--    服务器启动的时候,让DispatcherServlet对象创建-->

    <load-on-startup>1</load-on-startup>

  </servlet>

  <!--  如果没有定义配置文件名字,spring直接会找web-inf下的servlet-name-servler.xml文件-->

  <servlet-mapping>

    <servlet-name>springmvc</servlet-name>

    <url-pattern>/</url-pattern>

  </servlet-mapping>

  <filter>

    <filter-name>characterEncodingFilter</filter-name>

    <filter-class>org.springframework.web.filter.CharacterEncodingFilter</filter-class>

    <init-param>

      <param-name>encoding</param-name>

      <param-value>UTF-8</param-value>

    </init-param>

  </filter>

  <filter-mapping>

    <filter-name>characterEncodingFilter</filter-name>

    <url-pattern>/*</url-pattern>

  </filter-mapping>
在WEB-INF/建立springmvc的配置文件:
springmvc-servlet.xml
<?xml version="1.0" encoding="UTF-8"?>

<beans xmlns="http://www.springframework.org/schema/beans"

       xmlns:tx="http://www.springframework.org/schema/tx"

       xmlns:context="http://www.springframework.org/schema/context"

       xmlns:mvc="http://www.springframework.org/schema/mvc"

       xmlns:aop="http://www.springframework.org/schema/aop"

       xmlns:xsi="http://www.w3.org/2001/XMLSchema-instance"

       xsi:schemaLocation="http://www.springframework.org/schema/beans

        http://www.springframework.org/schema/beans/spring-beans.xsd

        http://www.springframework.org/schema/tx

        http://www.springframework.org/schema/tx/spring-tx.xsd

        http://www.springframework.org/schema/context

        http://www.springframework.org/schema/context/spring-context.xsd

        http://www.springframework.org/schema/mvc

        http://www.springframework.org/schema/mvc/spring-mvc.xsd

            http://www.springframework.org/schema/aop

        http://www.springframework.org/schema/mvc/spring-aop.xsd

">

<!--    配置注解扫描-->

    <context:component-scan base-package="com.quan">

        <context:include-filter type="annotation" expression="org.springframework.stereotype.Controller"/>

    </context:component-scan>

<!--    配置试图解析器-->

    <bean id="viewResolver" class="org.springframework.web.servlet.view.InternalResourceViewResolver">

        <property name="prefix" value="/WEB-INF/pages/"/>

        <property name="suffix" value=".jsp"/>

    </bean>

<!--    设置静态资源不过滤-->

    <mvc:resources mapping="/css/**" location="WEB-INF/css"/>

    <mvc:resources mapping="/images/**" location="WEB-INF/images"/>

    <mvc:resources mapping="/js/**" location="WEB-INF/js"/>

<!--    开启springMVC注解支持-->

    <mvc:annotation-driven/>

</beans>
编写controller:
@Controller

@RequestMapping("/account")

public class AccountController {

    @Autowired

    private AccountService accountService;

    @RequestMapping("/findAll")

    public ModelAndView accFindAll(){

        ModelAndView mv = new ModelAndView();

        System.out.println("springmvcdone1");

        Account account = accountService.findAll();

        mv.addObject("at",account);

        mv.addObject("atmoney",account.getMoney());

        mv.setViewName("list");

        System.out.println("springmvcdone2");

        return mv;

    }

}
list.jsp:
<%@ page contentType="text/html;charset=UTF-8" language="java" isELIgnored="false"%>

<html>

<head>

    <title>findAll</title>

</head>

<body>

${requestScope.atmoney}

${requestScope.at.toString()}

</body>

</html>
这里可以不用编写页面,直接命令行输入消息验证生效就行
由于Tomcat服务器会自动通过web.xml配置文件进行springmvc配置文件的加载,
并没有applicationContext.xml的加载(也就是spring并没有被加载),所以可以通过监听ServeltContext域对象,在创建时加载spring的配置文件
在web.xml文件加入监听器:
<!--  配置spring的监听器-->

  <listener>

    <listener-class>org.springframework.web.context.ContextLoaderListener</listener-class>

  </listener>

<!--  配置加载的类路径-->

  <context-param>

    <param-name>contextConfigLocation</param-name>

    <param-value>classpath:spring-config.xml</param-value>

  </context-param>
这样子我们就可以使用依赖注入
配置Mybaties:
可以在spring配置文件里面直接在上mybatis的配置
<!--配置链接对象-->

    <bean id="dataSource" class="org.springframework.jdbc.datasource.DriverManagerDataSource">

        <property name="url" value="jdbc:mysql://129.204.3.133/mybatis" />

        <property name="driverClassName" value="com.mysql.jdbc.Driver"/>

        <property name="username" value="root"/>

        <property name="password" value="2004"/>

    </bean>

<!--    配置SQLsession工厂-->

 <bean id="factoryBean" class="org.mybatis.spring.SqlSessionFactoryBean">

     <property name="dataSource" ref="dataSource"/>

<!--     <property name="mapperLocations" value="com.quan.dao/*.xml"/>-->

 </bean>

<!--    配置邵渺的dao-->

    <bean id="mapperScannerConfigurer" class="org.mybatis.spring.mapper.MapperScannerConfigurer">

        <property name="basePackage" value="com.quan.dao"/>

    </bean>
编写AccountDao的maping文件:
<?xml version="1.0" encoding="utf-8" ?>

<!DOCTYPE mapper

        PUBLIC "-//mybatis.org//DTD Mapper 3.0//EN"

        "http://mybatis.org/dtd/mybatis-3-mapper.dtd">

<mapper namespace="com.quan.dao.AccountDao">

    <select id="findAll" resultType="com.quan.model.Account">

        select * from account where id = 1;

    </select>

</mapper>
测试结果:
SSM-learning的更多相关文章
- 【Machine Learning】KNN算法虹膜图片识别
K-近邻算法虹膜图片识别实战 作者:白宁超 2017年1月3日18:26:33 摘要:随着机器学习和深度学习的热潮,各种图书层出不穷.然而多数是基础理论知识介绍,缺乏实现的深入理解.本系列文章是作者结 ...
- 【SSM框架】Spring + Springmvc + Mybatis 基本框架搭建集成教程
本文将讲解SSM框架的基本搭建集成,并有一个简单demo案例 说明:1.本文暂未使用maven集成,jar包需要手动导入. 2.本文为基础教程,大神切勿见笑. 3.如果对您学习有帮助,欢迎各种转载,注 ...
- 【Machine Learning】Python开发工具:Anaconda+Sublime
Python开发工具:Anaconda+Sublime 作者:白宁超 2016年12月23日21:24:51 摘要:随着机器学习和深度学习的热潮,各种图书层出不穷.然而多数是基础理论知识介绍,缺乏实现 ...
- 【Machine Learning】机器学习及其基础概念简介
机器学习及其基础概念简介 作者:白宁超 2016年12月23日21:24:51 摘要:随着机器学习和深度学习的热潮,各种图书层出不穷.然而多数是基础理论知识介绍,缺乏实现的深入理解.本系列文章是作者结 ...
- 【Machine Learning】决策树案例:基于python的商品购买能力预测系统
决策树在商品购买能力预测案例中的算法实现 作者:白宁超 2016年12月24日22:05:42 摘要:随着机器学习和深度学习的热潮,各种图书层出不穷.然而多数是基础理论知识介绍,缺乏实现的深入理解.本 ...
- springmvc 多数据源 SSM java redis shiro ehcache 头像裁剪
获取下载地址 QQ 313596790 A 调用摄像头拍照,自定义裁剪编辑头像 B 集成代码生成器 [正反双向](单表.主表.明细表.树形表,开发利器)+快速构建表单; 技术:31359679 ...
- Deep learning:五十一(CNN的反向求导及练习)
前言: CNN作为DL中最成功的模型之一,有必要对其更进一步研究它.虽然在前面的博文Stacked CNN简单介绍中有大概介绍过CNN的使用,不过那是有个前提的:CNN中的参数必须已提前学习好.而本文 ...
- SSM项目搭建(提供源码)
1创建web动态项目,项目结构截图 2.配置日志文件 #\u5B9A\u4E49LOG\u8F93\u51FA\u7EA7\u522B log4j.rootLogger=INFO,Console,Fi ...
- activiti工作流的web流程设计器整合视频教程 SSM和独立部署
本视频为activiti工作流的web流程设计器整合视频教程 整合Acitiviti在线流程设计器(Activiti-Modeler 5.21.0 官方流程设计器) 本视频共讲了两种整合方式 1. 流 ...
- activiti工作流的web流程设计器整合视频教程 SSM 和 独立部署
本视频为activiti工作流的web流程设计器整合视频教程 整合Acitiviti在线流程设计器(Activiti-Modeler 5.21.0 官方流程设计器) 本视频共讲了两种整合方式 1. 流 ...
随机推荐
- [题解]Mail.Ru Cup 2018 Round 1 - D. Changing Array
[题目] D. Changing Array [描述] 给n个整数a[1],...,a[n],满足0<=a[i]<=2^k-1.Vanya可以对这n个数中任一多个数进行操作,即将x变为x' ...
- 单网口RFC2544测试——信而泰网络测试仪实操
一.测试拓扑 拓扑说明 测试仪一个端口和DUT一个端口相连 DUT假设是一台交换设备,它能够把测试仪发送的流量直接转发回来 注意:要求DUT必须能够把收到的流量环回出来,否则没有办法测试 二.测试思路 ...
- RFC2544时延测试——信而泰网络测试仪实操
关键词:RFC2544:时延测试:标记帧:储存转发时延:直通交换时延 时延概述: 时延也常被成为延时(latency),是指一个帧从源点到目的点的总传输时间,包括网络节点的处理时间和在传输介质上的传播 ...
- C语言while循环语句
循环语句三要素 1.在循环外给循环变量赋初值2.进入循环判断循环变量3.在循环体内修改循环变量,使循环趋近结束 2021-11-02
- JAVA String、StringBuilder、和StringBuffer的区别,及如何使用
目录 String类 一.String类的理解和创建对象 二.String类创建的方式 两种创建String对象的区别 测试题 三.String常用方法 四.StringBuffer类 1.Strin ...
- LeetCode-040-组合总和 II
组合总和 II 题目描述:给定一个数组 candidates 和一个目标数 target ,找出 candidates 中所有可以使数字和为 target 的组合. candidates 中的每个数字 ...
- Windows安装face_recognition库
写在前面: 在pip官网搜face_recognition https://pypi.org/project/face_recognition/ 介绍中可看出该包更适合在Linux系统中使用,但也附上 ...
- 扩展我们的分析处理服务(Smartly.io):使用 Citus 对 PostgreSQL 数据库进行分片
原文:Scaling Our Analytical Processing Service: Sharding a PostgreSQL Database with Citus 在线广告商正在根据绩效数 ...
- tp5 Redis缓冲的设置与清除
控制器代码: //设置缓冲的方法 public function order() { $word = input('word');//接受搜索值 //题意:将订单数据使用redis进行缓存中,第二次读 ...
- cookie、session和Storage
概念: cookie:HTTP响应头的一部分,通过name=value的形式存储,主要用于保存登录信息.在设置的cookie过期时间之前一直有效,即使窗口或浏览器关闭. 存放数据大小为4K左右 .有个 ...