
Spring Boot入门===Hello World
昨天无意间看到Spring Boot ,今天又了解了一下,试着写一个Hello World! 今天看了半天,最后还是要用Maven最方便!以下:
一、工具
JDK1.7
Eclipse
Maven
这里Eclipse集成Maven的这一步就省了!
二、编码
新建Maven Project 命名为:SpringBoot 选项如图

2、修改工程目录,添加源文件夹后目录如下:
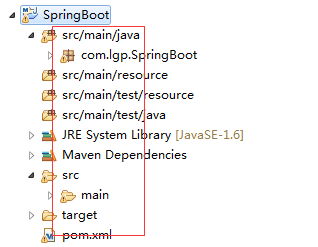
3、修改pom.xml文件如下:
<project xmlns="http://maven.apache.org/POM/4.0.0" xmlns:xsi="http://www.w3.org/2001/XMLSchema-instance"

    xsi:schemaLocation="http://maven.apache.org/POM/4.0.0 http://maven.apache.org/xsd/maven-4.0.0.xsd">

    <modelVersion>4.0.0</modelVersion>

  <groupId>com.lgp</groupId>

  <artifactId>SpringBoot</artifactId>

  <version>0.0.1-SNAPSHOT</version>

  <packaging>jar</packaging>

  <name>SpringBoot</name>

  <url>http://maven.apache.org</url>

  <properties>

    <project.build.sourceEncoding>UTF-8</project.build.sourceEncoding>

  </properties>

     <!-- Inherit defaults from Spring Boot -->

    <parent>

        <groupId>org.springframework.boot</groupId>

        <artifactId>spring-boot-starter-parent</artifactId>

        <version>1.4.0.BUILD-SNAPSHOT</version>

    </parent>

    <!-- Add typical dependencies for a web application -->

    <dependencies>

        <dependency>

            <groupId>org.springframework.boot</groupId>

            <artifactId>spring-boot-starter-web</artifactId>

        </dependency>

          <dependency>

          <groupId>junit</groupId>

          <artifactId>junit</artifactId>

          <version>3.8.1</version>

           <scope>test</scope>

        </dependency>

    </dependencies>

    <!-- Package as an executable jar -->

    <build>

        <plugins>

            <!-- <plugin>

                <groupId>org.springframework.boot</groupId>

                <artifactId>spring-boot-maven-plugin</artifactId>

            </plugin> -->

            <!-- Maven Assembly Plugin -->

            <plugin>

                <groupId>org.apache.maven.plugins</groupId>

                <artifactId>maven-assembly-plugin</artifactId>

                <version>2.4.1</version>

                <configuration>

                    <!-- get all project dependencies -->

                    <descriptorRefs>

                        <descriptorRef>jar-with-dependencies</descriptorRef>

                    </descriptorRefs>

                    <!-- MainClass in mainfest make a executable jar -->

                    <archive>

                      <manifest>

                        <mainClass>com.lgp.SpringBoot.App</mainClass>

                      </manifest>

                    </archive>

                </configuration>

                <executions>

                  <execution>

                    <id>make-assembly</id>

                     <!-- bind to the packaging phase -->

                    <phase>package</phase>

                    <goals>

                        <goal>single</goal>

                    </goals>

                  </execution>

                </executions>

            </plugin>

        </plugins>

    </build>

    <!-- Add Spring repositories -->

    <!-- (you don't need this if you are using a .RELEASE version) -->

    <repositories>

        <repository>

            <id>spring-snapshots</id>

            <url>http://repo.spring.io/snapshot</url>

            <snapshots><enabled>true</enabled></snapshots>

        </repository>

        <repository>

            <id>spring-milestones</id>

            <url>http://repo.spring.io/milestone</url>

        </repository>

    </repositories>

    <pluginRepositories>

        <pluginRepository>

            <id>spring-snapshots</id>

            <url>http://repo.spring.io/snapshot</url>

        </pluginRepository>

        <pluginRepository>

            <id>spring-milestones</id>

            <url>http://repo.spring.io/milestone</url>

        </pluginRepository>

    </pluginRepositories>

</project>
pom.xml
4、编辑JAVA代码新建APP.class
package com.lgp.SpringBoot;

import org.springframework.boot.SpringApplication;

import org.springframework.boot.autoconfigure.EnableAutoConfiguration;

import org.springframework.web.bind.annotation.RequestMapping;

import org.springframework.web.bind.annotation.RestController;

@RestController

@EnableAutoConfiguration

public class App

{

      @RequestMapping("/h")

      public String home() {

        return "Hello";

      }

      @RequestMapping("/w")

      public String word() {

        return "World";

      }

    public static void main( String[] args )

    {

        System.out.println( "Hello World ! App!" );

        SpringApplication.run(App.class, args);

        //SpringApplication.run(UserController.class, args);

    }

}
App.java
运行此代码 服务端口默认8080 访问localhost:8080/h 展示Hello
localhost:8080/w 展示World
OK!!!!!!!!!!!!!!!!!!!!!!!!!!!!!
---------------风格线---------------------
新建RestController风格的Controller
新建UserController
package com.lgp.SpringBoot;

import org.springframework.context.annotation.ComponentScan;

import org.springframework.context.annotation.Configuration;

import org.springframework.web.bind.annotation.PathVariable;

import org.springframework.web.bind.annotation.RequestMapping;

import org.springframework.web.bind.annotation.RestController;

@ComponentScan

@Configuration

@RestController

@RequestMapping("/user")

public class UserController {

    @RequestMapping("/{id}")

    public User getUser(@PathVariable String id){

        User user  = new User();

        user.setId(id);

        user.setUsername("id==="+Math.random());

        return user;

    }

    private class User{

        private  String id;

        private  String username;

        public String getId() {

            return id;

        }

        public void setId(String id) {

            this.id = id;

        }

        public String getUsername() {

            return username;

        }

        public void setUsername(String username) {

            this.username = username;

        }

    }

}
UserController
需修改App.java
package com.lgp.SpringBoot;

import org.springframework.boot.SpringApplication;

import org.springframework.boot.autoconfigure.EnableAutoConfiguration;

import org.springframework.web.bind.annotation.RequestMapping;

import org.springframework.web.bind.annotation.RestController;

@RestController

@EnableAutoConfiguration

public class App

{

      @RequestMapping("/h")

      public String home() {

        return "Hello";

      }

      @RequestMapping("/w")

      public String word() {

        return "World";

      }

    public static void main( String[] args )

    {

        System.out.println( "Hello World ! App!" );

        //SpringApplication.run(App.class, args);

        SpringApplication.run(UserController.class, args);

    }

}
App.java
运行App.java 访问 http://localhost:8080/user/12

新建其他Controller
package com.lgp.SpringBoot;

import org.springframework.context.annotation.ComponentScan;

import org.springframework.context.annotation.Configuration;

import org.springframework.web.bind.annotation.RequestMapping;

import org.springframework.web.bind.annotation.RestController;

@ComponentScan

@Configuration

@RestController

@RequestMapping("/file")

public class FileController {

    @RequestMapping("/name")

    public String getFileName(){

        return "filename.....";

    }

}
重启程序 访问http://localhost:8080/file/name

======================================================
修改默认端口
一、
package com.lgp.SpringBoot;

import org.springframework.boot.SpringApplication;

import org.springframework.boot.autoconfigure.SpringBootApplication;

import org.springframework.boot.context.embedded.ConfigurableEmbeddedServletContainer;

import org.springframework.boot.context.embedded.EmbeddedServletContainerCustomizer;

import org.springframework.web.bind.annotation.RequestMapping;

import org.springframework.web.bind.annotation.RestController;

@RestController

@SpringBootApplication

public class MainApplication implements EmbeddedServletContainerCustomizer{

    @Override

    public void customize(ConfigurableEmbeddedServletContainer container) {

        container.setPort(8011);

    }

    public static void main(String[] args) {

//        SpringApplication.run(MainApplication.class, args);

        SpringApplication.run(FileController.class, args);

    }

    @RequestMapping("/main")

    public String testPort(){

        return "Hello 端口8011......";

    }

}
MainApplication
二、
package com.lgp.SpringBoot;

import java.util.concurrent.TimeUnit;

import org.springframework.boot.SpringApplication;

import org.springframework.boot.autoconfigure.EnableAutoConfiguration;

import org.springframework.boot.context.embedded.EmbeddedServletContainerFactory;

import org.springframework.boot.context.embedded.tomcat.TomcatEmbeddedServletContainerFactory;

import org.springframework.context.annotation.Bean;

import org.springframework.web.bind.annotation.RequestMapping;

import org.springframework.web.bind.annotation.RestController;

@RestController

@EnableAutoConfiguration

public class App

{

      @RequestMapping("/h")

      public String home() {

        return "Hello";

      }

      @RequestMapping("/w")

      public String word() {

        return "World";

      }

    public static void main( String[] args )

    {

        System.out.println( "Hello World ! App!" );

        //SpringApplication.run(App.class, args);

        SpringApplication.run(UserController.class, args);

    }

    @Bean

    public EmbeddedServletContainerFactory servletFactory(){

        TomcatEmbeddedServletContainerFactory tomcatFactory =

                new TomcatEmbeddedServletContainerFactory();

        tomcatFactory.setPort(8011);

        tomcatFactory.setSessionTimeout(10,TimeUnit.SECONDS);

        return tomcatFactory;

    }

}
App.java
修改为8011
======================================================
Spring Boot入门===Hello World的更多相关文章
- 161103、Spring Boot 入门
Spring Boot 入门 spring Boot是Spring社区较新的一个项目.该项目的目的是帮助开发者更容易的创建基于Spring的应用程序和服务,让更多人的人更快的对Spring进行入门体验 ...
- spring boot 入门操作(二)
spring boot入门操作 使用FastJson解析json数据 pom dependencies里添加fastjson依赖 <dependency> <groupId>c ...
- spring boot 入门操作(三)
spring boot入门操作 devtools热部署 pom dependencies里添加依赖 <dependency> <groupId>org.springframew ...
- Spring Boot入门教程1、使用Spring Boot构建第一个Web应用程序
一.前言 什么是Spring Boot?Spring Boot就是一个让你使用Spring构建应用时减少配置的一个框架.约定优于配置,一定程度上提高了开发效率.https://zhuanlan.zhi ...
- Spring Boot入门教程2-1、使用Spring Boot+MyBatis访问数据库(CURD)注解版
一.前言 什么是MyBatis?MyBatis是目前Java平台最为流行的ORM框架https://baike.baidu.com/item/MyBatis/2824918 本篇开发环境1.操作系统: ...
- Spring Boot 入门教程
Spring Boot 入门教程,包含且不仅限于使用Spring Boot构建API.使用Thymeleaf模板引擎以及Freemarker模板引擎渲染视图.使用MyBatis操作数据库等等.本教程示 ...
- Spring Boot入门(五):使用JDBC访问MySql数据库
本系列博客记录自己学习Spring Boot的历程,如帮助到你,不胜荣幸,如有错误,欢迎指正! 在程序开发的过程中,操作数据库是必不可少的部分,前面几篇博客中,也一直未涉及到数据库的操作,本篇博客 就 ...
- Spring Boot入门(四):开发Web Api接口常用注解总结
本系列博客记录自己学习Spring Boot的历程,如帮助到你,不胜荣幸,如有错误,欢迎指正! 在程序员的日常工作中,Web开发应该是占比很重的一部分,至少我工作以来,开发的系统基本都是Web端访问的 ...
- Spring Boot入门(六):使用MyBatis访问MySql数据库(注解方式)
本系列博客记录自己学习Spring Boot的历程,如帮助到你,不胜荣幸,如有错误,欢迎指正! 本篇博客我们讲解下在Spring Boot中使用MyBatis访问MySql数据库的简单用法. 1.前期 ...
- Spring Boot入门(二):使用Profile实现多环境配置管理&如何获取配置文件值
在上一篇博客Spring Boot入门(一):使用IDEA创建Spring Boot项目并使用yaml配置文件中,我们新建了一个最原始的Spring Boot项目,并使用了更为流行的yaml配置文件. ...
随机推荐
- UIPickerView的使用(三)
前两篇文章 UIPickerView的使用(一) . UIPickerView的使用(二),学习了UIPickerView的单列选择器和双列选择器的使用. 现在我们一起学习相互依赖的多列选择器 1.遵 ...
- iOS UIActivityIndicatorView
UIActivityIndicatorView *indicator = [[UIActivityIndicatorView alloc] initWithActivityIndicatorStyle ...
- UIButton
//UIButton->UIControl->UIView //UIControl 带有操作的控件都是继承于它的 //UIButton 实例化 类方法实例化 //实例化时没有位置及大小 ...
- Github+hexo绑定域名
Github绑定域名 近期在新网购买了一个属于自己的域名,因此想着把自己用hexo+github搭建的博客通过域名访问,但是找了n长时间来搞,都没有成功.心灰意冷之中再次通过google来搜索,终于有 ...
- C#中Split用法
1.用字符串分隔: using System.Text.RegularExpressions; string str="aaajsbbbjsccc"; string[] sArr ...
- MySQL(三)
MYSQL(三) 上一章给大家说的是数据库的视图,存储过程等等操作,这章主要讲索引,以及索引注意事项,如果想看前面的文章,url如下: MYSQL入门全套(第一部) MYSQL入门全套(第二部) 索引 ...
- C++基础——函数指针 函数指针数组
==================================声明================================== 本文版权归作者所有. 本文原创,转载必须在正文中显要地注明 ...
- Android开发究竟用什么工具,Eclipse||AS
所谓公欲善其事必先利器,那就让我们来看一下android的开发工具吧,安卓的开发工具有Eclipse和Android Studio,另外还有IntelliJ IDEA,可能很多人并不知道. 首先看一下 ...
- 如何区分/dev/input/event
方法是把每一个/dev/input/event打开.通过ioctl函数来读取设备name,每一个设备name是固定的,可以根据name区分event.我这是查找触摸事件为例:代码如下: static ...
- 详解Linux命令行下常用svn命令
1.Linux命令行下将文件checkout到本地目录 svn checkout path(path是服务器上的目录) 例如:svn checkout svn://192.168.1.1/pro/do ...