
Spring编程式事务管理
--------------------siwuxie095
Spring 编程式事务管理
以转账为例
1、在
MySQL 中手动创建数据库和表
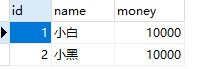
数据库名:tx_db,表名:account,字段:id、name、money

手动添加数据,用作测试
2、具体步骤
(1)配置事务管理器
|
<!-- 配置事务管理器 --> <bean class="org.springframework.jdbc.datasource.DataSourceTransactionManager"> <!-- 在 DataSourceTransactionManager 源代码中有 属性 dataSource 和其 set 方法,所以可以注入 --> <property </bean> |
(2)配置事务管理模板
|
<!-- 配置事务管理模板 --> <bean class="org.springframework.transaction.support.TransactionTemplate"> <!-- 在 TransactionTemplate 源代码中有属性 transactionTemplate 和其 set 方法,所以可以注入 --> <property </bean> |
(3)在业务层注入事务管理模板
|
<!-- 配置对象并注入属性 --> <bean <property <!-- 在业务层注入注入事务管理模板 --> <property </bean> |
(4)在业务层手动编写代码实现事务管理
3、具体实现
(1)编写
Dao 类
AccountDao.java:
|
package com.siwuxie095.dao; import org.springframework.jdbc.core.JdbcTemplate; public class AccountDao { private JdbcTemplate jdbcTemplate;
public this.jdbcTemplate = jdbcTemplate; }
/** * 转出 */ public String sql="update account set money=money-? where name=?"; jdbcTemplate.update(sql, money, from); }
/** * 转入 */ public String sql="update account set money=money+? where name=?"; jdbcTemplate.update(sql, money, to); }
} |
(2)编写一个
Service 类
AccountService.java:
|
package com.siwuxie095.service; import org.springframework.transaction.TransactionStatus; import org.springframework.transaction.support.TransactionCallbackWithoutResult; import org.springframework.transaction.support.TransactionTemplate; import com.siwuxie095.dao.AccountDao; public class AccountService { private AccountDao accountDao; private TransactionTemplate transactionTemplate;
public this.accountDao = accountDao; }
public this.transactionTemplate = transactionTemplate; }
/** * 转账 */ public
// 在业务层手动编写代码实现事务管理 transactionTemplate.execute(new TransactionCallbackWithoutResult() {
@Override protected
accountDao.lessMoney(from, money);
// 即便中间出现了什么异常,也会进行回滚 // 如:int num=10/0;
accountDao.moreMoney(to, money);
} });
}
} |
(3)在配置文件中进行配置
applicationContext.xml:
|
<?xml <beans xmlns:xsi="http://www.w3.org/2001/XMLSchema-instance" xmlns:aop="http://www.springframework.org/schema/aop" xmlns:context="http://www.springframework.org/schema/context" xmlns:tx="http://www.springframework.org/schema/tx" xsi:schemaLocation=" http://www.springframework.org/schema/beans http://www.springframework.org/schema/beans/spring-beans.xsd http://www.springframework.org/schema/aop http://www.springframework.org/schema/aop/spring-aop.xsd http://www.springframework.org/schema/context http://www.springframework.org/schema/context/spring-context.xsd http://www.springframework.org/schema/tx http://www.springframework.org/schema/tx/spring-tx.xsd">
<!-- 配置内置连接池 --> <bean <property <!-- jdbc:mysql:///tx_db 是 jdbc:mysql://localhost:3306/tx_db 的简写 --> <property <property <property </bean>
<!-- 配置事务管理器 --> <bean class="org.springframework.jdbc.datasource.DataSourceTransactionManager"> <!-- 在 DataSourceTransactionManager 源代码中有 属性 dataSource 和其 set 方法,所以可以注入 --> <property </bean>
<!-- 配置事务管理模板 --> <bean class="org.springframework.transaction.support.TransactionTemplate"> <!-- 在 TransactionTemplate 源代码中有属性 transactionTemplate 和其 set 方法,所以可以注入 --> <property </bean>
<!-- 配置对象并注入属性 --> <bean <property <!-- 在业务层注入注入事务管理模板 --> <property </bean>
<bean <property </bean>
<bean <!-- 在 JdbcTemplate 源代码中有属性 dataSource 和其 set 方法,所以可以注入 --> <property </bean> </beans> |
(4)编写一个测试类
TestDemo.java:
|
package com.siwuxie095.test; import org.junit.Test; import org.springframework.context.ApplicationContext; import org.springframework.context.support.ClassPathXmlApplicationContext; import com.siwuxie095.service.AccountService; public class TestDmo { /** * 手动加上 @Test 以进行单元测试(将自动导入 JUnit 4 的 jar 包) * * 选中方法名,右键->Run As->JUint Test */ @Test public
ApplicationContext context=new ClassPathXmlApplicationContext("applicationContext.xml");
AccountService accountService=(AccountService) context.getBean("accountService");
accountService.transfer("小白", "小黑", 1000); }
} |
【made by siwuxie095】
Spring编程式事务管理的更多相关文章
- spring 编程式事务管理和声明式事务管理
编程式事务管理 Spring 的编程式事务管理概述 在 Spring 出现以前,编程式事务管理对基于 POJO 的应用来说是唯一选择.用过 Hibernate 的人都知道,我们需要在代码中显式调用be ...
- Spring编程式事务管理及声明式事务管理
本文将深入讲解 Spring 简单而强大的事务管理功能,包括编程式事务和声明式事务.通过对本教程的学习,您将能够理解 Spring 事务管理的本质,并灵活运用之. Spring 事务属性分析 事务管理 ...
- Spring编程式事务管理和声明式事务管理
本来想写一篇随笔记一下呢,结果发现一篇文章写的很好了,已经没有再重复写的必要了. https://www.ibm.com/developerworks/cn/education/opensource/ ...
- 全面分析 Spring 的编程式事务管理及声明式事务管理
开始之前 关于本教程 本教程将深入讲解 Spring 简单而强大的事务管理功能,包括编程式事务和声明式事务.通过对本教程的学习,您将能够理解 Spring 事务管理的本质,并灵活运用之. 先决条件 本 ...
- Spring学习8-Spring事务管理(编程式事务管理)
一.Spring事务的相关知识 1.事务是指一系列独立的操作,但在概念上具有原子性. 比如转账:A账号-100, B账号+100,完成.这两个操作独立是没问题的. 但在逻辑上,要么全部完成,要么一 ...
- 全面分析 Spring 的编程式事务管理及声明式事务管理--转
开始之前 关于本教程 本教程将深入讲解 Spring 简单而强大的事务管理功能,包括编程式事务和声明式事务.通过对本教程的学习,您将能够理解 Spring 事务管理的本质,并灵活运用之. 先决条件 本 ...
- Spring事务管理的另一种方式--TransactionTemplate编程式事务管理简单入门
1, 一直以来, 在用Spring进行事物管理时, 只知道用声明式的策略, 即根据不同的数据源, 配置一个事物管理器(TransactionManager), 通过配置切面(PointCut)应用到相 ...
- 8.spring:事务管理(上):Spring的数据库编程、编程式事务管理
Spring的数据库编程 Spring框架提供了JDBC模板模式------>JdbcTemplate 简化了开发,在开发中并不经常是使用 实际开发更多使用的是Hibernate和MyBatis ...
- Spring事务管理之编程式事务管理
© 版权声明:本文为博主原创文章,转载请注明出处 案例:利用Spring的编程式事务管理模拟转账过程 数据库准备 -- 创建表 CREATE TABLE `account`( `id` INT NOT ...
随机推荐
- unbound域名解析
安装unbound服务 # yum install unbound -y 开启服务 linux系统如何查看命令属于哪一个安装包 # yum provides */netstat 安装netstat命令 ...
- 利用新浪js接口根据ip地址获取实际地址
1.核心:http://int.dpool.sina.com.cn/iplookup/iplookup.php?format=json&ip=192.152.3.25 把这句话直接输入到浏览器 ...
- 第13章 TCP编程(2)_TCP的连接和关闭过程
4. TCP的连接和关闭过程 4.1 TCP连接的三次握手和四次挥手 (1)三次握手 ①第1次握手:建立连接.客户端发送连接请求报文段(SYN=1,sequence Number=x):然后客户端进入 ...
- FIO read测试结果偏离
工作中发现一个fio问题,测试组测试出来的数据read速度一个是17.0G/s,一个是13.2G/s.要知道我后台只有24块7.2k RPM的机械硬盘啊!怎么也不可能有这样的速度. 回家之后我模拟了实 ...
- Out 与 Ref 关键字的区别
相同点:既可以通过值也可以通过引用传递参数.通过引用传递参数允许函数成员更改参数的值,并保持该更改.若要通过引用传递参数, 可使用ref或out关键字.ref和out这两个关键字都能够提供相似的功效, ...
- tomcat原理解析(一):一个简单的实现
tomcat原理解析(一):一个简单的实现 https://blog.csdn.net/qiangcai/article/details/60583330 2017年03月07日 09:54:27 逆 ...
- 写下thinkphp5和thinkphp3.2的不同
只列出一些自己的直观感受 1 引入了命令行,估计来源是laravel,前阵子刚练手完laravel5.0的系统, 感觉thinkphp5的命令行和laravel的很像 2 引入了路由,来源估计也是la ...
- OpenACC 优化矩阵乘法
▶ 按书上的步骤使用不同的导语优化矩阵乘法 ● 所有的代码 #include <iostream> #include <cstdlib> #include <chrono ...
- CUDA C Programming Guide 在线教程学习笔记 Part 2
▶ 纹理内存使用 ● 纹理内存使用有两套 API,称为 Object API 和 Reference API .纹理对象(texture object)在运行时被 Object API 创建,同时指定 ...
- Kafka集群扩展以及重新分布分区
我们往已经部署好的Kafka集群里面添加机器是最正常不过的需求,而且添加起来非常地方便,我们需要做的事是从已经部署好的Kafka节点中复制相应的配置文件,然后把里面的broker id修改成全局唯一的 ...