How to Set Up a NFS Server on Debian 10 Buster
How to Set Up a NFS Server on Debian 10 Buster
- Nick Congleton
- Debian
- 24 May 2019
There are plenty of reasons why you'd want to share files across computers on your network, and Debian makes a perfect file server, whether you're running it from a workstation, dedicated server, or even a Raspberry Pi. Since NFS functionality comes from the kernel, everything is fairly simple to set up and well integrated.
In this tutorial you will learn:
- How to Install the NFS Packages
- How to Configure Your Shares
- How to Connect to a Share

Software Requirements and Conventions Used
| Category | Requirements, Conventions or Software Version Used |
|---|---|
| System | Debian 10 Buster |
| Software | NFS Server |
| Other | Privileged access to your Linux system as root or via the sudo command. |
| Conventions | # - requires given linux commands to be executed with root privileges either directly as a root user or by use of sudo command$ - requires given linux commands to be executed as a regular non-privileged user |
Install the NFS Packages

NFS is super simple to install on Debian. It's connected to the kernel, and it's a common package. You can install everything you need from the main repositories.
$ sudo apt install nfs-kernel-server
Subscribe to Linux Career NEWSLETTER and receive latest Linux news, jobs, career advice and tutorials.
Configure Your Shares
Start by creating a directory that you want to share or choosing an existing one. Make sure that the directory that you choose doesn't have root-only permissions.
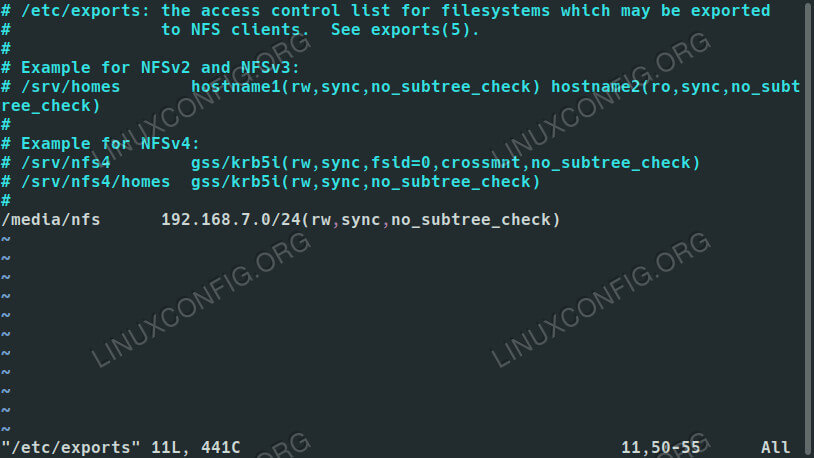
Next, open up /etc/exports with your favorite text editor. This is the file that you'll use to set up your shares. Here, you can configure which directories you're sharing and who can access them. You can also set specific permissions for the shares to further limit access.
In the file, each share gets its own line. That line begins with the location of the share on the server machine. Across from that, you can list the hostname of an accepted client, if is available in the server's hosts file, or an IP or range of IPs. Directly behind the IP address, place the rules for the share in a set of parenthesis. Altogether, it should look something like this:
/media/nfs 192.168.1.0/24(rw,sync,no_subtree_check)
You can include as many shares as you like, provided each has its own line. You can also include more than one hostname or IP in each line and assign them different permissions. For example:
/media/nfs 192.168.1.112(rw,sync,no_subtree_check) 192.168.1.121(ro,sync,no_subtree_check)
In that instance, each of those machines could view and read from the share, but only the computer at 192.168.1.112 could write to it.
There are plenty more options that you can choose from to configure how the server handles you share for each guest. Here is a complete breakdown of what's available:
- ro: specifies that the directory may only be mounted as read only
- rw: grants both read and write permissions on the directory
- no_root_squash: is an extremely dangerous option that allows remote “root” users the same privilege as the “root” user of the host machine
- subtree_check: specifies that, in the case of a directory is exported instead of an entire filesystem, the host should verify the location of files and directories on the host filesystem
- no_subtree_check: specifies that the host should not check the location of the files being accessed withing the host filesystem
- sync: this just ensures that the host keeps any changes uploaded to the shared directory in sync
- async: ignores synchronization checks in favor of increased speed
Once you have everything set up the way you want, save and exit the file. Then, restart the server to load your new exports configuration.
$ sudo systemctl restart nfs-kernel-server
Connect to a Share
Your share is now accessible from the client machines that you configured in your exports. Assuming that your clients are Ubuntu or Debian based, you can install the required package to connect with:
$ sudo apt install nfs-common

With that, you'll be able to mount the NFS shares. So, to try it out, pick a directory to mount to, and run the mount command as root privileges to mount the networked share.
$ sudo mount -t nfs4 192.168.1.110:/media/nfs /media/share
Provided the mount succeeded, you'll be able to access your shared files in the directory where you mounted them.
For a more permanent solution, you can add the share to your client's /etc/fstab file. The overall syntax looks a lot like the command that you just used to mount your share. Start with the location of the share on your network. Follow that with where the share is to be mounted. The filesystem type here is nfs4. The options are up to you, but using the defaults and allowing user access are pretty common for non-sensitive shares. The end result should look a bit like the example below.
192.168.1.110:/media/nfs /media/share nfs4 defaults,user,exec 0 0
If you aren't certain if the share will always be available on the client, add noauto to the list of options to prevent your system from trying to mount it automatically.
192.168.1.110:/media/nfs /media/share nfs4 defaults,user,exec,noauto 0 0
Try mounting it on the client using /etc/fstab.
$ sudo mount -a
Your share should be mounted exactly where you specified.
Conclusion
Your Debian server is now ready to start serving files, and you shouldn't have any trouble setting up the rest of your client machines. Remember that NFS doesn't have much in the way of security, so you're going to need other methods to restrict access to your files, should you choose to share anything more sensitive.
How to Set Up a NFS Server on Debian 10 Buster的更多相关文章
- nfs server的配置 Starting NFS daemon: [FAILED]
总结了一下是nfs server的制作过程:nfs(Network File System)其实就是说,这个机器的硬盘不够了,我要把文件放到别的服务器上去,服务器端的配置如下:首先(1)确保你的机器上 ...
- nfs:server 172.168.1.22 not responding,still trying问题解决方法 平台为RealARM 210平台
nfs:server 172.168.1.22 not responding,still trying问题解决方法 ,平台为RealARM 210平台. 这里的问题是在使用nfs挂载文件系统时遇到的, ...
- windows nfs server for linux
摘要 在开发嵌入式系统的过程中,为了方便调试与文件共享,需要使用到nfs,即网络文件系统,这位板子的调试测试带来了很大的方便.之前在linux系统下开发,与ARM11核心板 linux系统对接共享也比 ...
- Ubuntu 12.04安装NFS server
首先安装nfs-kernel-server apt-get install nfs-kernel-server 然后创建一个目录: mkdir -p /opt/share 并赋予权限777: chmo ...
- nfs:server is not responding,still trying 原因与解决
方案(学自他人) nfs:server is not responding,still trying的解决方法 (2009-04-20 10:20) 方法1 : 我在arm上通过NFS共享文件时出现下 ...
- Linux 文件服务---------- nfs Server
Linux 文件服务nfs (Network file system)#网络文件系统 ---> 远程文件调用samba #文件共享(unix /linux /windows ) ,只能适用于局域 ...
- 树莓派 nfs server安装
安装服务 sudo apt-get install portmap sudo apt-get install nfs-kernel-server 配置: sudo nano /etc/expo ...
- CentOS 7下NFS Server作rootfs时的兼容性问题
最近新装CentOS 7,发现原先CentOS 6.3下可用的一块ARM Dev board不能用了,表现为VFS mount挂载rootfs失败. 使用WireShark发现,服务器对client发 ...
- NFS Server宕机后,NFS Client主机上df命令挂死
方法1: 使用root用户:Oracle@NDMCDB05:~> su -Password: NDMCDB05:~ # cat /etc/mtab /dev/sda2 / reiserfs rw ...
随机推荐
- 外网访问虚拟机搭建的web服务
凌晨了,就简单写个一定可行的思路吧,有时间了再补上. 设置虚拟机为桥接模式,当然NAT也行,只是我嫌NAT麻烦 设置路由器,将虚拟机端口映射到外网
- git出现Invalid path
今天换了电脑,我直接把整个仓库从电脑A复制到了电脑B,包括仓库下面的 .git 文件夹. 修改代码后我执行了一下 git add . 出现了一个报错 fatal: Invalid path 'D:/S ...
- JPA 一对一 一对多 多对一 多对多配置
1 JPA概述 1.1 JPA是什么 JPA (Java Persistence API) Java持久化API.是一套Sun公司 Java官方制定的ORM 方案,是规范,是标准 ,sun公司自己并没 ...
- javascript之防抖与节流
防抖 你是否在日常开发中遇到一个问题,在滚动事件中需要做个复杂计算或者实现一个按钮的防二次点击操作. 这些需求都可以通过函数防抖动来实现.尤其是第一个需求,如果在频繁的事件回调中做复杂计算,很有可能导 ...
- 在论坛中出现的比较难的sql问题:16(取一个字段中的数字)
原文:在论坛中出现的比较难的sql问题:16(取一个字段中的数字) 所以,觉得有必要记录下来,这样以后再次碰到这类问题,也能从中获取解答的思路. 问题:取一个字段中的数字http://bbs.csdn ...
- mac下卸载android studio
Execute these commands from the terminal rm -Rf /Applications/Android\ Studio.app rm -Rf ~/Library/P ...
- 【转载】如何自己DIY组装一台台式电脑
针对很多懂计算机的人员来说,有时候都希望自己DIY组装一台台式机,来达到自己的个性化要求以及省钱.其实自己DIY组装一台电脑也很简单,将相应的CPU处理器.主板.内存条.硬盘.固态硬盘.电脑机箱.屏幕 ...
- 【转载】 Asp.Net MVC网站提交富文本HTML标签内容抛出异常
今天开发一个ASP.NET MVC网站时,有个页面使用到了FCKEditor富文本编辑器,通过Post方式提交内容时候抛出异常,仔细分析后得出应该是服务器阻止了带有HTML标签内容的提交操作,ASP. ...
- python之tkinter入坑Pack()------(1)
tkinter 的pack()可以设置的属性如下: pack_configure(self, cnf={}, **kw)Pack a widget in the parent widget. Use ...
- brew install thrift
➜ ~ brew install thriftUpdating Homebrew...Warning: You are using macOS 10.11.We (and Apple) do not ...