教程二 网页和lua交互修改openwrt
硬件
http://zhan.renren.com/h5/entry/3602888498044209332
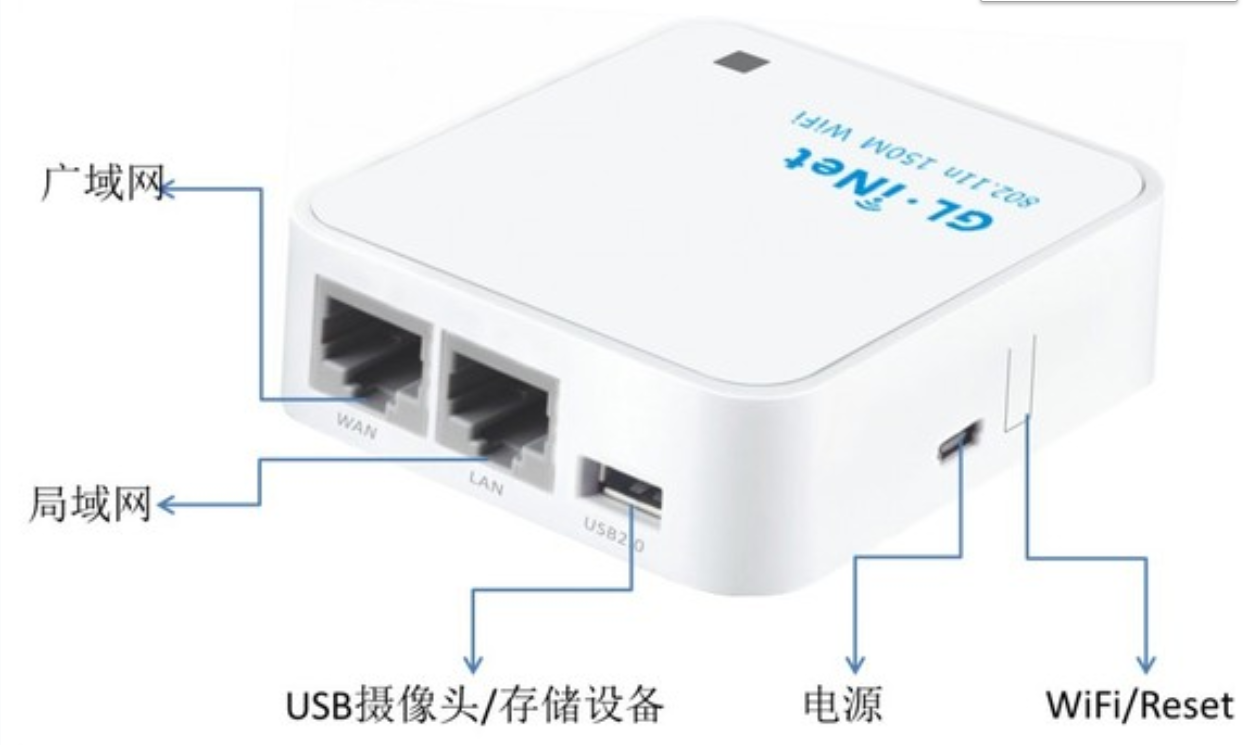
GL-iNet
1 首先安装 webserver之lighttpd ,openwrt自带的是uhttpd
http://www.voidcn.com/article/p-zqbwgqwy-vy.html
1-1安装过程简略
1-2配置
Lighttpd默认页面
http://localhost/index.lighttpd.html
写lighttpd的配置文件lighttpd.conf。
(1)使用语句 server.modules = ("mod_cgi")加入 cgi 模块;
(2)使用语句 cgi.assign = (".cgi" => "") 设置 cgi模块的扩展名和解释器。就本语句而言,表示cgi模块的扩展名是“.cgi”且该 cgi模块不需要特别的解释器来执行
lighttpd configuration
修改文件 /etc/lighttpd/lighttpd.conf in:
server.modules              = (

            "mod_access",

            "mod_cgi",

            "mod_alias",

            "mod_accesslog",

            "mod_compress",

)

and add these lines:

$HTTP["url"] =~ "/cgi-bin/" {

        cgi.assign = ( "" => "" )

}

cgi.assign      = (

        ".cgi"  => ""

)

Restart lighttpd typing:

debarm:~# /etc/init.d/lighttpd restart
2 编写登陆网页
http://192.168.8.1/cgi-bin/webservice?wifi-key=xixi&wifi-key-msg=xx

3 编写lua脚本文件执行修改
3-1 lua获取http参数 https://www.cnblogs.com/kekeoutlook/p/10787233.html
3-2 lua解析http参数
3-3 lua调用shell脚本命令,使用uci接口交互修改。
- 安装uhttpd包(https需要加装“uhttpd-mod-tls”和“px5g”);
- 修改uhttpd配置文件“/etc/config/uhttpd”,将Lua作为“interpreter”;
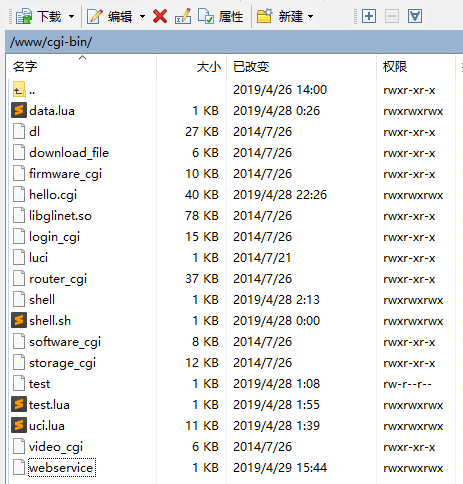
- Lua脚本写到“/www/cgi-bin/”目录下,但是不带扩展名,且可执行;
- Fast-CGI要求Lua脚本必须首先使用“io.write()”输出“Content-type: text/html\n\n”;
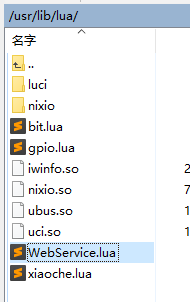
- “/www/cgi-bin/”目录下的脚本可以调用“/usr/lib/lua/”目录下的自定义模块;
- Lua环境已经就绪。
1登陆路由器文件系统

登陆后
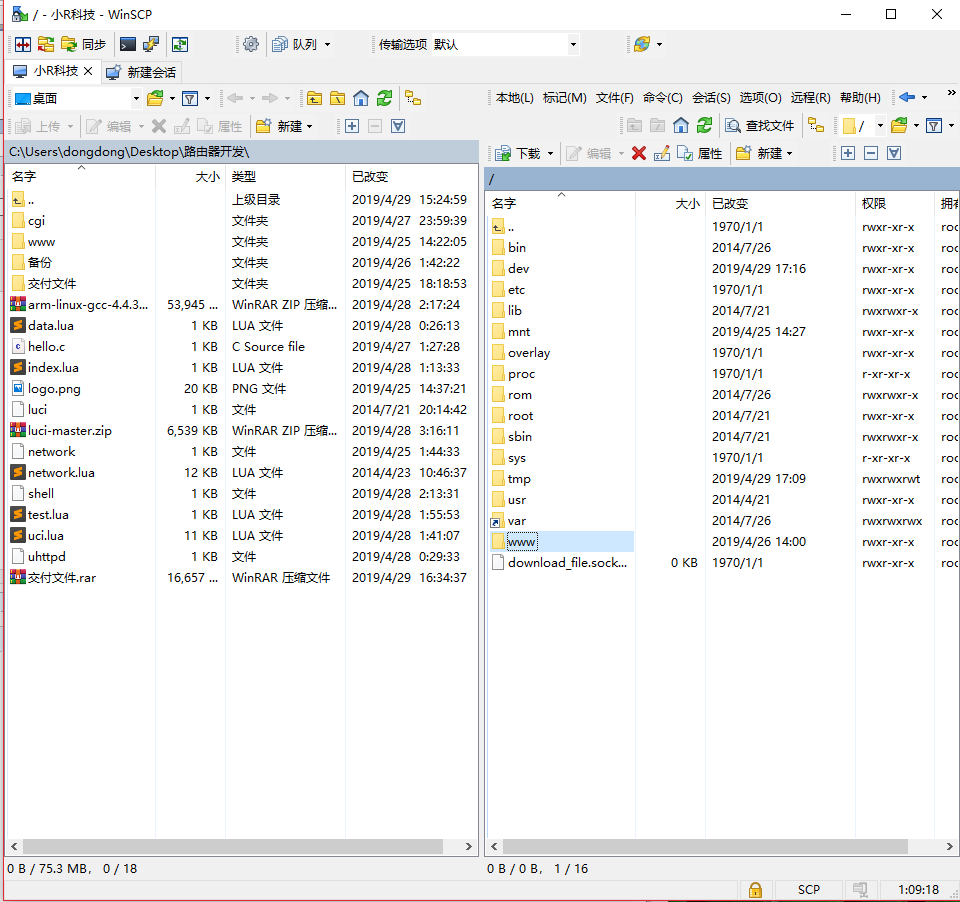
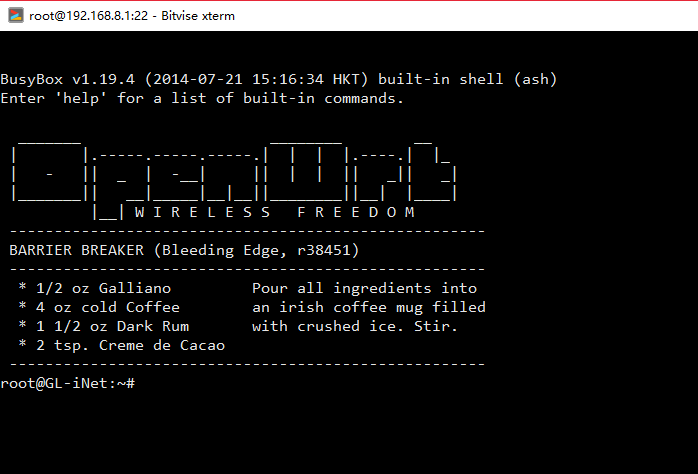
登录命令行

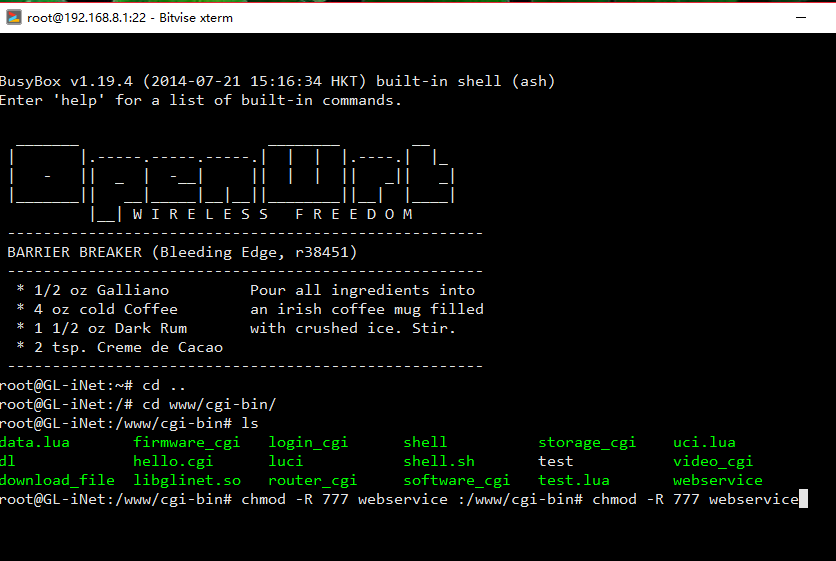
新建文件“/www/cgi-bin/webservice” 给予访问修改权限(注意没有 .lua结尾)
cd ..

cd www/cgi-bin/

ls
chmod -R 777 webservice
内容修改为:
#!/usr/bin/lua

local WebService = require 'WebService'

WebService.Run()
建立Lua模块文件,并读取参数,返回响应:
路径/usr/lib/lua/WebService.lua
local WebService = {}

--分割字符串函数

function Split(szFullString, szSeparator)

    local nFindStartIndex = 1

    local nSplitIndex = 1

    local nSplitArray = {}

    while true do

--找=号

        local nFindLastIndex = string.find(szFullString, szSeparator, nFindStartIndex)

        if not nFindLastIndex then

            nSplitArray[nSplitIndex] = string.sub(szFullString, nFindStartIndex, string.len(szFullString))

            break

        end

--从=号后面开始找 &

        nFindStartIndex=nFindLastIndex+1

        nFindLastIndex = string.find(szFullString, '&', nFindStartIndex)

 	if not nFindLastIndex then --最后一个

        nFindLastIndex=string.len(szFullString)

--截取 =和&之间

 	nSplitArray[nSplitIndex] = string.sub(szFullString, nFindStartIndex, nFindLastIndex)

        nFindStartIndex = nFindLastIndex+1

        nSplitIndex = nSplitIndex + 1

 	end

--截取 =和&之间

	nSplitArray[nSplitIndex] = string.sub(szFullString, nFindStartIndex, nFindLastIndex - 1)

     	nFindStartIndex = nFindLastIndex+1

                nSplitIndex = nSplitIndex + 1

      end

    return nSplitArray

end

--执行修改配置文件

function change_config(wifiname,wifipws)

--查询现有的WIFi名字

local t= io.popen('uci get wireless.@wifi-iface[0].ssid')

local a = t:read("*all")

--修改WIFI名字

local setwifiname='uci set wireless.@wifi-iface[0].ssid='..wifiname

io.popen(setwifiname)

--修改WIFI密码

local setwifipsd='uci set wireless.@wifi-iface[0].key='..wifipws

io.popen(setwifipsd)

--保存文件提交

io.popen('uci commit wireless')

--print("save change!")

--重启WIFI生效

--print("restart!")

io.popen('wifi')

end

--主函数

function WebService.Run()

    local client = os.getenv("REMOTE_ADDR")

    local GET = os.getenv("QUERY_STRING")

--解析求求

      list = Split(GET,'=')

    local POST = nil

    local POSTLength = tonumber(os.getenv("CONTENT_LENGTH")) or 0

    if (POSTLength > 0) then

        POST = io.read(POSTLength)

        --POST = io.read("*a")

    end

    io.write("Content-type: text/html\nPragma: no-cache\n\n")

    local reply = string.format("Client %s said: url: [%s], data: [%s]\n", client or '-', GET or '-', POST or '-')

    io.write(reply )

 --修改配置文件

       change_config(list [1],list [2])

end

return WebService
重启“uhttpd”服务(为了让更改的/etc/config/uhttpd生效):
root@OpenWrt:~# /etc/init.d/uhttpd restart
使用浏览器测试:
http://<openwrt_ipaddr>/cgi-bin/webservice?author=qige
这里假设OpenWrt开发板的IP为192.168.8.1
http://192.168.8.1/cgi-bin/webservice?wifi-key=xixi&wifi-key-msg=xx

单独讲解:
1脚本命令交互uci
查看每个配置在那个文件
uci export
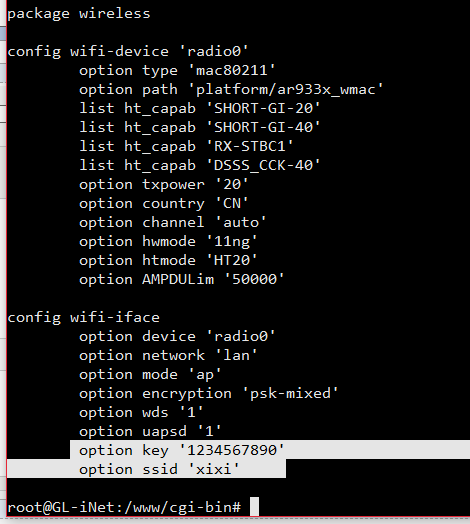
在次看到 无线账号密码在wireless配置文件里
uci show
查看具体包里面的信息

查询

uci get wireless.@wifi-iface[0].ssid

修改

uci set wireless.@wifi-iface[0].ssid="dongdong"

提交保存

uci commit wireless

重启生效

wifi
@wifi-iface[0]可能一个文件里面有多个同名的,这个代表第一个
教程二 网页和lua交互修改openwrt的更多相关文章
- Cocos 2d-X Lua 游戏添加苹果内购(二) OC和Lua交互代码详解
这是第二篇 Cocos 2d-X Lua 游戏添加苹果内购(一) 图文详解准备流程 这是前面的第一篇,详细的说明了怎样添加内购项目以及填写银行信息提交以及沙盒测试员的添加使用以及需要我们注意的东西,结 ...
- MIP开发教程(二) 使用MIP-CLI工具调试MIP网页
初始化 MIP 配置 新建一个 MIP 网页 编写 MIP 网页代码 校验 MIP 网页 调试 MIP 网页 1. 初始化 MIP 配置 首先在html目录下进行初始化 MIP 配置: $ mip i ...
- 无废话ExtJs 入门教程二十[数据交互:AJAX]
无废话ExtJs 入门教程二十[数据交互:AJAX] extjs技术交流,欢迎加群(521711109) 1.代码如下: 1 <!DOCTYPE html PUBLIC "-//W3C ...
- 【Visual C++】游戏开发五十六 浅墨DirectX教程二十三 打造游戏GUI界面(一)
本系列文章由zhmxy555(毛星云)编写,转载请注明出处. 文章链接:http://blog.csdn.net/poem_qianmo/article/details/16384009 作者:毛星云 ...
- C++与Lua交互之配置&交互原理&示例
|Lua 简介 Lua 是一种轻量小巧的脚本语言,也是号称性能最高的脚本语言,它用C语言编写并以源代码形式开放. 某些程序常常需要修改内容,而修改的内容不仅仅是数据,更要修改很多函数的行为. 而修改函 ...
- WiFi-ESP8266入门http(2-2)文件系统-复杂结构的网页 + 文本框交互WIFI信息
网友教程:https://blog.csdn.net/solar_Lan/article/details/74231360 通过网友教程,我们搭建了文件系统.在此基础上,我们增加WIFI交互. 现有功 ...
- Quartz教程二:API,Job和Trigger
原文链接 | 译文链接 | 翻译:nkcoder | 校对:方腾飞 本系列教程由quartz-2.2.x官方文档翻译.整理而来,希望给同样对quartz感兴趣的朋友一些参考和帮助,有任何不当或错误之处 ...
- PySide——Python图形化界面入门教程(二)
PySide——Python图形化界面入门教程(二) ——交互Widget和布局容器 ——Interactive Widgets and Layout Containers 翻译自:http://py ...
- 手把手教从零开始在GitHub上使用Hexo搭建博客教程(二)-Hexo参数设置
前言 前文手把手教从零开始在GitHub上使用Hexo搭建博客教程(一)-附GitHub注册及配置介绍了github注册.git相关设置以及hexo基本操作. 本文主要介绍一下hexo的常用参数设置. ...
随机推荐
- SSM-SpringMVC-07:SpringMVC中处理器映射器
------------吾亦无他,唯手熟尔,谦卑若愚,好学若饥------------- BeanNameUrlHandlerMapping和SimpleUrlHandlerMapping BeanN ...
- Ubuntu系统下安装CodeBlocks
本文由荒原之梦原创,原文链接:http://zhaokaifeng.com/?p=616 1 添加CodeBlocks的软件仓库 sudo add-apt-repository ppa:damien- ...
- CentOS-7修改主机名
本文由荒原之梦原创,原文链接:http://zhaokaifeng.com/?p=589 方法一(修改静态主机名): vi /etc/hostname 注:由于静态主机名是系统初始化时从/etc/ho ...
- Kali Linux中下载工具Axel的安装和使用
前言: Axel是一个多线程的HTTP/FTP下载工具,支持断点续传. Axel的安装 apt-get install axel Axel的卸载 apt remove axel 安装完成之后输入 ax ...
- JFrame图形界面 ----鼠标消息
#开始 不管是什么GUI 按钮的存在都是必不可少的而且还会有很多奇怪的按钮 #代码 package window; import java.awt.Container; import java.awt ...
- When to use next() and return next() in Node.js
Some people always write return next() is to ensure that the execution stops after triggering the ca ...
- 微信H5中静默登录及非静默登录的正确使用姿势
在微信中打开网页且需要调用微信登录接口时,微信官方给我们提供了两种登录调用方式:静默登录和非静默登录:但是官方文档中却没有说明在何种情况下使用静默登录,何种情况下使用非静默登录,所以在这里,我想将之前 ...
- tkinter中menu菜单控件(十二)
menu菜单控件 import tkinter wuya = tkinter.Tk() wuya.title("wuya") wuya.geometry("300x200 ...
- python实现邮件的发送
一.163邮箱设置 进入163邮箱,点击设置中的pop3/smtp/imap 开启smtp服务,如果没有开启,点击设置,手机号验证后勾选开启即可,开启后图如下: 主要用到的就是smtp服务器:smtp ...
- JS题目合集---新技术层出不穷,打好基础才是上策~
在IT界中公司对JavaScript开发者的要求还是比较高的,但是如果JavaScript开发者的技能和经验都达到了一定的级别,那他们还是很容易跳到优秀的公司的,当然薪水就更不是问题了.但是在面试之前 ...