搭建harbor私有仓库
2-1、项目说明
Harbor是一个用于存储和分发Docker镜像的企业级Registry服务器,由VMware开源,其通过添加一些企业必需的功能特性,例如安全、标识和管理等,扩展了开源 Docker Distribution。作为一个企业级私有Registry服务器,Harbor 提供了更好的性能和安全。提升用户使用Registry构建和运行环境传输镜像的效率。Harbor支持安装在多个Registry节点的镜像资源复制,镜像全部保存在私有 Registry 中, 确保数据和知识产权在公司内部网络中管控,另外,Harbor也提供了高级的安全特性,诸如用户管理,访问控制和活动审计等 - vmware 官方开源服务: https://vmware.github.io/
- harbor 官方github 地址: https://github.com/vmware/harbor
- harbor 官方网址: https://goharbor.io/
- harbor 官方文档: https://goharbor.io/docs/
- github文档: https://github.com/goharbor/harbor/tree/master/docs2-2、部署及测试
前提:清理存在的docker软件
 [root@node1 ~]#  yum remove docker \

     docker-client \

     docker-client-latest \

     docker-common \

     docker-latest \

     docker-latest-logrotate \

     docker-logrotate \

     docker-selinux \

     docker-engine-selinux \

     docker-engine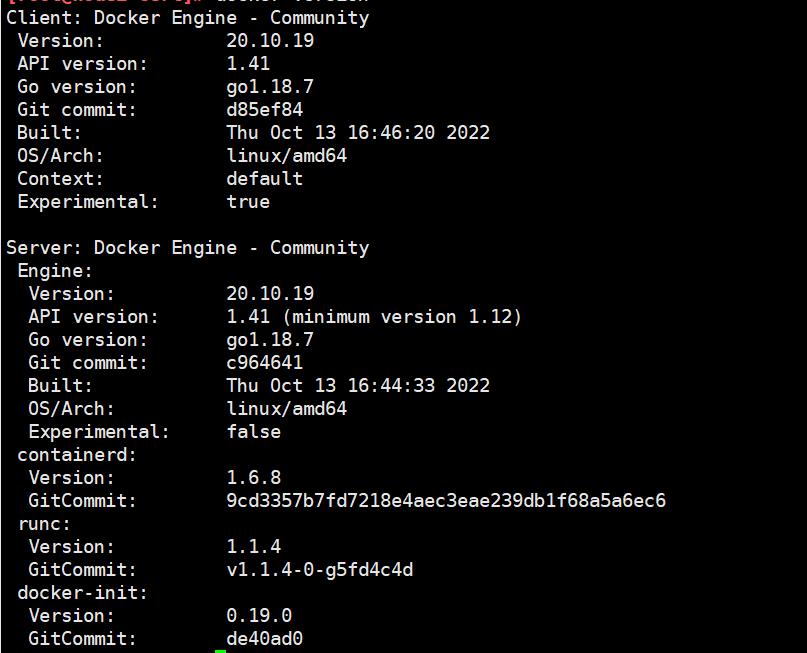
2-2-1、安装docker依赖
[root@node2 ~]# yum install -y yum-utils device-mapper-persistent-data lvm22-2-2、安装docker的repo文件
[root@node2 ~]# yum-config-manager --add-repo https://download.docker.com/linux/centos/docker-ce.repo2-2-3、安装docker并启动
 [root@node2 ~]# yum install -y docker-ce docker-ce-cli containerd.io

 [root@node2 ~]# systemctl start docker

 [root@node2 ~]# systemctl enable docker
2-2-4、修改配置文件
[root@node2 ~]# vim /etc/docker/daemon.json
{
"registry-mirrors": ["192.168.100.103"]
}
[root@node2 ~]# ystemctl daemon-reload
[root@node2 ~]# ystemctl restart docker
注:即使启用https后,103仍然需要配置该项内容,否则在用 docker login命令登录时会出错Error response from daemon: Get "https://harbor103.com/v2/": unauthorized: authentication required2-2-5、安装docker-compose
#国内源下载docker-compose,github太慢
[root@node2 ~]# curl -L https://get.daocloud.io/docker/compose/releases/download/1.25.3/docker-compose-$(uname -s)-$(uname -m) -o /usr/local/bin/docker-compose
#授权
[root@node2 ~]# chmod +x /usr/local/bin/docker-compose
[root@node2 ~]# ll /usr/local/bin/docker-compose
-rwxr-xr-x 1 root root 17213176 Oct 16 15:31 /usr/local/bin/docker-compose
#查看是否生效
[root@node2 ~]# docker-compose --version
docker-compose version 1.25.3, build d4d1b42b2-2-6、安装openssl
[root@node2 ~]# yum install openssl -y2-2-7、修改hosts文件
 [root@node2 ~]# echo "192.168.100.103 harbor103.org" >> /etc/hosts    #客户端和服务器都配置

 注:一定要带上`.org`,不要使用 `harbor103` 这样类似`hostname`的配置,否则使用`docker push`命令时会出现向`docker.io`推送镜像的情况导致出现,如下所示:

 Using default tag: latest

 The push refers to repository [docker.io/harbor103/test-public/alpine-amd64]

 8d3ac3489996: Preparing

 denied: requested access to the resource is denied
2-2-8、配置证书
#创建存放证书的目录
[root@node2 ~]# mkdir -p /data/cert
[root@node2 ~]# cd /data/cert
============================================
#生成证书颁发机构证书
#生成 CA 证书私钥
[root@node2 cert]# openssl genrsa -out ca.key 4096
#生成 CA 证书
[root@node2 cert]# openssl req -x509 -new -nodes -sha512 -days 3650 \
-subj "/C=CN/ST=Beijing/L=Beijing/O=example/OU=Personal/CN=harbor103.org" \
-key ca.key \
-out ca.crt
#注:CN改为自己设置的域名 #生成服务器证书
#生成私钥
[root@node2 cert]# openssl genrsa -out harbor103.org.key 4096
#生成证书签名请求
[root@node2 cert]# openssl req -sha512 -new \
-subj "/C=CN/ST=Beijing/L=Beijing/O=example/OU=Personal/CN=harbor103.org" \
-key harbor103.org.key \
-out harbor103.org.csr
#生成 x509 v3 扩展文件
[root@node2 cert]# cat > v3.ext <<-EOF
authorityKeyIdentifier=keyid,issuer
basicConstraints=CA:FALSE
keyUsage = digitalSignature, nonRepudiation, keyEncipherment, dataEncipherment
extendedKeyUsage = serverAuth
subjectAltName = @alt_names
[alt_names]
DNS.1=harbor103.org
DNS.2=harbor103
DNS.3=harbor
EOF
# 注:DNS.1是域名,DNS.2是去掉com,DNS.3是hostname,本次搭建103的hostname是harbor,该内容来自官网介绍
#使用 v3.ext 文件为您的 Harbor 主机生成证书
[root@node2 cert]# openssl x509 -req -sha512 -days 3650 \
-extfile v3.ext \
-CA ca.crt -CAkey ca.key -CAcreateserial \
-in harbor103.org.csr \
-out harbor103.org.crt[root@node2 cert]#
#将 harbor103.org.crt 转换为 harbor103.org.cert,供 Docker 使用
[root@node2 cert]# openssl x509 -inform PEM -in harbor103.org.crt -out harbor103.org.cert
#将服务器证书、密钥和 CA 文件复制到 Harbor 主机(103)上的 Docker 证书文件夹中
[root@node2 cert]# mkdir -p /etc/docker/certs.d/harbor103.org
[root@node2 cert]# cd /data/cert
[root@node2 cert]# cp harbor103.org.cert /etc/docker/certs.d/harbor103.org/
[root@node2 cert]# cp harbor103.org.key /etc/docker/certs.d/harbor103.org/
[root@node2 cert]# cp ca.crt /etc/docker/certs.d/harbor103.org/
#注:/etc/docker/certs.d/harbor103.com 该目录与域名保持一致,不要随意命名
#操作系统信任证书
[root@node2 cert]# cp harbor103.org.crt /etc/pki/ca-trust/source/anchors/harbor103.org.crt
[root@node2 cert]# update-ca-trust
#重启docker
[root@node2 cert]# systemctl restart docker2-2-9、安装harbor
#下载地址:
官网:https://github.com/goharbor/harbor/releases
百度网盘链接:https://pan.baidu.com/s/1vBunW3IqADhGE0eke3q--g 提取码:2tve
#解压之opt下
[root@node2 ~]# tar xf harbor-offline-installer-v2.6.1.tgz -C /opt
#修改配置
[root@node2 ~]# cd /opt/harbor/
[root@node2 harbor]# cp harbor.yml.tmpl harbor.yml
[root@node2 harbor]# vim harbor.yml
hostname: harbor103.org #修改此行,指向当前主机IP 或 FQDN,建议配置IP
harbor_admin_password: 123456 #修改此行指定harbor登录用户admin的密码
data_volume: /data/harbor_data/ #指定存放数据的目录,建议放在独立的大容量快速磁盘或存储上
#注:data_volume最好使用独立的目录只保存harbor的数据
#安装
[root@node2 harbor]# ./install.sh
[Step 0]: checking if docker is installed ...
Note: docker version: 20.10.19
[Step 1]: checking docker-compose is installed ...
Note: docker-compose version: 1.25.3
[Step 2]: loading Harbor images ...
......
[Step 3]: preparing environment ...
[Step 4]: preparing harbor configs ...
......
[Step 5]: starting Harbor ...
......
----Harbor has been installed and started successfully.----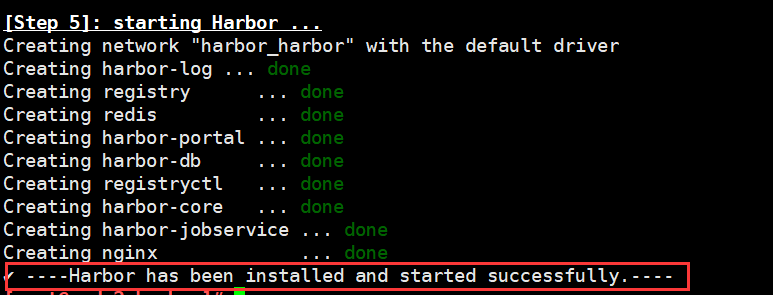
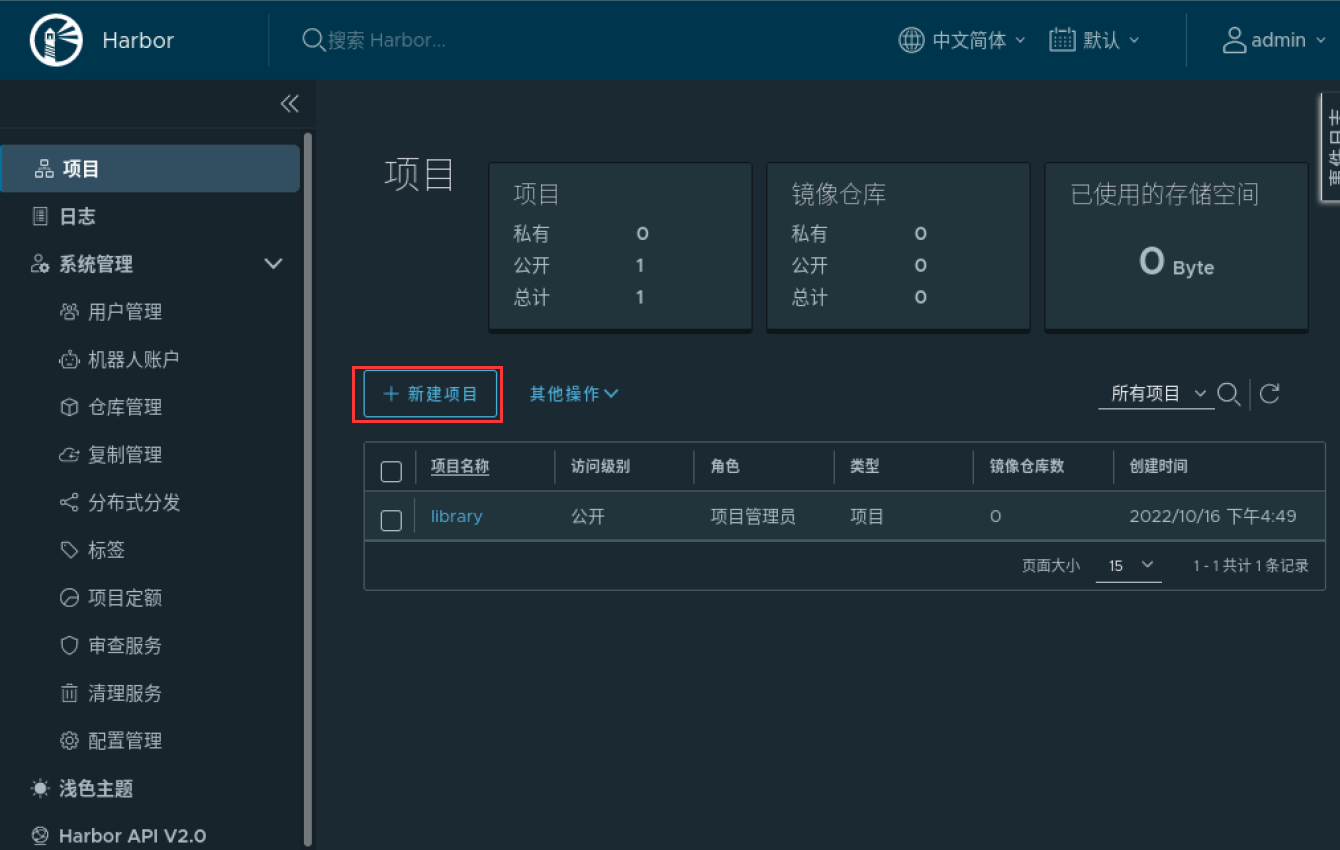
2-2-10、浏览器访问harbor 主机网站
 用浏览器访问: http://192.168.100.103/

     用户名: admin

     密码: 即前面harbor.cfg中指定的密码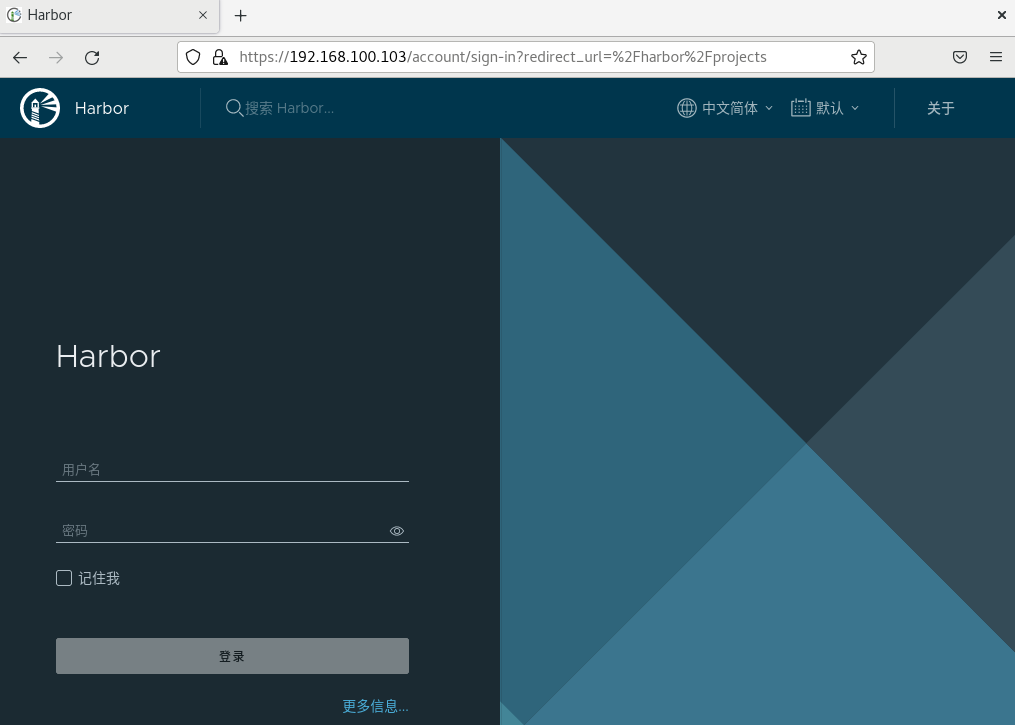

2-2-11、设置开机自启
#方法1:通过service文件实现
[root@node2 harbor]# vim /lib/systemd/system/harbor.service
[Unit]
Description=Harbor Service
After=docker.service systemd-networkd.service systemd-resolved.service
Requires=docker.service
Documentation=http://github.com/vmware/harbor
[Service]
Type=simple
Restart=on-failure
RestartSec=5
ExecStart=/usr/local/bin/docker-compose -f /opt/harbor/docker-compose.yml up
ExecStop=/usr/local/bin/docker-compose -f /opt/harbor/docker-compose.yml down
[Install]
WantedBy=multi-user.target
[root@node2 harbor]# systemctl daemon-reload
[root@node2 harbor]# systemctl restart harbor.service
#方法2: 通过 rc.local实现
[root@node2 harbor]# cat /etc/rc.local
#!/bin/bash
cd /apps/harbor
/usr/bin/docker-compose up
[root@node2 harbor]# chmod +x /etc/rc.local2-2-12、Harbor 安全 Https 配置
#配置 Harbor 服务器使用证书
[root@node2 harbor]# vim harbor.yml
......
hostname: harbor103.org
......
# http related config
http:
# port for http, default is 80. If https enabled, this port will redirect to https port
port: 80
......
# https related config
https:
# https port for harbor, default is 443
port: 443
# The path of cert and key files for nginx
certificate: /data/cert/harbor103.org.crt #修改两行,指定证书和私钥的路径
private_key: /data/cert/harbor103.org.key
......
harbor_admin_password: 123456
......
data_volume: /data/harbor_data/
......
#使配置生效方法1:
[root@node2 harbor]# ./prepare # 根据 harbor.yml 配置生成docker-compose文件
prepare base dir is set to /opt/harbor
Clearing the configuration file: /config/portal/nginx.conf
......
[root@node2 harbor]# docker-compose down -v # 停止容器并移除存在的容器
Stopping harbor-jobservice ... done
Stopping nginx ... done
......
[root@node2 harbor]# docker-compose up -d # 启动docker容器
Creating network "harbor_harbor" with the default driver
Creating harbor-log ... done
......
#使配置生效方法2:
[root@node2 harbor]# systemctl stop harbor.service
[root@node2 harbor]# systemctl start harbor.service
=====================================================================================================
#访问http链接制动跳转到https
http://harbor.org2-2-13、将证书发送给客户端
[root@node2 harbor]# scp /data/cert/ca.crt root@192.168.100.104:/etc/pki/ca-trust/source/anchors/ 2-2-14、客户端测试推送镜像至harbor
[root@client ~]# ls /etc/pki/ca-trust/source/anchors # 查看证书是否存在
ca.crt
[root@client ~]# update-ca-trust extract #更新证书
[root@client ~]# systemctl restart podman #重启podman(docker)
[root@client ~]# docker login harbor103.org #登录
Emulate Docker CLI using podman. Create /etc/containers/nodocker to quiet msg.
Username: admin
Password:
Login Succeeded!
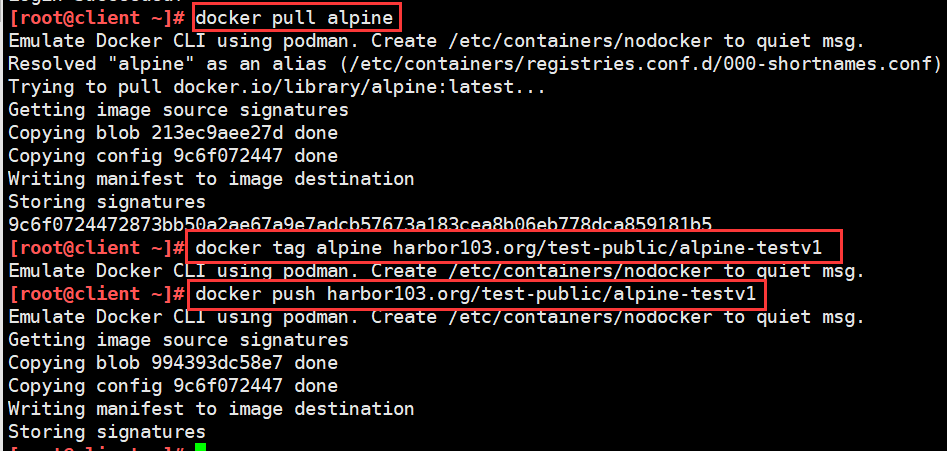
[root@client ~]# docker pull alpine # 拉取dockerhub的镜像
[root@client ~]# docker tag alpine harbor103.org/test-public/alpine-testv1 # 打标签
[root@client ~]# docker push harbor103.org/test-public/alpine-testv1 #测试推送镜像到harbor私有仓库

2-2-15、参考链接
https://zhuanlan.zhihu.com/p/479716198搭建harbor私有仓库的更多相关文章
- Centos7搭建Harbor私有仓库(二)
1 说明 前文Centos7搭建Harbor私有仓库(一)中成功搭建了Harbor,但,是以http方式搭建的,这里我们修改为https方式 以下基于镜像CentOS-7-x86_64-Minimal ...
- Centos7搭建Harbor私有仓库(一)
1 说明 前文Centos7搭建DockerRegistry介绍了DockerRegistry的搭建,但它没有UI页面,因此选择Harbor 以下基于镜像CentOS-7-x86_64-Minimal ...
- Docker-compose 搭建 Harbor私有仓库
一. 安装docker-compose 1. 下载docker-compose的最新版本 curl -L "https://github.com/docker/compose/release ...
- Docker以http访问Harbor私有仓库(一)
1 说明 前文Centos7搭建Harbor私有仓库(一)我们成功搭建Harbor,本篇我们主要配置Docker以http方式访问私有仓库 2 Docker配置 2.1 Mac系统 2.1.1 配置D ...
- Docker以https访问Harbor私有仓库(二)
1 说明 前文Centos7搭建Harbor私有仓库(二)中,我们以https方式搭建了Harbor,本篇我们主要配置Docker以https方式访问Harbor私有仓库 2 Docker配置 2.1 ...
- 搭建Harbor私有镜像仓库--v1.5.1
搭建Harbor私有镜像仓库--v1.5.1 1.介绍 Docker容器应用的开发和运行离不开可靠的镜像管理,虽然Docker官方也提供了公共的镜像仓库,但是从安全和效率等方面考虑,部署我们私有环境 ...
- Kubernetes-5:搭建企业级私有仓库Harbor
搭建企业级私有仓库Harbor 安装需求 python版本 >= 2.7 Docker引擎版本 >= 1.10 docker-compose版本 >= 1.6.0 安装环境 一.Py ...
- 创建Harbor私有仓库
前提 1.安装docker服务 参考:https://blog.csdn.net/weixin_36522099/article/details/108861134 老名字:docker.docker ...
- Docker Harbor私有仓库部署与管理 (超详细配图)
Docker Harbor私有仓库部署与管理 1.Harbor 介绍 2.Harbor部署 3.Harbor管理 1.Harbor 介绍: 什么是 Harbor ? Harbor 是 VMware 公 ...
随机推荐
- 生成 SSH 公钥
什么是 SSH 一般的网络服务程序,如FTP.PoP和TelNet在本质上都是不安全的,因为它们在网络上用明文传送口令和数据,别有用心的人非常容易就可以截获这些口令和数据.而且,这些服务程序的安全验证 ...
- postgresql使用group by进行数据去重-2022新项目
一.业务场景 数据去重是web开发中经常会遇到的方式之一,数据库操作中有一个关键字distinct主要就是用来做这件事,用来进行去重. 比如进行统计查询的时候,可以这样写 select count(d ...
- 创建Prism项目
1.创建Prism Prism是一个用于WPF.Xamarin Form.Uno平台和 WinUI 中构建松散耦合.可维护和可测试的XAML应用程序框架 通过以下方式访问.使用.学习它: https: ...
- [Android开发学iOS系列] 工具篇: Xcode使用和快捷键
[Android开发学iOS系列] 工具篇: Xcode使用和快捷键 工欲善其事必先利其器. 编辑 Cmd + N: 新建文件 Option + Cmd + N: 新建文件夹 Cmd + / : 注释 ...
- 硬件IIC驱动原理
1.IIC物理层 IIC通信属于同步半双工通信,IIC总线由两根信号线组成.一根是数据线SDA,一根是时钟线SCL,时钟线只能由主机发送给从机,数据线可以双向进行通信,总线上可挂载多个设备,挂载数量受 ...
- 【java】学习路径45-多线程-线程生命周期
线程分为五大状态:新建.就绪.运行.阻塞.死亡. New,Runnable,Running,Blocked,Terminated. 新建状态(New: 创建好一个系统对象,在调用start()之前,线 ...
- eBackup备份服务器安装及配置
####### 原博客地址 创建虚拟机 选择第一个 分配硬盘 其余默认 导入压缩包安装eBackup备份软件 用户名root 密码Cloud12#$ 查看ip地址 连接xftp导入包 安装备份软件 # ...
- RTSP鉴权认证之基础认证和摘要认证区别
RTSP认证类型 基本认证(basic authentication):http 1.0提出的认证方案,其消息传输不经过加密转换因此存在严重的安全隐患.: 摘要认证(digest authentica ...
- KingbaseES V8R6集群部署案例之---Windows环境配置主备流复制(异机复制)
案例说明: 目前KingbaseES V8R6的Windows版本不支持数据库sys_rman的物理备份,可以考虑通过建立主备流复制实现数据库的异机物理备份.本案例详细介绍了,在Windows环境下建 ...
- Hive数据仓库工具基本架构和入门部署详解
@ 目录 概述 定义 本质 特点 Hive与Hadoop关系 Hive与关系型数据库区别 优缺点 其他说明 架构 组成部分 数据模型(Hive数据组织形式) Metastore(元数据) Compil ...