
Spring Security认证器实现
一些权限框架一般都包含认证器和决策器,前者处理登陆验证,后者处理访问资源的控制
Spring Security的登陆请求处理如图

下面来分析一下是怎么实现认证器的
拦截请求
首先登陆请求会被UsernamePasswordAuthenticationFilter拦截,这个过滤器看名字就知道是一个拦截用户名密码的拦截器
主要的验证是在attemptAuthentication()方法里,他会去获取在请求中的用户名密码,并且创建一个该用户的上下文,然后在去执行一个验证过程
String username = this.obtainUsername(request);

String password = this.obtainPassword(request);

//创建上下文

UsernamePasswordAuthenticationToken authRequest = new UsernamePasswordAuthenticationToken(username, password);

this.setDetails(request, authRequest);

return this.getAuthenticationManager().authenticate(authRequest);
可以看看UsernamePasswordAuthenticationToken这个类,他是继承了AbstractAuthenticationToken,然后这个父类实现了Authentication
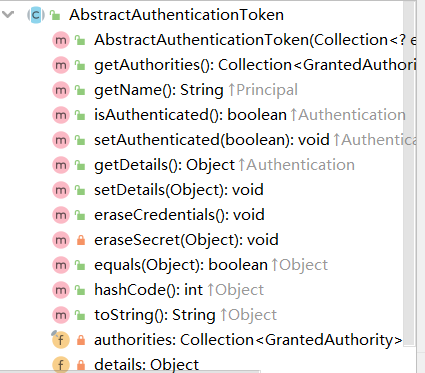
由这个类的方法和属性可得知他就是存储用户验证信息的,认证器的主要功能应该就是验证完成后填充这个类
回到UsernamePasswordAuthenticationToken中,在上面创建的过程了可以发现
public UsernamePasswordAuthenticationToken(Object principal,Object credentials){

    super(null);

    this.principal=principal;

    this.credentials=credentials;

    //还没认证

    setAuthenticated(false);

}
还有一个super(null)的处理,因为刚进来是还不知道有什么权限的,设置null是初始化一个空的权限
//权限利集合

private final Collection<GrantedAuthority> authorities;

//空的集合

public static final List<GrantedAuthority> NO_AUTHORITIES = Collections.emptyList();

//初始化

if (authorities == null) {

    this.authorities = AuthorityUtils.NO_AUTHORITIES;

    return;

}
那么后续认证完还会把权限设置尽量,此时可以看UsernamePasswordAuthenticationToken的另一个重载构造器
//认证完成

public UsernamePasswordAuthenticationToken(Object principal, Object credentials,

    Collection<? extends GrantedAuthority> authorities) {

    super(authorities);

    this.principal = principal;

    this.credentials = credentials;

    super.setAuthenticated(true); // must use super, as we override

}
在看源码的过程中,注释一直在强调这些上下文的填充和设置都应该是由AuthenticationManager或者AuthenticationProvider的实现类去操作
验证过程
接下来会把球踢给AuthenticationManager,但他只是个接口
/**

 * Attempts to authenticate the passed {@link Authentication} object, returning a

 * fully populated <code>Authentication</code> object (including granted authorities)

 * if successful.

 **/

public interface AuthenticationManager {

    Authentication authenticate(Authentication authentication)

            throws AuthenticationException;

}
注释也写的很清楚了,认证完成后会填充Authentication
接下来会委托给ProviderManager,因为他实现了AuthenticationManager
刚进来看authenticate()方法会发现他先遍历了一个List<AuthenticationProvider>集合
/**

 * Indicates a class can process a specific Authentication

 **/

public interface AuthenticationProvider {

    Authentication authenticate(Authentication authentication)

            throws AuthenticationException;

    //支不支持特定类型的authentication

    boolean supports(Class<?> authentication);

}
实现这个类就可以处理不同类型的Authentication,比如上边的UsernamePasswordAuthenticationToken,对应的处理类是AbstractUserDetailsAuthenticationProvider,为啥知道呢,因为在这个supports()里
public boolean supports(Class<?> authentication) {

		return (UsernamePasswordAuthenticationToken.class

				.isAssignableFrom(authentication));

}
注意到这个是抽象类,实际的处理方法是在他的子类DaoAuthenticationProvider里,但是最重要的authenticate()方法子类好像没有继承,看看父类是怎么实现这个方法的
首先是继续判断
Authentication是不是特定的类Assert.isInstanceOf(UsernamePasswordAuthenticationToken.class, authentication,
() -> messages.getMessage(
"AbstractUserDetailsAuthenticationProvider.onlySupports",
"Only UsernamePasswordAuthenticationToken is supported"));
查询根据用户名用户,这次就是到了子类的方法了,因为这个方法是抽象的
 user=retrieveUser(username,

     (UsernamePasswordAuthenticationToken)authentication);
接着
DaoAuthenticationProvider会调用真正实现查询用户的类UserDetailsServiceUserDetails loadedUser = this.getUserDetailsService().loadUserByUsername(username);
UserDetailsService这个类信息就不陌生了,我们一般都会去实现这个类来自定义查询用户的方式,查询完后会返回一个UserDetails,当然也可以继承这个类来扩展想要的字段,主要填充的是权限信息和密码检验用户,如果获取到的
UserDetails是null,则抛异常,不为空则继续校验//检验用户合法性
preAuthenticationChecks.check(user);
//校验密码
additionalAuthenticationChecks(user,
(UsernamePasswordAuthenticationToken) authentication);
第一个教育是判断用户的合法性,就是判断
UserDetails里的几个字段//账号是否过期
boolean isAccountNonExpired();
//账号被锁定或解锁状态。
boolean isAccountNonLocked();
//密码是否过期
boolean isCredentialsNonExpired();
//是否启用
boolean isEnabled();
第二个则是由子类实现的,判断从数据库获取的密码和请求中的密码是否一致,因为用的登陆方式是根据用户名称登陆,所以有检验密码的步骤
 String presentedPassword = authentication.getCredentials().toString();

 if (!passwordEncoder.matches(presentedPassword, userDetails.getPassword())) {

     logger.debug("Authentication failed: password does not match stored value");

     throw new BadCredentialsException(messages.getMessage(

     "AbstractUserDetailsAuthenticationProvider.badCredentials",

     "Bad credentials"));

 }
需要主要的是请求中的密码是被加密过的,所以从数据库获取到的密码也应该是被加密的
注意到当完成校验的时候会把信息放入缓存
//当没有从缓存中获取到值时,这个字段会被设置成false

if (!cacheWasUsed) {

			this.userCache.putUserInCache(user);

 }

 //下次进来的时候回去获取

 UserDetails user = this.userCache.getUserFromCache(username);
如果是从缓存中获取,也是会走检验逻辑的
最后完成检验,并填充一个完整的
Authenticationreturn createSuccessAuthentication(principalToReturn, authentication, user);
由上述流程来看,Security的检验过程还是比较清晰的,通过AuthenticationManager来委托给ProviderManager,在通过具体的实现类来处理请求,在这个过程中,将查询用户的实现和验证代码分离开来
整个过程看着像是策略模式,后边将变化的部分抽离出来,实现解耦
返回完整的Authentication
前边提到的认证成功会调用createSuccessAuthentication()方法,里边的内容很简单
UsernamePasswordAuthenticationToken result = new UsernamePasswordAuthenticationToken(

     principal, authentication.getCredentials(),

     authoritiesMapper.mapAuthorities(user.getAuthorities()));

     result.setDetails(authentication.getDetails());
public UsernamePasswordAuthenticationToken(Object principal, Object credentials,

        Collection<? extends GrantedAuthority> authorities) {

        super(authorities);

        this.principal = principal;

        this.credentials = credentials;

        super.setAuthenticated(true); // must use super, as we override

        }
这次往supe里放了权限集合,父类的处理是判断里边的权限有没有空的,没有则转换为只读集合
for (GrantedAuthority a : authorities) {

    if (a == null) {

        throw new IllegalArgumentException(

        "Authorities collection cannot contain any null elements");

    }

}

ArrayList<GrantedAuthority> temp = new ArrayList<>(

authorities.size());

temp.addAll(authorities);

this.authorities = Collections.unmodifiableList(temp);
收尾工作
回到ProviderManager里的authenticate方法,当我们终于从
result = provider.authenticate(authentication);
走出来时,后边还有什么操作
- 将返回的用户信息负责给当前的上下文
   if (result != null) {

   	copyDetails(authentication, result);

   	break;

   }
删除敏感信息
((CredentialsContainer) result).eraseCredentials();
这个过程会将一些字段设置为null,可以实现
eraseCredentials()方法来自定义需要删除的信息
最后返回到UsernamePasswordAuthenticationFilter中通过过滤
结论
这就是Spring Security实现认证的过程了
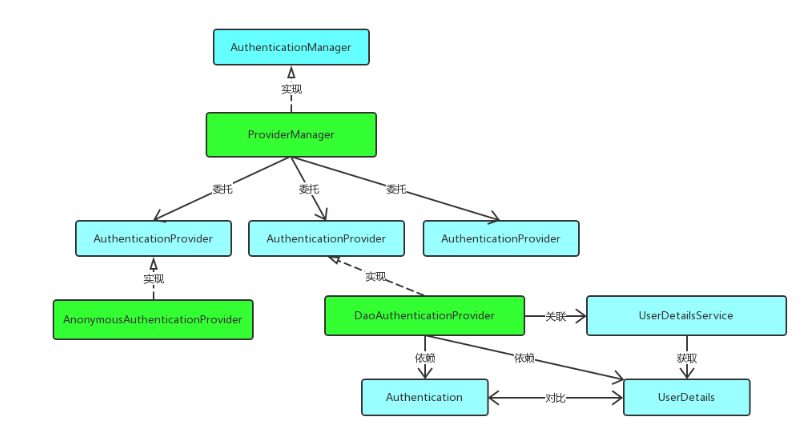
通过实现自己的上下文Authentication和处理类AuthenticationProvider以及具体的查询用户的方法就可以自定义自己的登陆实现
具体可以看Spring Security自定义认证器
Spring Security认证器实现的更多相关文章
- Spring Security认证配置(三)
学习本章之前,可以先了解下上篇Spring Security认证配置(二) 本篇想要达到这样几个目的: 1.登录成功处理 2.登录失败处理 3.调用方自定义登录后处理类型 具体配置代码如下: spri ...
- spring security 认证源码跟踪
spring security 认证源码跟踪 在跟踪认证源码之前,我们先根据官网说明一下security的内部原理,主要是依据一系列的filter来实现,大家可以根据https://docs.sp ...
- Spring Security 入门(1-4-1)Spring Security - 认证过程
理解时可结合一下这位老兄的文章:http://www.importnew.com/20612.html 1.Spring Security的认证过程 1.1.登录过程 - 如果用户直接访问登录页面 用 ...
- Authentication讲解(Spring security认证)
标准认证过程: 1.用户使用username和password登录 2.系统验证这个password对于该username是正确的 3.假设第二步验证成功,获取该用户的上下文信息(如他的角色列表) 4 ...
- Spring Security认证配置(二)
学习本章之前,可以先了解下上篇Spring Security基本配置. 本篇想要达到这样几个目的: 1.访问调用者服务时,如果是html请求,则跳转到登录页,否则返回401状态码和错误信息 2.调用方 ...
- spring security认证
1 开发基于表单的认证 Spring security核心的功能 认证(你是谁?) 授权(你能干什么?) 攻击防护(防止伪造身份) spring security实现了默认的用户名+密码认证,默认用户 ...
- Spring Security 入门(1-4-2)Spring Security - 认证过程之AuthenticationProvider的扩展补充说明
1.用户信息从数据库获取 通常我们的用户信息都不会向第一节示例中那样简单的写在配置文件中,而是从其它存储位置获取,比如数据库.根据之前的介绍我们知道用户信息是通过 UserDetailsService ...
- Spring Security认证配置(一)
学习本章之前,可以先了解下上篇 Spring Security基本配置. 本篇主要讲述Spring Security基于表单,自定义用户认证配置(上篇中的配置,本篇将不再阐述).一共分为三步: 1.处 ...
- Authentication(Spring Security 认证笔记)
这篇文章是对Spring Security的Authentication模块进行一个初步的概念了解,知道它是如何进行用户认证的 考虑一个大家比较熟悉的标准认证过程: 1.用户使用username和pa ...
随机推荐
- 黑客入门——渗透必备神器Burpsuit的安装和简单使用教程
很多人没有听说过burp全称(BurpSuite)BurpSuite是一款白帽子,黑帽子渗透测试必备工具,通过拦截HTTP/HTTPS的web数据包,当浏览器和相关应用程序的中间人,进行拦截.修改 ...
- python基础练习题(题目 画菱形)
day15 --------------------------------------------------------------- 实例022:画菱形 题目 打印出如下图案(菱形):. * * ...
- Docker极简入门:使用Docker-Compose 运行网站浏览量统计Demo
Docker-Compose 是一个可以对 Docker 容器集群的快速编排的工具,能够减轻您心智和手指的负担. 简单的来说 Docker-Compose 就是将你运行多个容器的命令编写到了一起,类似 ...
- UML的三项基础
UML的定义 UML语义:描述基于UML的精确元模型定义. UML表示法:定义UML符号和文本语法提供标准. 五类模型图 用例视图:用例图 逻辑视图:类图.对象图.包图(我把包放在一起的图) 静态视图 ...
- es篇-es基础
点赞再看,养成习惯,微信搜索「小大白日志」关注这个搬砖人. 文章不定期同步公众号,还有各种一线大厂面试原题.我的学习系列笔记. es基础知识 es和solr一样,都是基于Lucene的全文检索数据库 ...
- 倒数第N个字符
一. 题目描述 给定一个完全由小写英文字母组成的字符串等差递增序列,该序列中的每个字符串的长度固定为 L,从 L 个 a 开始,以 1 为步长递增.例如当 L 为 3 时,序列为 { aaa, aab ...
- WFP资源
资源基础 WPF程序在代码中以及在标记中的各个位置定义资源,具有高效性.可维护性.适应性的优点. 资源的层次 <Windows.Resource> <ImageBrush x:key ...
- kubevirt在360的探索之路(k8s接管虚拟化)
来源:360云计算 KubeVirt是一个Kubernetes插件,在调度容器之余也可以调度传统的虚拟机.它通过使用自定义资源(CRD)和其它 Kubernetes 功能来无缝扩展现有的集群,以提供一 ...
- .NetCore Hangfire任务计划
安装Hangfire 新建ASP.NET Core空 项目,.Net Core版本3.1 往*.csproj添加包引用,添加新的PackageReference标记.如下所示.请注意,下面代码段中的版 ...
- Invocation failed Unexpected end of file from server java.lang.RuntimeException: Invocation failed Unexpected end of file from server
Android studio 提交 push的时候报错. Invocation failed Unexpected end of file from serverjava.lang.RuntimeEx ...