
LAMP+Varnish的实现
基于Keepalived+Varnish+Nginx实现的高可用LAMP架构
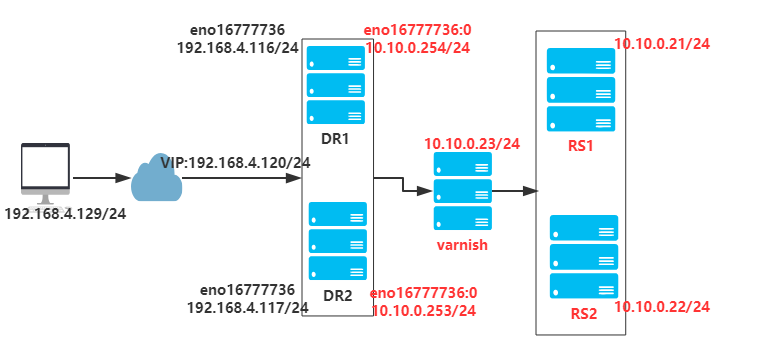
注意:各节点的时间需要同步(ntpdate ntp1.aliyun.com),关闭firewalld(systemctl stop firewalld.service,systemctl disable firewalld.service),设置selinux为permissive(setenforce 0 或 vim /etc/selinux/config);同时确保DR1和DR2节点的网卡支持MULTICAST(多播)通信。通过命令ifconfig可以查看到是否开启了MULTICAST:

搭建RS1(RS1提供mariadb服务和静态资源)
[root@RS1 Desktop]# yum -y install mariadb-server httpd

[root@RS1 Desktop]# vim /etc/my.cnf

    [mysqld]

    ...

    skip-name-resolve=ON

    innodb-file-per-table=ON

    ...

[root@RS1 Desktop]# systemctl start mariadb

[root@RS1 Desktop]# mysql_secure_installation  #进行数据库相关安全设置

    ...

[root@RS1 Desktop]# mysql -uroot -p

    Enter password:

    MariaDB [(none)]> create database wordpress;

    MariaDB [(none)]> grant all on wordpress.* to 'wpuser'@'10.10.0.%' identified by '123456';

    MariaDB [(none)]> flush privileges;

    MariaDB [(none)]> exit;

[root@RS1 Desktop]# wget https://cn.wordpress.org/wordpress-4.9.4-zh_CN.tar.gz

[root@RS1 Desktop]# tar xf wordpress-4.9.4-zh_CN.tar.gz -C /var/www/html

[root@RS1 Desktop]# vim /var/www/html/index.html

    <h1>10.10.0.21 server</h1>

[root@RS1 Desktop]# vim /etc/httpd/conf.d/vhost.conf

    <virtualhost *:80>

        servername www.test.org

        DirectoryIndex index.html index.php

        Documentroot /var/www/html

        ProxyRequests off

        ProxyPassMatch ^/(.*\.php)$ fcgi://10.10.0.22:9000/var/www/html/$1

        ProxyPassMatch ^/(ping|status)$ fcgi://10.10.0.22:9000/$1

        <Directory />

            options FollowSymlinks

            Allowoverride none

            Require all granted

        </Directory>

    </virtualhost>

[root@RS1 Desktop]# systemctl start httpd

[root@RS1 Desktop]# /var/www/html/wordpress/wp-config-sample.php /var/www/html/wordpress/wp-config.php

[root@RS1 Desktop]# vim /var/www/html/wordpress/wp-config.php  #关联wordpress数据库

    define('DB_NAME', 'wordpress');

    define('DB_USER', 'wpuser');

    define('DB_PASSWORD', '123456');

    define('DB_HOST', '10.10.0.21');

[root@RS1 Desktop]# scp /var/www/html/wordpress 10.10.0.22:/var/www/html/  #复制wordpress到22的主机
搭建RS2(RS2提供动态资源)
[root@RS2 Desktop]# yum -y httpd php-fpm php-mysql php-mbstring php-mcrypt

[root@RS2 Desktop]# vim /var/www/html/index.html

    <h1>10.10.0.22 server</h1>

[root@RS2 Desktop]# vim /etc/httpd/conf.d/vhost.conf

    <virtualhost *:80>

        servername www.test.org

        DirectoryIndex index.html index.php

        Documentroot /var/www/html

        ProxyRequests off

        ProxyPassMatch ^/(.*\.php)$ fcgi://127.0.0.1:9000/var/www/html/$1

        ProxyPassMatch ^/(ping|status)$ fcgi://127.0.0.1:9000/$1

        <Directory />

            options FollowSymlinks

            Allowoverride none

            Require all granted

        </Directory>

    </virtualhost>

[root@RS2 Desktop]# systemctl start httpd

[root@RS2 Desktop]# vim /etc/php-fpm.d/www.conf

    listen = 0.0.0.0:9000

    ; listen.allowed_clients = 127.0.0.1  #注释此句,允许其他主机远程访问

    pm.status_path = /status

    ping.path = /ping

    ping.response = pong

[root@RS2 Desktop]# chown apache:apache /var/lib/php/session

[root@RS2 Desktop]# systemctl start php-fpm
搭建DR1
[root@DR1 Desktop]# yum install -y nginx keepalived

[root@DR1 Desktop]# vim /etc/nginx/nginx.conf  #配置nginx反代

    http {

        ...

        upstream websrvs {

            server 10.10.0.21:80;

            server 10.10.0.22:80;

            server 127.0.0.1:80 backup;

        }

        server {

            listen 80;

            include /etc/nginx/default.d/*.conf;

            location / {

                proxy_pass http://websrvs;

                proxy_set_header host $http_host;

                proxy_set_header X-Forward-For $remote_addr;

            }

        ...

    }

[root@DR1 Desktop]# vim /etc/nginx/conf.d/localhost.conf  #配置nginx本地服务

    server{

        listen 127.0.0.1:80;

        root /usr/share/nginx/html;

        index index.html;

    }

[root@DR1 Desktop]# vim /usr/share/nginx/html/index.html

    <h1>Balance Server DR1</h1>

[root@DR1 Desktop]# nginx -t  #检查nginx语法

[root@DR1 Desktop]# systemctl start nginx

[root@DR1 Desktop]# vim /etc/keepalived/keepalived.conf  #配置keepalived

    global_defs {

       notification_email {

            root@localhost

       }

       notification_email_from keepalived@localhost

       smtp_server 127.0.0.1

       smtp_connect_timeout 30

       router_id dr1

       vrrp_skip_check_adv_addr

       vrrp_mcast_group4 224.0.0.111

    }

    vrrp_script chk_ngx {    #检查此服务器的nginx进程是否存在,如果不存在则减权

       #kill -0 PID,0信号量不发送任何信号但系统会进行错误检查,经常用来检查一个进程是否存在,存在返回0,不存在返回1

       script "killall -0 nginx 2> /dev/null && exit 0 || exit 1"

       weight -10

       interval 1

       fall 3

       rise 3

    }

    vrrp_instance VIP_1 {

        state MASTER

        interface eno16777736

        virtual_router_id 1

        priority 100

        advert_int 1

        authentication {

            auth_type PASS

            auth_pass 1111@#$%

        }

        track_script {

            chk_ngx

        }

        virtual_ipaddress {

            192.168.4.120/24 dev eno16777736 label eno16777736:0

        }

[root@DR1 Desktop]# systemctl start keepalived.service
搭建DR2,参考DR1自行搭建
客户端测试
[root@client Desktop]# for i in {1..20}; do curl http://192.168.4.120; done

<h1>10.10.0.21 server</h1>

<h1>10.10.0.22 server</h1>

<h1>10.10.0.21 server</h1>

<h1>10.10.0.22 server</h1>

<h1>10.10.0.21 server</h1>

<h1>10.10.0.22 server</h1>

<h1>10.10.0.21 server</h1>

<h1>10.10.0.22 server</h1>

<h1>10.10.0.21 server</h1>

<h1>10.10.0.22 server</h1>

<h1>10.10.0.21 server</h1>

<h1>10.10.0.22 server</h1>

<h1>10.10.0.21 server</h1>

<h1>10.10.0.22 server</h1>

<h1>10.10.0.21 server</h1>

<h1>10.10.0.22 server</h1>

<h1>10.10.0.21 server</h1>

<h1>10.10.0.22 server</h1>

<h1>10.10.0.21 server</h1>

<h1>10.10.0.22 server</h1>

[root@client Desktop]# ab -c 100 -n 10000 http://192.168.4.120/wordpress  #对动态页面进行压测

This is ApacheBench, Version 2.3 <$Revision: 1430300 $>

Copyright 1996 Adam Twiss, Zeus Technology Ltd, http://www.zeustech.net/

Licensed to The Apache Software Foundation, http://www.apache.org/

Benchmarking 192.168.4.120 (be patient)

Completed 1000 requests

Completed 2000 requests

Completed 3000 requests

Completed 4000 requests

Completed 5000 requests

Completed 6000 requests

Completed 7000 requests

Completed 8000 requests

Completed 9000 requests

Completed 10000 requests

Finished 10000 requests

Server Software:        nginx/1.12.2

Server Hostname:        192.168.4.120

Server Port:            80

Document Path:          /wordpress

Document Length:        239 bytes

Concurrency Level:      100

Time taken for tests:   4.685 seconds

Complete requests:      10000

Failed requests:        0

Write errors:           0

Non-2xx responses:      10000

Total transferred:      4600000 bytes

HTML transferred:       2390000 bytes

Requests per second:    2134.44 [#/sec] (mean)

Time per request:       46.851 [ms] (mean)

Time per request:       0.469 [ms] (mean, across all concurrent requests)

Transfer rate:          958.83 [Kbytes/sec] received

Connection Times (ms)

              min  mean[+/-sd] median   max

Connect:        0    1   4.8      0      51

Processing:    10   45   7.4     46      67

Waiting:        1   44   7.8     46      67

Total:         12   47   6.5     46      89

Percentage of the requests served within a certain time (ms)

  50%     46

  66%     47

  75%     48

  80%     49

  90%     53

  95%     58

  98%     63

  99%     67

 100%     89 (longest request)
配置Varnish服务器
[root@Varnish Desktop]# yum install varnish

[root@Varnish Desktop]# vim /etc/varnish/varnish.params

    RELOAD_VCL=1

    VARNISH_VCL_CONF=/etc/varnish/default.vcl

    VARNISH_LISTEN_PORT=6081

    VARNISH_ADMIN_LISTEN_ADDRESS=10.10.0.23

    VARNISH_ADMIN_LISTEN_PORT=6082

    VARNISH_SECRET_FILE=/etc/varnish/secret

    VARNISH_STORAGE="file,/data/cache,1G"  #需要先创建好/data目录

    VARNISH_USER=varnish

    VARNISH_GROUP=varnish

[root@Varnish Desktop]# vim /etc/varnish/default.vcl  #修改配置文件,添加VCL规则

    vcl 4.0;

    import directors;

    probe web_healthchk {  #定义后端健康监测机制

        .url="/index.html";

        .interval=2s;

        .timeout=1s;

        .window=5;

        .threshold=3;

    }

    backend RS1 {  #定义后端RS1

        .host="10.10.0.21";

        .port="80";

        .probe=web_healthchk;

    }

    backend RS2 {  #定义后端RS2

        .host="10.10.0.22";

        .port="80";

        .probe=web_healthchk;

    }

    sub vcl_init {  #初始化服务器

        new WEBGROUP=directors.round_robin();

        WEBGROUP.add_backend(RS1);

        WEBGROUP.add_backend(RS2);

    }

    acl PURGERS {  #定义可用于purge操作的ip来源

        "127.0.0.1";

        "10.10.0.0"/24;

    }

    sub vcl_recv {

        if(req.http.Authorization ||  req.http.Cookie) {  #认证及cookie不缓存

            return(pass);

        }

        if(req.method != "GET" && req.method != "HEAD") {  #除了get和head以外的请求方法不缓存

            return(pass);

        }

        if(req.url ~ "index.php") {  #动态资源不缓存

            return(pass);

        }

        if(req.method == "PURGE") {  #purge方法清理缓存

            if(client.ip ~ PURGERS) {

                return(purge);

            }

        }

        if(req.http.X-Forward-For) {  #为发往后端主机添加的请求报文添加X-Forward-For的首部

            set req.http.X-Forward-For = req.http.X-Forward-For+","+client.ip;

        }else {

            set req.http.X-Forward-For = client.ip;

        }

        set req.backend_hint = WEBGROUP.backend();  #调用服务器组

        return(hash);

    }

    sub vcl_hash {

        hash_data(req.url);

    }

    sub vcl_backend_response {  #自定义缓存时长

        if(bereq.url ~ "\.(jpg|jpeg|gif|png)$") {

            set beresp.ttl = 1d;

        }

        if(bereq.url ~ "\.(html|css|js)$") {

            set beresp.ttl = 12h;

        }

        if(beresp.http.Set-Cookie) {

            set beresp.grace = 600s;

            return(deliver);

        }

    }

    sub vcl_deliver {

        if(obj.hits > 0) {  #为响应报文添加X-Cache的首部,标识缓存是否命中

            set resp.http.X-Cache = "Hit from "+server.ip;

        }else {

            set resp.http.X-Cache = "Miss";

        }

    }

[root@Varnish Desktop]# systemctl start varnish.service

[root@Varnish Desktop]# ss -tan

    State      Recv-Q Send-Q Local Address:Port               Peer Address:Port

    LISTEN     0      5      192.168.122.1:53                       *:*

    LISTEN     0      128          *:22                       *:*

    LISTEN     0      128    127.0.0.1:631                      *:*

    LISTEN     0      100    127.0.0.1:25                       *:*

    LISTEN     0      128          *:6081                     *:*

    LISTEN     0      10     10.10.0.23:6082                     *:*

    LISTEN     0      128         :::22                      :::*

    LISTEN     0      128        ::1:631                     :::*

    LISTEN     0      100        ::1:25                      :::*

    LISTEN     0      128         :::6081                    :::*
修改DR1和DR2定义的代理服务器组(DR2的修改参考DR1)
[root@DR1 Desktop]# vim /etc/nginx/nginx.conf

...

    upstream websrvs {

        #server 10.10.0.21:80;

        #server 10.10.0.22:80;

        server 10.10.0.23:6081;  #转发到Varnish服务器

        server 127.0.0.1:80 backup;

    }

...

[root@DR2 Desktop]# systemctl reload nginx.service
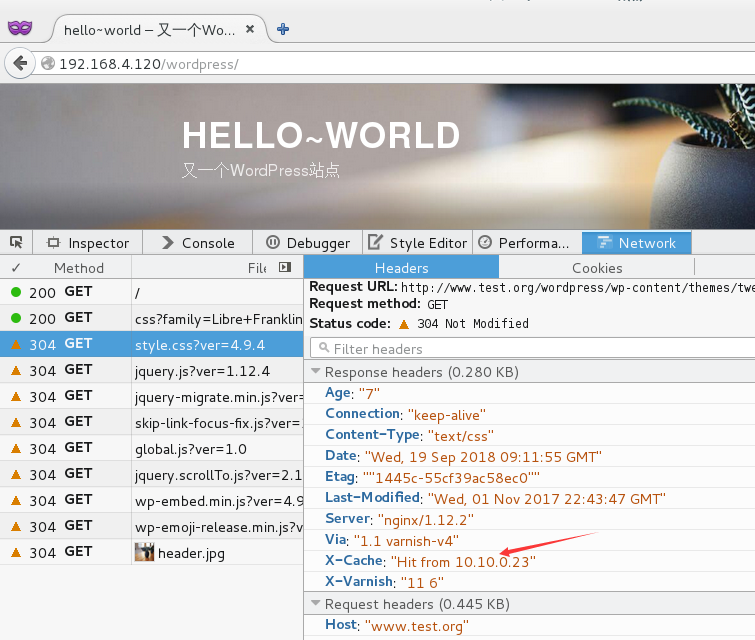
客户端再次测试
LAMP+Varnish的实现的更多相关文章
- Varnish+Xcache构建高性能WEB构架初探
本文主要讲述web优化方案和缓存工具的调研及使用.根据目前的测试结果来看,采用varnish+xcache作为 apache和 php缓存这种架构具有高并发.高稳定性,易扩展等优点,服务器的动态请求处 ...
- varnish学习以及CDN的原理
一.varnish学习Web Page Cache: squid --> varnish 程序的运行具有局部性特征: 时间局部性:一个数据被访问过之后,可能很快会被再次访问到: 空间局部性:一个 ...
- Linux安装LAMP开发环境及配置文件管理
Linux主要分为两大系发行版,分别是RedHat和Debian,lamp环境的安装和配置也会有所不同,所以分别以CentOS 7.1和Ubuntu 14.04做为主机(L) Linux下安装软件,最 ...
- Web应用之LAMP源码环境部署
一.LAMP环境的介绍 1.LAMP环境的重要性 思索许久,最终还是决定写一篇详细的LAMP的源码编译安装的实验文档,一来是为了给自己一个交代,把技术进行系统的归纳,将技术以极致的形式呈现出来,做为一 ...
- 【笔记】LAMP 环境无脑安装配置 Centos 6.3
p.p1 { margin: 0.0px 0.0px 5.0px 0.0px; font: 12.0px Times; color: #ff2500 } p.p2 { margin: 0.0px 0. ...
- LAMP坏境和LNMP环境安装Nagios4.1.1和基本配置
----------------------------------------以下内容为笔者生产环境的监控,安装都是经过一步步测试的-------------------------------- ...
- 1-web应用之LAMP源码环境搭建
目录 一.LAMP环境的介绍 1.LAMP环境的重要性 2.LAMP组件介绍 二.Apache源码安装 1.下载Apache以及相关依赖包 2.安装Apache以及相关 ...
- CentOS7 配置LAMP
这两天要带新同事.没办法,只有现学现卖,又回到Linux的怀抱了.今晚想配置一下LAMP环境,但是之前用的6.6,今晚想闷声做大死,用一次7试试.网上找了很多教程,但是好像转载的都不负责任,有些到下一 ...
- Ubuntu 16.04 LAMP server 指南 - 配置 Apache2.4,PHP7,和MariaDB(而不是MySQL)
翻译自:https://www.howtoforge.com/tutorial/install-apache-with-php-and-mysql-on-ubuntu-16-04-lamp/ 昨天在虚 ...
随机推荐
- awk查找
cat catalina.out|grep "报表 sql"|awk -F '[' '{print $5}'|awk -F ']' '{print $1}'|sort -n|uni ...
- hdu 4513 吉哥系列故事——完美队形II (manachar算法)
吉哥系列故事——完美队形II Time Limit: 3000/1000 MS (Java/Others) Memory Limit: 65535/32768 K (Java/Others) P ...
- RocketMQ读书笔记3——消费者
[不同类型的消费者] DefaultMQPushConsumer 由系统控制读取操作,收到消息后自动调用传入的处理方法来处理. DefaultMQPullConsumer 读取操作中的大部分功能由使用 ...
- VS2010环境开发Teamcenter ITK
前言 这篇文章主要是用Teamcenter ITK开发的入门配置教程.几个月前学习ITK开发时,领导要求将配置过程整理成学习笔记.最近同事要做ITK开发,就发给他了.感觉这篇文章对别人还是有帮助的,决 ...
- 【Machine Learning】决策树之简介(1)
Content 1.decision tree representation 2.ID3:a top down learning algorithm 3.expressiveness of data ...
- 任务十六:零基础JavaScript编码(四)
任务目的 在上一任务基础上继续JavaScript的体验 深入学习JavaScript的事件机制及DOM操作 学习事件代理机制 学习简单的表单验证功能 学习外部加载JavaScript文件 任务描述 ...
- klee错误汇报二:KLEE的optimize选项的一个困惑
问题已经提交github:https://github.com/klee/klee/issues/650 在一个对命令行参数进行建模的符号执行过程中,添加optimize选项与不添加optimize选 ...
- 3.用less浏览文件内容
less 命令是一个用来浏览文本文件的程序.纵观 Linux 系统,有许多人类可读的文本文件.less 程序为我们检查文本文件 提供了方便. 什么是“文本” 在计算机中,有许多方法可以表达信息.所有的 ...
- android快速启动动画
http://blog.csdn.net/robert_cysy/article/details/72824513 https://www.cnblogs.com/404map/p/4981099.h ...
- SQL点点滴滴_UPDATE小计
1.更新tb_card中c_customer字段的值等于tb_customer表中c_no的值 update tb_card set c_customer=ct.c_no from tb_custom ...