ASP.NET Core的身份认证框架IdentityServer4(7)- 使用客户端证书控制API访问
一.前言
本文已更新到 .NET Core 2.2
本文包括后续的Demo都会放在github:https://github.com/stulzq/IdentityServer4.Samples (QuickStart的几个Demo随着本系列的更新,目前为从官方Demo仓库的拷贝,防止本文和Demo不匹配,因为官方Demo和文档一直在更新,本系列更新速度可能会慢一步)。
这里特别说明一下:快速入门以及Topic系列为了保持到最新,目前几乎都是翻译的官方文档(以往的不适合最新版本就换掉了),需要深入一点的请看实战系列。
二.使用客户端认证保护API
此示例介绍了使用IdentityServer保护API的最基本场景。
在这种情况下,我们将定义一个API和要访问它的客户端。 客户端将在IdentityServer上请求访问令牌,并使用它来访问API。
三.准备
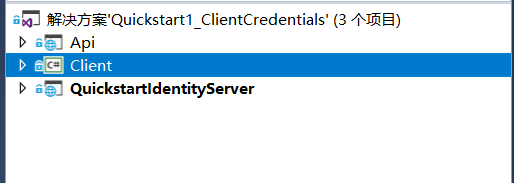
创建一个名为QuickstartIdentityServer的ASP.NET Core Web 空项目(asp.net core 2.2),端口5000
创建一个名为Api的ASP.NET Core Web Api 项目(asp.net core 2.2),端口5001
创建一个名为Client的控制台项目(.net core 2.2)
四.定义API、Identity资源
在QuickstartIdentityServer项目中添加一个Config.cs文件:
public static class Config

    {

        public static IEnumerable<IdentityResource> GetIdentityResources()

        {

            return new IdentityResource[]

            {

                new IdentityResources.OpenId()

            };

        }

        public static IEnumerable<ApiResource> GetApis()

        {

            return new List<ApiResource>

            {

                new ApiResource("api1", "My API")

            };

        }

        public static IEnumerable<Client> GetClients()

        {

            return new List<Client>

            {

                new Client

                {

                    ClientId = "client",

                    // no interactive user, use the clientid/secret for authentication

                    AllowedGrantTypes = GrantTypes.ClientCredentials,

                    // secret for authentication

                    ClientSecrets =

                    {

                        new Secret("secret".Sha256())

                    },

                    // scopes that client has access to

                    AllowedScopes = { "api1" }

                }

            };

        }

    }
五.定义客户端
对于这种情况,客户端将不具有交互式(人机交互)用户,并将使用IdentityServer的客户端模式进行身份验证。 将以下代码添加到Config.cs文件中:
public static IEnumerable<Client> GetClients()

{

    return new List<Client>

    {

        new Client

        {

            ClientId = "client",

            // no interactive user, use the clientid/secret for authentication

            AllowedGrantTypes = GrantTypes.ClientCredentials,

            // secret for authentication

            ClientSecrets =

            {

                new Secret("secret".Sha256())

            },

            // scopes that client has access to

            AllowedScopes = { "api1" }

        }

    };

}
六.配置 IdentityServer
要配置IdentityServer以使用Scope和客户端定义,您需要向ConfigureServices方法添加代码。
Startup.cs
public void ConfigureServices(IServiceCollection services)

{

    var builder = services.AddIdentityServer()

        .AddDeveloperSigningCredential()

        .AddInMemoryIdentityResources(Config.GetIdentityResources())

        .AddInMemoryApiResources(Config.GetApis())

        .AddInMemoryClients(Config.GetClients());

    // rest omitted

}

public void Configure(IApplicationBuilder app)

{

        if (Environment.IsDevelopment())

        {

            app.UseDeveloperExceptionPage();

        }

        // uncomment if you want to support static files

        //app.UseStaticFiles();

        app.UseIdentityServer();

        // uncomment, if you wan to add an MVC-based UI

        //app.UseMvcWithDefaultRoute();

}
运行此项目,打开浏览器访问http://localhost:5000/.well-known/openid-configuration你将会看到IdentityServer的各种元数据信息。
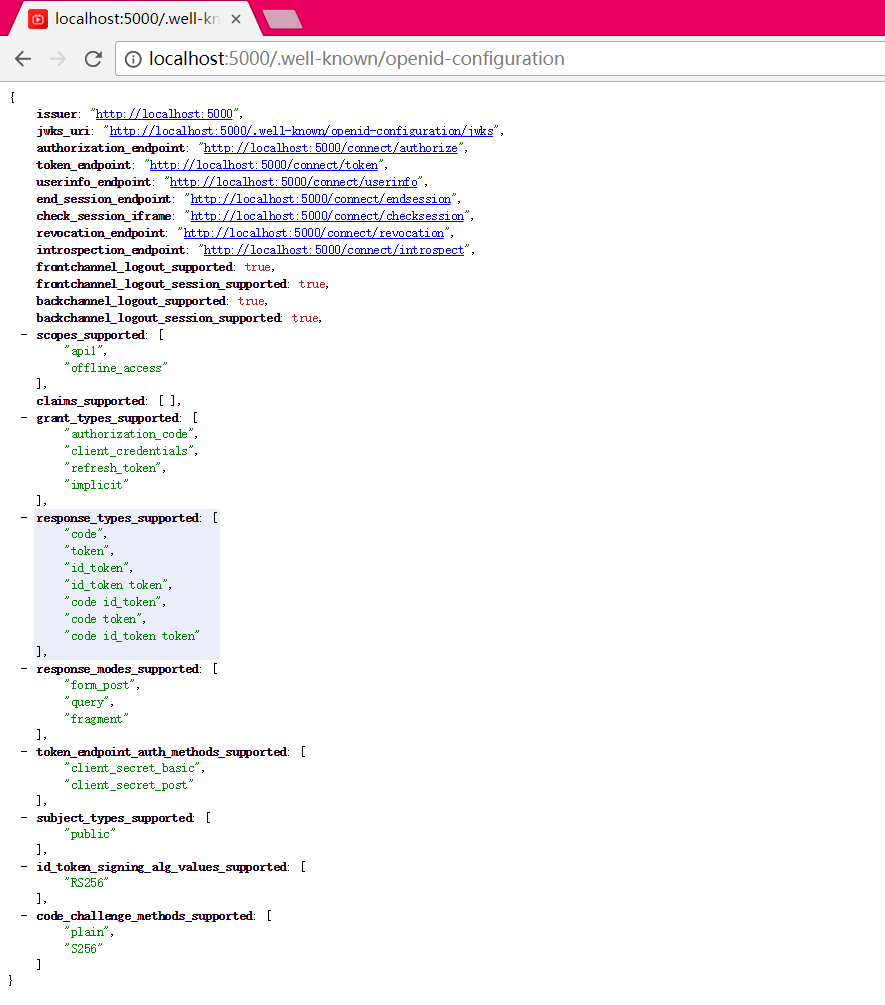
首次启动时,IdentityServer将为您创建一个开发人员签名密钥,它是一个名为tempkey.rsa的文件。 您不必将该文件检入源代码管理中,如果该文件不存在,将重新创建该文件。
七.添加API
在项目Api中添加一个Controller:IdentityController
[Route("identity")]

[Authorize]

public class IdentityController : ControllerBase

{

    [HttpGet]

    public IActionResult Get()

    {

        return new JsonResult(from c in User.Claims select new { c.Type, c.Value });

    }

}
最后一步是将身份验证服务添加到DI和身份验证中间件到管道。 这些将:
- 验证传入令牌以确保它来自受信任的颁发者
- 验证令牌是否有效用于此API(也称为 audience)
将Startup更新为如下所示:
public class Startup

{

    public void ConfigureServices(IServiceCollection services)

    {

        services.AddMvcCore()

            .AddAuthorization()

            .AddJsonFormatters();

        services.AddAuthentication("Bearer")

            .AddJwtBearer("Bearer", options =>

            {

                options.Authority = "http://localhost:5000";

                options.RequireHttpsMetadata = false;

                options.Audience = "api1";

            });

    }

    public void Configure(IApplicationBuilder app)

    {

        app.UseAuthentication();

        app.UseMvc();

    }

}
AddAuthentication 将身份认证服务添加到DI,并将“Bearer”配置为默认方案。 AddJwtBearer 将 JWT 认证处理程序添加到DI中以供身份认证服务使用。 UseAuthentication 将身份认证中间件添加到管道中,因此将在每次调用API时自动执行身份验证。
如果在浏览器访问(http:// localhost:5001/identity),你会得到HTTP 401的结果。 这意味着您的API需要凭据。
就是这样,API现在受 IdentityServer 保护。
八.创建客户端
为 "Client" 项目添加 Nuget 包:IdentityModel
IdentityModel 包括用于发现 IdentityServer 各个终结点(EndPoint)的客户端库。这样您只需要知道 IdentityServer 的地址 - 可以从元数据中读取实际的各个终结点地址:
// discover endpoints from metadata

var client = new HttpClient();

var disco = await client.GetDiscoveryDocumentAsync("http://localhost:5000");

if (disco.IsError)

{

    Console.WriteLine(disco.Error);

    return;

}
DiscoveryClient 已在最新版移除
接下来,您可以使用从 IdentityServer 元数据获取到的Token终结点请求令牌:
// request token

var tokenResponse = await client.RequestClientCredentialsTokenAsync(new ClientCredentialsTokenRequest

{

    Address = disco.TokenEndpoint,

    ClientId = "client",

    ClientSecret = "secret",

    Scope = "api1"

});

if (tokenResponse.IsError)

{

    Console.WriteLine(tokenResponse.Error);

    return;

}

Console.WriteLine(tokenResponse.Json);
九.调用API
要将Token发送到API,通常使用HTTP Authorization标头。 这是使用SetBearerToken扩展方法完成的:
// call api

var client = new HttpClient();

client.SetBearerToken(tokenResponse.AccessToken);

var response = await client.GetAsync("http://localhost:5001/identity");

if (!response.IsSuccessStatusCode)

{

    Console.WriteLine(response.StatusCode);

}

else

{

    var content = await response.Content.ReadAsStringAsync();

    Console.WriteLine(JArray.Parse(content));

}
输出应如下所示:
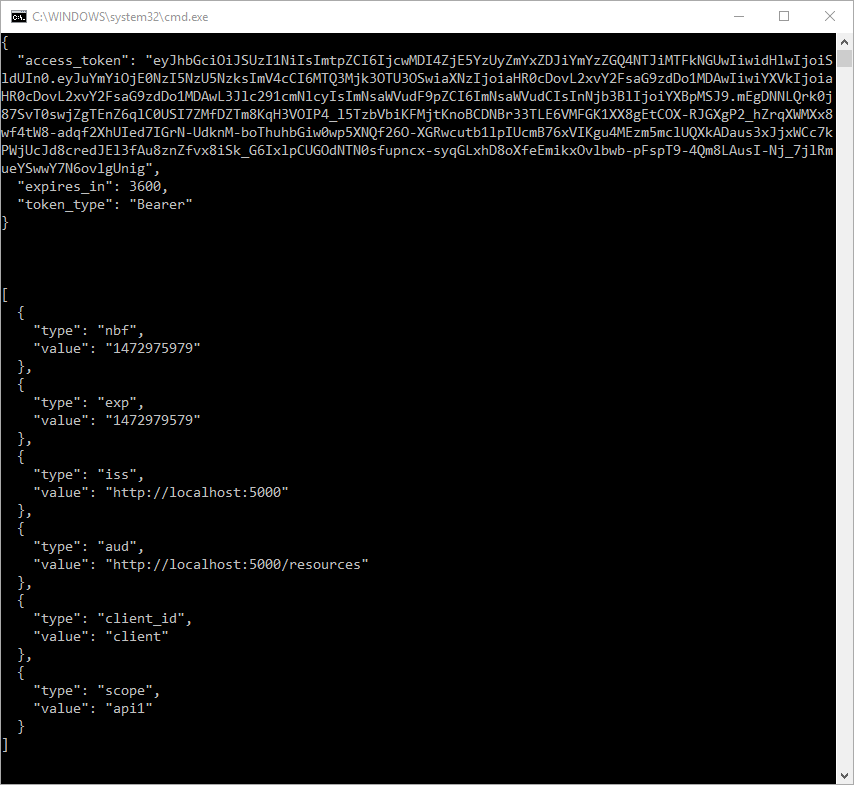
默认情况下,Token将包含有关 Scope,生命周期(nbf和exp),客户端ID(client_id)和颁发者名称(iss)的身份信息单元(Claim)。
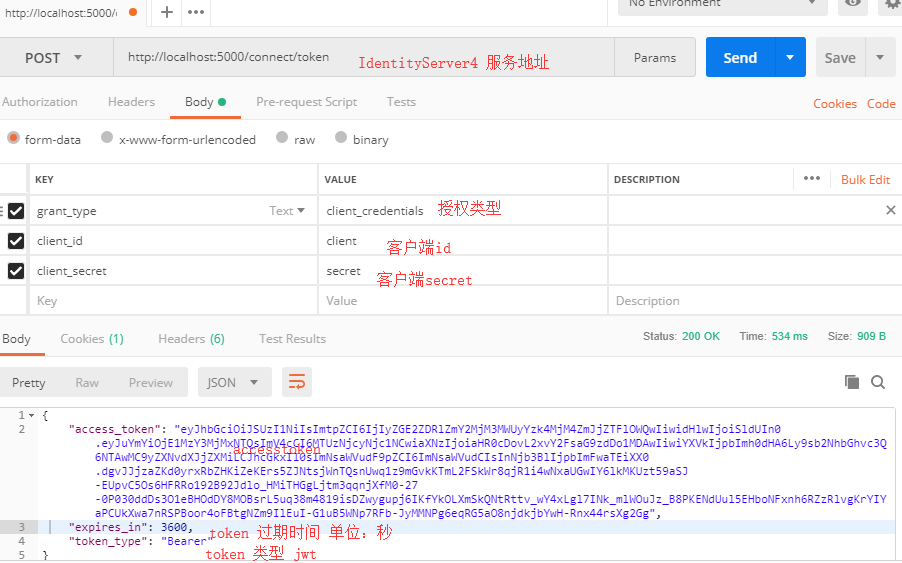
十.使用Postman调试
十一.项目所用代码
github地址: https://github.com/stulzq/IdentityServer4.Samples/tree/master/Quickstarts/1_ClientCredentials
ASP.NET Core的身份认证框架IdentityServer4(7)- 使用客户端证书控制API访问的更多相关文章
- ASP.NET Core的身份认证框架IdentityServer4(1)-特性一览
IdentityServer4是ASP.NET Core的一个包含OpenID和OAuth 2.0协议的框架.OpenID和OAuth 的区别请看 https://www.zhihu.com/ques ...
- ASP.NET Core的身份认证框架IdentityServer4(6)- 开始
安装和概述 启动一个新的IdentityServer项目有两种基本方法: 从头开始 从Visual Studio中的ASP.NET身份模板开始 如果从头开始,我们提供了一些文档.项目帮助和内存存储支持 ...
- ASP.NET Core的身份认证框架IdentityServer4(5)- 包和构建
包和构建 IdentityServer有许多nuget包 IdentityServer4 nuget | github 包含IdentityServer核心对象模型,服务和中间件. 仅支持内存配置和用 ...
- ASP.NET Core的身份认证框架IdentityServer4(9)-使用OpenID Connect添加用户认证
OpenID Connect OpenID Connect 1.0是OAuth 2.0协议之上的一个简单的身份层. 它允许客户端基于授权服务器执行的身份验证来验证最终用户的身份,以及以可互操作和类似R ...
- ASP.NET Core的身份认证框架IdentityServer4(3)-术语的解释
IdentityServer4 术语 IdentityServer4的规范.文档和对象模型使用了一些你应该了解的术语. 身份认证服务器(IdentityServer) IdentityServer是一 ...
- ASP.NET Core的身份认证框架IdentityServer4(8)- 使用密码认证方式控制API访问
前言 本文及IdentityServer这个系列使用的都是基于.net core 2.0的.上一篇博文在API项目中我使用了icrosoft.AspNetCore.Authentication.Jwt ...
- ASP.NET Core的身份认证框架IdentityServer4(4)- 支持的规范
IdentityServer实现以下规范: OpenID Connect OpenID Connect Core 1.0 (spec) OpenID Connect Discovery 1.0 (sp ...
- ASP.NET Core的身份认证框架IdentityServer4--入门
ASP.NET Core的身份认证框架IdentityServer4--入门 2018年08月11日 10:09:00 qq_42606051 阅读数 4002 https://blog.csdn ...
- ASP.NET Core的身份认证框架IdentityServer4--入门【转】
原文地址 Identity Server 4是IdentityServer的最新版本,它是流行的OpenID Connect和OAuth Framework for .NET,为ASP.NET Cor ...
随机推荐
- ORA-12516: TNS: 监听程序找不到符合协议堆栈要求的可用处理程”的异常
简单说明:我们开发时多人开发,会频繁访问服务器数据库,结果当连接数大的时候,就会报ora-12516的错误,ORA-12516: TNS: 监听程序找不到符合协议堆栈要求的可用处理程"的异常 ...
- 初识RabbitMQ系列之一:简单介绍
一:RabbitMQ是什么? 众所周知,MQ是Message Queue(消息队列)的意思,RabbitMQ就是众多MQ框架其中的一款,开源实现了AMQP协议(官网:http://www.amqp. ...
- Flunetd 用于统一日志记录层的开源数据收集器
传统的日志查看方式 使用fluentd之后 一.介绍 Fluentd是一个开源的数据收集器,可以统一对数据收集和消费,以便更好地使用和理解数据. 几大特色: 使用JSON统一记录 简单灵活可插拔架构 ...
- 【bzoj2819】Nim
Description 著名游戏设计师vfleaking,最近迷上了Nim.普通的Nim游戏为:两个人进行游戏,N堆石子,每回合可以取其中某一堆的任意多个,可以取完,但不可以不取.谁不能取谁输.这个游 ...
- Oracle数据库常用关键字以及函数
常用关键字 insert into---插入数据 delete---删除数据 update---更新一条数据 select---实际工作中尽量不要写* set---设置某些属性 where---给执行 ...
- 使用纯css3写出来的表情包 (^v^)
效果如图所示: 不多说,我们直接一个一个来写出,主要列出每个表情的结构,样式我们统一写出,基本全部会用到,颜色以及结构可以根据自己的需求来调整.(里面可是没有一张图片的哦) 页面预览:http://2 ...
- Android 原生 Intent 分享支持的那些事
版权声明: 本账号发布文章均来自公众号,承香墨影(cxmyDev),版权归承香墨影所有. 每周会统一更新到这里,如果喜欢,可关注公众号获取最新文章. 未经允许,不得转载. 一.前言 对于一个 App ...
- 开源蜘蛛集合(转自haizhiguang博客,链接:http://blog.csdn.net/haizhiguang/article/details/20209573)
各种蜘蛛: Heritrix 点击次数:1458 Heritrix是一个开源,可扩展的web爬虫项目.Heritrix设计成严格按照robots.txt文件的排除指示和META robots标签. ...
- NYOJ--32--SEARCH--组合数
按照思路写:深搜,r控制位数,位数为0输出否则递归 /* Name: NYOJ--32--搜索--组合数 Date: 14/04/17 16:48 Description: 深度优先搜索 */ #in ...
- Linux/Unix监控其他用户和信号
--Linux/Unix监控其他用户和信号 ------------------------------------------------------2013/10/27 查看有哪些用户登录 w ...