elasticsearch start
启动、停止服务
默认官方版启动:
linux:./bin/elasticsearch start
window:直接运行bin/elasticsearch.bat
默认官方版停止:
linux:kill 掉elasticsearch 进程。
window:管理启动的elasticsearch.bat 窗口
中文集成版启动与停止:
中文集成版集成了 elasticsearch-servicewrapper这个es插件
linux:
                         ./elasticsearch console  ------前台运行

                         ./elasticsearch start    ------后台运行

                         ./elasticsearch install  -------添加到系统自动启动

                         ./elasticsearch remove   -----取消随系统自动启动
./elasticsearch stop ------停止
./elasticsearch restart ------重新启动
window:直接运行elasticsearch.bat
Tips:
ik_max_word: 会将文本做最细粒度的拆分,比如会将“中华人民共和国国歌”拆分为“中华人民共和国,中华人民,中华,华人,人民共和国,人民,人,民,共和国,共和,和,国国,国歌”,会穷尽各种可能的组合;
ik_smart: 会做最粗粒度的拆分,比如会将“中华人民共和国国歌”拆分为“中华人民共和国,国歌”。
Download and install the .tar.gz packageedit
The .tar.gz archive for Elasticsearch v6.2.3 can be downloaded and installed as follows:
wget https://artifacts.elastic.co/downloads/elasticsearch/elasticsearch-6.2.3.tar.gz

wget https://artifacts.elastic.co/downloads/elasticsearch/elasticsearch-6.2.3.tar.gz.sha512
[root@VM_0_15_centos soft]# shasum

-bash: shasum: command not found

[root@VM_0_15_centos soft]#

[root@VM_0_15_centos soft]#

[root@VM_0_15_centos soft]# yum install perl-Digest-SHA -y

Loaded plugins: fastestmirror, langpacks

Loading mirror speeds from cached hostfile

Resolving Dependencies

--> Running transaction check

---> Package perl-Digest-SHA.x86_64 :5.85-.el7 will be installed

--> Processing Dependency: perl(Digest::base) for package: :perl-Digest-SHA-5.85-.el7.x86_64

--> Running transaction check

---> Package perl-Digest.noarch :1.17-.el7 will be installed

--> Finished Dependency Resolution

Dependencies Resolved

================================================================================================================================

 Package                             Arch                       Version                            Repository              Size

================================================================================================================================

Installing:

 perl-Digest-SHA                     x86_64                     :5.85-.el7                       os                       k

Installing for dependencies:

 perl-Digest                         noarch                     1.17-.el7                       os                       k

Transaction Summary

================================================================================================================================

Install   Package (+ Dependent package)

Total download size:  k

Installed size:  k

Downloading packages:

(/): perl-Digest-1.17-.el7.noarch.rpm                                                               |   kB  ::

(/): perl-Digest-SHA-5.85-.el7.x86_64.rpm                                                             |   kB  ::

--------------------------------------------------------------------------------------------------------------------------------

Total                                                                                            kB/s |   kB  ::

Running transaction check

Running transaction test

Transaction test succeeded

Running transaction

  Installing : perl-Digest-1.17-.el7.noarch                                                                              /

  Installing : :perl-Digest-SHA-5.85-.el7.x86_64                                                                          /

  Verifying  : perl-Digest-1.17-.el7.noarch                                                                              /

  Verifying  : :perl-Digest-SHA-5.85-.el7.x86_64                                                                          /

Installed:

  perl-Digest-SHA.x86_64 :5.85-.el7

Dependency Installed:

  perl-Digest.noarch :1.17-.el7

Complete!

[root@VM_0_15_centos soft]#

[root@VM_0_15_centos soft]# shasum -a 512 -c elasticsearch-6.2..tar.gz.sha512

elasticsearch-6.2..tar.gz: OK

[root@VM_0_15_centos soft]#
http://www.elastic.co/guide/en/elasticsearch/reference/current/zip-targz.html
 ./elasticsearch

[--17T15::,][WARN ][o.e.b.ElasticsearchUncaughtExceptionHandler] [] uncaught exception in thread [main]

org.elasticsearch.bootstrap.StartupException: java.lang.RuntimeException: can not run elasticsearch as root

        at org.elasticsearch.bootstrap.Elasticsearch.init(Elasticsearch.java:) ~[elasticsearch-6.2..jar:6.2.]

        at org.elasticsearch.bootstrap.Elasticsearch.execute(Elasticsearch.java:) ~[elasticsearch-6.2..jar:6.2.]

        at org.elasticsearch.cli.EnvironmentAwareCommand.execute(EnvironmentAwareCommand.java:) ~[elasticsearch-6.2..jar:6.2.]

        at org.elasticsearch.cli.Command.mainWithoutErrorHandling(Command.java:) ~[elasticsearch-cli-6.2..jar:6.2.]

        at org.elasticsearch.cli.Command.main(Command.java:) ~[elasticsearch-cli-6.2..jar:6.2.]

        at org.elasticsearch.bootstrap.Elasticsearch.main(Elasticsearch.java:) ~[elasticsearch-6.2..jar:6.2.]

        at org.elasticsearch.bootstrap.Elasticsearch.main(Elasticsearch.java:) ~[elasticsearch-6.2..jar:6.2.]

Caused by: java.lang.RuntimeException: can not run elasticsearch as root

        at org.elasticsearch.bootstrap.Bootstrap.initializeNatives(Bootstrap.java:) ~[elasticsearch-6.2..jar:6.2.]

        at org.elasticsearch.bootstrap.Bootstrap.setup(Bootstrap.java:) ~[elasticsearch-6.2..jar:6.2.]

        at org.elasticsearch.bootstrap.Bootstrap.init(Bootstrap.java:) ~[elasticsearch-6.2..jar:6.2.]

        at org.elasticsearch.bootstrap.Elasticsearch.init(Elasticsearch.java:) ~[elasticsearch-6.2..jar:6.2.]
Elasticsearch Reference [6.2] » Set up Elasticsearch » Installing Elasticsearch » Install Elasticsearch with .zip or .tar.gz
https://www.elastic.co/guide/en/elasticsearch/reference/current/zip-targz.html#_checking_that_elasticsearch_is_running
异常描述为不能以root权限运行Elasticsearch.
解决办法是运行时加上参数:
bin/elasticsearch -Des.insecure.allow.root=true
或者修改bin/elasticsearch,加上ES_JAVA_OPTS属性:
ES_JAVA_OPTS="-Des.insecure.allow.root=true"
保存之后重启Elasticsearch。
安装运行
1、前置安装java8
jdk-8u112-linux-x64.rpm
下载地址:http://www.oracle.com/technetwork/java/javase/downloads/index.html
2、下载
wget https://artifacts.elastic.co/downloads/elasticsearch/elasticsearch-5.1.1.zip
3、解压
unzip elasticsearch-5.1.1.zip
4、运行
./bin/elasticsearch
./bin/elasticsearch -d #后台运行
tail -f logs/elasticsearch.log #查看日志
注:ES有执行脚本的能力,因安全因素,不能在root用户下运行,强行运行会报如下错误:
org.elasticsearch.bootstrap.StartupException: java.lang.RuntimeException: can not run elasticsearch as root
解决方案:
groupadd es #增加es组
useradd es -g es -p pwd #增加es用户并附加到es组
chown -R es:es elasticsearch-5.1.1 #给目录权限
su es #使用es用户
./bin/elasticsearch -d #后台运行es
外网访问
vi conf/elasticsearch.yml
修改network.host: 0.0.0.0
再次启动linux可能出现如下类似错误
bootstrap checks failed
max file descriptors [65535] for elasticsearch process is too low, increase to at least [65536]
解决方案
1、vi /etc/sysctl.conf
设置fs.file-max=655350
保存之后sysctl -p使设置生效
2、vi /etc/security/limits.conf 新增
* soft nofile 655350
* hard nofile 655350
3、重新使用SSH登录,再次启动elasticsearch即可。
外网访问:serverip:9200/
安装elasticsearch-head插件
elasticsearch 5以后的版本比较新,不支持直接安装head插件,以下是github上提供的安装方法,如下图示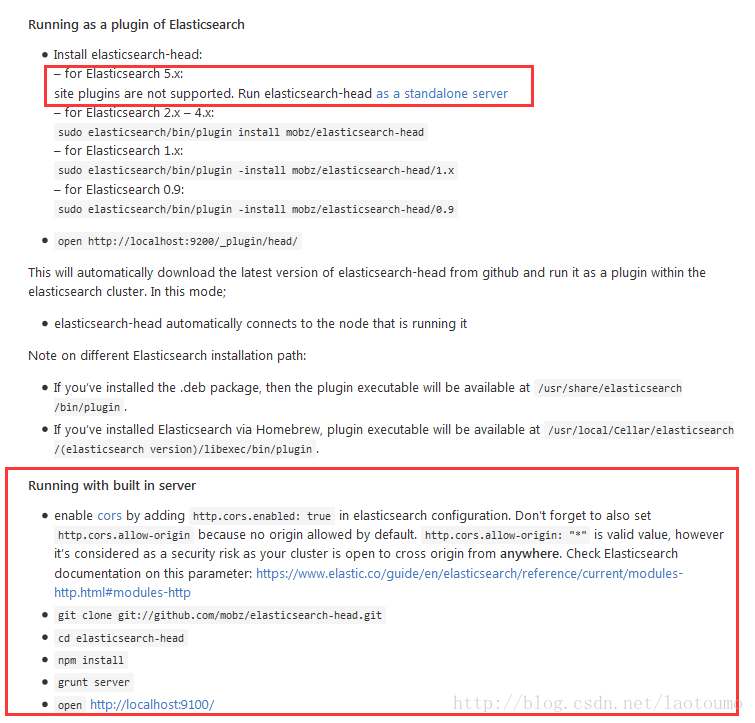
1、下载head插件
wget https://codeload.github.com/mobz/elasticsearch-head/zip/master
2、下载nodejs
nodejs官网下载地址https://nodejs.org/dist/
wget https://nodejs.org/dist/v6.9.2/node-v6.9.2-linux-x64.tar.xz
3、配置node环境变量
xz –d node-v6.9.2-linux-x64.tar.xz
tar –xvf node-v6.9.2-linux-x64.tar
mv node-v6.9.2-linux-x64 /alidata/app/node
vim /etc/profile
export NODE_HOME=/alidata/app/node
export PATH=$PATH:$NODE_HOME/bin
source /etc/profile
# node –v
v6.9.2
# npm –v
3.10.9
4、安装grunt
cd elasticsearch-head-master
npm install -g grunt --registry=https://registry.npm.taobao.org
5、测试一下
cd elasticsearch-head-master
grunt
出现以下提示,为Gruntfile.js引用的,缺少以下包
>> Local Npm module "grunt-contrib-clean" not found. Is it installed?
>> Local Npm module "grunt-contrib-concat" not found. Is it installed?
>> Local Npm module "grunt-contrib-watch" not found. Is it installed?
>> Local Npm module "grunt-contrib-connect" not found. Is it installed?
>> Local Npm module "grunt-contrib-copy" not found. Is it installed?
>> Local Npm module "grunt-contrib-jasmine" not found. Is it installed?
Warning: Task "connect:server" not found. Use --force to continue.
Aborted due to warnings.
安装
npm install grunt-contrib-clean --registry=https://registry.npm.taobao.org
npm install grunt-contrib-concat --registry=https://registry.npm.taobao.org
npm install grunt-contrib-watch --registry=https://registry.npm.taobao.org
npm install grunt-contrib-connect --registry=https://registry.npm.taobao.org
npm install grunt-contrib-copy --registry=https://registry.npm.taobao.org
npm install grunt-contrib-jasmine --registry=https://registry.npm.taobao.org
6、运行
grunt server
7、测试
http://serverip:9100/
修改head目录下的Gruntfile.js配置,head默认监听127.0.0.1
vm Gruntfile.js
hostname: '0.0.0.0',
8、为es设置跨域访问
vi config/elasticsearch.yml #新增两行
http.cors.enabled: true
http.cors.allow-origin: "*"
9、启动es,启动head插件
https://blog.csdn.net/laotoumo/article/details/53890279
一、拼音分词的应用
拼音分词在日常生活中其实很常见,也许你每天都在用。打开淘宝看一看吧,输入拼音”zhonghua”,下面会有包含”zhonghua”对应的中文”中华”的商品的提示:
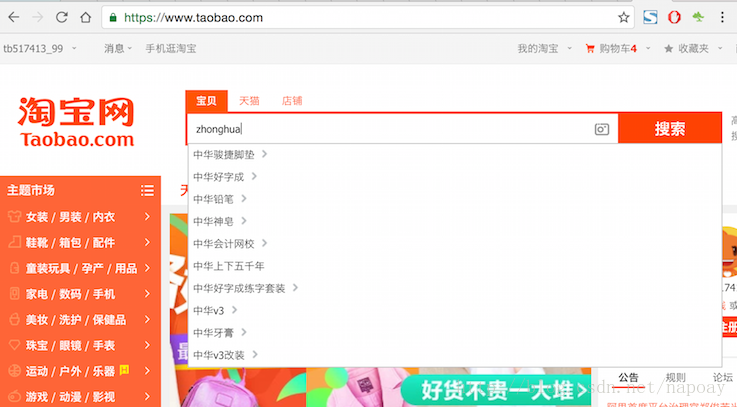
拼音分词是根据输入的拼音提示对应的中文,通过拼音分词提升搜索体验、加快搜索速度。下面介绍如何在Elasticsearch 5.1.1中配置和实现pinyin+iK分词。
二、IK分词器下载与安装
关于IK分词器的介绍不再多少,一言以蔽之,IK分词是目前使用非常广泛分词效果比较好的中文分词器。做ES开发的,中文分词十有八九使用的都是IK分词器。
下载地址:https://github.com/medcl/elasticsearch-analysis-ik
配置之前关闭elasticsearch,配置完成以后再重启。
IK的版本要和当前ES的版本一致,README中有说明。我使用的是ES是5.1.1,IK的版本为5.1.1(你也许会奇怪为什么IK上一个版本是1.X,下一个版本一下升到5.X?是因为Elastic官方为了统一版本号,之前es的版本是2.x,logstash的版本是2.x,同时Kibana的版本是4.x,ik的版本是1.x,这样版本很混乱。5.0之后,统一版本号,这样你使用5.1.1的es,其它软件的版本也使用5.1.1就好了)。
下载之后进入到elasticsearch-analysis-pinyin-master目录,mvn打包(没有安装maven的自行安装),运行命令:
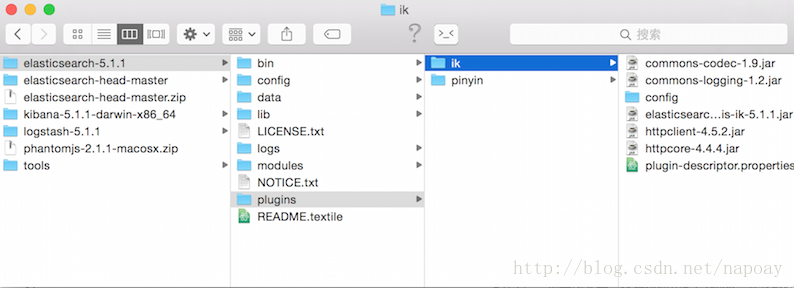
mvn package打包成功以后,会生成一个target文件夹,在elasticsearch-analysis-ik-master/target/releases目录下,找到elasticsearch-analysis-ik-5.1.1.zip,这就是我们需要的安装文件。解压elasticsearch-analysis-ik-5.1.1.zip,得到下面内容:
commons-codec-1.9.jar

commons-logging-1.2.jar

config

elasticsearch-analysis-ik-5.1.1.jar

httpclient-4.5.2.jar

httpcore-4.4.4.jar

plugin-descriptor.properties
然后在elasticsearch-5.1.1/plugins目录下新建一个文件夹ik,把elasticsearch-analysis-ik-5.1.1.zip解压后的文件拷贝到elasticsearch-5.1.1/plugins/ik目录下.截图方便理解。
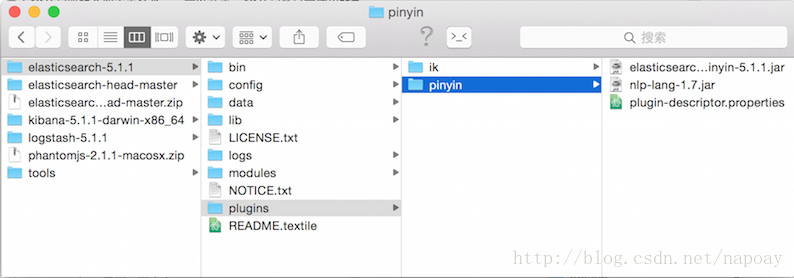
三、pinyin分词器下载与安装
pinyin分词器的下载地址:
https://github.com/medcl/elasticsearch-analysis-pinyin
安装过程和IK一样,下载、打包、加入ES。这里不在重复上述步骤,给出最后配置截图
四、分词测试
IK和pinyin分词配置完成以后,重启ES。如果重启过程中ES报错,说明安装有错误,没有报错说明配置成功。
4.1 IK分词测试
创建一个索引:
curl -XPUT "http://localhost:9200/index"测试分词效果:
curl -XPOST "http://localhost:9200/index/_analyze?analyzer=ik_max_word&text=中华人民共和国"分词结果:
   {

    "tokens": [{

        "token": "中华人民共和国",

        "start_offset": 0,

        "end_offset": 7,

        "type": "CN_WORD",

        "position": 0

    }, {

        "token": "中华人民",

        "start_offset": 0,

        "end_offset": 4,

        "type": "CN_WORD",

        "position": 1

    }, {

        "token": "中华",

        "start_offset": 0,

        "end_offset": 2,

        "type": "CN_WORD",

        "position": 2

    }, {

        "token": "华人",

        "start_offset": 1,

        "end_offset": 3,

        "type": "CN_WORD",

        "position": 3

    }, {

        "token": "人民共和国",

        "start_offset": 2,

        "end_offset": 7,

        "type": "CN_WORD",

        "position": 4

    }, {

        "token": "人民",

        "start_offset": 2,

        "end_offset": 4,

        "type": "CN_WORD",

        "position": 5

    }, {

        "token": "共和国",

        "start_offset": 4,

        "end_offset": 7,

        "type": "CN_WORD",

        "position": 6

    }, {

        "token": "共和",

        "start_offset": 4,

        "end_offset": 6,

        "type": "CN_WORD",

        "position": 7

    }, {

        "token": "国",

        "start_offset": 6,

        "end_offset": 7,

        "type": "CN_CHAR",

        "position": 8

    }, {

        "token": "国歌",

        "start_offset": 7,

        "end_offset": 9,

        "type": "CN_WORD",

        "position": 9

    }]

}
使用ik_smart分词:
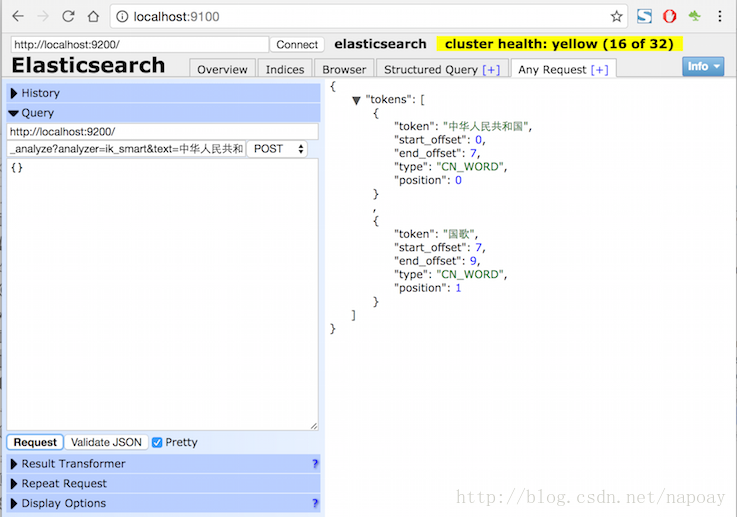
curl -XPOST "http://localhost:9200/index/_analyze?analyzer=ik_smart&text=中华人民共和国"分词结果:
{

    "tokens": [{

        "token": "中华人民共和国",

        "start_offset": 0,

        "end_offset": 7,

        "type": "CN_WORD",

        "position": 0

    }, {

        "token": "国歌",

        "start_offset": 7,

        "end_offset": 9,

        "type": "CN_WORD",

        "position": 1

    }]

}
截图方便理解:
4.2拼音分词测试
测试拼音分词:
curl -XPOST "http://localhost:9200/index/_analyze?analyzer=pinyin&text=张学友"分词结果:
{

    "tokens": [{

        "token": "zhang",

        "start_offset": 0,

        "end_offset": 1,

        "type": "word",

        "position": 0

    }, {

        "token": "xue",

        "start_offset": 1,

        "end_offset": 2,

        "type": "word",

        "position": 1

    }, {

        "token": "you",

        "start_offset": 2,

        "end_offset": 3,

        "type": "word",

        "position": 2

    }, {

        "token": "zxy",

        "start_offset": 0,

        "end_offset": 3,

        "type": "word",

        "position": 3

    }]

}
五、IK+pinyin分词配置
5.1创建索引与分析器设置
创建一个索引,并设置index分析器相关属性:
curl -XPUT "http://localhost:9200/medcl/" -d'

{

    "index": {

        "analysis": {

            "analyzer": {

                "ik_pinyin_analyzer": {

                    "type": "custom",

                    "tokenizer": "ik_smart",

                    "filter": ["my_pinyin", "word_delimiter"]

                }

            },

            "filter": {

                "my_pinyin": {

                    "type": "pinyin",

                    "first_letter": "prefix",

                    "padding_char": " "

                }

            }

        }

    }

}'
创建一个type并设置mapping:
curl -XPOST http://localhost:9200/medcl/folks/_mapping -d'

{

    "folks": {

        "properties": {

            "name": {

                "type": "keyword",

                "fields": {

                    "pinyin": {

                        "type": "text",

                        "store": "no",

                        "term_vector": "with_positions_offsets",

                        "analyzer": "ik_pinyin_analyzer",

                        "boost": 10

                    }

                }

            }

        }

    }

}'
5.2索引测试文档
索引2份测试文档。
文档1:
curl -XPOST http://localhost:9200/medcl/folks/andy -d'{"name":"刘德华"}'文档2:
curl -XPOST http://localhost:9200/medcl/folks/tina -d'{"name":"中华人民共和国国歌"}'5.3测试(1)拼音分词
下面四条命命令都可以匹配”刘德华”
curl -XPOST "http://localhost:9200/medcl/folks/_search?q=name.pinyin:liu"

curl -XPOST "http://localhost:9200/medcl/folks/_search?q=name.pinyin:de"

curl -XPOST "http://localhost:9200/medcl/folks/_search?q=name.pinyin:hua"

curl -XPOST "http://localhost:9200/medcl/folks/_search?q=name.pinyin:ldh"
5.4测试(2)IK分词测试
curl -XPOST "http://localhost:9200/medcl/_search?pretty" -d'

{

  "query": {

    "match": {

      "name.pinyin": "国歌"

    }

  },

  "highlight": {

    "fields": {

      "name.pinyin": {}

    }

  }

}'
返回结果:
{

  "took" : 2,

  "timed_out" : false,

  "_shards" : {

    "total" : 5,

    "successful" : 5,

    "failed" : 0

  },

  "hits" : {

    "total" : 1,

    "max_score" : 16.698704,

    "hits" : [

      {

        "_index" : "medcl",

        "_type" : "folks",

        "_id" : "tina",

        "_score" : 16.698704,

        "_source" : {

          "name" : "中华人民共和国国歌"

        },

        "highlight" : {

          "name.pinyin" : [

            "<em>中华人民共和国</em><em>国歌</em>"

          ]

        }

      }

    ]

  }

}
说明IK分词器起到了效果。
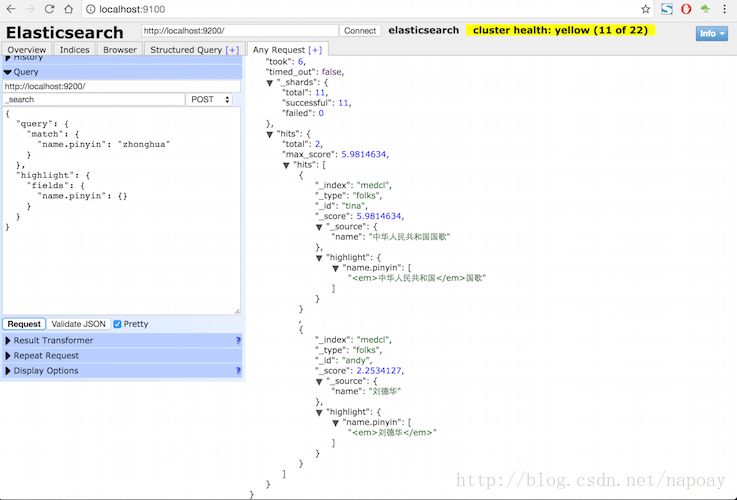
5.3测试(4)pinyin+ik分词测试:
curl -XPOST "http://localhost:9200/medcl/_search?pretty" -d'

{

  "query": {

    "match": {

      "name.pinyin": "zhonghua"

    }

  },

  "highlight": {

    "fields": {

      "name.pinyin": {}

    }

  }

}'
返回结果:
{

  "took" : 3,

  "timed_out" : false,

  "_shards" : {

    "total" : 5,

    "successful" : 5,

    "failed" : 0

  },

  "hits" : {

    "total" : 2,

    "max_score" : 5.9814634,

    "hits" : [

      {

        "_index" : "medcl",

        "_type" : "folks",

        "_id" : "tina",

        "_score" : 5.9814634,

        "_source" : {

          "name" : "中华人民共和国国歌"

        },

        "highlight" : {

          "name.pinyin" : [

            "<em>中华人民共和国</em>国歌"

          ]

        }

      },

      {

        "_index" : "medcl",

        "_type" : "folks",

        "_id" : "andy",

        "_score" : 2.2534127,

        "_source" : {

          "name" : "刘德华"

        },

        "highlight" : {

          "name.pinyin" : [

            "<em>刘德华</em>"

          ]

        }

      }

    ]

  }

}
截图如下:
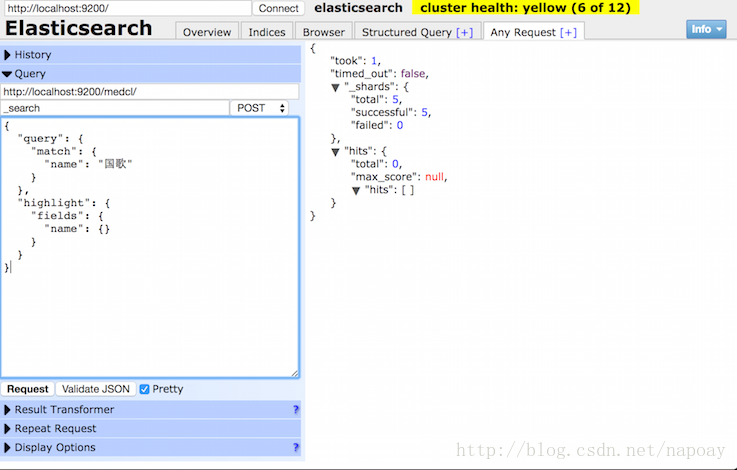
使用pinyin分词以后,原始的字段搜索要加上.pinyin后缀,搜索原始字段没有返回结果:
六、参考资料
https://blog.csdn.net/napoay/article/details/53907921
elasticsearch start的更多相关文章
- Elasticsearch之java的基本操作一
摘要 接触ElasticSearch已经有一段了.在这期间,遇到很多问题,但在最后自己的不断探索下解决了这些问题.看到网上或多或少的都有一些介绍ElasticSearch相关知识的文档,但个人觉得 ...
- Elasticsearch 5.0 中term 查询和match 查询的认识
Elasticsearch 5.0 关于term query和match query的认识 一.基本情况 前言:term query和match query牵扯的东西比较多,例如分词器.mapping ...
- 以bank account 数据为例,认识elasticsearch query 和 filter
Elasticsearch 查询语言(Query DSL)认识(一) 一.基本认识 查询子句的行为取决于 query context filter context 也就是执行的是查询(query)还是 ...
- Ubuntu 14.04中Elasticsearch集群配置
Ubuntu 14.04中Elasticsearch集群配置 前言:本文可用于elasticsearch集群搭建参考.细分为elasticsearch.yml配置和系统配置 达到的目的:各台机器配置成 ...
- ElasticSearch 5学习(10)——结构化查询(包括新特性)
之前我们所有的查询都属于命令行查询,但是不利于复杂的查询,而且一般在项目开发中不使用命令行查询方式,只有在调试测试时使用简单命令行查询,但是,如果想要善用搜索,我们必须使用请求体查询(request ...
- ElasticSearch 5学习(9)——映射和分析(string类型废弃)
在ElasticSearch中,存入文档的内容类似于传统数据每个字段一样,都会有一个指定的属性,为了能够把日期字段处理成日期,把数字字段处理成数字,把字符串字段处理成字符串值,Elasticsearc ...
- .net Elasticsearch 学习入门笔记
一. es安装相关1.elasticsearch安装 运行http://localhost:9200/2.head插件3.bigdesk插件安装(安装细节百度:windows elasticsear ...
- 自己写的数据交换工具——从Oracle到Elasticsearch
先说说需求的背景,由于业务数据都在Oracle数据库中,想要对它进行数据的分析会非常非常慢,用传统的数据仓库-->数据集市这种方式,集市层表会非常大,查询的时候如果再做一些group的操作,一个 ...
- 如何在Elasticsearch中安装中文分词器(IK+pinyin)
如果直接使用Elasticsearch的朋友在处理中文内容的搜索时,肯定会遇到很尴尬的问题--中文词语被分成了一个一个的汉字,当用Kibana作图的时候,按照term来分组,结果一个汉字被分成了一组. ...
- jar hell & elasticsearch ik 版本问题
想给es 安装一个ik 的插件, 我的es 是 2.4.0, 下载了一个版本是 1.9.5, [2016-10-09 16:56:26,248][INFO ][node ] [node-2] init ...
随机推荐
- GO语言学习(十一)Go 语言循环语句
Go 语言提供了以下几种类型循环处理语句: 循环类型 描述 for 循环 重复执行语句块 循环嵌套 在 for 循环中嵌套一个或多个 for 循环 语法 Go语言的For循环有3中形式,只有其中的一种 ...
- easyui datagrid editor checkbox 单击事件
Easyui datagrid treegrid中能够为行追加checkbox元素.比如: $('#tt').treegrid({ url:'get_data.php', idField:'id', ...
- stm32的串口中断
下面有很多问题没有验证: 在设置USART_CR1中的TE位时,会发送一个空闲帧作为第一次数据发送, 目前我所了解的串口中断发送,有两种方式: 一个是:TC 一个是:TXE 这是判断两个标志位, 第一 ...
- fatfs的设置
官方网址:file:///E:/%E5%8D%95%E7%89%87%E6%9C%BA/FATFS/ff13a/documents/doc/config.html 关于多个文件同时打开的配置::在ff ...
- 35、在编译Linux内核中增加程序需要完成以下3项工作
在编译Linux内核中增加程序需要完成以下3项工作: 将编写的源代码拷入Linux内核源代码的相应目录. 在目录的Kconfig文件中增加关于新源代码对应项目的编译配置选项 在目录的Makefile文 ...
- Win10安装后必做的优化,解决磁盘100%占用
Win10安装后必做的优化,解决磁盘100%占用 01关闭家庭组 控制面板–管理工具–服务– HomeGroup Listener和HomeGroup Provider禁用. 02关闭磁盘碎片整理.自 ...
- Instruments性能优化-Core Animation
简书地址:http://www.jianshu.com/users/6cb2622d5eac/latest_articles 当App发展到一定的规模.性能优化就成为不可缺少的一点.可是非常多人,又对 ...
- Android开发之SpannableString具体解释
在实际的应用开发过程中常常会遇到.在文本的不同部分显示一些不同的字体风格的信息如:文本的字体.大小.颜色.样式.以及超级链接等. 普通情况下,TextView中的文本都是一个样式.对于类似的情况.能够 ...
- javaScript_with用法
with语句用途 暂时改变作用域链.简化代码. 语法结构 with(object){ //其他语句 } 例1 with(person){ name= "zhang"; addres ...
- pycharm Zooming in the Editor
https://www.jetbrains.com/help/pycharm/zooming-in-the-editor.html To enable changing font size in th ...