
Greenplum源码安装(CentOS 7)
最近在看GP,在安装集群的时候遇到了很多问题,在此记录下来。
目录
1 安装环境及软件版本
2 安装准备工作
2.1 修改hosts(所有机器)
2.2 修改系统内核配置(所有机器)
2.3 关闭防火墙 (所有机器)
2.4 创建用户和用户组(所有机器)
3 安装和分发
3.1 依赖包 (所有机器)
3.2 解压代码编译安装
3.3 分发
4 初始化和创建数据库
4.1 配置 .bash_profile 环境变量(所有机器)
4.2 编写数据库启动参数文件
4.3 初始化
5 参考资料
彩蛋:安装的时候遇到的各种坑
1 安装环境及软件版本
| 参数 | 版本 |
| 主机数量 | 3台测试机,32G内存(1Master,2Segment) |
| 系统 | CentOS 7 |
| GP版本 | 5.0 |
3台机器的ip分别为
192.168.10.14
192.168.10.15
192.168.10.16
Master节点为192.168.10.15,其余为Segment数据节点。
2 安装准备工作
2.1 修改hosts配置互信(三台机器)
[root@hadoop-test2:~]# vim /etc/hosts
127.0.0.1   localhost localhost.localdomain

192.168.10.14 hadoop-test1

192.168.10.15 hadoop-test2
192.168.10.16 hadoop-test3
配置了这个文件之后,修改 /etc/sysconfig/network这个文件,
[root@hadoop-test2:~]# vim /etc/sysconfig/network
NETWORKING=yes

HOSTNAME=hadoop-test2
HOSTNAME一定要与/etc/hosts中的主机名一致,最终可以使用ping + 主机名 验证配置是否已生效。
2.2 修改系统内核配置(所有机器)
[root@hadoop-test2:~]# vim /etc/sysctl.conf
添加以下内容
kernel.shmmax =

kernel.shmmni =

kernel.shmall =

kernel.sem =

kernel.sysrq =

kernel.core_uses_pid =

kernel.msgmnb =

kernel.msgmax =

kernel.msgmni =

net.ipv4.tcp_syncookies =

net.ipv4.ip_forward =

net.ipv4.conf.default.accept_source_route =

net.ipv4.tcp_tw_recycle =

net.ipv4.tcp_max_syn_backlog =

net.ipv4.conf.all.arp_filter =

net.ipv4.ip_local_port_range =

net.core.netdev_max_backlog =

net.core.rmem_max =

net.core.wmem_max =

vm.overcommit_memory =
执行命令使上面配置生效
[root@hadoop-test2:~]# sysctl -p
修改文件打开限制,添加以下内容
[root@hadoop-test2:~]# vi /etc/security/limits.conf
* soft nofile

* hard nofile

* soft nproc

* hard nproc
关闭SELINUX安全设置
[root@hadoop-test2:~]# vi /etc/selinux/config
# This file controls the state of SELinux on the system.

# SELINUX= can take one of these three values:

# enforcing - SELinux security policy is enforced.

# permissive - SELinux prints warnings instead of enforcing.

# disabled - No SELinux policy is loaded.

SELINUX=disabled

# SELINUXTYPE= can take one of these two values:

# targeted - Targeted processes are protected,

# mls - Multi Level Security protection.

SELINUXTYPE=targeted
2.3 关闭防火墙(所有机器)
CentOS :

systemctl start firewalld.service#启动firewall

systemctl stop firewalld.service#停止firewall

systemctl disable firewalld.service#禁止firewall开机启动
[root@hadoop-test2:~]#  service iptables stop

[root@hadoop-test2:~]#  chkconfig iptables off
2.4 创建用户和组(所有机器)
[root@hadoop-test2:~]# groupadd -g  gpadmin

[root@hadoop-test2:~]# useradd -g  -u520 -m -d /home/gpadmin -s /bin/bash gpadmin

[root@hadoop-test2:~]# passwd gpadmin

Changing password for user gpadmin.

New password:

BAD PASSWORD: it is too simplistic/systematic

BAD PASSWORD: is too simple

Retype new password:

passwd: all authentication tokens updated successfully.
3 安装和分发
3.1 联网安装必要的包 (所有机器)
[root@hadoop-test2:~]# yum -y install rsync coreutils glib2 lrzsz sysstat e4fsprogs xfsprogs ntp readline-devel zlib zlib-devel openssl openssl-devel pam-devel libxml2-devel libxslt-devel python-devel tcl-devel gcc make smartmontools flex bison perl perl-devel perl-ExtUtils* OpenIPMI-tools openldap openldap-devel logrotate gcc-c++ python-py

[root@hadoop-test2:~]# yum -y install bzip2-devel libevent-devel apr-devel curl-devel ed python-paramiko python-devel

[root@hadoop-test2:~]# wget https://bootstrap.pypa.io/get-pip.py

[root@hadoop-test2:~]# python get-pip.py

[root@hadoop-test2:~]# pip install lockfile paramiko setuptools epydoc psutil

[root@hadoop-test2:~]# pip install --upgrade setuptools
3.2 解压代码编译安装
切换到gpadmin登录,在https://github.com/greenplum-db/gpdb/tree/5.7.0 上下载源码,并在对应的目录下安装。
一般来说应该安装在应用目录下,如果不慎安装在根目录下,做压测的时候很容易把磁盘写满,给压测造成麻烦。本文以/home/gpadmin为例。
在下载源码zip包解压后会生成gpdb-5.7.0 文件夹。可将 gpdb-master 代码目录移动到 /home/gpadmin 目录下。
创建程序安装目录gpdb,安装目录也放在 home 下,确认目录所有者为 gpadmin, 如果是 root 用户创建的,之后需要 chown 修改。
gpadmin 用户执行配置 --prefix 后是安装目录,可指定的参数如下,由于ORCA优化器初始化容易报错,一般执行红色那两个参数即可
[root@hadoop-test2:/home/gpadmin/gpdb-5.7.0]# ./configure --prefix=/home/gpadmin/gpdb --enable-mapreduce --with-perl --with-python --with-libxml --with-gssapi --disable-orca
--with-gssapi --with-pgport= --with-libedit-preferred --with-perl --with-python --with-openssl --with-pam --with-krb5 --with-ldap
--with-libxml --enable-cassert --enable-debug --enable-testutils --enable-debugbreak --enable-depend
[root@hadoop-test2:/home/gpadmin/gpdb-5.7.0]# make

[root@hadoop-test2:/home/gpadmin/gpdb-5.7.0]# make install -j 8
3.3 分发
因为只在 master 上安装了Greenplum,所以下面要将安装包批量发送到每个 slave 机器上,才能算是整个Greenplum 集群完整安装了Greenplum。
先在 master 主节点上创建安装 GP 的 tar 文件,其中 gpdb 是安装路径
[root@hadoop-test2:~]# cd /home/gpadmin
[root@hadoop-test2:/home/gpadmin]# gtar -cvf /home/gpadmin/gp.tar gpdb
下面的操作都是为了连接所有节点,并将安装包发送到每个节点。
在master 主机,以 gpadmin 用户身份创建以下文本,可在gpadmin目录下创建 conf 文件夹,用来放这些启动置信息
[root@hadoop-test2:/home/gpadmin/conf]# vim ./conf/hostlist
hadoop-test1

hadoop-test2

hadoop-test3
[root@hadoop-test2:/home/gpadmin/conf]# vim ./conf/seg_hosts
hadoop-test1

hadoop-test3
安装目录下的greenplum_path.sh中保存了运行Greenplum的一些环境变量设置,包括GPHOOME、PYTHONHOME等设置,
以 gpadmin 身份执行 source 命令使生效,之后 gpssh-exkeys 交换密钥。
[root@hadoop-test2:/home/gpadmin/conf]# source /home/gpadmin/gpdb/greenplum_path.sh

[root@hadoop-test2:/home/gpadmin/gpdb/bin]# gpssh-exkeys -f /home/gpadmin/conf/hostlist

[STEP  of ] create local ID and authorize on local host

  ... /home/gpadmin/.ssh/id_rsa file exists... key generation skipped

[STEP  of ] keyscan all hosts and update known_hosts file

[STEP  of ] authorize current user on remote hosts

  ... send to hadoop-test1

  ... send to hadoop-test3

[STEP  of ] determine common authentication file content

[STEP  of ] copy authentication files to all remote hosts

  ... finished key exchange with hadoop-test1

  ... finished key exchange with hadoop-test3

[INFO] completed successfully
通过gpscp命令将之前的压缩包分发到/conf/seg_hosts文件配置的segment节点
[root@hadoop-test2:/home/gpadmin/gpdb/bin]# gpscp -f /home/gpadmin/conf/seg_hosts /home/gpadmin/gp.tar =:/home/gpadmin
通过gpssh协议连接个segment节点时,hostlist里有多少机器就应该有多少输出
[gpadmin@hadoop-test2 ~]# gpssh -f /home/gpadmin/conf/hostlist

Note: command history unsupported on this machine ...

=> pwd

[hadoop-test1] /home/gpadmin

[hadoop-test3] /home/gpadmin

[hadoop-test2] /home/gpadmin

=>
解压之间的安装包
=> gtar -xvf gp.tar
最后创建数据库工作目录
=> pwd

[hadoop-test1] /home/gpadmin

[hadoop-test3] /home/gpadmin

[hadoop-test2] /home/gpadmin

=> mkdir gpdata

=> cd gpdata

=> mkdir gpdatap1 gpdatap2 gpdatam1 gpdatam2 gpmaster

=> ll

[hadoop-test1] 总用量

[hadoop-test1] drwxrwxr-x  gpadmin gpadmin  8月   : gpdatam1

[hadoop-test1] drwxrwxr-x  gpadmin gpadmin  8月   : gpdatam2

[hadoop-test1] drwxrwxr-x  gpadmin gpadmin  8月   : gpdatap1

[hadoop-test1] drwxrwxr-x  gpadmin gpadmin  8月   : gpdatap2

[hadoop-test1] drwxrwxr-x  gpadmin gpadmin  8月   : gpmaster

[hadoop-test2] 总用量

[hadoop-test2] drwxrwxr-x  gpadmin gpadmin  8月   : gpdatam1

[hadoop-test2] drwxrwxr-x  gpadmin gpadmin  8月   : gpdatam2

[hadoop-test2] drwxrwxr-x  gpadmin gpadmin  8月   : gpdatap1

[hadoop-test2] drwxrwxr-x  gpadmin gpadmin  8月   : gpdatap2

[hadoop-test2] drwxrwxr-x  gpadmin gpadmin  8月   : gpmaster

[hadoop-test3] 总用量

[hadoop-test3] drwxrwxr-x  gpadmin gpadmin  8月   : gpdatam1

[hadoop-test3] drwxrwxr-x  gpadmin gpadmin  8月   : gpdatam2

[hadoop-test3] drwxrwxr-x  gpadmin gpadmin  8月   : gpdatap1

[hadoop-test3] drwxrwxr-x  gpadmin gpadmin  8月   : gpdatap2

[hadoop-test3] drwxrwxr-x  gpadmin gpadmin  8月   : gpmaster

=> exit
4 初始化和创建数据库
4.1 配置 .bash_profile 环境变量
[gpadmin@hadoop-test2:~]# cd
[gpadmin@hadoop-test2:~]# vi .bash_profile
# .bash_profile

# Get the aliases and functions

if [ -f ~/.bashrc ]; then

. ~/.bashrc

fi

# User specific environment and startup programs

PATH=$PATH:$HOME/bin

export PATH

source /home/gpadmin/gpdb/greenplum_path.sh

export MASTER_DATA_DIRECTORY=/home/gpadmin/gpdata/gpmaster/gpseg-

export PGPORT=

export PGDATABASE=testDB
[gpadmin@hadoop-test2 ~]$ . ~/.bash_profile (让环境变量生效)
4.2 编写数据库启动参数文件
将安装目录下的 /gpdb/docs/cli_help/gpconfigs/gpinitsystem_config 文件 copy 到 /home/gpadmin/conf 目录下然后编辑,保留如下参数即可
ARRAY_NAME="Greenplum"

SEG_PREFIX=gpseg PORT_BASE=

declare -a DATA_DIRECTORY=(/home/gpadmin/gpdata/gpdatap1 /home/gpadmin/gpdata/gpdatap2)

MASTER_HOSTNAME=hadoop-test2 MASTER_DIRECTORY=/home/gpadmin/gpdata/gpmaster

##### Port number for the master instance.

MASTER_PORT=

# #### Shell utility used to connect to remote hosts.

TRUSTED_SHELL=/usr/bin/ssh

CHECK_POINT_SEGMENTS=

ENCODING=UNICODE

#######如果没有mirror节点,以下四行红色部分注释掉

MIRROR_PORT_BASE=

REPLICATION_PORT_BASE=

MIRROR_REPLICATION_PORT_BASE=

declare -a MIRROR_DATA_DIRECTORY=(/home/gpadmin/gpdata/gpdatam1 /home/gpadmin/gpdata/gpdatam2)

MACHINE_LIST_FILE=/home/gpadmin/conf/seg_hosts
4.3 初始化
然后运行如下命令进行初始化
[gpadmin@hadoop-test2 ~]$ gpinitsystem -c /home/gpadmin/conf/gpinitsystem_config –a
正常的话会出现
[gpadmin@hadoop-test2 conf]$ psql -d postgres

psql (8.3.)

Type "help" for help.

postgres-# select * from gp_segment_configuration ;
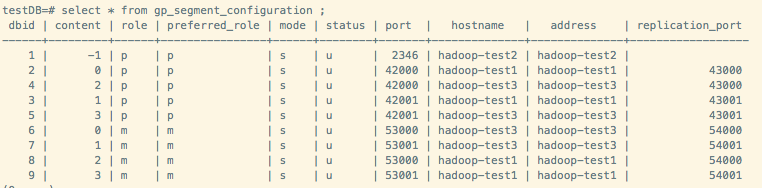
如果出现报错,根据报错信息进行相关处理即可。
5 参考资料
1、linux配置 https://gpdb.docs.pivotal.io/4380/prep_os-system-params.html#topic3
2、GP配置 https://gpdb.docs.pivotal.io/5120/install_guide/prep_os_install_gpdb.html#topic_ylh_b53_c1b
3、安装及初始化 https://gpdb.docs.pivotal.io/5120/install_guide/prep_os_install_gpdb.html#topic8
彩蛋:安装的时候遇到的各种坑
1、Python依赖包及包的版本问题,主要是paramiko生成.ssh目录及公钥。
2、gpssh协议是基于ssh协议改写的,如果禁用了ssh协议会导致gpssh互信无法通过。在GP初始化的时候,如果参数了指定了mirror,那么不论是Group模式还是Spread模式,都会有数据文件在Segment节点互相拷贝作为mirror文件,这一步也是无法执行通过,会导致报错。
3、如果不慎以root账号执行gpssh命令会在/home/gpadmin下生成.ssh目录及对应的root密钥,会出现报错。删掉.ssh目录,以gpadmin再次执行即可。
4、安装目录问题。尽量装在空间足够大的磁盘上,避免压测时很快写满磁盘,导致压测无法正常进行。
5、如果不采用mirror模式只是安装单库,指定mirror参数会导致报错。
6、configure时,会因为缺少GPOS headed files导致ORCA优化器安装报错。暂未解决,目前粗暴跳过。
7、最开始安装了一个测试版GP,版本号带有alpha,目前的JDBC无法只能解析数字,导致报错。后来装回稳定版解决。
8、各种文件权限问题。
Greenplum源码安装(CentOS 7)的更多相关文章
- Greenplum 源码安装教程 —— 以 CentOS 平台为例
Greenplum 源码安装教程 作者:Arthur_Qin 禾众 Greenplum 主体以及orca ( 新一代优化器 ) 的代码以可以从 Github 上下载.如果不打算查看代码,想下载编译好的 ...
- nginx源码安装(CentOS版)
准备工作: 1) 配好网易yum源 登录此网站(http://mirrors.163.com/.help/centos.html),下载相应版本的yum源至服务器的/etc/yum.repos.d/目 ...
- centos 7 MysSQL 5.7.23 源码安装
MySQL 5.7.23 源码安装 CentOS 7 将默认数据库MySQL替换成了Mariadb. 这里会从系统的环境准备开始一步一步安装. 环境准备 系统版本 内核版本 IP地址 Centos 7 ...
- centos 6x系统下源码安装mysql操作记录
在运维工作中经常部署各种运维环境,涉及mysql数据库的安装也是时常需要的.mysql数据库安装可以选择yum在线安装,但是这种安装的mysql一般是系统自带的,版本方面可能跟需求不太匹配.可以通过源 ...
- CentOS 7下源码安装MySQL 5.6
本文转载,并非原创. 目录 准备工作 运行环境 确认你的安装版本 下载MySQL 安装MySQL 准备安装环境 编译和安装 配置MySQL 单实例配置 单实例配置方法 添加防火墙 启动MySQL 重启 ...
- CentOS 7下源码安装MySQL 5.7
网上说linux安装mysql服务分两种安装方法: ①源码安装,优点是安装包比较小,只有几十M左右,缺点是安装依赖的库多,安装编译时间长,安装步骤复杂容易出错: ②使用官方编译好的二进制文件安装,优点 ...
- CentOS 6.5下源码安装MySQL 5.6
变量lower_case_file_system说明是否数据目录所在的文件系统对文件名的大小写敏感.ON说明对文件名的大小写不敏感,OFF表示敏感. 在my.cnf中[mysqld]更改lower_c ...
- CentOS下源码安装Apache2.4+PHP5.4+MySQL5.5
一.准备(把所有的源文件放在‘/home/yuanjun’目录下) apr http://mirror.bjtu.edu.cn/apache/apr/apr-1.4.6.tar.gz apr-util ...
- CentOS 6.5 + Nginx 1.8.0 + PHP 5.6(with PHP-FPM) 负载均衡源码安装 之 (一)Nginx安装篇
CentOS 6.5 minimal安装不再赘述 Nginx源码安装 1.安装wget下载程序 yum -y install wget 2.安装编译环境:gcc gcc-c++ automake au ...
随机推荐
- mysql中外键的特点
mysql中外键的特点简单描述: 1.要求在从表中设置外键关系: 2.从表的外键列的类型和主表的关联列的类型要求一致或兼容,名称无要求: 3.主表的关联列必须是一个key(一般是主键或唯一键): 4. ...
- 项目详解2—LVS负载均衡详解
一.负载均衡集群介绍 1.集群 ① 集群(cluster)技术是一种较新的技术,通过集群技术,可以在付出较低成本的情况下获得在性能.可靠性.灵活性方面的相对较高的收益,其任务调度则是集群系统中的核心技 ...
- 翻译:SET Variable(已提交到MariaDB官方手册)
本文为mariadb官方手册:SET Variable的译文. 原文:https://mariadb.com/kb/en/set-variable/我提交到MariaDB官方手册的译文:https:/ ...
- C#工具类:使用SharpZipLib进行压缩、解压文件
SharpZipLib是一个开源的C#压缩解压库,应用非常广泛.就像用ADO.NET操作数据库要打开连接.执行命令.关闭连接等多个步骤一样,用SharpZipLib进行压缩和解压也需要多个步骤.Sha ...
- http协议、web服务器、并发服务器(下)
Web静态服务器-5-非堵塞模式 单进程非堵塞模型 import socket import time def main(): tcp_socket_server = socket.socket(so ...
- python网络编程-udp
目录 1. 创建socket 2. udp网络程序-发送数据 3. udp网络程序-接收数据 4. python3中的编码转换 5. udp端口绑定 1. 创建socket 在 Python 中 使用 ...
- linux下的~/
在linux里面,~/表示的是个人目录,例如你的账户是student,那么~/代表的是/home/student/
- 面试必会之HashMap源码分析
相关文章 面试必会之ArrayList源码分析 面试必会之LinkedList源码分析 简介 HashMap最早出现在JDK1.2中,底层基于散列算法实现.HashMap 允许 null 键和 nul ...
- Flask 系列之 Pagination
说明 操作系统:Windows 10 Python 版本:3.7x 虚拟环境管理器:virtualenv 代码编辑器:VS Code 实验目标 实现当前登录用户的事务浏览.添加.删除 操作 实现 首先 ...
- Java中的强引用和弱引用
旭日Follow_24 的CSDN 博客 ,全文地址请点击: https://blog.csdn.net/xuri24/article/details/81114944 一.强引用 如下是强引用的经典 ...