Nginx代理缓存功能
Nginx代理缓存功能
Nginx缓存主要是用于减轻后端服务器的负载,提高网站并发量,提升用户体验度。
注意:Nginx反向代理的缓存功能是由ngx_http_proxy_module提供,在使用缓存功能时务必要nginx支持该模块。可能有些选项的不支持Nginx的版本,具体看官方文档: http://nginx.org/en/docs/http/ngx_http_proxy_module.html
后端服务器可能无法承受负载
为了更好的提升用户体验
环境介绍
服务器IP 服务器角色
192.168.123.36 代理服务器
192.168.123.34 上游服务器
部署环境配置表 1-0
Proxy cache配置
1.server配置
proxy_cache_path /cache/nginx/ levels=1:2 keys_zone=mycache:64m;
server {
listen 80;
location / {
proxy_cache mycache;
proxy_pass http://192.168.123.34:80/;
proxy_set_header Host $host;
proxy_set_header X-Real-IP $remote_addr;
proxy_cache_methods GET HEAD;
proxy_cache_revalidate on;
proxy_cache_valid 200 302 10m;
proxy_cache_valid 404 1m;
proxy_cache_valid any 1m;
proxy_cache_min_uses 1;
proxy_cache_use_stale error timeout invalid_header http_500 http_502 http_503 http_504;
}
}
2.参数详解
proxy_cache_path /cache/nginx/ levels=1:2 keys_zone=mycache:64m;
#proxy_cache_path 为缓存存放路径;
#levels的第一位表示使用1级子目录冒号隔开第二位表示使用2级子目录,其最多使用三级,1表示每个一级子目录的名字只能使用1个字符;
#key_zone中的mycache为缓存名字,可以在location或者server中通过proxy_cache引用;64m表示用多少内存空间存储nginx key;
proxy_cache mycache;
#引用mycache缓存空间;
proxy_pass http://192.168.123.34:80/;
#将来自 / 的请求代理至192.168.123.34:80 该服务器,后面的 '/' 是必须的;
proxy_set_header Host $host;
#用于后端的real server区分不同的虚拟主机;
proxy_set_header X-Real-IP $remote_addr;
#记录客户端真实ip地址,而不是代理服务器地址,需要后端web服务器开启日志相应功能接收;
proxy_cache_methods GET HEAD;
#表示对客户端请求的GET 和 HEAD方法进行缓存;
proxy_cache_revalidate on;
#本地缓存过期会检查后端服务器该缓存是否存在,避免后端重传占据带宽;
proxy_cache_valid 200 302 10m;
proxy_cache_valid 404 1m;
proxy_cache_valid any 1m;
#针对于不同的响应码进行缓存不同的时间设定;
proxy_cache_min_uses 1;
#某一个请求被响应多少次才会被缓存,默认是1,可以将该值设置为大一些;
proxy_cache_use_stale error timeout invalid_header http_500 http_502 http_503 http_504;
#指明哪种场景可以使用过期缓存,提升用户体验;
补充:
proxy_hide_header;
#隐藏由proxy响应客户端时指定的首部;
proxy_buffer 4|8k
#为了响应客户端更快,服务器端响应客户端可能分成多个ip报文响应,也可以整合在一起再一次响应;
Nginx缓存是键值存储,URL是键,文件路径是值。键值存储的速度就是加快在文件系统中查找的速度。所以,存储的key是哈希过的值。
3.平滑重启nginx
[root@localhost nginx]# nginx -s reload
[root@localhost nginx]# ps -elf|grep nginx
1 S root 10175 1 0 80 0 - 27830 sigsus 09:52 ? 00:00:00 nginx: master process nginx
5 S www 11165 10175 0 80 0 - 28893 ep_pol 18:10 ? 00:00:00 nginx: worker process
5 S www 11166 10175 0 80 0 - 28893 ep_pol 18:10 ? 00:00:00 nginx: worker process
5 S www 11167 10175 0 80 0 - 27830 ep_pol 18:10 ? 00:00:00 nginx: cache manager process
重启完成这里会多一个cache manager,其主要作用和memcached的LRU算法相似,删除过期缓存。而如果缓存没过期其上有服务器数据发生变化则依旧访问是错误的数据。可以通过程序实现。
4. 后端服务器配置静态页面
4.1 虚拟主机配置
server {
listen 80;
server_name www.test.com;
location / {
root html/bbs;
index index.html index.htm;
}
}
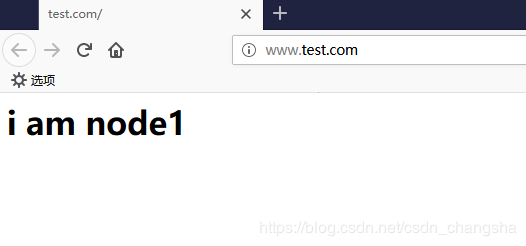
4.2 页面内容
<h1>i am node1</h1>
4.3 物理机尝试访问

#可以在代理服务器里查看到缓存的key
#此时修改index内容客户端请求并不会发生改变
<h1>i am node2 node2!!!</h1>
#客户端清理缓存再次请求
5.在不使用缓存与使用缓存的对比测速
1.分别处理10000个请求1000个并发对比,先是不使用缓存的情况
[root@localhost nginx]# ab -n 10000 -c 1000 http://www.test.com/index.html
This is ApacheBench, Version 2.3 <$Revision: 1430300 $>
Copyright 1996 Adam Twiss, Zeus Technology Ltd, http://www.zeustech.net/
Licensed to The Apache Software Foundation, http://www.apache.org/
Benchmarking www.test.com (be patient)
Completed 1000 requests
Completed 2000 requests
Completed 3000 requests
Completed 4000 requests
Completed 5000 requests
Completed 6000 requests
Completed 7000 requests
Completed 8000 requests
Completed 9000 requests
Completed 10000 requests
Finished 10000 requests
Server Software: nginx/1.6.3
Server Hostname: www.test.com
Server Port: 80
Document Path: /index.html
Document Length: 20 bytes
Concurrency Level: 1000
Time taken for tests: 4.393 seconds
Complete requests: 10000
Failed requests: 836
(Connect: 0, Receive: 0, Length: 836, Exceptions: 0)
Write errors: 0
Non-2xx responses: 836
Total transferred: 2586108 bytes
HTML transferred: 343792 bytes
Requests per second: 2276.42 [#/sec] (mean)
Time per request: 439.286 [ms] (mean)
Time per request: 0.439 [ms] (mean, across all concurrent requests)
Transfer rate: 574.91 [Kbytes/sec] received
Connection Times (ms)
min mean[+/-sd] median max
Connect: 0 114 312.3 6 3018
Processing: 11 116 283.4 51 3038
Waiting: 1 112 283.4 48 3038
Total: 18 230 482.0 64 4019
Percentage of the requests served within a certain time (ms)
50% 64
66% 78
75% 93
80% 105
90% 1054
95% 1261
98% 2066
99% 2315
100% 4019 (longest request)
#在不使用缓存的情况下耗费了4.393秒,值可以多测试几次对比
2.使用缓存
[root@localhost nginx]# ab -n 10000 -c 1000 http://www.test.com/index.html
This is ApacheBench, Version 2.3 <$Revision: 1430300 $>
Copyright 1996 Adam Twiss, Zeus Technology Ltd, http://www.zeustech.net/
Licensed to The Apache Software Foundation, http://www.apache.org/
Benchmarking www.test.com (be patient)
Completed 1000 requests
Completed 2000 requests
Completed 3000 requests
Completed 4000 requests
Completed 5000 requests
Completed 6000 requests
Completed 7000 requests
Completed 8000 requests
Completed 9000 requests
Completed 10000 requests
Finished 10000 requests
Server Software: nginx/1.6.3
Server Hostname: www.test.com
Server Port: 80
Document Path: /index.html
Document Length: 20 bytes
Concurrency Level: 1000
Time taken for tests: 1.179 seconds
Complete requests: 10000
Failed requests: 651
(Connect: 0, Receive: 0, Length: 651, Exceptions: 0)
Write errors: 0
Total transferred: 2337250 bytes
HTML transferred: 186980 bytes
Requests per second: 8483.63 [#/sec] (mean)
Time per request: 117.874 [ms] (mean)
Time per request: 0.118 [ms] (mean, across all concurrent requests)
Transfer rate: 1936.36 [Kbytes/sec] received
Connection Times (ms)
min mean[+/-sd] median max
Connect: 0 66 195.8 24 1044
Processing: 11 31 11.0 30 249
Waiting: 0 22 11.3 22 239
Total: 35 97 194.3 55 1070
Percentage of the requests served within a certain time (ms)
50% 55
66% 59
75% 62
80% 64
90% 84
95% 107
98% 1062
99% 1066
100% 1070 (longest request)
#可以看到在使用缓存的情况下处理10000个请求1000的并发耗时为1.179秒!!!
注意:在使用到缓存的时候务必考虑缓存过期!根据生产场景使用
Nginx代理缓存功能的更多相关文章
- nginx代理缓存
(1)缓存介绍 1.代理服务器端缓存作用 减少后端压力,提高网站并发延时 2.缓存常见类型 服务器端缓存:代理缓存,获取服务器端内容进行缓存 浏览器端缓存 3.nginx代理缓存:proxy_cach ...
- 12、Nginx代理缓存服务
通常情况下缓存是用来减少后端压力, 将压力尽可能的往前推, 减少后端压力,提高网站并发延时 1.缓存常见类型 服务端缓存 代理缓存, 获取服务端内容进行缓存 客户端浏览器缓存 Nginx代理缓存原理 ...
- nginx实现缓存功能
Nginx从0.7.48版本开始,支持了类似Squid的缓存功能.这个缓存是把URL及相关组合当作Key,用md5编码哈希后保存在硬盘上,所以它可以支持任意URL链接,同时也支持404/301/302 ...
- 网站集群架构(LVS负载均衡、Nginx代理缓存、Nginx动静分离、Rsync+Inotify全网备份、Zabbix自动注册全网监控)--技术流ken
前言 最近做了一个不大不小的项目,现就删繁就简单独拿出来web集群这一块写一篇博客.数据库集群请参考<MySQL集群架构篇:MHA+MySQL-PROXY+LVS实现MySQL集群架构高可用/高 ...
- 21.Nginx代理缓存
1.环境准备 操作系统 应用服务 外网地址 内网地址 CentOS7.6 LB01 10.0.0.5 172.16.1.5 CentOS7.6 Web01 10.0.0.7 172.16.1.7 2. ...
- 开启Nginx代理HTTPS功能
1.首先查看是否已经安装SSL openssl version -a 2.生成SSL证书 在nginx目录下创建ssl文件夹 cd /etc/pki mkdir nginx cd nginx 生成20 ...
- nginx的反向代理功能和缓存功能
html { font-family: sans-serif } body { margin: 0 } article,aside,details,figcaption,figure,footer,h ...
- nginx反向代理+缓存开启+url重写+负载均衡(带健康探测)的部署记录
在日常运维工作中,运维人员会时常使用到nginx的反向代理,负载均衡以及缓存等功能来优化web服务性能. 废话不多说,下面对测试环境下的nginx反向代理+缓存开启+url重写+负载均衡(带健康探测) ...
- nginx实现负载均衡、缓存功能实战
nginx实现负载均衡.缓存功能实战 什么是正向代理?应用场景:翻墙 什么是反向代理?例如:haproxy和nginx Nginx实现反向代理 nginx代理基于是ngx_http_proxy_m ...
随机推荐
- PostGIS安装教程
安装环境: win10专业版 postgresql-10.6-1-windows-x64 ---因为使用的是ArcGIS10.4版本,pg10.6对于ArcGIS10.4版本过高,建议选择安装pg9. ...
- 超速入门AT指令集 | 我的物联网成长记
[摘要] 在物联网中,AT命令集可用于控制&调测设备.通信模块入网等.本文为您介绍NB-IoT常用的AT命令集及其调测工具. 什么是AT指令集 AT命令,用来控制TE(Terminal Equ ...
- python字符串、正则-xdd
1.分割字符串 str.split(sep,maxsplit) #(分隔符,分几次) 2.合并字符串 str2=string.join(iterable) #str2='@'.join(list1) ...
- IdentityServer4 保护.net framework webapi
一.IS4服务器配置 1.新建一个Asp.net Core MVC程序,模板选择 Empty 2.Nuget添加 IdentityServer4,我这里添加的是2.5.3 3.添加Config文件, ...
- 是谁,在敲打我窗-CSS雨滴动画效果
1.扯闲篇 是谁在敲打我窗 是谁在撩动琴弦 那一段被遗忘的时光 渐渐地回升出我心坎 是谁在敲打我窗 是谁在撩动琴弦 记忆中那欢乐的情景 慢慢地浮现在我的脑海 那缓缓飘落的小雨 不停地打在我 ...
- Coroutines in Android - One Shot and Multiple Values
Coroutines in Android - One Shot and Multiple Values 在Android中, 我们用到的数据有可能是一次性的, 也有可能是需要多个值的. 本文介绍An ...
- jsp html 实现隐藏输入框,点击可以取消隐藏&&弹出输入框
jsp代码: <script language="javascript" type="text/javascript"> function chg ...
- Chapter 02—Creating a dataset(Part1)
一. 数据集 1. 在R语言中,进行数据分析的第一步是创建一个包含待研究数据并且符合要求的数据集. · 选择装数据的数据结构 · 把数据装入数据结构中 2. 理解数据集 (1)数据集通常是矩形的数据列 ...
- 使用 colgroup 和 col 实现响应式表格
Table 在项目使用中十分频繁,特别是在后台管理系统中,table 无疑是数据展示的第一公民,在早些年的网页中,table 也是网页布局的第一选择,然后使用好 table 并不容易,其它有很多子元素 ...
- Scheme实现数字电路仿真(1)——组合电路
EDA是个很大的话题,本系列只针对其中一小部分,数字电路的仿真,叙述一点概念性的东西,并不会过于深入,这方面的内容实则是无底洞.本系列并不是真的要做EDA,按照SICP里的相关内容,采用Lisp的方言 ...