【javaFX学习】(二) 面板手册
移至http://blog.csdn.net/qq_37837828/article/details/78732591 更新
找了好几个资料,没找到自己想要的,自己整理下吧,方便以后用的时候挑选,边学边记。以学习笔记为主,所以会写的会偏个人记忆性。非教程,有什么问题一起讨论啊。
各个不同的控件放入不同的面板中有不同的效果,挨个开撸。这里可以把面板当作容器来理解,就是装各种东西的,容器装容器、装控件等等。
面板列表:
Accordion
手风琴面板:就是一个折叠展开功能,一般与TitledPane一起用)
AnchorPane
相对位置控制面板:锚布局:可以设置容器里面的控件的各种相对位置,主要用于界面大小改变而控件相对位置不变的情况
BorderPane
区域面板:划分为了5个区域:上、下、左、右、中
FlowPane
流面板:会随着界面大小而改变控件布局
GridPane
网格面板 :面板中的控件可以设置按网格坐标分布,就当作一个棋盘吧,控件就是棋子,指哪放哪
HBox
水平排列面板:顾名思义,水平排列,与垂直排列VBox对应
Pane
所有面板的爸爸:当作java的Object来理解就好了
ScrollPane
滚动面板:瞄一眼你的网页右边有没有一个滚动条→_→,注意滚动面板里面只能放一个元素,所以一般是把需要的控件都装到一个其他面板里面,再把那个叫其他的面板扔到这个滚动面板里面-_-
SplitPane
分割面板:里面存放的其他面板可以自由拖动大小)
StackPane
层级面板:放入进StackPane的子模块会根据放入顺序的不同形成不同的层级关系.
TabPane
标签面板: 用来放标签
TilePane
片面板: 就是特殊的流面板,里面每个元素的网格大小都是相同的,测试发现取最大的,详见示例
TitledPane
标题面板:用法见Accordion
VBox
竖直面板:用法见HBox示例
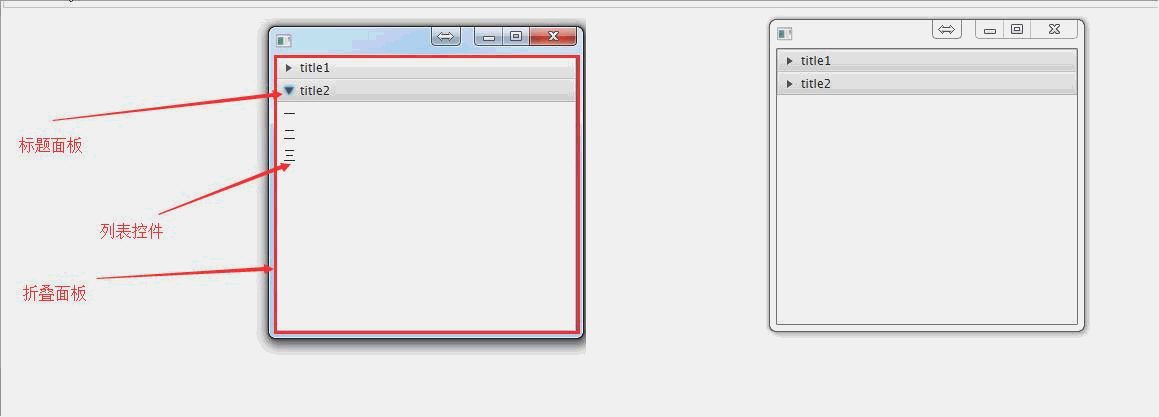
Accordion(折叠面板):
import javafx.application.Application;

import javafx.collections.FXCollections;

import javafx.collections.ObservableList;

import javafx.scene.Scene;

import javafx.scene.control.Accordion;

import javafx.scene.control.Button;

import javafx.scene.control.ListView;

import javafx.scene.control.TitledPane;

import javafx.stage.Stage;

public class Main extends Application {

    @Override

    public void start(Stage primaryStage) throws Exception{

        //创建标题面板1

        TitledPane titledPane1 = new TitledPane("title1",new Button("按钮1"));

        //创建一个列表控件

        ListView<String> listView = new ListView<>();

        ObservableList<String> ob = FXCollections.observableArrayList();

        ob.addAll("一","二","三");

        listView.setItems(ob);

        //创建标题面板2

        TitledPane titledPane2 = new TitledPane("title2",listView);

        //创建折叠面板

        Accordion accordion = new Accordion();

        //将标题面板添加到折叠面板中

        accordion.getPanes().addAll(titledPane1,titledPane2);

        primaryStage.setScene(new Scene(accordion, 300, 275));

        primaryStage.show();

    }

    public static void main(String[] args) {

        launch(args);

    }

}
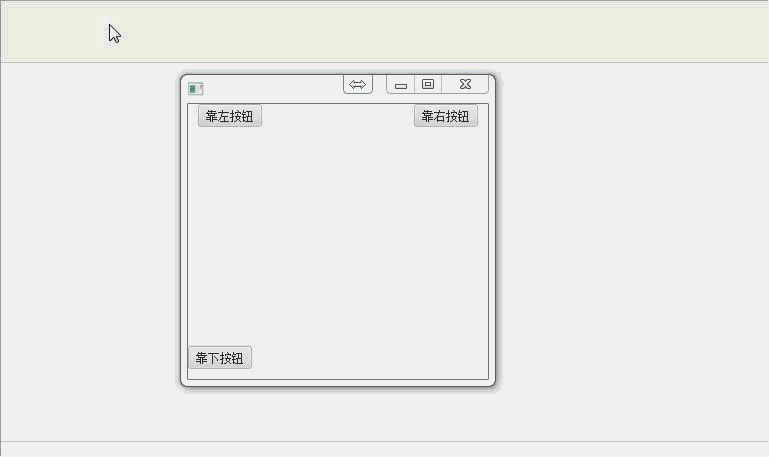
AnchorPane(控件位置控制面板):
import javafx.application.Application;

import javafx.scene.Scene;

import javafx.scene.control.Button;

import javafx.scene.layout.AnchorPane;

import javafx.stage.Stage;

public class Main extends Application {

    @Override

    public void start(Stage primaryStage) throws Exception {

        //创建一个anchorPane面板,

        AnchorPane anchorPane = new AnchorPane();

        //创建按钮控件

        Button button1 = new Button("靠右按钮");

        Button button2 = new Button("靠左按钮");

        Button button3 = new Button("靠下按钮");

        //将按钮控件添加入面板(容器)

        anchorPane.getChildren().addAll(button1,button2,button3);

        //设置边距为

        AnchorPane.setRightAnchor(button1, 10.0);//设置右边距为10

        AnchorPane.setLeftAnchor(button2,10.0);//左

        AnchorPane.setBottomAnchor(button3,10.0);//下

        primaryStage.setScene(new Scene(anchorPane, 300, 275));

        primaryStage.show();

    }

    public static void main(String[] args) {

        launch(args);

    }

}
BorderPane:区域面板,将界面划分为了5个区域

import javafx.application.Application;

import javafx.scene.Scene;

import javafx.scene.control.Button;

import javafx.scene.layout.BorderPane;

import javafx.stage.Stage;

public class Main extends Application {

    @Override

    public void start(Stage primaryStage) throws Exception {

        //创建一个区域控制面板

        BorderPane borderPane = new BorderPane();

        //创建5个按钮,洗净,备用

        Button button1 = new Button("左按钮");

        Button button2 = new Button("右按钮");

        Button button3 = new Button("上按钮");

        Button button4 = new Button("下按钮");

        Button button5 = new Button("中按钮");

        //将按钮放入相应区域

        borderPane.setLeft(button1);

        borderPane.setRight(button2);

        borderPane.setTop(button3);

        borderPane.setBottom(button4);

        borderPane.setCenter(button5);

        primaryStage.setScene(new Scene(borderPane, 300, 275));

        primaryStage.show();

    }

    public static void main(String[] args) {

        launch(args);

    }

}

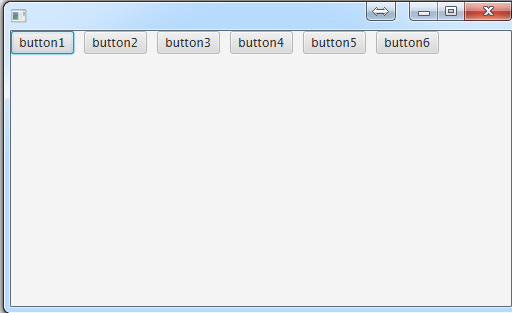
FlowPane(流面板):
import javafx.application.Application;

import javafx.scene.Scene;

import javafx.scene.control.Button;

import javafx.scene.layout.FlowPane;

import javafx.stage.Stage;

public class Main extends Application {

    @Override

    public void start(Stage primaryStage) throws Exception {

        //创建一个流面板

        FlowPane flowPane = new FlowPane();

        //创建一堆按钮或其他什么东西

        Button button1 = new Button("button1");

        Button button2 = new Button("button2");

        Button button3 = new Button("button3");

        Button button4 = new Button("button4");

        Button button5 = new Button("button5");

        Button button6 = new Button("button6");

        //把按钮都扔进去

        flowPane.getChildren().addAll(button1,button2,button3,button4,button5,button6);

        primaryStage.setScene(new Scene(flowPane, 400, 275));

        primaryStage.show();

    }

    public static void main(String[] args) {

        launch(args);

    }

}

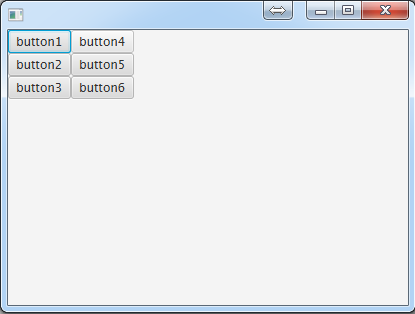
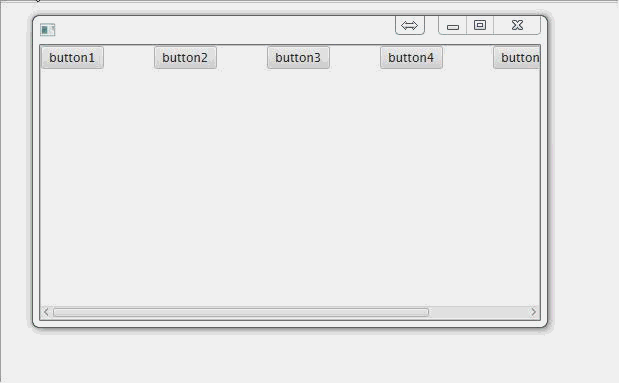
GridPane(网格布局):
创建6个按钮,前3个放第一行,后3个放第二行
import javafx.application.Application;

import javafx.scene.Scene;

import javafx.scene.control.Button;

import javafx.scene.layout.GridPane;

import javafx.stage.Stage;

public class Main extends Application {

    @Override

    public void start(Stage primaryStage) throws Exception {

        //创建一个网格面板

        GridPane gridPane = new GridPane();

        //创建一堆按钮或其他什么东西

        Button button1 = new Button("button1");

        Button button2 = new Button("button2");

        Button button3 = new Button("button3");

        Button button4 = new Button("button4");

        Button button5 = new Button("button5");

        Button button6 = new Button("button6");

        //把按钮按照网格坐标扔进去

        gridPane.add(button1,0,0);

        gridPane.add(button2,0,1);

        gridPane.add(button3,0,2);

        gridPane.add(button4,1,0);

        gridPane.add(button5,1,1);

        gridPane.add(button6,1,2);

        primaryStage.setScene(new Scene(gridPane, 400, 275));

        primaryStage.show();

    }

    public static void main(String[] args) {

        launch(args);

    }

}
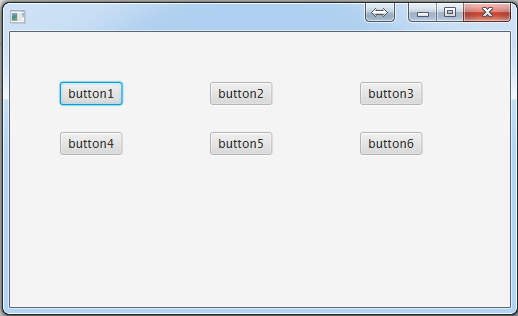
HBox(水平排列)
import javafx.application.Application;

import javafx.scene.Scene;

import javafx.scene.control.Button;

import javafx.scene.layout.HBox;

import javafx.stage.Stage;

public class Main extends Application {

    @Override

    public void start(Stage primaryStage) throws Exception {

        //创建一个水平排列面板

        HBox hBox = new HBox();

        //创建一堆按钮或其他什么东西

        Button button1 = new Button("button1");

        Button button2 = new Button("button2");

        Button button3 = new Button("button3");

        Button button4 = new Button("button4");

        Button button5 = new Button("button5");

        Button button6 = new Button("button6");

        //把按钮扔进去

        hBox.getChildren().addAll(button1,button2,button3,button4,button5,button6);

        //设置一下各个按钮的间隔。

        hBox.setSpacing(10.0);

        primaryStage.setScene(new Scene(hBox, 500, 275));

        primaryStage.show();

    }

    public static void main(String[] args) {

        launch(args);

    }

}
Pane:
由于是所有面板的"父类",所以不具备其他面板已经设置好的的布局属性,故而加进去的控件要记得自己设置在面板中的坐标,否则就会挤在一堆,像这样:

设置一下控件的坐标:
import javafx.application.Application;

import javafx.scene.Scene;

import javafx.scene.control.Button;

import javafx.scene.layout.Pane;

import javafx.stage.Stage;

public class Main extends Application {

    @Override

    public void start(Stage primaryStage) throws Exception {

        //创建一个面板

        Pane pane = new Pane();

        //创建一堆按钮或其他什么东西

        Button button1 = new Button("button1");

        Button button2 = new Button("button2");

        Button button3 = new Button("button3");

        Button button4 = new Button("button4");

        Button button5 = new Button("button5");

        Button button6 = new Button("button6");

        //设置按钮在控件中的坐标

        button1.setLayoutX(50);button1.setLayoutY(50);

        button2.setLayoutX(200);button2.setLayoutY(50);

        button3.setLayoutX(350);button3.setLayoutY(50);

        button4.setLayoutX(50);button4.setLayoutY(100);

        button5.setLayoutX(200);button5.setLayoutY(100);

        button6.setLayoutX(350);button6.setLayoutY(100);

        //把按钮扔进去

        pane.getChildren().addAll(button1,button2,button3,button4,button5,button6);

        primaryStage.setScene(new Scene(pane, 500, 275));

        primaryStage.show();

    }

    public static void main(String[] args) {

        launch(args);

    }

}
ScrollPane(滚动面板):
import javafx.application.Application;

import javafx.scene.Scene;

import javafx.scene.control.Button;

import javafx.scene.control.ScrollPane;

import javafx.scene.layout.HBox;

import javafx.stage.Stage;

public class Main extends Application {

    @Override

    public void start(Stage primaryStage) throws Exception {

        //创建一个滚动面板

        ScrollPane scrollPane = new ScrollPane();

        //创建一个水平排列面板,用来装按钮,如果想测试垂直滚动,就换成垂直排列面板

        HBox hBox = new HBox();

        //创建一堆按钮或其他什么东西

        Button button1 = new Button("button1");

        Button button2 = new Button("button2");

        Button button3 = new Button("button3");

        Button button4 = new Button("button4");

        Button button5 = new Button("button5");

        Button button6 = new Button("button6");

        //把按钮放在行面板里面

        hBox.getChildren().addAll(button1,button2,button3,button4,button5,button6);

        //为了少装几个东西而出现滚动条,我们把按钮间隔设大一点

        hBox.setSpacing(50);

        //把行面板放到滚动面板里面

        scrollPane.setContent(hBox);

        primaryStage.setScene(new Scene(scrollPane, 500, 275));

        primaryStage.show();

    }

    public static void main(String[] args) {

        launch(args);

    }

}
SplitPane(分割面板):
import javafx.application.Application;

import javafx.scene.Scene;

import javafx.scene.control.Button;

import javafx.scene.control.SplitPane;

import javafx.scene.layout.Pane;

import javafx.stage.Stage;

public class Main extends Application {

    @Override

    public void start(Stage primaryStage) throws Exception {

        //创建一个滚动面板

        SplitPane splitPane = new SplitPane();

        //创建两个普通面板

        Pane pane1 = new Pane(new Button("左边的面板"));

        Pane pane2 = new Pane(new Button("右边的面板"));

        //添加到滚动面板中

        splitPane.getItems().addAll(pane1,pane2);

        primaryStage.setScene(new Scene(splitPane, 500, 275));

        primaryStage.show();

    }

    public static void main(String[] args) {

        launch(args);

    }

}

StackPane(层级面板):
import javafx.application.Application;

import javafx.scene.Scene;

import javafx.scene.control.Button;

import javafx.scene.layout.Background;

import javafx.scene.layout.BackgroundFill;

import javafx.scene.layout.Pane;

import javafx.scene.layout.StackPane;

import javafx.scene.paint.Color;

import javafx.stage.Stage;

public class Main extends Application {

    @Override

    public void start(Stage primaryStage) throws Exception {

        //创建一个层级面板

        StackPane stack = new StackPane();

        //创建一个普通面板,并设置背景为黑色

        Pane pane = new Pane();

        pane.setBackground(new Background(new BackgroundFill(Color.BLACK,null,null)));

        //创建一个按钮

        Button button = new Button("按钮2");

        //将按钮和普通面板添加到stackPane面板中

        //stack.getChildren().addAll(pane,button);

        stack.getChildren().addAll(button,pane);

        primaryStage.setScene(new Scene(stack, 300, 275));

        primaryStage.show();

    }

    public static void main(String[] args) {

        launch(args);

    }

}
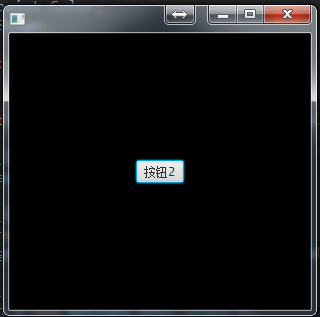
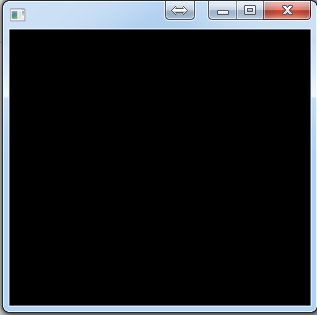
如图所示,先添加pane时,pane在下面,按钮在pane的上面;先添加button时,button在下面,pane在上面,所以将button盖住了。
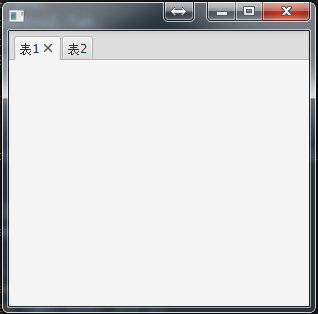
TabPane(标签面板):
import javafx.application.Application;

import javafx.scene.Scene;

import javafx.scene.control.Tab;

import javafx.scene.control.TabPane;

import javafx.stage.Stage;

public class Main extends Application {

    @Override

    public void start(Stage primaryStage) throws Exception {

        //创建一个标签面板

        TabPane tabPane = new TabPane();

        //创建两个标签,放入标签面板

        Tab tab1 = new Tab("表1");

        Tab tab2 = new Tab("表2");

        tabPane.getTabs().addAll(tab1,tab2);

        primaryStage.setScene(new Scene(tabPane, 300, 275));

        primaryStage.show();

    }

    public static void main(String[] args) {

        launch(args);

    }

}
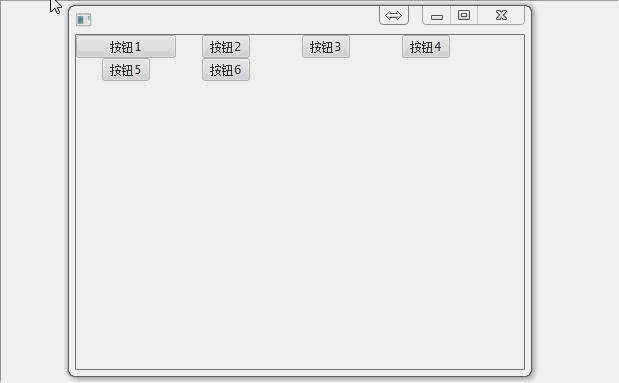
TilePane(片面板):
特殊的流面板,里面的元素都在网格中,每个网格大小相同,默认取最大的网格大小.例如下面把按钮1设成100宽,则所有的网格都变成了100宽
import javafx.application.Application;

import javafx.scene.Scene;

import javafx.scene.control.Button;

import javafx.scene.layout.TilePane;

import javafx.stage.Stage;

public class Main extends Application {

    @Override

    public void start(Stage primaryStage) throws Exception {

        //创建片面板

        TilePane tilePane = new TilePane();

        Button button1 = new Button("按钮1");

        button1.setPrefWidth(100);

        Button button2 = new Button("按钮2");

        Button button3 = new Button("按钮3");

        Button button4 = new Button("按钮4");

        Button button5 = new Button("按钮5");

        Button button6 = new Button("按钮6");

        tilePane.getChildren().addAll(button1,button2,button3,button4,button5,button6);

        primaryStage.setScene(new Scene(tilePane, 300, 275));

        primaryStage.show();

    }

    public static void main(String[] args) {

        launch(args);

    }

}
【javaFX学习】(二) 面板手册的更多相关文章
- Android JNI学习(二)——实战JNI之“hello world”
本系列文章如下: Android JNI(一)——NDK与JNI基础 Android JNI学习(二)——实战JNI之“hello world” Android JNI学习(三)——Java与Nati ...
- JavaFX学习之道:JavaFX之TableView
TableView表 TableColumn列 构建一个表主要有TableView,TableColumn,ObservableList,Bean. 加入列table.getColumns ...
- emberjs学习二(ember-data和localstorage_adapter)
emberjs学习二(ember-data和localstorage_adapter) 准备工作 首先我们加入ember-data和ember-localstorage-adapter两个依赖项,使用 ...
- ReactJS入门学习二
ReactJS入门学习二 阅读目录 React的背景和基本原理 理解React.render() 什么是JSX? 为什么要使用JSX? JSX的语法 如何在JSX中如何使用事件 如何在JSX中如何使用 ...
- TweenMax动画库学习(二)
目录 TweenMax动画库学习(一) TweenMax动画库学习(二) TweenMax动画库学习(三) Tw ...
- Hbase深入学习(二) 安装hbase
Hbase深入学习(二) 安装hbase This guidedescribes setup of a standalone hbase instance that uses the local fi ...
- Struts2框架学习(二) Action
Struts2框架学习(二) Action Struts2框架中的Action类是一个单独的javabean对象.不像Struts1中还要去继承HttpServlet,耦合度减小了. 1,流程 拦截器 ...
- Python学习二:词典基础详解
作者:NiceCui 本文谢绝转载,如需转载需征得作者本人同意,谢谢. 本文链接:http://www.cnblogs.com/NiceCui/p/7862377.html 邮箱:moyi@moyib ...
- Quartz学习--二 Hello Quartz! 和源码分析
Quartz学习--二 Hello Quartz! 和源码分析 三. Hello Quartz! 我会跟着 第一章 6.2 的图来 进行同步代码编写 简单入门示例: 创建一个新的java普通工程 ...
- SpringCloud学习(二):微服务入门实战项目搭建
一.开始使用Spring Cloud实战微服务 1.SpringCloud是什么? 云计算的解决方案?不是 SpringCloud是一个在SpringBoot的基础上构建的一个快速构建分布式系统的工具 ...
随机推荐
- Springboot:SpringBoot2.0整合WebSocket,实现后端数据实时推送!
一.什么是WebSocket? B/S结构的软件项目中有时客户端需要实时的获得服务器消息,但默认HTTP协议只支持请求响应模式,这样做可以简化Web服务器,减少服务器的负担,加快响应速度,因为服务器不 ...
- 其他:压力测试Jmeter工具使用
下载路径: http://yd01.siweidaoxiang.com:8070/jmeter_52z.com.zip 配置汉化中文: 找到jmeter的安装目录:打开 \bin\jmeter.pro ...
- 资源:Maven仓库地址路径
Maven下载路径 https://archive.apache.org/dist/maven/maven-3/ 查找需要引入的包路径时,可以在maven仓库进行查找 maven仓库地址:https: ...
- imply套件以及plyql的安装
本文出自:http://www.cnblogs.com/gaojiang/p/7212149.html 1.安装nodejs,版本需要在4.0以上,安装方法见上篇博客 2.下载imply,地址:htt ...
- 32. Longest Valid Parentheses **堆栈
description: Given a string containing just the characters '(' and ')', find the length of the longe ...
- ESP32智能配网笔记
基于ESP-IDF4.1 #include <string.h> #include <stdlib.h> #include "freertos/FreeRTOS.h& ...
- 使用crt连接linux慢
1.主要原因是linux中启用了 修改sshd的配置文件把其中dns解析设置为no即可,操作如下: [root@dong ~]# vi /etc/ssh/sshd_config 查找: #UseDNS ...
- Django基础010--ORM操作
orm返回的数据有两种,QuerySet,object 1.QuerySet支持链式编程,可以在all()后面继续.方法 teachers = models.Teacher.objects.all() ...
- c语言函数的嵌套使用和矩阵运算
这段时间,听刚刚学习c的同学说函数嵌套运用不太熟练,想做一个简单的程序进行练习,我也就当练练手了,哈哈.虽然说是比较简单,但是其中的思维也是值得思考的. 一.函数的嵌套使用 简单说明题目:对于等式 y ...
- 论文阅读:hector_slam: A Flexible and Scalable SLAM System with Full 3D Motion Estimation.
参考:<A Flexible and Scalable SLAM System with Full 3D Motion Estimation.> 该论文是ROS中hector_mappin ...