Hadoop集群搭建中时间同步步骤
一、设置主节点时间服务器的时区
二、在每一个节点上检查是否安装时间服务ntp
三、在主节点上配置时间同步的相关文件
四、在其他从节点上配置与主节点时间同步的脚本
一、设置主节点时间服务器的时区
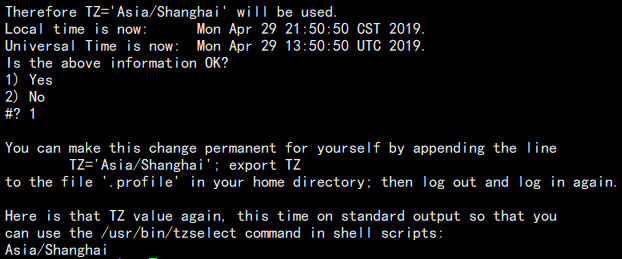
1、选择时区(就选到beijing就行)
[root@node001 ~]# tzselect

2、把时区,将cp /usr/share/zoneinfo/Asia/Shanghai设置为到/etc/localtime的链接
[root@node001 ~]# cp /usr/share/zoneinfo/Asia/Shanghai /etc/localtime
二、在每一个节点上检查是否安装时间服务ntp
[root@node001 ~]# rpm -q ntp
ntp-4.2.6p5-15.el6.centos.x86_64
[root@node001 ~]# chkconfig --list ntpd
ntpd 0:关闭 1:关闭 2:启用 3:启用 4:启用 5:启用 6:关闭
# For more information about this file, see the man pages

# ntp.conf(5), ntp_acc(5), ntp_auth(5), ntp_clock(5), ntp_misc(5), ntp_mon(5).

driftfile /var/lib/ntp/drift

# Permit time synchronization with our time source, but do not

# permit the source to query or modify the service on this system.

restrict default kod nomodify notrap nopeer noquery

restrict -6 default kod nomodify notrap nopeer noquery

# Permit all access over the loopback interface.  This could

# be tightened as well, but to do so would effect some of

# the administrative functions.

restrict 127.0.0.1

restrict -6 ::1

# Hosts on local network are less restricted.

restrict 192.168.181.0 mask 255.255.255.0 nomodify notrap        #这里新增内容,更改为自己的网关,我的是181.第一处新增,意思是从IP                                                                                                                                        #地址192.168.181.1-192.168.181.254,默认网关255.255.255.0的服务器                                                                                                                                                                      #都可以使用我们的NTP服务器来同步时间

# Use public servers from the pool.ntp.org project.

# Please consider joining the pool (http://www.pool.ntp.org/join.html).

#server 0.centos.pool.ntp.org iburst

#server 1.centos.pool.ntp.org iburst                 #如果集群是在一个封闭的局域网内,可以屏蔽掉默认的server这里注释掉

#server 2.centos.pool.ntp.org iburst

#server 3.centos.pool.ntp.org iburst

server 210.72.145.44 perfer          #中国国家受时中心

server 202.112.10.36                 #1.cn.pool.ntp.org

server 59.124.196.83                          #这里可有可无,制定ntp服务器的同步时间范围

server 192.168.217.130

#broadcast 192.168.1.255 autokey        # broadcast server

#broadcastclient                        # broadcast client

#broadcast 224.0.1.1 autokey            # multicast server

#multicastclient 224.0.1.1              # multicast client

#manycastserver 239.255.254.254         # manycast server

#manycastclient 239.255.254.254 autokey # manycast client

# Enable public key cryptography.

#crypto

includefile /etc/ntp/crypto/pw

# Key file containing the keys and key identifiers used when operating
# with symmetric key cryptography.

keys /etc/ntp/keys

# Specify the key identifiers which are trusted.

#trustedkey 4 8 42

# Specify the key identifier to use with the ntpdc utility.

#requestkey 8

# Specify the key identifier to use with the ntpq utility.

#controlkey 8

# Enable writing of statistics records.

#statistics clockstats cryptostats loopstats peerstats

server 127.127.1.0                                    #当服务器与公网失去连接后使用本地时间作为服务的同步时间

fudge 127.127.1.0 stratum 10
[root@node001 ~]# vi /etc/sysconfig/ntpd
增加内容
SYNC_HWCLOCK=yes
正在启动 ntpd: [确定]
[root@node002 ~]# crontab -e
* */1 * * * /usr/sbin/ntpdate node001
检查是否写成
[root@node002 ~]# crontab -l
* */1 * * * /usr/sbin/ntpdate node001
同样的步骤在其他节点重复
更改一个节点的时间
[root@node002 ~]# date -s "2019-4-29 00:00:00"
十分钟后查看时间检查是否同步
[root@node002 ~]# date
如果现在立即要同步,可以手动同步
[root@node002 ~]#ntpdate node001
Hadoop集群搭建中时间同步步骤的更多相关文章
- Hadoop集群搭建安装过程(二)(图文详解---尽情点击!!!)
Hadoop集群搭建安装过程(二)(配置SSH免密登录)(图文详解---尽情点击!!!) 一.配置ssh无密码访问 ®生成公钥密钥对 1.在每个节点上分别执行: ssh-keygen -t rsa(一 ...
- Linux环境下Hadoop集群搭建
Linux环境下Hadoop集群搭建 前言: 最近来到了武汉大学,在这里开始了我的研究生生涯.昨天通过学长们的耐心培训,了解了Hadoop,Hdfs,Hive,Hbase,MangoDB等等相关的知识 ...
- Hadoop学习之路(四)Hadoop集群搭建和简单应用
概念了解 主从结构:在一个集群中,会有部分节点充当主服务器的角色,其他服务器都是从服务器的角色,当前这种架构模式叫做主从结构. 主从结构分类: 1.一主多从 2.多主多从 Hadoop中的HDFS和Y ...
- 三节点Hadoop集群搭建
1. 基础环境搭建 新建3个CentOS6.5操作系统的虚拟机,命名(可自定)为masternode.slavenode1和slavenode2.该过程参考上一篇博文CentOS6.5安装配置详解 2 ...
- 大数据初级笔记二:Hadoop入门之Hadoop集群搭建
Hadoop集群搭建 把环境全部准备好,包括编程环境. JDK安装 版本要求: 强烈建议使用64位的JDK版本,这样的优势在于JVM的能够访问到的最大内存就不受限制,基于后期可能会学习到Spark技术 ...
- Hadoop集群搭建-01前期准备
Hadoop集群搭建-05安装配置YARN Hadoop集群搭建-04安装配置HDFS Hadoop集群搭建-03编译安装hadoop Hadoop集群搭建-02安装配置Zookeeper Hado ...
- Hadoop 集群搭建和维护文档
一.前言 -- 基础环境准备 节点名称 IP NN DN JNN ZKFC ZK RM NM Master Worker master1 192.168.8.106 * * * * * * maste ...
- Hadoop集群搭建(完全分布式版本) VMWARE虚拟机
Hadoop集群搭建(完全分布式版本) VMWARE虚拟机 一.准备工作 三台虚拟机:master.node1.node2 时间同步 ntpdate ntp.aliyun.com 调整时区 cp /u ...
- Hadoop集群搭建的详细过程
Hadoop集群搭建 一.准备 三台虚拟机:master01,node1,node2 时间同步 1.date命令查看三台虚拟机时间是否一致 2.不一致时间同步:ntpdate ntp.aliyun.c ...
随机推荐
- lnmp源码编译安装zabbix
软件安装 Mysql 安装 tar xf mysql-5.7.13-1.el6.x86_64.rpm-bundle.tar -C mysql rpm -e --nodeps mysql-libs-5 ...
- sql_id VS hash_value
有没有发现,v$session,v$sql,v$sqlarea,v$sqltext,v$sql_shared_cursor等试图连接的时候经常会用到hash_value,sql_id,但是他们2个之间 ...
- python(1)在windows8.1下搭建python27和python36环境
去Python官网下载需要的Python版本 https://www.python.org/ 我下载的是下面这两个版本: Python 2.7.13 Python 3.6.1 安装Python27时, ...
- java基础-day23
第11天 面向网络编程 今日内容介绍 u 网络编程概述 u UDP u TCP 第1章 网络编程概述 1.1 网络协议 通过计算机网络可以使多台计算机实现连接,位于同一个网络中的 ...
- JDBC架构
JDBC API支持两层和三层处理模型进行数据库访问,但在一般的JDBC体系结构由两层组成: JDBC API: 提供了应用程序对JDBC的管理连接. JDBC Driver API: 支持JDBC管 ...
- hdu 5089 使做对k-1题最大概率的选题方案
http://acm.hdu.edu.cn/showproblem.php?pid=5089 给出N道难度递增的题目,难度用可能做出的百分比表示,选出K道题目使得做出K-1道题目的概率最大. 选k题的 ...
- MCU编程_基础
包含头文件符号的区别 有这样的包含头文件语句 #include <reg52.h> #include"reg52.h" 两者区别在于: <>:编译器先进入软 ...
- EBS Custom Password Rules
https://blogs.oracle.com/manojmadhusoodanan/entry/custom_password_rules Custom Password Rules By Man ...
- Oracle开发包被锁解决办法-终极办法
http://www.itpub.net/forum.php?mod=viewthread&tid=1761963 以前在数据库维护中,基本都是碰到表被锁的情况,然后就是查找被锁的表相关的信息 ...
- Flask系列05--Flask的配置config
一.flask配置 示例说明, 就是使用config进行配置 from flask import Flask app = Flask(__name__) # type:Flask app.conf ...