Cisco基础(四):配置标准ACL、配置扩展ACL、配置标准命名ACL、配置扩展命名ACL
一、配置标准ACL
目标:
络调通后,保证网络是通畅的。同时也很可能出现未经授权的非法访问。企业网络既要解决连连通的问题,还要解决网络安全的问题。
- 配置标准ACL实现拒绝PC1(IP地址为192.168.1.1)对外问网络192.168.2.1的访问
方案:
访问控制是网络安全防范和保护的主要策略,它的主要任务是保证网络资源不被非法使用和访问。它是保证网络安全最重要的核心策略之一。
访问控制列表(Access Control Lists,ACL)是应用在路由器接口的指令列表。这些指令列表用来告诉路由器哪能些数据包可以收、哪能数据包需要拒绝。至于数据包是被接收还是拒绝,可以由类似于源地址、目的地址、端口号等的特定指示条件来决定。
标准访问控制列表只能根据数据包的源IP地址决定是否允许通过。
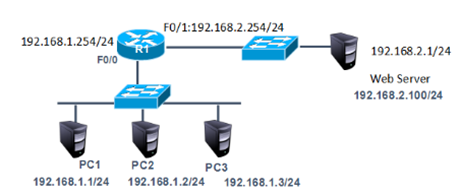
网络拓扑如下图所示:
步骤:
步骤一:在R1上配置接口IP
tarena-R1(config)#interface f0/0
tarena-R1(config-if)#ip address 192.168.1.254 255.255.255.0
tarena-R1(config-if)#no shutdown
tarena-R1(config-if)#interface f0/1
tarena-R1(config-if)#ip address 192.168.2.254 255.255.255.0
tarena-R1(config-if)#no shutdown
步骤二:测试主机到192.168.2.1的连通性
在实施ACL之前先检查网络是否能够正常通信,因为没有任何限制,网络应该是处于连通状态。
PC1测试如下所示:
PC>ipconfig
FastEthernet0 Connection:(default port)
Link-local IPv6 Address.........: FE80::2E0:F7FF:FED6:54CC
IP Address......................: 192.168.1.1
Subnet Mask.....................: 255.255.255.0
Default Gateway.................: 192.168.1.254
PC>ping 192.168.2.100
Pinging 192.168.2.100 with 32 bytes of data:
Reply from 192.168.2.1: bytes=32 time=0ms TTL=126
Reply from 192.168.2.1: bytes=32 time=0ms TTL=126
Reply from 192.168.2.1: bytes=32 time=0ms TTL=126
Reply from 192.168.2.1: bytes=32 time=0ms TTL=126
Ping statistics for 192.168.2.1:
Packets: Sent = 4, Received = 2, Lost = 2 (50% loss),
Approximate round trip times in milli-seconds:
Minimum = 0ms, Maximum = 0ms, Average = 0ms
PC>
PC2测试如下所示:
PC>ipconfig
FastEthernet0 Connection:(default port)
Link-local IPv6 Address.........: FE80::2D0:BAFF:FE98:9E29
IP Address......................: 192.168.1.2
Subnet Mask.....................: 255.255.255.0
Default Gateway.................: 192.168.1.254
PC>ping 192.168.2.1
Pinging 192.168.2.1 with 32 bytes of data:
Reply from 192.168.2.1: bytes=32 time=2ms TTL=126
Reply from 192.168.2.1: bytes=32 time=0ms TTL=126
Reply from 192.168.2.1: bytes=32 time=0ms TTL=126
Reply from 192.168.2.1: bytes=32 time=0ms TTL=126
Ping statistics for 192.168.2.1:
Packets: Sent = 4, Received = 4, Lost = 0 (0% loss),
Approximate round trip times in milli-seconds:
Minimum = 0ms, Maximum = 2ms, Average = 0ms
PC>
步骤三:在R1上配置标准访问控制列表,并应用到Fa0/0端口
ACL的匹配规则中,最后有一条隐含拒绝全部。如果语句中全部是拒绝条目,那么最后必须存在允许语句,否则所有数据通信都将被拒绝。
tarena-R1(config)#access-list 1 deny host 192.168.1.1
tarena-R1(config)#access-list 1 permit 192.168.1.0 0.0.0.255
tarena-R1(config)#interface f0/0
tarena-R1(config-if)#ip access-group 1 in
步骤四:分别在两台主机上测试到192.168.2.1的连通性
PC1测试如下所示:
PC>ipconfig
FastEthernet0 Connection:(default port)
Link-local IPv6 Address.........: FE80::2E0:F7FF:FED6:54CC
IP Address......................: 192.168.1.1
Subnet Mask.....................: 255.255.255.0
Default Gateway.................: 192.168.1.254
PC>ping 192.168.2.1
Pinging 192.168.2.1 with 32 bytes of data:
Reply from 192.168.1.254: Destination host unreachable.
Reply from 192.168.1.254: Destination host unreachable.
Reply from 192.168.1.254: Destination host unreachable.
Reply from 192.168.1.254: Destination host unreachable.
Ping statistics for 192.168.2.1:
Packets: Sent = 4, Received = 0, Lost = 4 (100% loss),
PC>
PC2测试如下所示:
PC>ipconfig
FastEthernet0 Connection:(default port)
Link-local IPv6 Address.........: FE80::207:ECFF:FE46:CAC0
IP Address......................: 192.168.1.2
Subnet Mask.....................: 255.255.255.0
Default Gateway.................: 192.168.1.254
PC>ping 192.168.2.1
Pinging 192.168.2.1 with 32 bytes of data:
Reply from 192.168.2.1: bytes=32 time=1ms TTL=127
Reply from 192.168.2.1: bytes=32 time=0ms TTL=127
Reply from 192.168.2.1: bytes=32 time=1ms TTL=127
Reply from 192.168.2.1: bytes=32 time=0ms TTL=127
Ping statistics for 192.168.2.1:
Packets: Sent = 4, Received = 4, Lost = 0 (0% loss),
Approximate round trip times in milli-seconds:
Minimum = 0ms, Maximum = 1ms, Average = 0ms
PC>
结果显示PC2(IP地址为192.168.1.2)可以正常访问192.168.2.1,而PC1(IP地址为192.168.1.1)已经被192.168.1.254(R1)拒绝。
步骤五:在R1上查看相关的ACL信息
tarena-R1#show ip access-lists
Standard IP access list 1
10 deny host 192.168.1.1 (4 match(es))
20 permit 192.168.1.0 0.0.0.255 (8 match(es)
二、配置扩展ACL
目标:
在网络中很有可能要允许或拒绝的并不是某一个源IP地址,而是根据目标地址或是协议来匹配。但是标准访问控制列表只能根据源IP地址来决定是否允许一个数据包通过。
配置扩展ACL允许pc1访问pc4的www服务但拒绝访问PC4的其他服务,PC2、PC3无限制。
方案:
为了实现更灵活、列精确的网络控制就需要用到扩展访问控制列表了。
扩展IP访问控制列表比标准IP访问控制列表具有更多的匹配项,包括协议类型、源地址、目的地址、源端口、目的端口、建立连接的和IP优先级等。
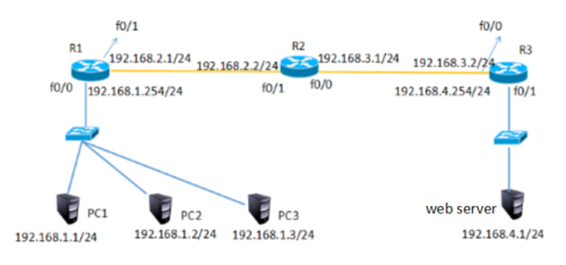
网络拓扑如下图所示:
步骤:
步骤一:在三台路由器中配置IP、RIP动态路由实现全网互通
tarena-R1(config)#interface fastEthernet 0/0
tarena-R1(config-if)#ip address 192.168.1.254 255.255.255.0
tarena-R1(config-if)#no shutdown
tarena-R1(config-if)#exit
tarena-R1(config)#interface fastEthernet 0/1
tarena-R1(config-if)#ip address 192.168.2.1 255.255.255.0
tarena-R1(config-if)#no shutdown
tarena-R1(config-if)#exit
tarena-R1(config)#router rip
tarena-R1(config-router)#no auto-summary
tarena-R1(config-router)#version
tarena-R1(config-router)#network 192.168.1.0
tarena-R1(config-router)#network 192.168.2.0
tarena-R2(config)#interface fastEthernet 0/1
tarena-R2(config-if)#ip address 192.168.2.2 255.255.255.0
tarena-R2(config-if)#no shutdown
tarena-R2(config-if)#exit
tarena-R2(config)#interface fastEthernet 0/0
tarena-R2(config-if)#ip address 192.168.3.1 255.255.255.0
tarena-R2(config-if)#exit
tarena-R2(config)#router rip
tarena-R2(config-router)#version 2
tarena-R2(config-router)#no auto-summary
tarena-R2(config-router)#network 192.168.2.0
tarena-R2(config-router)#network 192.168.3.0
tarena-R3(config)# interface fastEthernet 0/0
tarena-R3(config-if)#ip add 192.168.3.2 255.255.255.0
tarena-R3(config-if)#no shu
tarena-R3(config-if)#exit
tarena-R3(config)#interface fastEthernet 0/1
tarena-R3(config-if)#ip address 192.168.4.254 255.255.255.0
tarena-R3(config-if)#no shutdown
tarena-R3(config-if)#exit
tarena-R3(config)#router rip
tarena-R3(config-router)#version 2
tarena-R3(config-router)#no auto-summary
tarena-R3(config-router)#network 192.168.3.0
tarena-R3(config-router)#network 192.168.4.0
步骤二:开启192.168.4.1的http服务后在PC1、PC2和PC3上验证到Web Server的HTTP协议访问,均如下图所示:

在没有配置扩展ACL的时候,主机均可以正常访问到Web Server。
步骤三:R1上配置扩展访问控制列表,PC1仅允许到Web Server的HTTP服务(不允许访问其他服务),PC2、PC3无限制
扩展ACL可以对数据包中的源、目标IP地址以及端口号进行检查,所以可以将该ACL放置在通信路径中的任一位置。但是,如果放到离目标近的地方,每台路由器都要对数据进行处理,会更多的消耗路由器和带宽资源。放到离源最近的路由器端口入方向直接就将拒绝数据丢弃,可以减少其他路由器的资源占用以及带宽占用。
tarena-R1(config)#access-list 100 permit tcp host 192.168.1.1 host 192.168.4.1 eq 80
tarena-R1(config)#access-list 100 deny ip host 192.168.1.1 host 192.168.4.1
tarena-R1(config)#access-list 100 permit ip 192.168.1.0 0.0.0.255 host 192.168.4.1
tarena-R1(config)#interface fastEthernet 0/0
tarena-R1(config-if)#ip access-group 100 in
步骤四:在PC1上验证
PC>ipconfig
FastEthernet0 Connection:(default port)
Link-local IPv6 Address.........: FE80::2E0:F7FF:FED6:54CC
IP Address......................: 192.168.1.1
Subnet Mask.....................: 255.255.255.0
Default Gateway.................: 192.168.1.254
PC>ping 192.168.4.1
Pinging 192.168.4.1 with 32 bytes of data:
Reply from 192.168.1.254: Destination host unreachable.
Reply from 192.168.1.254: Destination host unreachable.
Reply from 192.168.1.254: Destination host unreachable.
Reply from 192.168.1.254: Destination host unreachable.
Ping statistics for 192.168.4.1:
Packets: Sent = 4, Received = 0, Lost = 4 (100% loss),
PC>
HTTP协议的验证如下图所示:

从输入结果可以验证,PC1到Web Server的http服务访问没有受到影响但不能ping通Web Server。
步骤五:在PC2上进行验证
PC>ipconfig
FastEthernet0 Connection:(default port)
Link-local IPv6 Address.........: FE80::209:7CFF:FED5:B0E4
IP Address......................: 192.168.1.2
Subnet Mask.....................: 255.255.255.0
Default Gateway.................: 192.168.1.254
PC>ping 192.168.4.1
Pinging 192.168.4.1 with 32 bytes of data:
Reply from 192.168.4.1: bytes=32 time=0ms TTL=125
Reply from 192.168.4.1: bytes=32 time=12ms TTL=125
Reply from 192.168.4.1: bytes=32 time=13ms TTL=125
Reply from 192.168.4.1: bytes=32 time=12ms TTL=125
Ping statistics for 192.168.4.1:
Packets: Sent = 4, Received = 4, Lost = 0 (0% loss),
Approximate round trip times in milli-seconds:
Minimum = 0ms, Maximum = 13ms, Average = 9ms
HTTP协议的验证,如下图所示:

步骤六:在R1上查看相关的ACL信息
tarena-R1#show ip access-lists
Extended IP access list 100
10 permit tcp host 192.168.1.1 host 192.168.4.1 eq www (5 match(es))
20 deny ip host 192.168.1.1 host 192.168.4.1 (4 match(es))
30 permit ip 192.168.1.0 0.0.0.255 host 192.168.4.1 (8 match(es))
三、配置标准命名ACL
目标:
使用基本编号的ACL没有实际意义,只有通过阅读具体的条目才能得知该ACL的作用。而且ACL的编号有限制,如传统的标准ACL用1~99表示,扩展ACL用100~199表示。
- 配置标准命名ACL实现192.168.1.0网段拒绝PC1访问外部网络,其他主机无限制。
方案:
命名访问控制列表可以为ACL起一个有意义的名字,通过名称就可以得知该ACL要实现什么功能。同时,因为使用的是名称而不是数字,也就没有了ACL数量上的限制。
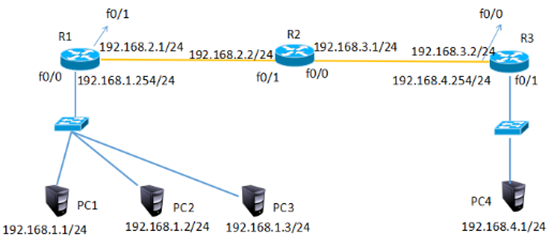
网络拓扑如下图所示:

步骤:
步骤一:将案例1配置标准ACL中的扩展访问控制列表移除,其他配置保留
tarena-R1(config)#interface f0/0
tarena-R1(config-if)#no ip access-group 1 in
tarena-R1(config-if)#exit
tarena-R1(config)#no access-list 1
步骤二:在R2上配置标准的命名访问控制列表
命名访问控制列表的配置总体上和用数字表示的ACL一样,但是更加灵活。
tarena-R2(config)#ip access-list standard tedu
tarena-R2(config-std-nacl)#deny host 192.168.1.1
tarena-R2(config-std-nacl)#permit 192.168.1.0 0.0.0.255
tarena-R2(config-std-nacl)#exit
tarena-R2(config)#interface f0/0
tarena-R2(config-if)#ip access-group tedu in
步骤三:分别在PC1和PC2上做连通性测试
PC2测试如下所示:
PC>ipconfig
FastEthernet0 Connection:(default port)
Link-local IPv6 Address.........: FE80::2E0:F7FF:FED6:54CC
IP Address......................: 192.168.1.2
Subnet Mask.....................: 255.255.255.0
Default Gateway.................: 192.168.0.1
PC>ping 192.168.4.1
Pinging 192.168.4.1 with 32 bytes of data:
Reply from 192.168.4.1: bytes=32 time=0ms TTL=126
Reply from 192.168.4.1: bytes=32 time=0ms TTL=126
Reply from 192.168.4.1: bytes=32 time=0ms TTL=126
Reply from 192.168.4.1: bytes=32 time=0ms TTL=126
Ping statistics for 192.168.4.1:
Packets: Sent = 4, Received = 4, Lost = 0 (0% loss),
Approximate round trip times in milli-seconds:
Minimum = 0ms, Maximum = 0ms, Average = 0ms
PC>
PC1 测试如下所示:
PC>ipconfig
FastEthernet0 Connection:(default port)
Link-local IPv6 Address.........: FE80::2D0:BAFF:FE98:9E29
IP Address......................: 192.168.1.1
Subnet Mask.....................: 255.255.255.0
Default Gateway.................: 192.168.1.254
PC>ping 192.168.4.1
Pinging 192.168.4.1 with 32 bytes of data:
Reply from 192.168.1.254: Destination host unreachable.
Reply from 192.168.1.254: Destination host unreachable.
Reply from 192.168.1.254: Destination host unreachable.
Reply from 192.168.1.254: Destination host unreachable.
Ping statistics for 192.168.4.1:
Packets: Sent = 4, Received = 0, Lost = 4 (100% loss),
PC>
输出结果表明,PC1的访问是正常的,而PC2到Web Server的访问被R2(IP地址为192.168.1.2)拒绝。
步骤四:在R1上查看相关的ACL信息
tarena-R2#show ip access-lists
Standard IP access list tedu
10 deny host 192.168.1.1 (4 match(es))
20 permit 192.168.1.0 0.0.0.255(4 match(es))
输出结果也表明,来自于PC1的数据包被拦截。
四、配置扩展命名ACL
目标:
使用基本编号的ACL没有实际意义,只有通过阅读具体的条目才能得知该ACL的作用。而且ACL的编号有限制,如传统的标准ACL用1~99表示,扩展ACL用100~199表示。
- 配置扩展命名ACL允许PC1访问192.168.4.1的www服务但拒绝访问192.168.4.1的其他服务,PC2、PC3无限制。
方案:
命名访问控制列表可以为ACL起一个有意义的名字,通过名称就可以得知该ACL要实现什么功能。同时,因为使用的是名称而不是数字,也就没有了ACL数量上的限制。
网络拓扑如下图所示:
步骤:
步骤一:将2配置扩展ACL中的扩展访问控制列表移除,其他配置保留
tarena-R1(config)#no access-list 100 permit tcp host 192.168.1.1 host 192.168.4.1 eq www
tarena-R1(config)#interface fastEthernet 0/0
tarena-R1(config-if)#no ip access-group 100 in
步骤二:在R1上配置扩展命名访问控制列表
命名访问控制列表的配置总体上和用数字表示的ACL一样,但是更加灵活。
tarena-R1(config)#ip access-list extended tarena
tarena-R1(config-ext-nacl)#permit tcp host 192.168.1.1 host 192.168.4.1 eq 80
tarena-R1(config-ext-nacl)#deny ip host 192.168.1.1 host 192.168.4.1
tarena-R1(config-ext-nacl)#permit ip 192.168.1.0 0.0.0.255 host 192.168.4.1
tarena-R1(config)#interface fastEthernet 0/0
tarena-R2(config-if)#ip access-group tarena in
步骤三:在R1上查看相关的ACL信息
tarena-R1#show ip access-lists
Extended IP access list tarena
10 permit tcp host 192.168.1.1 host 192.168.4.1 eq www
20 deny ip host 192.168.1.1 host 192.168.4.1
30 permit ip 192.168.1.0 0.0.0.255 host 192.168.4.1
步骤四:在PC1上验证
PC>ipconfig
FastEthernet0 Connection:(default port)
Link-local IPv6 Address.........: FE80::2E0:F7FF:FED6:54CC
IP Address......................: 192.168.1.1
Subnet Mask.....................: 255.255.255.0
Default Gateway.................: 192.168.1.254
PC>ping 192.168.4.1
Pinging 192.168.4.1 with 32 bytes of data:
Reply from 192.168.1.254: Destination host unreachable.
Reply from 192.168.1.254: Destination host unreachable.
Reply from 192.168.1.254: Destination host unreachable.
Reply from 192.168.1.254: Destination host unreachable.
Ping statistics for 192.168.4.1:
Packets: Sent = 4, Received = 0, Lost = 4 (100% loss),
PC>
PC>
HTTP协议的验证如下图所示:
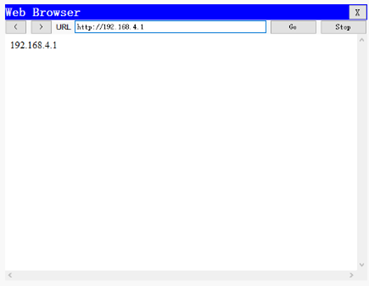
从输入结果可以验证,PC1到Web Server的http访问没有受到影响,但不能ping通192.168.4.1。
步骤五:在PC2上进行验证
PC>ipconfig
FastEthernet0 Connection:(default port)
Link-local IPv6 Address.........: FE80::2E0:F7FF:FED6:54CC
IP Address......................: 192.168.1.2
Subnet Mask.....................: 255.255.255.0
Default Gateway.................: 192.168.0.1
PC>ping 192.168.4.1
Pinging 192.168.4.1 with 32 bytes of data:
Reply from 192.168.4.1: bytes=32 time=0ms TTL=126
Reply from 192.168.4.1: bytes=32 time=0ms TTL=126
Reply from 192.168.4.1: bytes=32 time=0ms TTL=126
Reply from 192.168.4.1: bytes=32 time=0ms TTL=126
Ping statistics for 192.168.4.1:
Packets: Sent = 4, Received = 4, Lost = 0 (0% loss),
Approximate round trip times in milli-seconds:
Minimum = 0ms, Maximum = 0ms, Average = 0ms
PC>
HTTP协议的验证,如下图所示:

Cisco基础(四):配置标准ACL、配置扩展ACL、配置标准命名ACL、配置扩展命名ACL的更多相关文章
- Cisco基础(五):配置静态NAT、配置端口映射、配置动态NAT、PAT配置、办公区Internet的访问
一.配置静态NAT 目标: 随着接入Internet的计算机数量的不断猛增,IP地址资源也就愈加显得捉襟见肘.事实上,除了中国教育和科研计算机网(CERNET)外,一般用户几乎申请不到整段的C类IP地 ...
- 第三百九十四节,Django+Xadmin打造上线标准的在线教育平台—Xadmin后台进阶开发配置2,以及目录结构说明
第三百九十四节,Django+Xadmin打造上线标准的在线教育平台—Xadmin后台进阶开发配置2,以及目录结构说明 设置后台列表页面可以直接修改字段内容 在当前APP里的adminx.py文件里的 ...
- Linux入门基础(四):Linux网络基本配置
网络基础 ip编址 ip编址是一个双层编址方案(网络部分和主机部分),一个ip地址标识一个主机(或一个网卡接口) 现在应用最广泛的是IPv4编址,已经开始逐渐向IPv6编址切换 IPv4地址32位长, ...
- Cisco基础(二):三层交换vlan间通信、多交换机vlan间通信、三层交换配置路由、RIP动态路由配置、三层交换配置RIP动态路由
一.三层交换vlan间通信 目标: VLAN实现了广播域的隔离,同时也将VLAN间的通信隔离了.三层交换技术使得VLAN间可以通信. 通过三层交换实现VLAN间通信 方案: 为了解决了传统路由器低速. ...
- Ubuntu 17.10 用 apt 搭建 lamp 环境、安装 phpmyadmin、redis 服务+扩展、mysql 扩展、开启错误提示、配置虚拟主机
2018-02-24 13:50:30 更新: 个人喜欢相对原生又不太麻烦,所以用 apt 构建环境.不过,最近使用到现在记得出现过了 3 次 apache 或 mysql 服务器无法启动或无法连接的 ...
- 【转载】salesforce 零基础开发入门学习(一)Salesforce功能介绍,IDE配置以及资源下载
salesforce 零基础开发入门学习(一)Salesforce功能介绍,IDE配置以及资源下载 目前国内已经有很多公司做salesforce,但是国内相关的资料确是少之又少.上个月末跳槽去了新 ...
- 第三百九十三节,Django+Xadmin打造上线标准的在线教育平台—Xadmin后台进阶开发配置
第三百九十三节,Django+Xadmin打造上线标准的在线教育平台—Xadmin后台进阶开发配置 设置后台某个字段的排序规则 在当前APP里的adminx.py文件里的数据表管理器里设置 order ...
- 大数据入门第十四天——Hbase详解(一)入门与安装配置
一.概述 1.什么是Hbase 根据官网:https://hbase.apache.org/ Apache HBase™ is the Hadoop database, a distributed, ...
- Spring Boot 2.x 基础案例:整合Dubbo 2.7.3+Nacos1.1.3(配置中心)
本文原创首发于公众号:Java技术干货 1.概述 本文将Nacos作为配置中心,实现配置外部化,动态更新.这样做的优点:不需要重启应用,便可以动态更新应用里的配置信息.在如今流行的微服务应用下,将应用 ...
随机推荐
- 2017 ACM-ICPC 亚洲区(南宁赛区)网络赛 GSM Base Station Identification (点在多边形内模板)
In the Personal Communication Service systems such as GSM (Global System for Mobile Communications), ...
- HDU 6050 Funny Function —— 2017 Multi-University Training 2
Funny Function Time Limit: 2000/1000 MS (Java/Others) Memory Limit: 32768/32768 K (Java/Others)To ...
- 启动Nginx、查看nginx进程、nginx帮助命令、Nginx平滑重启、Nginx服务器的升级
1.启动nginx的方式: cd /usr/local/nginx ls
- [CSP-S模拟测试]:gcd(莫比乌斯反演)
题目描述 有$n$个正整数$x_1\sim x_n$,初始时状态均为未选.有$m$个操作,每个操作给定一个编号$i$,将$x_i$的选取状态取反.每次操作后,你需要求出选取的数中有多少个互质的无序数对 ...
- Spring Boot学习一之配置类及自动配置
一.配置类 1. 导入其他配置类 你不需要将所有的 @Configuration 放进一个单独的类, @Import 注解可以用来导入其他配置类.另外,你也可以使用 @ComponentScan 注解 ...
- vijos 1243 生产产品
貌似两年前联赛复习的时候就看过这题 然而当时大概看看了 感觉太难 便没有去做 如今再去做的时候 发现其实也并不容易 ------------------------------------------ ...
- oracle 远程访问
oracle 本机能连外部访问不了 新装的 oracle 数据库经常会出现本地计算机能连接,但是局域网内的其他计算机不能连接的问题,如果出现此问题可以参考此文来解决. 本文中用的数据库版本为 Orac ...
- selenium2-java 浏览器cookie的获取
//成功登陆后增加如下代码 File cookieFile = new File("C:\\tmp\\tangdai.cookie.txt"); ...
- idea下web工程的编译和输出设置
公司的一个项目,别人用的eclipse,我这边用IDEA,路径上出了点问题,现在大概有点头绪了,记录下来. 打开project structure后,看到如下设置,最重要的是Modules和Artif ...
- Django--Aadmin入门