SpringMVC、SpringFox和Swagger整合项目实例
目标
在做项目的时候,有时候需要提供其它平台(如业务平台)相关的HTTP接口,业务平台则通过开放的HTTP接口获取相关的内容,并完成自身业务~
提供对外开放HTTP API接口,比较常用的是采用Spring MVC来完成。
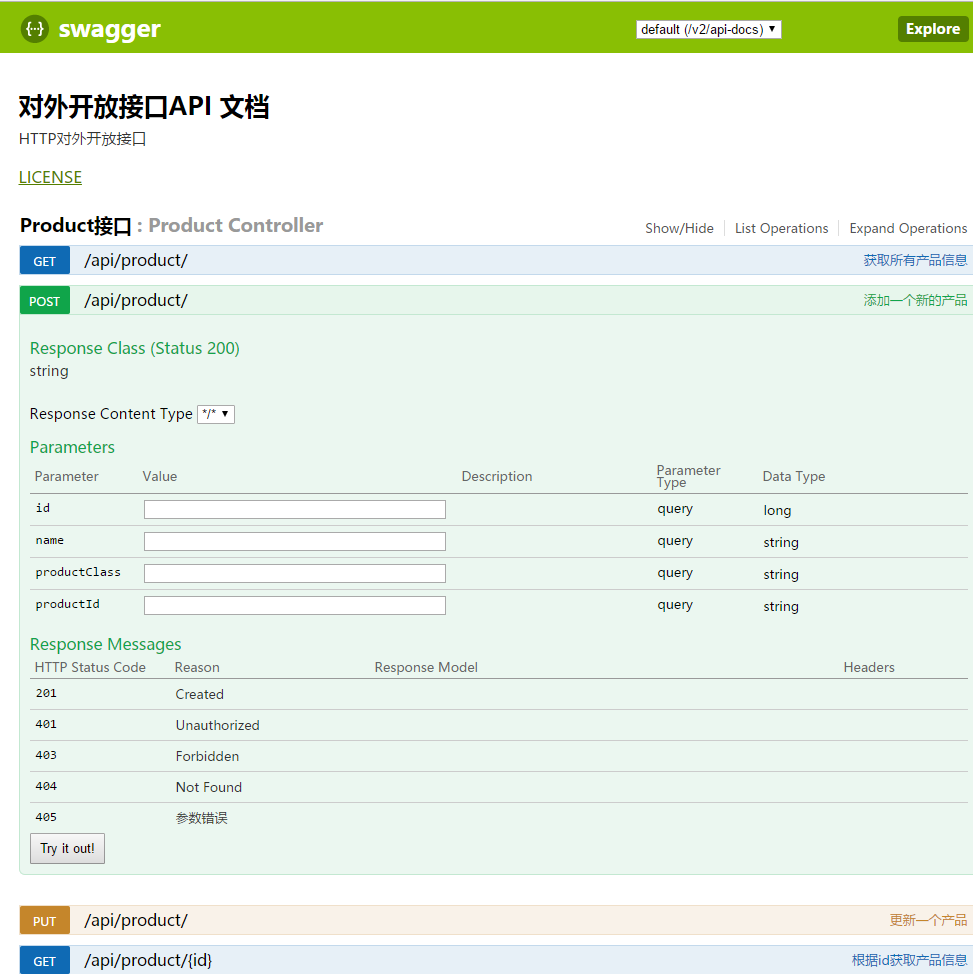
本文的目标是先搭建一个简单的Spring MVC应用,然后为Spring MVC整合SpringFox-Swagger以及SpringFox-Swagger-UI,最终,达到Spring MVC对外开放接口API文档化。
如下图所示:
搭建SpringMVC工程
新建Maven工程
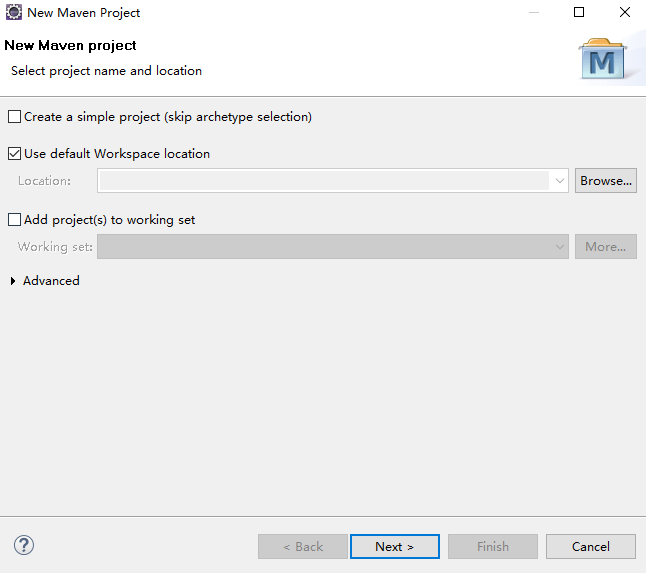
Eclipse中,File --> New --> Maven Project,
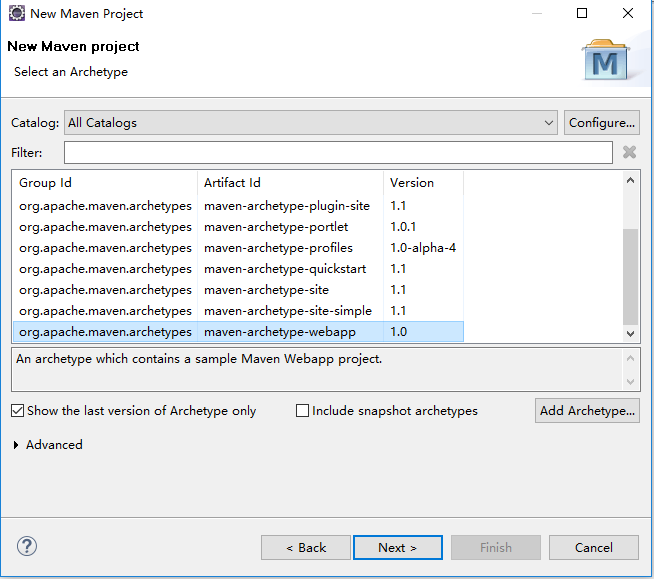
点击“Next”按钮, 然后选择 “maven-archetype-webapp”,
继续点击“Next”按钮,然后指定
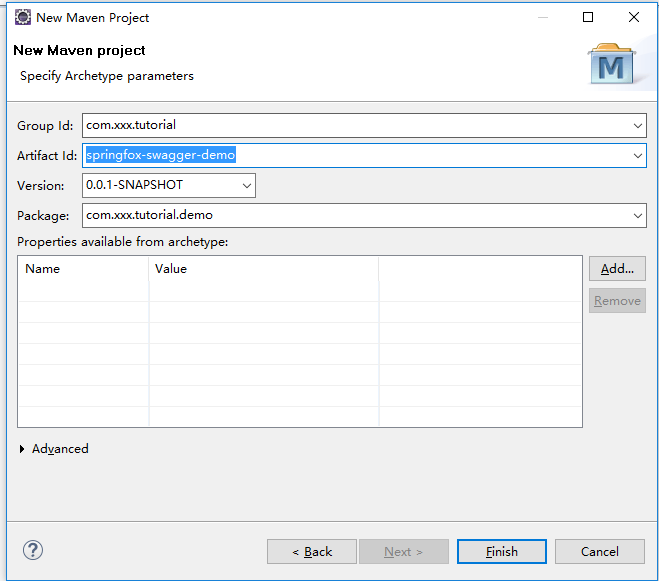
点击“Finish” 按钮结束~ 就这样,一个简单的Web工程就建好了~
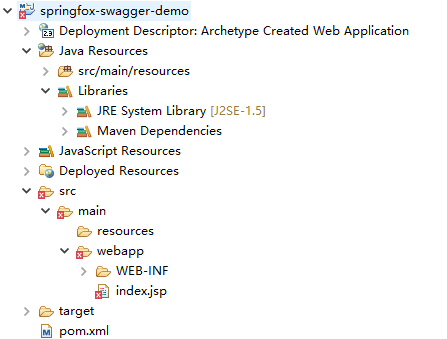
但是,
默认是使用J2SE-1.5, 配置一下Build Path,使用本地机器上安装的JDK
(本文中使用的是JDK 1.7),工程默认字体是GBK,将其改成UTF-8
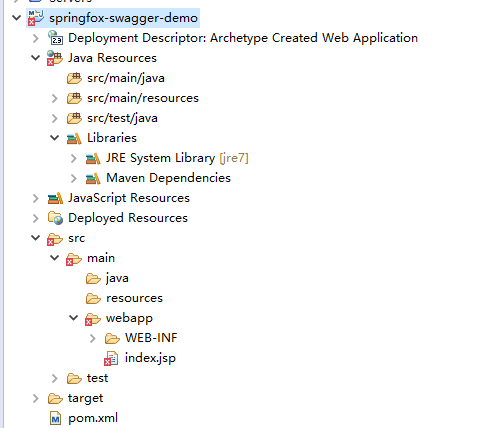
完成后,Maven工程的结构如下图所示:
引入Spring依赖包
在本示例中,因为简单,所以只要引入如下几个jar包就好了~
<dependencies>

        <!--引入Spring依赖包 -->

        <dependency>

            <groupId>org.springframework</groupId>

            <artifactId>spring-core</artifactId>

            <version>${spring.framework.version}</version>

        </dependency>

        <dependency>

            <groupId>org.springframework</groupId>

            <artifactId>spring-context</artifactId>

            <version>${spring.framework.version}</version>

        </dependency>

        <dependency>

            <groupId>org.springframework</groupId>

            <artifactId>spring-webmvc</artifactId>

            <version>${spring.framework.version}</version>

        </dependency>

    </dependencies>
完整的pom.xml文件内容如下:
<project xmlns="http://maven.apache.org/POM/4.0.0" xmlns:xsi="http://www.w3.org/2001/XMLSchema-instance"

    xsi:schemaLocation="http://maven.apache.org/POM/4.0.0 http://maven.apache.org/maven-v4_0_0.xsd">

    <modelVersion>4.0.0</modelVersion>

    <groupId>com.xxx.tutorial</groupId>

    <artifactId>springfox-swagger-demo</artifactId>

    <packaging>war</packaging>

    <version>0.0.1-SNAPSHOT</version>

    <name>springfox-swagger-demo Maven Webapp</name>

    <url>http://maven.apache.org</url>

    <properties>

        <project.build.sourceEncoding>UTF-8</project.build.sourceEncoding>

        <spring.framework.version>4.3.6.RELEASE</spring.framework.version>

    </properties>

    <dependencies>

        <!--引入Spring依赖包 -->

        <dependency>

            <groupId>org.springframework</groupId>

            <artifactId>spring-core</artifactId>

            <version>${spring.framework.version}</version>

        </dependency>

        <dependency>

            <groupId>org.springframework</groupId>

            <artifactId>spring-context</artifactId>

            <version>${spring.framework.version}</version>

        </dependency>

        <dependency>

            <groupId>org.springframework</groupId>

            <artifactId>spring-webmvc</artifactId>

            <version>${spring.framework.version}</version>

        </dependency>

    </dependencies>

    <build>

        <finalName>springfox-swagger-demo</finalName>

    </build>

</project>
编写spring-mvc.xml文件
<?xml version="1.0" encoding="UTF-8"?>

<beans xmlns="http://www.springframework.org/schema/beans"

    xmlns:xsi="http://www.w3.org/2001/XMLSchema-instance" xmlns:context="http://www.springframework.org/schema/context"

    xmlns:mvc="http://www.springframework.org/schema/mvc" xmlns:p="http://www.springframework.org/schema/p"

    xsi:schemaLocation="http://www.springframework.org/schema/beans http://www.springframework.org/schema/beans/spring-beans-4.0.xsd

        http://www.springframework.org/schema/context http://www.springframework.org/schema/context/spring-context-4.0.xsd

        http://www.springframework.org/schema/mvc http://www.springframework.org/schema/mvc/spring-mvc-4.0.xsd">

    <!-- 默认的注解映射的支持 ,它会自动注册DefaultAnnotationHandlerMapping 与AnnotationMethodHandlerAdapter -->

    <mvc:annotation-driven />

    <!-- 设置使用注解的类所在的jar包 -->

    <context:component-scan base-package="com.htjf.controller" />  <!--这个是我的项目包结构-->

</beans>
配置applicationContext.xml
<?xml version="1.0" encoding="UTF-8"?>

<beans xmlns="http://www.springframework.org/schema/beans"

    xmlns:xsi="http://www.w3.org/2001/XMLSchema-instance"

    xmlns:p="http://www.springframework.org/schema/p"

    xmlns:context="http://www.springframework.org/schema/context"

    xsi:schemaLocation="http://www.springframework.org/schema/beans

        http://www.springframework.org/schema/beans/spring-beans-4.3.xsd

        http://www.springframework.org/schema/context

        http://www.springframework.org/schema/context/spring-context-4.3.xsd">

        <!-- 启用注解扫描,并定义组件查找规则 ,除了@controller,扫描所有的Bean -->

        <context:component-scan base-package="com.htjf"/>

         <!-- 启动SpringMVC的注解功能,完成请求和注解POJO的映射 -->

        <bean class="org.springframework.web.servlet.mvc.annotation.AnnotationMethodHandlerAdapter" />

        <!-- enable autowire 向容器自动注册 -->

        <context:annotation-config />

</beans>
配置web.xml
<?xml version="1.0" encoding="UTF-8"?>

<web-app xmlns="http://xmlns.jcp.org/xml/ns/javaee"

         xmlns:xsi="http://www.w3.org/2001/XMLSchema-instance"

         xsi:schemaLocation="http://xmlns.jcp.org/xml/ns/javaee http://xmlns.jcp.org/xml/ns/javaee/web-app_3_1.xsd"

         version="3.1">

  <display-name>Archetype Created Web Application</display-name>

    <!-- 利用Spring提供的ContextLoaderListener监听器去监听ServletContext对象的创建,并初始化WebApplicationContext对象 -->

    <listener>

        <listener-class>org.springframework.web.context.ContextLoaderListener</listener-class>

    </listener>

    <!-- Context Configuration locations for Spring XML files(默认查找/WEB-INF/applicationContext.xml) -->

    <context-param>

        <param-name>contextConfigLocation</param-name>

        <param-value>classpath:applicationContext.xml</param-value>

    </context-param>

<!-- 配置Spring MVC的前端控制器:DispatchcerServlet -->

  <servlet>

    <servlet-name>springmvc</servlet-name>

    <servlet-class>org.springframework.web.servlet.DispatcherServlet</servlet-class>

    <init-param>

      <param-name>contextConfigLocation</param-name>

      <param-value>classpath:spring-mvc.xml</param-value>

    </init-param>

    <load-on-startup>1</load-on-startup>

    <async-supported>true</async-supported>

  </servlet>

  <servlet-mapping>

    <servlet-name>springmvc</servlet-name>

    <url-pattern>/</url-pattern>

  </servlet-mapping>

  <!--字符编码过滤器-->

  <filter>

    <filter-name>encoding</filter-name>

    <filter-class>org.springframework.web.filter.CharacterEncodingFilter</filter-class>

    <init-param>

      <param-name>encoding</param-name>

      <param-value>UTF-8</param-value>

    </init-param>

    <init-param>

      <param-name>forceEncoding</param-name>

      <param-value>true</param-value>

    </init-param>

  </filter>

  <filter-mapping>

    <filter-name>encoding</filter-name>

    <url-pattern>/*</url-pattern>

  </filter-mapping>

</web-app>
编写Controller并测试
配置好spring-mvc.xml、applicationContext.xml以及web.xml文件之后,咱们继续往下走~
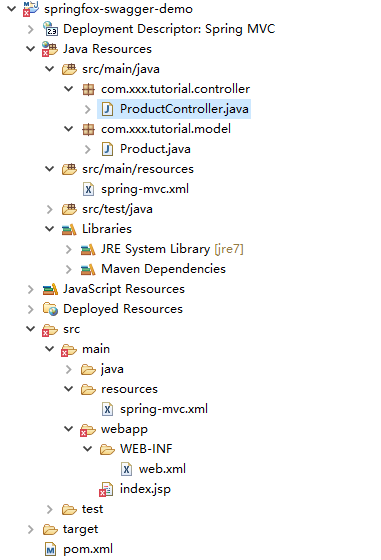
因为,本文Spring MVC示例的作用主要用来暴露对外HTTP API接口,先写一个简单的ProductController,其包含一个按照id查询的方法。
Product.java和ProductController.java的内容如下:
Product.java
package com.xxx.tutorial.model;

import java.io.Serializable;

/**

 *

 * @author wangmengjun

 *

 */

public class Product implements Serializable {

    private static final long serialVersionUID = 1L;

    /**ID*/

    private Long id;

    /**产品名称*/

    private String name;

    /**产品型号*/

    private String productClass;

    /**产品ID*/

    private String productId;

    /**

     * @return the id

     */

    public Long getId() {

        return id;

    }

    /**

     * @param id

     *            the id to set

     */

    public void setId(Long id) {

        this.id = id;

    }

    /**

     * @return the name

     */

    public String getName() {

        return name;

    }

    /**

     * @param name

     *            the name to set

     */

    public void setName(String name) {

        this.name = name;

    }

    /**

     * @return the productClass

     */

    public String getProductClass() {

        return productClass;

    }

    /**

     * @param productClass

     *            the productClass to set

     */

    public void setProductClass(String productClass) {

        this.productClass = productClass;

    }

    /**

     * @return the productId

     */

    public String getProductId() {

        return productId;

    }

    /**

     * @param productId

     *            the productId to set

     */

    public void setProductId(String productId) {

        this.productId = productId;

    }

    /*

     * (non-Javadoc)

     *

     * @see java.lang.Object#toString()

     */

    @Override

    public String toString() {

        return "Product [id=" + id + ", name=" + name + ", productClass=" + productClass + ", productId=" + productId

                + "]";

    }

}
ProductController.java
package com.xxx.tutorial.controller;

import org.springframework.http.ResponseEntity;

import org.springframework.web.bind.annotation.PathVariable;

import org.springframework.web.bind.annotation.RequestMapping;

import org.springframework.web.bind.annotation.RequestMethod;

import org.springframework.web.bind.annotation.RestController;

import com.xxx.tutorial.model.Product;

@RestController

@RequestMapping(value = { "/api/product/"})

public class ProductController {

    @RequestMapping(value = "/{id}", method = RequestMethod.GET)

    public ResponseEntity<Product> get(@PathVariable Long id) {

        Product product = new Product();

        product.setName("七级滤芯净水器");

        product.setId(1L);

        product.setProductClass("seven_filters");

        product.setProductId("T12345");

        return ResponseEntity.ok(product);

    }

}
注:
鉴于是一个demo示例,所以没有写ProductService以及相关DAO, 直接在方法中返回固定的Product信息~
验证Spring MVC是否ok
完成Controller的代码,运行Spring MVC项目,然后,看一下Spring MVC是否运行ok,访问URL地址
http://localhost:8888/springfox-swagger-demo/api/product/1
- 出现错误
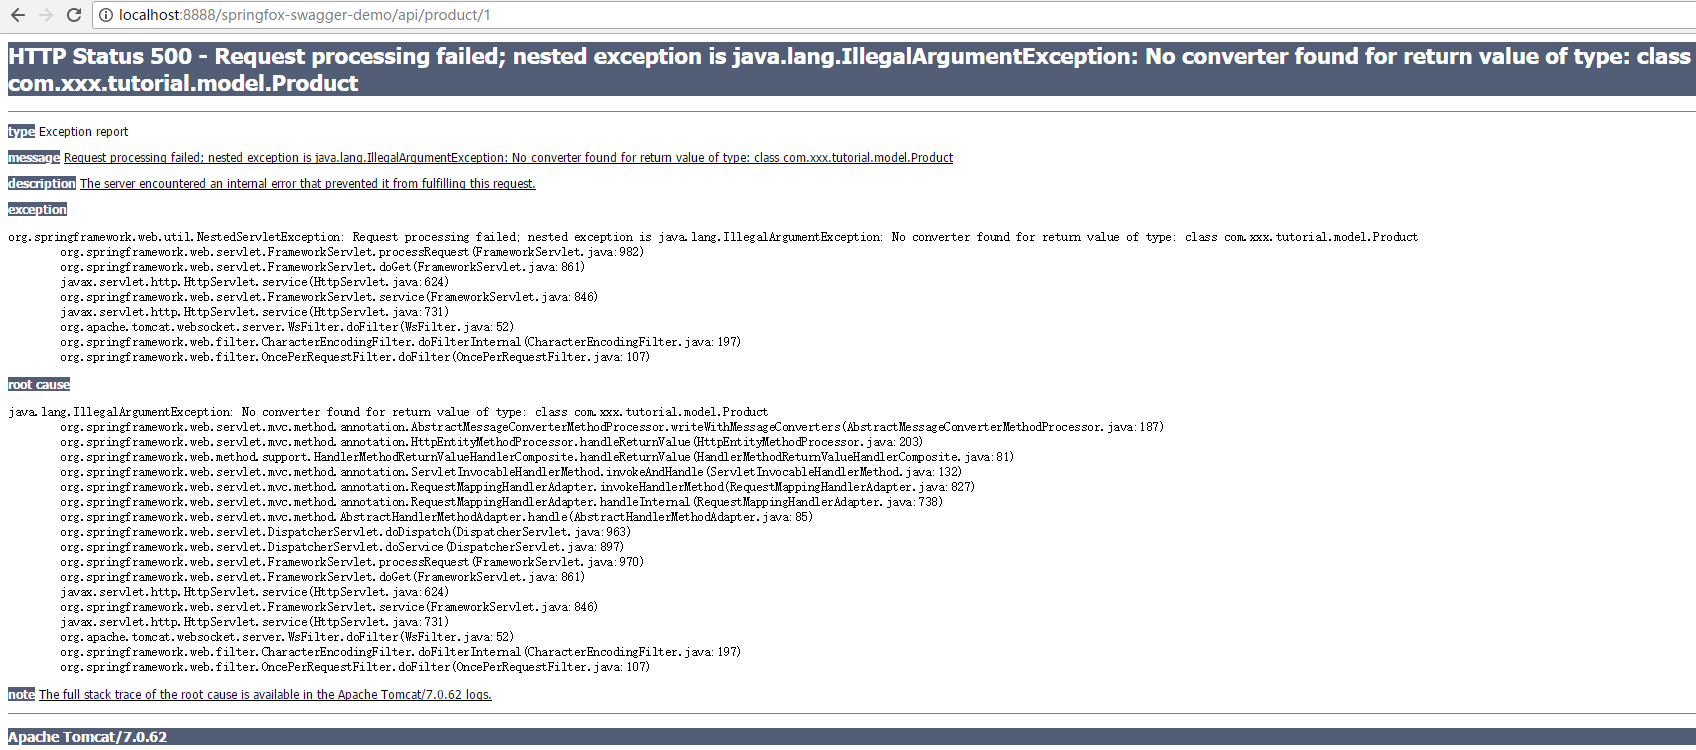
详细的错误信息如下:
五月 23, 2017 3:00:55 下午 org.apache.catalina.core.StandardWrapperValve invoke

严重: Servlet.service() for servlet [spring-mvc] in context with path [/springfox-swagger-demo] threw exception [Request processing failed; nested exception is java.lang.IllegalArgumentException: No converter found for return value of type: class com.xxx.tutorial.model.Product] with root cause

java.lang.IllegalArgumentException: No converter found for return value of type: class com.xxx.tutorial.model.Product

	at org.springframework.web.servlet.mvc.method.annotation.AbstractMessageConverterMethodProcessor.writeWithMessageConverters(AbstractMessageConverterMethodProcessor.java:187)

	at org.springframework.web.servlet.mvc.method.annotation.HttpEntityMethodProcessor.handleReturnValue(HttpEntityMethodProcessor.java:203)

	at org.springframework.web.method.support.HandlerMethodReturnValueHandlerComposite.handleReturnValue(HandlerMethodReturnValueHandlerComposite.java:81)

	at org.springframework.web.servlet.mvc.method.annotation.ServletInvocableHandlerMethod.invokeAndHandle(ServletInvocableHandlerMethod.java:132)

	at org.springframework.web.servlet.mvc.method.annotation.RequestMappingHandlerAdapter.invokeHandlerMethod(RequestMappingHandlerAdapter.java:827)

	at org.springframework.web.servlet.mvc.method.annotation.RequestMappingHandlerAdapter.handleInternal(RequestMappingHandlerAdapter.java:738)

	at org.springframework.web.servlet.mvc.method.AbstractHandlerMethodAdapter.handle(AbstractHandlerMethodAdapter.java:85)

	at org.springframework.web.servlet.DispatcherServlet.doDispatch(DispatcherServlet.java:963)

	at org.springframework.web.servlet.DispatcherServlet.doService(DispatcherServlet.java:897)

	at org.springframework.web.servlet.FrameworkServlet.processRequest(FrameworkServlet.java:970)

	at org.springframework.web.servlet.FrameworkServlet.doGet(FrameworkServlet.java:861)

	at javax.servlet.http.HttpServlet.service(HttpServlet.java:624)

	at org.springframework.web.servlet.FrameworkServlet.service(FrameworkServlet.java:846)

	at javax.servlet.http.HttpServlet.service(HttpServlet.java:731)

	at org.apache.catalina.core.ApplicationFilterChain.internalDoFilter(ApplicationFilterChain.java:303)

	at org.apache.catalina.core.ApplicationFilterChain.doFilter(ApplicationFilterChain.java:208)

	at org.apache.tomcat.websocket.server.WsFilter.doFilter(WsFilter.java:52)

	at org.apache.catalina.core.ApplicationFilterChain.internalDoFilter(ApplicationFilterChain.java:241)

	at org.apache.catalina.core.ApplicationFilterChain.doFilter(ApplicationFilterChain.java:208)

	at org.springframework.web.filter.CharacterEncodingFilter.doFilterInternal(CharacterEncodingFilter.java:197)

	at org.springframework.web.filter.OncePerRequestFilter.doFilter(OncePerRequestFilter.java:107)

	at org.apache.catalina.core.ApplicationFilterChain.internalDoFilter(ApplicationFilterChain.java:241)

	at org.apache.catalina.core.ApplicationFilterChain.doFilter(ApplicationFilterChain.java:208)

	at org.apache.catalina.core.StandardWrapperValve.invoke(StandardWrapperValve.java:220)

	at org.apache.catalina.core.StandardContextValve.invoke(StandardContextValve.java:122)

	at org.apache.catalina.core.StandardHostValve.invoke(StandardHostValve.java:170)

	at org.apache.catalina.valves.ErrorReportValve.invoke(ErrorReportValve.java:103)

	at org.apache.catalina.valves.AccessLogValve.invoke(AccessLogValve.java:957)

	at org.apache.catalina.core.StandardEngineValve.invoke(StandardEngineValve.java:116)

	at org.apache.catalina.connector.CoyoteAdapter.service(CoyoteAdapter.java:423)

	at org.apache.coyote.http11.AbstractHttp11Processor.process(AbstractHttp11Processor.java:1079)

	at org.apache.coyote.AbstractProtocol$AbstractConnectionHandler.process(AbstractProtocol.java:620)

	at org.apache.tomcat.util.net.JIoEndpoint$SocketProcessor.run(JIoEndpoint.java:316)

	at java.util.concurrent.ThreadPoolExecutor.runWorker(Unknown Source)

	at java.util.concurrent.ThreadPoolExecutor$Worker.run(Unknown Source)

	at org.apache.tomcat.util.threads.TaskThread$WrappingRunnable.run(TaskThread.java:61)

	at java.lang.Thread.run(Unknown Source)
解决方法,添加jackson-databind依赖包即可~
<dependency>

            <groupId>com.fasterxml.jackson.core</groupId>

            <artifactId>jackson-databind</artifactId>

            <version>2.6.6</version>

        </dependency>
重新启动,运行一下,成功返回信息~

为了看的更加清楚,可以使用postman来完成~, 如~
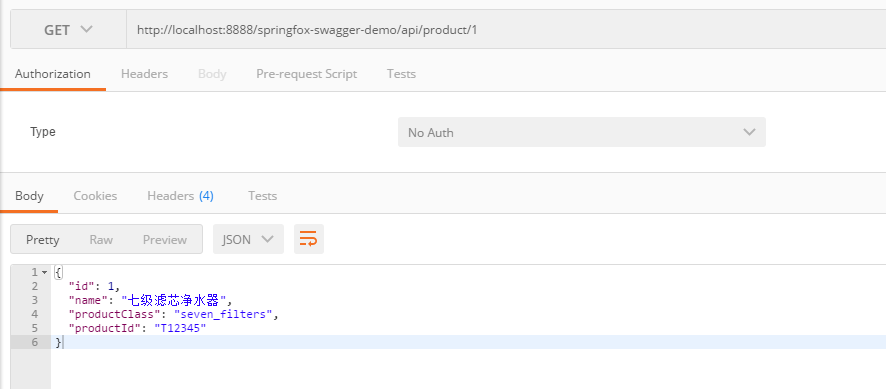
至此,一个简单的基于SpringMVC的Web项目已经创建,并能对外提供API接口~
接下来,我们要整合SpringFox和SwaggerUI到该SpringMVC项目中去,使其对外接口文档化
整合SpringFox-Swagger
SpringFox【SpringFox链接】已经可以代替Swagger-SpringMVC, 目前SpringFox同时支持Swagger 1.2 和 2.0.
在SpringMVC项目中整合SpringFox-Swagger只要如下几步即可~
- 添加SpringFox-Swagger依赖
- 添加SwaggerConfig
添加依赖
<dependency>

            <groupId>io.springfox</groupId>

            <artifactId>springfox-swagger2</artifactId>

            <version>2.7.0</version>

        </dependency>
添加SwaggerConfig
package com.htjf.config;

import org.springframework.context.annotation.Bean;

import org.springframework.context.annotation.ComponentScan;

import org.springframework.context.annotation.Configuration;

import org.springframework.web.servlet.config.annotation.EnableWebMvc;

import springfox.documentation.builders.ApiInfoBuilder;

import springfox.documentation.builders.RequestHandlerSelectors;

import springfox.documentation.service.ApiInfo;

import springfox.documentation.spi.DocumentationType;

import springfox.documentation.spring.web.plugins.Docket;

import springfox.documentation.swagger2.annotations.EnableSwagger2;

@Configuration

@EnableSwagger2

@ComponentScan(basePackages= {"com.htjf.controller"})

@EnableWebMvc

public class SwaggerConfig {

    @Bean

    public Docket api() {

        return new Docket(DocumentationType.SWAGGER_2)

                .select()

                .apis(RequestHandlerSelectors.any())

                .build()

                .apiInfo(apiInfo());

    }

    private ApiInfo apiInfo() {

        return new ApiInfoBuilder()

                .title("对外开放接口API 文档")               //大标题 title

                .description("HTTP对外开放接口")             //小标题

                .version("1.0.0")                           //版本

                .termsOfServiceUrl("http://xxx.xxx.com")    //终端服务程序

                .license("LICENSE")                         //链接显示文字

                .licenseUrl("http://xxx.xxx.com")           //网站链接

                .build();

    }

}
整合SpringFox-Swagger-UI
在SpringMVC项目中整合SpringFox-Swagger-UI也只要如下两个步骤即可~
- 添加SpringFox-Swagger-UI依赖
- 添加配置
添加依赖
<dependency>

            <groupId>io.springfox</groupId>

            <artifactId>springfox-swagger-ui</artifactId>

            <version>2.7.0</version>

        </dependency>
添加配置
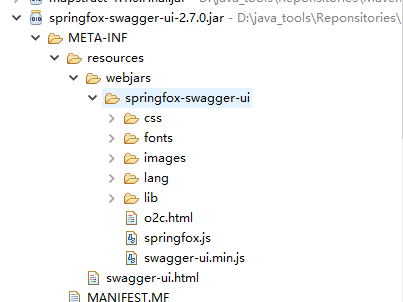
在添加配置之前,一起来看一下swagger-ui中使用的静态资源文件(如 swagger-ui.html )放在那里~
spingfox-swagger-ui-2.7.0.jar中的/META-INF/resources/下~ 如下图所示:
为了访问swagger-ui.html,我们配置对这些静态资源的访问~ 如:
package com.xxx.tutorial.config;

import org.springframework.context.annotation.Configuration;

import org.springframework.web.servlet.config.annotation.EnableWebMvc;

import org.springframework.web.servlet.config.annotation.ResourceHandlerRegistry;

import org.springframework.web.servlet.config.annotation.WebMvcConfigurerAdapter;

@Configuration

@EnableWebMvc

public class WebAppConfig extends WebMvcConfigurerAdapter {

    @Override

    public void addResourceHandlers(ResourceHandlerRegistry registry) {

        registry.addResourceHandler("swagger-ui.html").addResourceLocations("classpath:/META-INF/resources/");

        registry.addResourceHandler("/webjars/**").addResourceLocations("classpath:/META-INF/resources/webjars/");

    }

}
该配置代码的效果和如下代码等价~
<mvc:resources mapping="swagger-ui.html" location="classpath:/META-INF/resources/" />

    <mvc:resources mapping="/webjars/**"

        location="classpath:/META-INF/resources/webjars/" />
在本文中,可以将其配置在spring-mvc.xml中,
<?xml version="1.0" encoding="UTF-8"?>

<beans xmlns="http://www.springframework.org/schema/beans"

    xmlns:xsi="http://www.w3.org/2001/XMLSchema-instance" xmlns:context="http://www.springframework.org/schema/context"

    xmlns:mvc="http://www.springframework.org/schema/mvc" xmlns:p="http://www.springframework.org/schema/p"

    xsi:schemaLocation="http://www.springframework.org/schema/beans http://www.springframework.org/schema/beans/spring-beans-4.0.xsd

        http://www.springframework.org/schema/context http://www.springframework.org/schema/context/spring-context-4.0.xsd

        http://www.springframework.org/schema/mvc http://www.springframework.org/schema/mvc/spring-mvc-4.0.xsd">

    <!-- 默认的注解映射的支持 ,它会自动注册DefaultAnnotationHandlerMapping 与AnnotationMethodHandlerAdapter -->

    <mvc:annotation-driven />

    <!-- 设置使用注解的类所在的jar包 -->

    <context:component-scan base-package="com.htjf.controller" />

    <mvc:resources location="classpath:/META-INF/resources/" mapping="swagger-ui.html"/>

    <mvc:resources location="classpath:/META-INF/resources/webjars/" mapping="/webjars/**"/>

</beans>
API接口说明代码添加并测试
经过上述几个步骤之后,之前写的ProductController的接口,就可以实现文档化了,如本文通过如下的访问地址访问:
http://localhost:8888/springfox-swagger-demo/swagger-ui.html
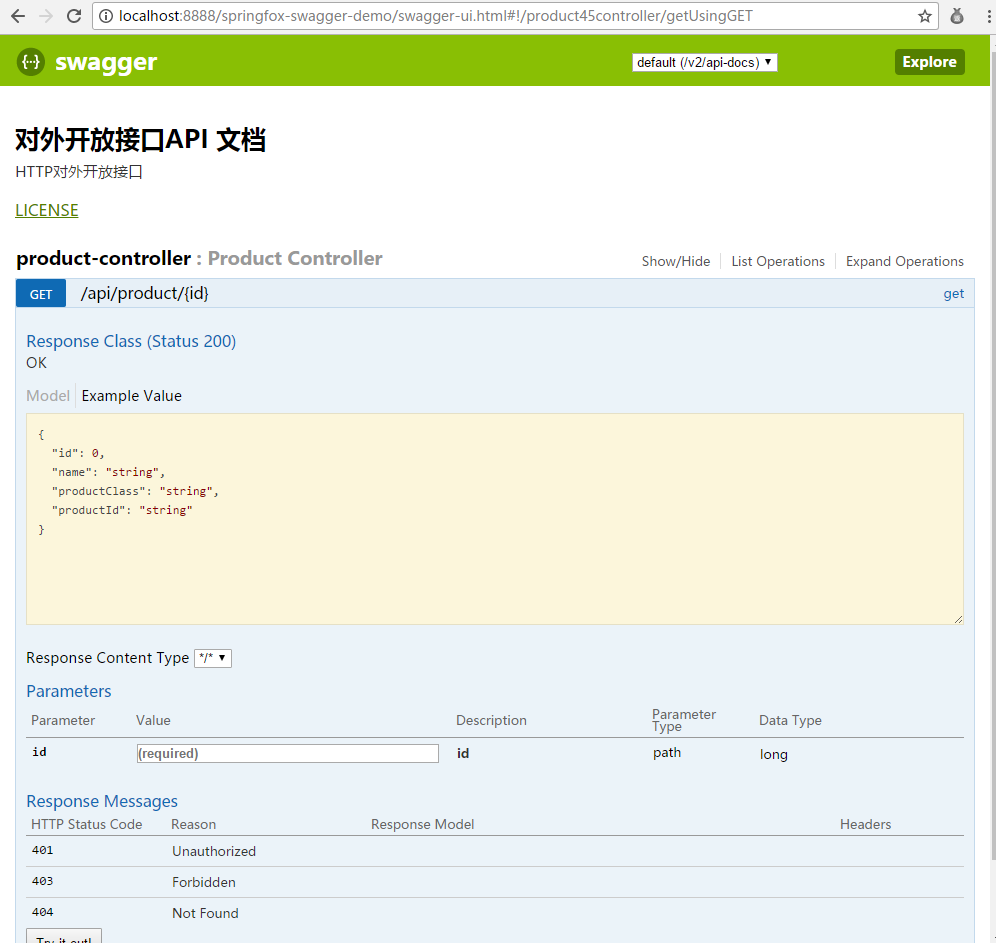
这个接口API雏形出来了,但是还缺少点东西,比如:接口方法的描述等都没有~
修改一下,ProductController.java内容,如:
package com.xxx.tutorial.controller;

import org.springframework.http.ResponseEntity;

import org.springframework.web.bind.annotation.PathVariable;

import org.springframework.web.bind.annotation.RequestMapping;

import org.springframework.web.bind.annotation.RequestMethod;

import org.springframework.web.bind.annotation.RestController;

import com.xxx.tutorial.model.Product;

import io.swagger.annotations.Api;

import io.swagger.annotations.ApiOperation;

@RestController

@RequestMapping(value = { "/api/product/" })

@Api(value = "/product", tags = "Product接口")

public class ProductController {

    @RequestMapping(value = "/{id}", method = RequestMethod.GET)

    @ApiOperation(value = "根据id获取产品信息", notes = "根据id获取产品信息", httpMethod = "GET", response = Product.class)

    public ResponseEntity<Product> get(@PathVariable Long id) {

        Product product = new Product();

        product.setName("七级滤芯净水器");

        product.setId(1L);

        product.setProductClass("seven_filters");

        product.setProductId("T12345");

        return ResponseEntity.ok(product);

    }

}
重新访问,接口已经出现多个我们指定的描述信息~
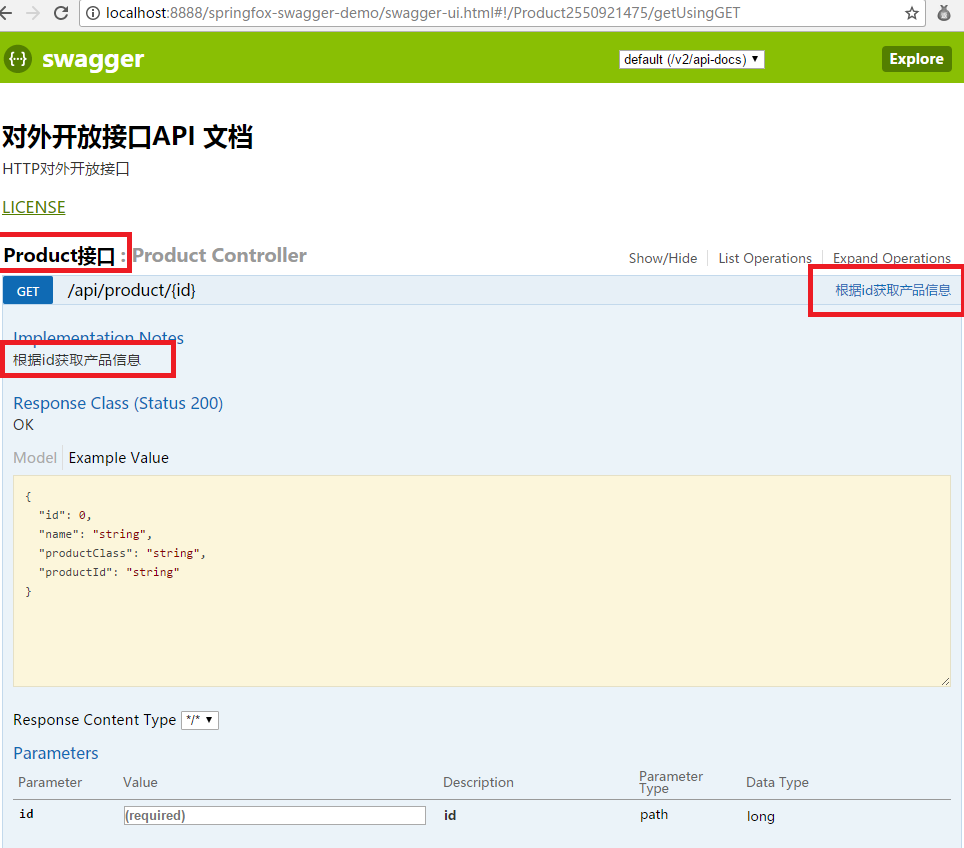
在参数id栏中输入1,然后点击“try it out”按钮~ 可以查看接口调用结果~
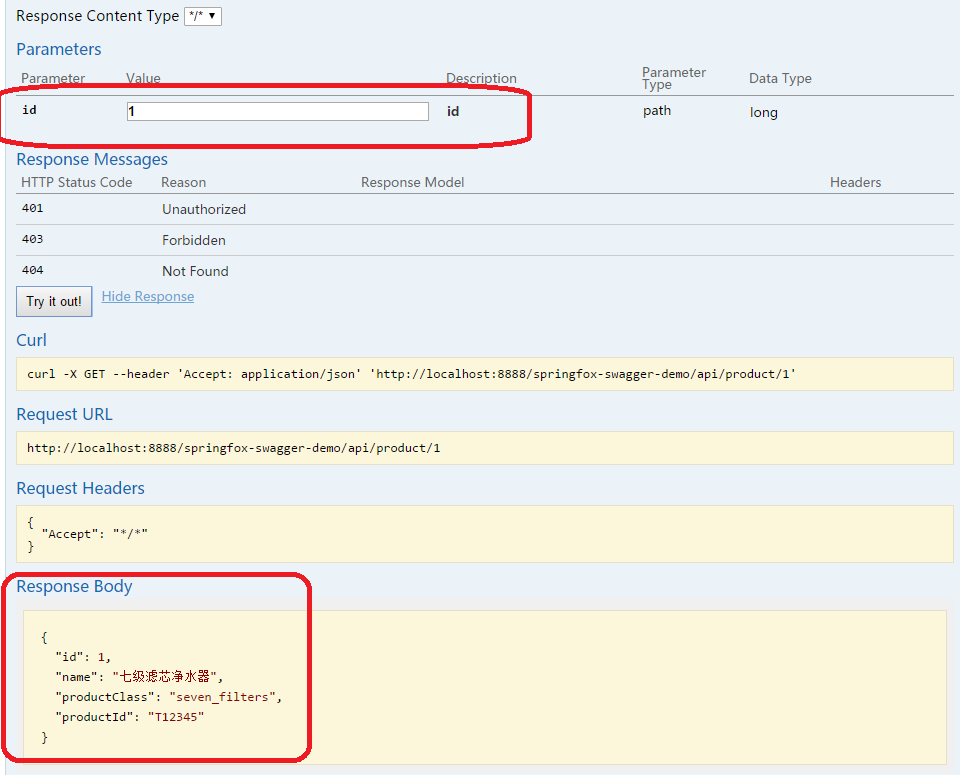
至此一个简单的示例就完成了~
稍微增加几个接口
修改ProductController
package com.xxx.tutorial.controller;

    import java.util.Arrays;

    import java.util.List;

    import org.springframework.http.ResponseEntity;

    import org.springframework.web.bind.annotation.PathVariable;

    import org.springframework.web.bind.annotation.RequestMapping;

    import org.springframework.web.bind.annotation.RequestMethod;

    import org.springframework.web.bind.annotation.RestController;

    import com.xxx.tutorial.model.Product;

    import io.swagger.annotations.Api;

    import io.swagger.annotations.ApiOperation;

    import io.swagger.annotations.ApiResponse;

    import io.swagger.annotations.ApiResponses;

    @RestController

    @RequestMapping(value = { "/api/product/" })

    @Api(value = "/product", tags = "Product接口")

    public class ProductController {

        @RequestMapping(value = "/{id}", method = RequestMethod.GET)

        @ApiResponses(value= {

                @ApiResponse(code = 400,message="参数错误"),

                @ApiResponse(code = 401,message="要求用户的身份认证"),

                @ApiResponse(code = 403,message="拒绝执行此请求"),

                @ApiResponse(code = 404,message="系统资源未发现"),

                @ApiResponse(code = 500,message="系统错误"),

                @ApiResponse(code = 200,message="成功,其它为错误,返回格式:{code:0,data[{}]},data中的属性参照下方Model",response=Product.class)})

        @ApiOperation(value = "根据id获取产品信息", notes = "根据id获取产品信息", httpMethod = "GET")

        public ResponseEntity<Product> get(@PathVariable Long id) {

            Product product = new Product();

            product.setName("七级滤芯净水器");

            product.setId(1L);

            product.setProductClass("seven_filters");

            product.setProductId("T12345");

            return ResponseEntity.ok(product);

        }

        @RequestMapping(method = RequestMethod.POST)

        @ApiOperation(value = "添加一个新的产品")

        @ApiResponses(value = {

                @ApiResponse(code = 201,message="已创建。成功请求并创建了新的资源"),

                @ApiResponse(code = 401,message="要求用户的身份认证"),

                @ApiResponse(code = 403,message="拒绝执行此请求"),

                @ApiResponse(code = 404,message="系统资源未发现"),

                @ApiResponse(code = 405, message = "参数错误"),

                @ApiResponse(code = 200,message="成功,其它为错误,返回格式:{code:0,data[{}]},data中的属性参照下方Model",response=String.class)})

        public ResponseEntity<String> add(Product product) {

            return ResponseEntity.ok("SUCCESS");

        }

        @RequestMapping(method = RequestMethod.PUT)

        @ApiOperation(value = "更新一个产品")

        @ApiResponses(value = {

                @ApiResponse(code = 200,message="成功,其它为错误,返回格式:{code:0,data[{}]},data中的属性参照下方Model",response=String.class),

                @ApiResponse(code = 201,message="已创建。成功请求并创建了新的资源"),

                @ApiResponse(code = 400, message = "参数错误"),

                @ApiResponse(code = 401,message="要求用户的身份认证"),

                @ApiResponse(code = 403,message="拒绝执行此请求"),

                @ApiResponse(code = 404,message="系统资源未发现")})

        public ResponseEntity<String> update(Product product) {

            return ResponseEntity.ok("SUCCESS");

        }

        @RequestMapping(method = RequestMethod.GET)

        @ApiOperation(value = "获取所有产品信息", notes = "获取所有产品信息", httpMethod = "GET", response = Product.class, responseContainer = "List")

        public ResponseEntity<List<Product>> getAllProducts() {

            Product product = new Product();

            product.setName("七级滤芯净水器");

            product.setId(1L);

            product.setProductClass("seven_filters");

            product.setProductId("T12345");

            return ResponseEntity.ok(Arrays.asList(product, product));

        }

    }

    @RequestMapping(method=RequestMethod.DELETE)

    @ApiOperation(value="删除某个产品信息",notes="删除某个产品信息")

/*    @ApiImplicitParams(@ApiImplicitParam(name="carOwnerName",value="产品id",dataType="Long"))*/

    @ApiResponses(value= {

            @ApiResponse(code = 204,message="无内容。服务器成功处理,但未返回内容!"),

            @ApiResponse(code = 400,message="参数错误"),

            @ApiResponse(code = 401,message="要求用户的身份认证"),

            @ApiResponse(code = 403,message="拒绝执行此请求"),

            @ApiResponse(code = 500,message="系统错误"),

            @ApiResponse(code = 200,message="成功,其它为错误,返回格式:{code:0,data[{}]},data中的属性参照下方Model",response=String.class)})

    public ResponseEntity<String> delete(@PathVariable Long id){

        if(carOwnerName==null) {

            return new ResponseEntity<String>(HttpStatus.NO_CONTENT);

        }else {

            return ResponseEntity.ok("SUCCESS");

        }

}
swagger-ui展示

由上图可以看出,不同的method(GET / PUT / POST等)都会以不同的颜色展示出来~
Swagger-ui的添加,可以帮助他人查看接口信息,并在页面上进行输入参数来调用接口~
Maven工程的目录如下:
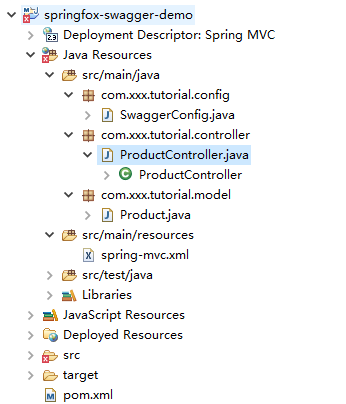
本文只是一个简单的整合示例,大家只要操作一下就能出来结果。
接下来讲解Swagger 常用注解使用
--@Api()用于类;
表示这个类是一个swagger的资源。它有两个属性,分别是:
String value();---也是说明,可以使用tags替代
String[] tags();---是一个数组,表示说明,tags如果有多个值,会生成多个list;
例如:
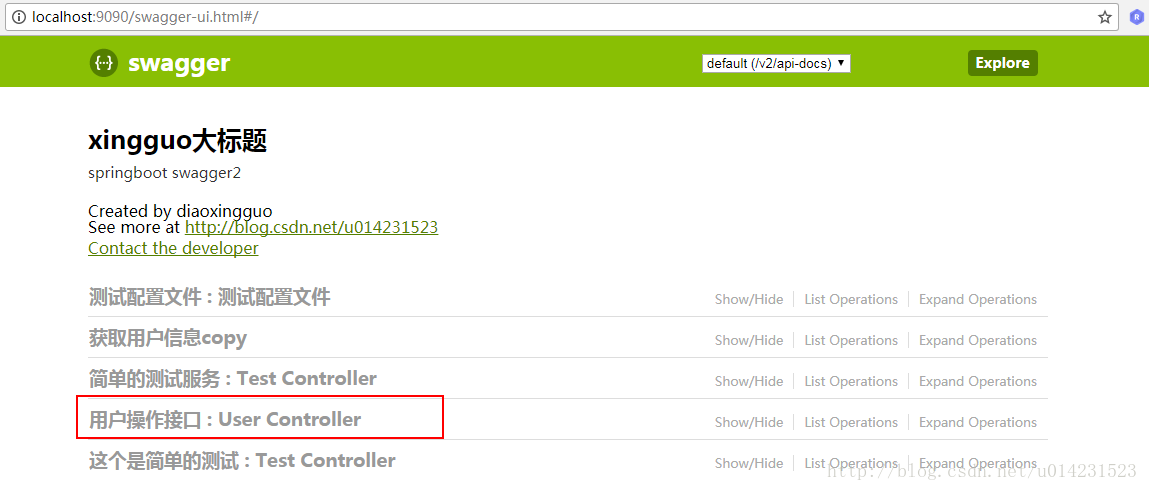
@Api(value="用户controller",tags={"用户操作接口"})

@RestController

public class UserController {

}
ui效果图:
--@ApiOperation()用于方法;
表示一个http请求的操作 ,它有4个常用属性:
String value();--用于方法描述;
String notes();--用于提示内容
String[] tags();--可以重新分组(视情况而用)
String httpMethod(); --请求方法类型,例如:httpMethod=“GET”;
--@ApiParam() 用于方法,参数,字段说明;表示对参数的添加元数据(说明或是否必填等) ,它有几个常用参数:
String name();--参数名
String value();--参数说明
boolean required();--是否必填
boolean allowEmptyValue();--是否允许有空值
例如:
@Api(value="用户controller",tags={"用户操作接口"})

@RestController

public class UserController {

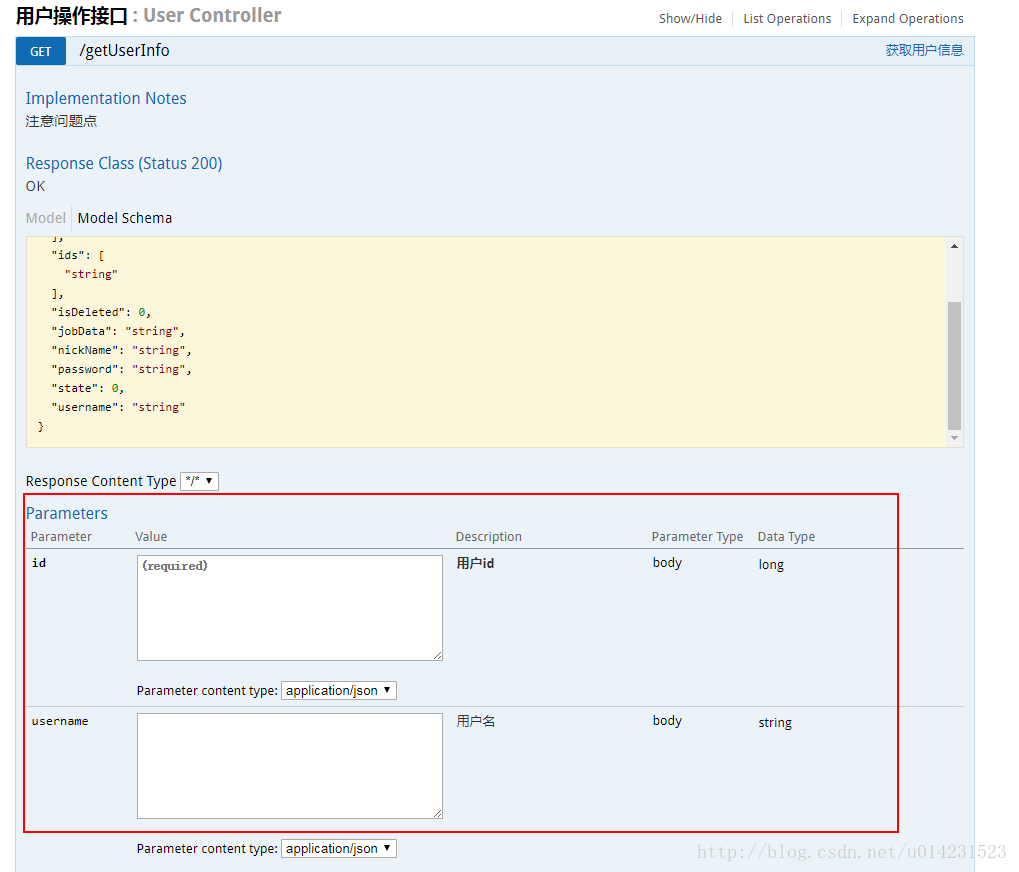
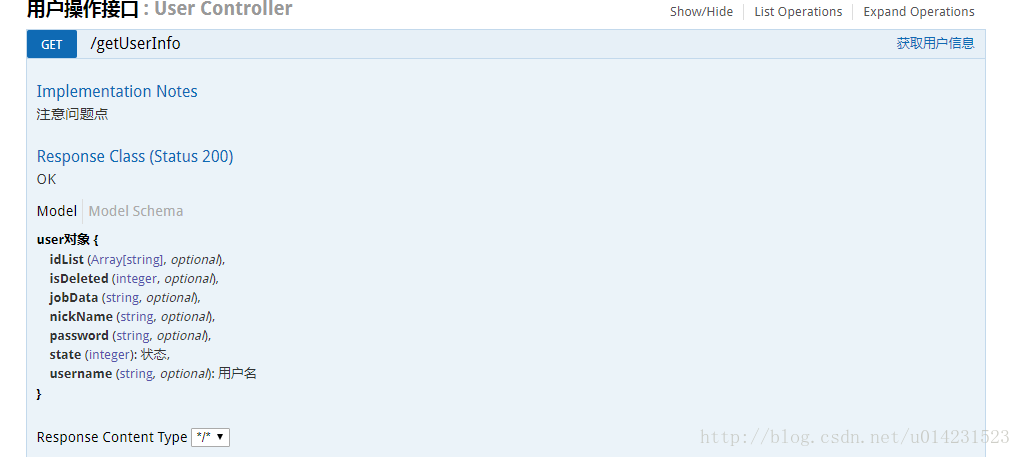
     @ApiOperation(value="获取用户信息",tags={"获取用户信息copy"},notes="注意问题点")

     @GetMapping("/getUserInfo")

     public User getUserInfo(@ApiParam(name="id",value="用户id",required=true) Long id,@ApiParam(name="username",value="用户名") String username) {

     // userService可忽略,是业务逻辑

      User user = userService.getUserInfo();

      return user;

  }

}
ui效果图:
--@ApiModel()用于类 ;表示对类进行说明,用于参数用实体类接收
value–表示对象名
description–描述
都可省略
--@ApiModelProperty()用于方法,字段; 表示对model属性的说明或者数据操作更改
value–字段说明
name–重写属性名字
dataType–重写属性类型
required–是否必填
example–举例说明
hidden–隐藏
例如:
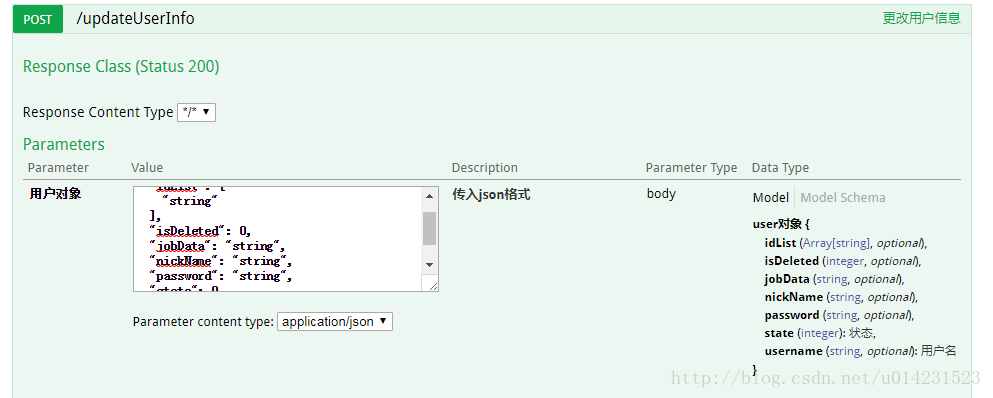
@ApiModel(value="user对象",description="用户对象user")

public class User implements Serializable{

    private static final long serialVersionUID = 1L;

     @ApiModelProperty(value="用户名",name="username",example="xingguo")

     private String username;

     @ApiModelProperty(value="状态",name="state",required=true)

      private Integer state;

      private String password;

      private String nickName;

      private Integer isDeleted;

      @ApiModelProperty(value="id数组",hidden=true)

      private String[] ids;

      private List<String> idList;

     //省略get/set

}
@ApiOperation("更改用户信息")

  @PostMapping("/updateUserInfo")

  public int updateUserInfo(@RequestBody @ApiParam(name="用户对象",value="传入json格式",required=true) User user){

     //注意,一定要添加@RequestBody注解

     int num = userService.updateUserInfo(user);

     return num;

  }
ui效果图:
--@ApiIgnore()用于类或者方法上,可以不被swagger显示在页面上
比较简单, 这里不做举例
--@ApiImplicitParam() 用于方法
表示单独的请求参数
@ApiImplicitParams() 用于方法,包含多个 @ApiImplicitParam
name–参数ming
value–参数说明
dataType–数据类型
paramType–参数类型
example–举例说明
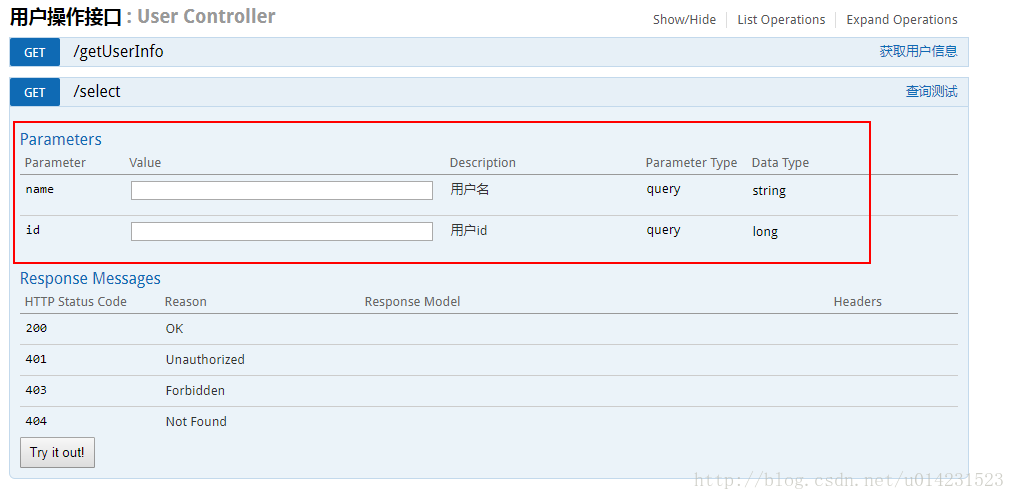
*****在controller层使用@RequestParam的时候,发现这个参数是必须要输入值的,但是我们有时候必须查询的时候允许参数为空,使用这个注解就不行了。但是使用@ApiImplicitParam这个注解可以解决这个问题。
例如:
@ApiOperation("查询测试")

  @GetMapping("select")

  //@ApiImplicitParam(name="name",value="用户名",dataType="String", paramType = "query")

  @ApiImplicitParams({

  @ApiImplicitParam(name="name",value="用户名",dataType="string", paramType = "query",example="xingguo"),

  @ApiImplicitParam(name="id",value="用户id",dataType="long", paramType = "query")})

  public void select(){

  }
ui效果图:
更加详细的文档,有兴趣的小伙伴可以访问swagger-ui的官网查看~
SpringMVC、SpringFox和Swagger整合项目实例的更多相关文章
- 一步步完成Maven+SpringMVC+SpringFox+Swagger整合示例
本文给出一个整合Maven+SpringMVC+SpringFOX+Swagger的示例,并且一步步给出完成步骤. 本人在做实例时发现 http://blog.csdn.net/zth1002/art ...
- Springfox与swagger的整合使用
一.前言 让我们先理一下springfox与swagger的关系. swagger是一个流行的API开发框架,这个框架以“开放API声明”(OpenAPI Specification,OAS)为基础, ...
- Springfox与swagger的整合使用(十七)
一.前言 让我们先理一下springfox与swagger的关系. swagger是一个流行的API开发框架,这个框架以“开放API声明”(OpenAPI Specification,OAS)为基础, ...
- SpringMVC中使用Swagger2整合
Swagger2是什么 Swagger 是一款RESTFUL接口的文档在线自动生成+功能测试功能软件. Swagger 是一个规范和完整的框架,用于生成.描述.调用和可视化 RESTful 风格的 W ...
- spring mvc和swagger整合
pom.xml 导入jar jar包 所属 备注 spring-core spring spring核心包 spring-expression spring spEl表达式 spring-beans ...
- SpringBoot+Swagger整合API
SpringBoot+Swagger整合API Swagger:整合规范的api,有界面的操作,测试 1.在pom.xml加入swagger依赖 <!--整合Swagger2配置类--> ...
- springboot+jpa+mysql+swagger整合
Springboot+jpa+MySQL+swagger整合 创建一个springboot web项目 <dependencies> <dependency> < ...
- Zuul Swagger 整合
疯狂创客圈 Java 高并发[ 亿级流量聊天室实战]实战系列 [博客园总入口 ] 架构师成长+面试必备之 高并发基础书籍 [Netty Zookeeper Redis 高并发实战 ] 前言 Crazy ...
- Swagger整合Jwt授权配置
Swagger整合Jwt授权配置 欢迎关注博主公众号「Java大师」, 专注于分享Java领域干货文章http://www.javaman.cn/sb2/swagger-jwt 一.Swagger入门 ...
随机推荐
- [转]Vue CLI 3搭建vue+vuex 最全分析
原文地址:https://my.oschina.net/wangnian/blog/2051369 一.介绍 Vue CLI 是一个基于 Vue.js 进行快速开发的完整系统.有三个组件: CLI:@ ...
- python爬虫中XPath和lxml解析库
什么是XML XML 指可扩展标记语言(EXtensible Markup Language) XML 是一种标记语言,很类似 HTML XML 的设计宗旨是传输数据,而非显示数据 XML 的标签需要 ...
- (7)Flask微电影之会员中心页面搭建
一.添加会员中心页面的路由 修改app/home/views.py内容,追加会员有关的5个路由: # coding:utf8 from . import home from flask import ...
- Docker 安装 MySQL 并实现远程连接
获取 MySQL 镜像 docker pull mysql:5.6 查看镜像列表 docker images 启动 MySQL 镜像 docker run -itd -P mysql:5.6 bash ...
- python中的捕获异常、异常跟踪
# 捕获异常,打印异常信息 try: 1/0 except Exception as e: print(e) 输出结果是integer division or modulo by zero,只知道是报 ...
- matlab学习笔记11_2高维数组操作 squeeze,ind2sub, sub2ind
一起来学matlab-matlab学习笔记11 11_2 高维数组处理和运算 squeeze, ind2sub, sub2ind 觉得有用的话,欢迎一起讨论相互学习~Follow Me squeeze ...
- C++基础 (杂七杂八的汇总 )
继承:继承就是新类从已有类那里得到已有的特性. 类的派生指的是从已有类产生新类的过程.原有的类成为基类或父类,产生的新类称为派生类或子类. 多态:将基类类型的指针或者引用指向派生类型的对象.多态通过虚 ...
- [LeetCode] 681. Next Closest Time 下一个最近时间点
Given a time represented in the format "HH:MM", form the next closest time by reusing the ...
- [LeetCode] 875. Koko Eating Bananas 可可吃香蕉
Koko loves to eat bananas. There are N piles of bananas, the i-th pile has piles[i] bananas. The g ...
- Oracle:时间字段模糊查询
需要查询某一天的数据,但是库里面存的是下图date类型 将Oracle中时间字段转化成字符串,然后进行字符串模糊查询 select * from CAINIAO_MONITOR_MSG t WHERE ...
