
Android 实现Path2.0中绚丽的的旋转菜单
上图先:
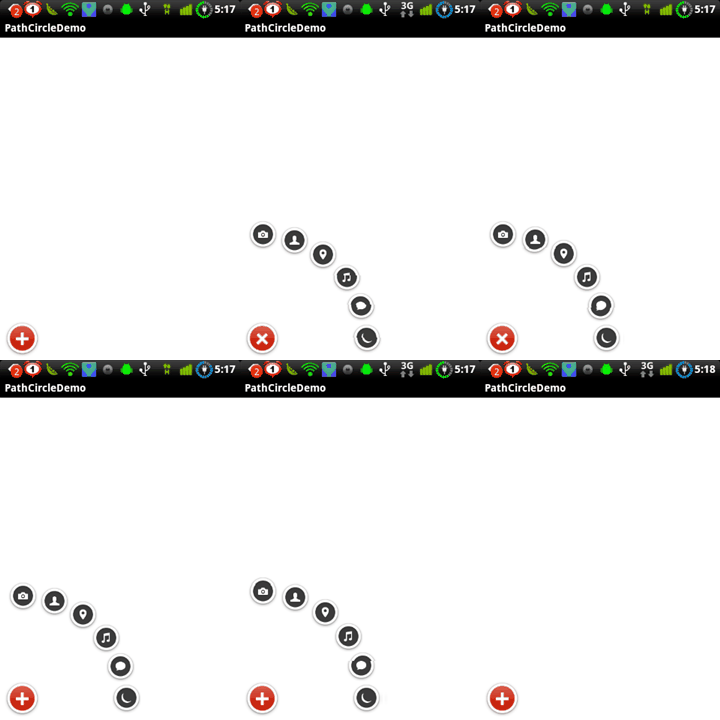

那么下面开始吧~
首先,将整个菜单动画分解开来。
1. 一级菜单按钮的旋转动画2个,十字和叉叉状态的转换。
2. 二级菜单按钮的平移动画2个,弹簧效果的in和out
3. 二级菜单按钮的点击效果,放大消失,其他未点击按钮缩小消失。
4. 一级菜单按钮的恢复效果,放大出现
好的 逐一去实现:
首先是一级菜单按钮的旋转动画,这2个动画可以直接在xml中定义,然后load到代码中来,具体代码如下:
rotate_story_add_button_in.xml
<?xml version="1.0" encoding="UTF-8"?>

 <rotate

     xmlns:android="http://schemas.android.com/apk/res/android"

          android:interpolator="@android:anim/linear_interpolator"

          android:duration=""

          android:fromDegrees="0.0"

          android:toDegrees="-225.0"

          android:pivotX="50.0%"

          android:pivotY="50.0%"

          android:fillAfter="true"

          android:fillEnabled="true"

          />
rotate_story_add_button_out.xml
<?xml version="1.0" encoding="UTF-8"?>

 <rotate

     xmlns:android="http://schemas.android.com/apk/res/android"

          android:interpolator="@android:anim/linear_interpolator"

          android:duration=""

          android:fromDegrees="-225.0"

          android:toDegrees="0.0"

          android:pivotX="50.0%"

          android:pivotY="50.0%"

          android:fillAfter="true"

          android:fillEnabled="true"

           />
这2段没什么好说的,定义好角度即可。
接下来是需要我们在代码中定义的动画部分,这几个动画的部分需要定义一个基类,作为统一的调用接口,这个基类被称作InOutAnimation,继承自AnimationSet,这个基类的主要工作是为view提供in和out两种不同的状态时的动画效果。其子类需要实现2个方法:
 protected abstract void addInAnimation(View aview[]);

 protected abstract void addOutAnimation(View aview[]);
从而进行view的入场和离场动画。
下面是InOutAnimation的代码部分:
public abstract class InOutAnimation extends AnimationSet {

          public Direction        direction;

          public enum Direction {

                    IN, OUT;

          }

          public InOutAnimation(Direction direction, long l, View[] aview) {

                    super(true);

                    this.direction = direction;

                    switch (this.direction) {

                    case IN:

                             addInAnimation(aview);

                             break;

                    case OUT:

                             addOutAnimation(aview);

                             break;

                    }

                    setDuration(l);

          }

          protected abstract void addInAnimation(View aview[]);

          protected abstract void addOutAnimation(View aview[]);

 }
接下来就是重头戏啦,二级菜单按钮的平移动画。
这部分动画看起来可能会比较复杂和神秘,其实不然,当把整个动画过程分解开来的时候,都是最最简单的平移而已,我们要做的只是定义一下平移的起点和终点、开始动画的顺序以及插值(Interpolator),让整个过程看起来很炫。
先说动画的起点和终点吧,起点很简单,就是整个view的左下角,即0,0点,为了效果漂亮一些,我们稍微的将左下角位置定义的有一些偏移,经验上的值是16,-13,这个点的位置看你心情而定咯~ 好 终点就是你想让他在的点上就好了,终点我们将定义到layout中去,为这个2级菜单指定一个margin的值就好。
还是上代码比较直观:
动画如下:
收缩部分:TranslateAnimation(xOffset + -mlp.leftMargin, 0F,yOffset + mlp.bottomMargin, 0F)

扩张部分:TranslateAnimation(0F, xOffset + -mlp.leftMargin, 0F,yOffset + mlp.bottomMargin)
位置定义部分:
例如:
android:layout_marginBottom="142dp" android:layout_marginLeft="10.667dp"
这个位置大家可以直观的在布局文件中看到,详细的布局文件也将在下面展示。
以上是单独的每一个二级按钮的动画,而组合的动画就是指定了一下开始的时间差以及插值:
这个就是奥妙所在了,OvershootInterpolator AnticipateInterpolator 这2个插值器提供了弹力效果。
整段的代码如下:
ComposerButtonAnimation.java
public class ComposerButtonAnimation extends InOutAnimation {

          public static final int                  DURATION       = ;

          private static final int       xOffset              = ;

          private static final int       yOffset              = -;

          public ComposerButtonAnimation(Direction direction, long l, View view) {

                    super(direction, l, new View[] { view });

          }

          public static void startAnimations(ViewGroup viewgroup,

                             InOutAnimation.Direction direction) {

                    switch (direction) {

                    case IN:

                             startAnimationsIn(viewgroup);

                             break;

                    case OUT:

                             startAnimationsOut(viewgroup);

                             break;

                    }

          }

          private static void startAnimationsIn(ViewGroup viewgroup) {

                    for (int i = ; i < viewgroup.getChildCount(); i++) {

                             if (viewgroup.getChildAt(i) instanceof InOutImageButton) {

                                      InOutImageButton inoutimagebutton = (InOutImageButton) viewgroup

                                                         .getChildAt(i);

                                      ComposerButtonAnimation animation = new ComposerButtonAnimation(

                                                         InOutAnimation.Direction.IN, DURATION, inoutimagebutton);

                                      animation.setStartOffset((i * )

                                                         / (- + viewgroup.getChildCount()));

                                      animation.setInterpolator(new OvershootInterpolator(2F));

                                      inoutimagebutton.startAnimation(animation);

                             }

                    }

          }

          private static void startAnimationsOut(ViewGroup viewgroup) {

                    for (int i = ; i < viewgroup.getChildCount(); i++) {

                             if (viewgroup.getChildAt(i) instanceof InOutImageButton) {

                                      InOutImageButton inoutimagebutton = (InOutImageButton) viewgroup

                                                         .getChildAt(i);

                                      ComposerButtonAnimation animation = new ComposerButtonAnimation(

                                                         InOutAnimation.Direction.OUT, DURATION,

                                                         inoutimagebutton);

                                      animation.setStartOffset(( * ((- + viewgroup

                                                         .getChildCount()) - i))

                                                         / (- + viewgroup.getChildCount()));

                                       animation.setInterpolator(new AnticipateInterpolator(2F));

                                      inoutimagebutton.startAnimation(animation);

                             }

                    }

          }

          @Override

          protected void addInAnimation(View[] aview) {

                    MarginLayoutParams mlp = (MarginLayoutParams) aview[]

                                      .getLayoutParams();

                    addAnimation(new TranslateAnimation(xOffset + -mlp.leftMargin, 0F,

                                      yOffset + mlp.bottomMargin, 0F));

          }

          @Override

          protected void addOutAnimation(View[] aview) {

                    MarginLayoutParams mlp = (MarginLayoutParams) aview[]

                                      .getLayoutParams();

                    addAnimation(new TranslateAnimation(0F, xOffset + -mlp.leftMargin, 0F,

                                      yOffset + mlp.bottomMargin));

          }

 }
剩下的增大出现、增大消失及缩小消失都是scale和alpha的组合动画
例如增大出现为:
 addAnimation(new ScaleAnimation(0F, 1F, 0F, 1F, , 0.5F, , 0.5F));

 addAnimation(new AlphaAnimation(0F, 1F));
整段的代码如下:
public class ComposerButtonGrowAnimationIn extends InOutAnimation {

          public ComposerButtonGrowAnimationIn(int i) {

                    super(InOutAnimation.Direction.IN, i, new View[]);

          }

          @Override

          protected void addInAnimation(View[] aview) {

                    addAnimation(new ScaleAnimation(0F, 1F, 0F, 1F, , 0.5F, , 0.5F));

                    addAnimation(new AlphaAnimation(0F, 1F));

          }

          @Override

          protected void addOutAnimation(View[] aview) {}

 }

 public class ComposerButtonGrowAnimationOut extends InOutAnimation {

          public ComposerButtonGrowAnimationOut(int i) {

                    super(InOutAnimation.Direction.OUT, i, new View[]);

          }

          @Override

          protected void addInAnimation(View[] aview) {}

          @Override

          protected void addOutAnimation(View[] aview) {

                    addAnimation(new ScaleAnimation(1F, 5F, 1F, 5F, , 0.5F, , 0.5F));

                    addAnimation(new AlphaAnimation(1F, 0F));

          }

 } public class ComposerButtonShrinkAnimationOut extends InOutAnimation {

          public ComposerButtonShrinkAnimationOut(int i) {

                    super(InOutAnimation.Direction.OUT, i, new View[]);

          }

          @Override

          protected void addInAnimation(View[] aview) {

          }

          @Override

          protected void addOutAnimation(View[] aview) {

                    addAnimation(new ScaleAnimation(1F, 0F, 1F, 0F, , 0.5F, , 0.5F));

                    addAnimation(new AlphaAnimation(1F, 0F));

          }

 }
接下来我们需要为这些控件做一下扩展,以便其可以再动画完成后显示或消失。
很简单
public class InOutImageButton extends ImageButton {

          private Animation    animation;

          public InOutImageButton(Context context, AttributeSet attrs, int defStyle) {

                    super(context, attrs, defStyle);

          }

          public InOutImageButton(Context context, AttributeSet attrs) {

                    super(context, attrs);

          }

          public InOutImageButton(Context context) {

                    super(context);

          }

          @Override

          protected void onAnimationEnd() {

                    super.onAnimationEnd();

                    if ((this.animation instanceof InOutAnimation)) {

                             setVisibility(((InOutAnimation) this.animation).direction != InOutAnimation.Direction.OUT ? View.VISIBLE

                                                : View.GONE);

                    }

          }

          @Override

          protected void onAnimationStart() {

                    super.onAnimationStart();

                    if ((this.animation instanceof InOutAnimation))

                             setVisibility(View.VISIBLE);

          }

          @Override

          public void startAnimation(Animation animation) {

                    super.startAnimation(animation);

                    this.animation = animation;

                    getRootView().postInvalidate();

          }

 }
那么到这里基本上就已经搞定了所有的事情了,剩下点没做的事就是把这些动画效果设置给对应的控件了.
代码:这里
Android 实现Path2.0中绚丽的的旋转菜单的更多相关文章
- Path2.0中绚丽的的旋转菜单
我们看一下实现的效果图: 在上图中,我将菜单弹出的效果设置成直线型,最终的弹出或汇总点在下面的红色按钮中. 它的实现原理是设置动画的同时并利用动画中的插入器(interpolator)来实现弹力.主要 ...
- Android RxJava 2.0中backpressure(背压)概念的理解
英文原文:https://github.com/ReactiveX/RxJava/wiki/Backpressure Backpressure(背压.反压力) 在rxjava中会经常遇到一种情况就是被 ...
- Android Studio 3.0 新特性
最新Android Studio版本是Android Studio 3.0,本文提供了所有新功能和更改的摘要. 所有这些功能都可以在最新的金丝雀版本中发布,但beta测试版本可能尚未提供. 核心IDE ...
- Android Studio 3.0 下载 使用新功能介绍
谷歌2017发布会更新了挺多内容的,而且也发布了AndroidStudio3.0预览版,一些功能先睹为快.(英语一般,有些翻译不太好) 下载地址 https://developer.android.g ...
- android圆形旋转菜单,而对于移动转换功能支持
LZ该公司最近接手一个项目,需要写一个圆形旋转菜单,和菜单之间的移动换位支持,我本来以为这样的demo如若互联网是非常.想想你妈妈也帮不了我,空旋转,但它不能改变位置,所以LZ我们只能靠自己摸索. 最 ...
- android 4.0 中出错 java.lang.UnsupportedOperationException
在android4.0中 画图的时候使用: canvas.clipPath(path, Region.Op.XOR); 报错 java.lang.UnsupportedOperationExcept ...
- Android 7.0 中 ContentProvider 实现原理
欢迎大家前往腾讯云社区,获取更多腾讯海量技术实践干货哦~ 作者:汪毅雄 导语: 本文描述了ContentProvider发布者和调用者这两在Framework层是如何实现的. 作为Android的四大 ...
- Android 6.0 中的 Wifi 连接
Android 6.0 中的 Wifi 连接 这几天在写一个软件,结果被其中的 wifi 连接问题困扰了 3 天. 先描述下需求: usb 接口接了一根 usb2serial,通过这个接口接收命令 当 ...
- 在Android 5.0中使用JobScheduler
在Android 5.0中使用JobScheduler 原文链接 : using-the-jobscheduler-api-on-android-lollipop 译者 : Mr.Simple 校对者 ...
随机推荐
- 评价正在使用输入法软件产品----QQ拼音输入法
评价一下大家手头正在使用输入法或者搜索类的软件产品. 我现在使用的是系统自带的QQ拼音输入法,以前使用的是搜狗拼音输入法,后来发现可能由于我的系统重装过好几次,搜狗输入法也重装了好几次,而每次都删不干 ...
- nodejs笔记二--文件I/O;
一.写入文件: fs.writeFile(filename, data, callback),数据参数可以是string或者是Buffer,编码格式参数可选,默认为"utf8",回 ...
- xml基础学习笔记01
注意:刚刚看了网上对于XML中的标签,节点和元素?到底应该怎么表述?起初我也有这个疑惑,现在我的想法是:下面出现node的应称作节点,节点对象.element应称作元素,毕竟这更符合英文的本意.至于标 ...
- 设计模式 --深入理解javascript
/* 一.单例模式 */ var Universe; (function () { var instance; Universe = function Universe() { if (instanc ...
- mysql的简单主从复制(ubuntu)
环境:两台ubuntu 12.04.5 虚拟机 mysql-server-5.5 master (192.168.240.130) slave (192.168.240.129) (1)查看二进 ...
- NYOJ-975 关于521 AC 分类: NYOJ 2014-02-25 22:14 349人阅读 评论(0) 收藏
#include<stdio.h> struct AC { int x,y; }a[1000004]; int main() { int i,j,k=0;a[125].x=1,a[521] ...
- 奶牛通讯 usaco 网络流
这道题很有意思,原题是只需输出最小割集大小,现在oj上改成了输出字典序最小的割集: 题解:可以考虑从小到大删边,若删掉这条边后,最小割变小,保持不变,记录此时的最小割大小: 若最小割不变,恢复这条边: ...
- JAVA数据结构系列 栈
java数据结构系列之栈 手写栈 1.利用链表做出栈,因为栈的特殊,插入删除操作都是在栈顶进行,链表不用担心栈的长度,所以链表再合适不过了,非常好用,不过它在插入和删除元素的时候,速度比数组栈慢,因为 ...
- 使用jQuery动态加载js脚本
动态加载Javascript是一项非常强大且有用的技术.这方面的主题在本站已经讨论了不少,我也经常会在一些个人项目上使用RequireJS和Dojo加载js.它们很强大,但有时候也会得不偿失.如果你使 ...
- MySql计数器,如网站点击数,如何实现高性能高并发的计数器功能
MySql计数器,如网站点击数,如何实现高性能高并发的计数器功能 Clicks: Date: -- :: Power By 李轩Lane TagMysql计数器高性能 现在有很多的项目,对计数器的实现 ...