为树莓派3B添加LCD1602液晶屏
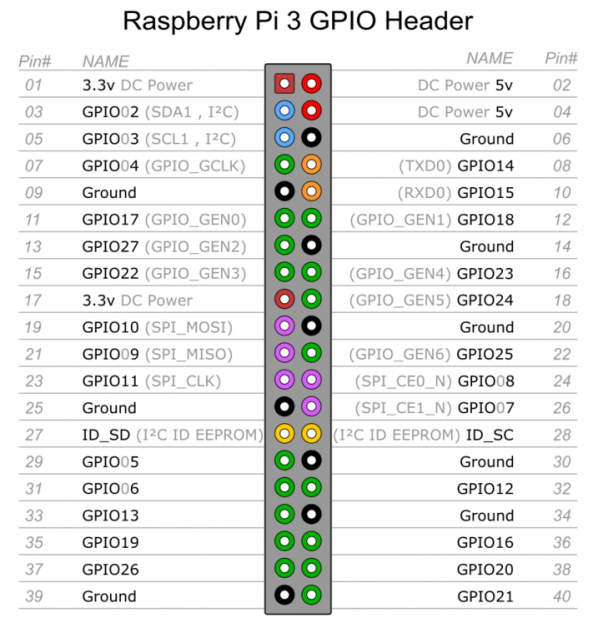
树莓派3B针脚说明
LCD1602接线说明
VSS,接地
VDD,接5V电源
VO,液晶对比度调节,接电位器中间的引脚,电位器两边的引脚分别接5V和接地。
RS,寄存器选择,接GPIO14
RW,读写选择,接地,表示写模式
EN,使能信号,接GPIO15
D0,数据位0,4位工作模式下不用,不接
D1,数据位1,4位工作模式下不用,不接
D2,数据位2,4位工作模式下不用,不接
D3,数据位3,4位工作模式下不用,不接
D4,数据位4,接GPIO17
D5,数据位5,接GPIO18
D6,数据位6,接GPIO27
D7,数据位7,接GPIO22
A,液晶屏背光+,接5V
K,液晶屏背光-,接地
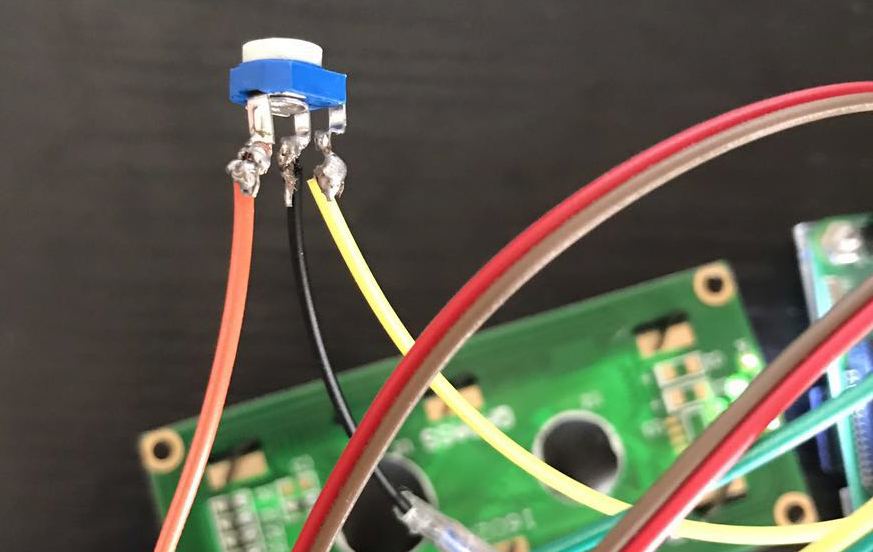
调整电位器
因为缺少1个5V的线,直接破皮拧一根进去就行,电位器调整到屏幕显示正常的对比度即可,第一次玩烙铁,焊的略丑…
lcd1602.py
#!/usr/bin/python |
1602.py
#!/usr/bin/python |
将以上两个文件保存在同一个目录下,运行1602.py即可打印信息到LCD上。
效果图

参考链接
http://www.cnblogs.com/xiaowuyi/p/4051238.html
https://www.6zou.net/tech/raspberry-pi-lcd1602-system-monitor.html
为树莓派3B添加LCD1602液晶屏的更多相关文章
- 树莓派3b添加python时间同步脚本
树莓派没有电池,因此断电后系统时间会停止,直到你开机后又继续计时,所以会造成系统时间和实际时间有很大的误差. 因为项目需要用到本地时间,精度要求不高不想折腾(如果需要高精度,需要安装ntp),所以考虑 ...
- [记录]学习树莓派3B接DHT11和LCD1602和修改树莓派时区
前提 树莓派系统安装好 apache web 服务器,如未安装,可在树莓派内执行sudo apt-get install apache2 进行安装apache 也可以通过命令获取GPIO信息: gpi ...
- 使用Python控制1602液晶屏实时显示时间(附PyCharm远程调试)
前言 原创文章,转载引用务必注明链接.水平有限,如有疏漏,欢迎指正. 本文介绍一下UP板的GPIO资源使用,以及一个使用Python演示一个简单的demo. 本文使用Markdown写成,为获得更好的 ...
- 树莓派3b在rt-thread上移植LittlevGL
树莓派3b在rt-thread上移植LittlevGL 目录 树莓派3b在rt-thread上移植LittlevGL 1.本文概述 2.资源准备 3.上手体验 4.rt-thread与lvgl进行无缝 ...
- s3c2440液晶屏驱动 (内核自带) linux-4.1.24
自带有一部分驱动的配置信息,只要修改这部分就能支援 不同的液晶屏 - /arch/arm/mach-s3c24xx/mach-smdk2440.c 另一部分在 /drivers/video/fbdev ...
- 树莓派3B+(一)
第一步:安装raspbian系统 介绍:Raspbian是为树莓派设计,基于Debian的操作系统,由一个小团队开发.其不隶属于树莓派基金会,但被列为官方支持的操作系统. 下载地址:https://w ...
- ARM40-A5应用——fbset与液晶屏参数的适配【转】
转自:https://blog.csdn.net/vonchn/article/details/80784579 ARM40-A5应用——fbset与液晶屏参数的适配 2018.6.18 版权声明:本 ...
- 树莓派3b安装Nginx和php7和百度语音合成模块
1.安装sox系统mp3音频播放模块(项目需要) sudo apt-get install lame sudo apt-get install sox sudo apt-get install lib ...
- 树莓派3B+首次登陆通过网络
树莓派3B+默认串口不能登录,即使可使用可需要通过连线方式连接,如何才能直接通过网络ssh登录树莓派呢? 串口问题及使用 树莓派3的UART串口的使用问题,该串口问题的官方反馈及回复请参考这两篇官方博 ...
随机推荐
- APM调用链产品对比
APM调用链产品对比 随着企业经营规模的扩大,以及对内快速诊断效率和对外SLA(服务品质协议,service-level agreement)的追求,对于业务系统的掌控度的要求越来越高,主要体现在: ...
- SW3518中文规格书
SW3518 是一款高集成度的多快充协议双口充电芯片, 支持 A+C 口任意口快充输出, 支持双口独立限流. 其集成了 5A 高效率同步降压变换器, 支持 PPS/PD/QC/AFC/FCP/SCP/ ...
- Python语言程序设计---函数的定义与使用
推荐一个Python学习交流的q群:610380249 在学习Python的过程中,有什么不懂的问题都可以发群里,一起讨论. 1 函数的理解和定义 函数是一段代码的表示,所指定的参数是一种占位符,如果 ...
- celery应用
celery---分布式任务队列 Celery是一个简单,灵活且可靠的分布式系统,可以处理大量消息,同时为操作提供维护该系统所需的工具. Celery是一个基于python开发的模块,可以帮助我们对任 ...
- Redis 核心篇:唯快不破的秘密
天下武功,无坚不摧,唯快不破! 学习一个技术,通常只接触了零散的技术点,没有在脑海里建立一个完整的知识框架和架构体系,没有系统观.这样会很吃力,而且会出现一看好像自己会,过后就忘记,一脸懵逼. 跟着「 ...
- 不占用额外内存空间能否做到 将图像旋转90度 N × N矩阵表示的图像,其中每个像素的大小为4字节
给定一幅由N × N矩阵表示的图像,其中每个像素的大小为4字节,编写一种方法,将图像旋转90度. 不占用额外内存空间能否做到? 示例 1: 给定 matrix = [ [1,2,3], [4,5,6] ...
- detect data races The cost of race detection varies by program, but for a typical program, memory usage may increase by 5-10x and execution time by 2-20x.
小结: 1. conflicting access 2.性能危害 优化 The cost of race detection varies by program, but for a typical ...
- 类型检查和鸭子类型 Duck typing in computer programming is an application of the duck test 鸭子测试 鸭子类型 指示编译器将类的类型检查安排在运行时而不是编译时 type checking can be specified to occur at run time rather than compile time.
Go所提供的面向对象功能十分简洁,但却兼具了类型检查和鸭子类型两者的有点,这是何等优秀的设计啊! Duck typing in computer programming is an applicati ...
- C++ Primer Plus读书笔记(五)循环和关系表达式
1.前缀运算符的优先级是从右到左,例如: 1 *++p; //这句话的含义是先对p进行++,再取* 2.循环 c++11新增了一种循环方式,有点和python类似,如下: 1 array<int ...
- Google performance Tools (gperftools) 使用心得
Google performance Tools (gperftools) 使用心得 gperftools是google开发的一款非常实用的工具集,主要包括:性能优异的malloc free内存分配器 ...