
HarmonyOS三方件开发指南(13)-SwipeLayout侧滑删除
鸿蒙入门指南,小白速来!0基础学习路线分享,高效学习方法,重点答疑解惑--->【课程入口】
目录:
1. SwipeLayout组件功能介绍
2. SwipeLayout使用方法
3. SwipeLayout开发实现
4.《HarmonyOS三方件开发指南》系列文章合集
1. SwipeLayout组件功能介绍
1.1.功能介绍:
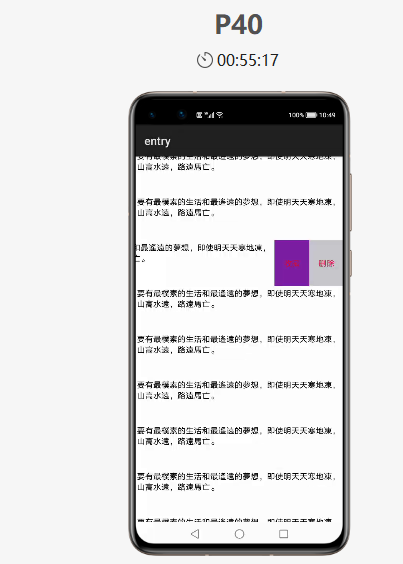
SwipeLayout组件是一个侧滑删除组件。
1.2. 模拟器上运行效果:
2. SwipeLayout使用方法
2.1. 新建工程,增加组件Har包依赖
在应用模块中添加HAR,只需要将SwipeLayout.har复制到entry\libs目录下即可(由于build.gradle中已经依赖的libs目录下的*.har,因此不需要再做修改)。
2.2. 修改主页面的布局文件
修改主页面的布局文件ability_main.xml,将自定义的SwipeLayout添加到xml中,将初始状态下展示的视图添加到SwipeLayout作为index为0的子视图:
<?xml version="1.0" encoding="utf-8"?>

<DirectionalLayout

    xmlns:ohos="http://schemas.huawei.com/res/ohos"

    ohos:id="$+id:total1"

    ohos:height="match_parent"

    ohos:width="match_parent"

    ohos:background_element="gray"

    ohos:orientation="vertical">

    <com.isoftstone.swipelayout.SwipeLayout

        ohos:id="$+id:sample2"

        ohos:height="80vp"

        ohos:width="match_parent"

        ohos:orientation="horizontal">

        <Text

            ohos:id="$+id:bottom_layout1"

            ohos:height="match_parent"

            ohos:width="match_parent"

            ohos:background_element="white"

            ohos:multiple_lines="true"

            ohos:padding="10"

            ohos:text="要有最樸素的生活和最遙遠的夢想,即使明天天寒地凍,山高水遠,路遠馬亡。"

            ohos:text_alignment="left"

            ohos:text_size="14fp"

            ohos:visibility="visible">

        </Text>

        <DirectionalLayout

            ohos:id="$+id:bottom_wrapper1"

            ohos:height="match_parent"

            ohos:width="360px"

            ohos:background_element="#ddff00"

            ohos:orientation="horizontal"

            ohos:visibility="visible">

            <Text

                ohos:id="$+id:Texts1"

                ohos:height="match_parent"

                ohos:width="180px"

                ohos:background_element="#7B1FA2"

                ohos:left_padding="25"

                ohos:right_padding="25"

                ohos:text="收藏"

                ohos:text_alignment="center"

                ohos:text_color="#DC143C"

                ohos:text_size="14fp"

                ohos:visibility="visible"

                />

            <Text

                ohos:id="$+id:texts2"

                ohos:height="match_parent"

                ohos:width="180px"

                ohos:background_element="#C7C7CC"

                ohos:left_padding="25"

                ohos:right_padding="25"

                ohos:text="删除"

                ohos:text_alignment="center"

                ohos:text_color="#DC143C"

                ohos:text_size="14fp"

                ohos:visibility="visible"

                />

        </DirectionalLayout>

        <Image

            ohos:id="$+id:images3"

            ohos:height="match_parent"

            ohos:width="match_parent"

            ohos:background_element="gray"

            ohos:image_src="$media:star"

            />

        <DirectionalLayout

            ohos:id="$+id:bottom_fronts"

            ohos:height="match_parent"

            ohos:width="match_content"

            ohos:background_element="#ddff00"

            ohos:orientation="horizontal"

            ohos:visibility="visible">

            <Image

                ohos:id="$+id:images1"

                ohos:height="match_parent"

                ohos:width="180px"

                ohos:background_element="green"

                ohos:image_src="$media:star"/>

            <Image

                ohos:id="$+id:images2"

                ohos:height="match_parent"

                ohos:width="180px"

                ohos:background_element="red"

                ohos:image_src="$media:trash"/>

        </DirectionalLayout>

    </com.isoftstone.swipelayout.SwipeLayout>

    <Image

        ohos:id="$+id:images"

        ohos:height="match_content"

        ohos:width="match_content"

        ohos:background_element="green"

        ohos:image_src="$media:star"

        ohos:layout_alignment="horizontal_center"

        ohos:top_margin="100vp"/>

</DirectionalLayout>
2.3. 初始化SwipeLayout
在MainAbilitySlince类的onStart函数中,增加如下代码。
SwipeLayout swipeLayout = (SwipeLayout) findComponentById(ResourceTable.Id_sample1);

DirectionalLayout right = (DirectionalLayout) findComponentById(ResourceTable.Id_bottom_wrapper);

//初始化

swipeLayout.initializeSwipe();

DirectionalLayout left = (DirectionalLayout) findComponentById(ResourceTable.Id_bottom_front);

Image image3 = (Image) findComponentById(ResourceTable.Id_image3);

//将各个方向拖拽时对应展示的视图添加到swipeLayout

swipeLayout.addDrag(SwipeLayout.DragEdge.Left, right);

swipeLayout.addDrag(SwipeLayout.DragEdge.Right, left);

swipeLayout.addDrag(SwipeLayout.DragEdge.Bottom, image3);
3. SwipeLayout开发实现
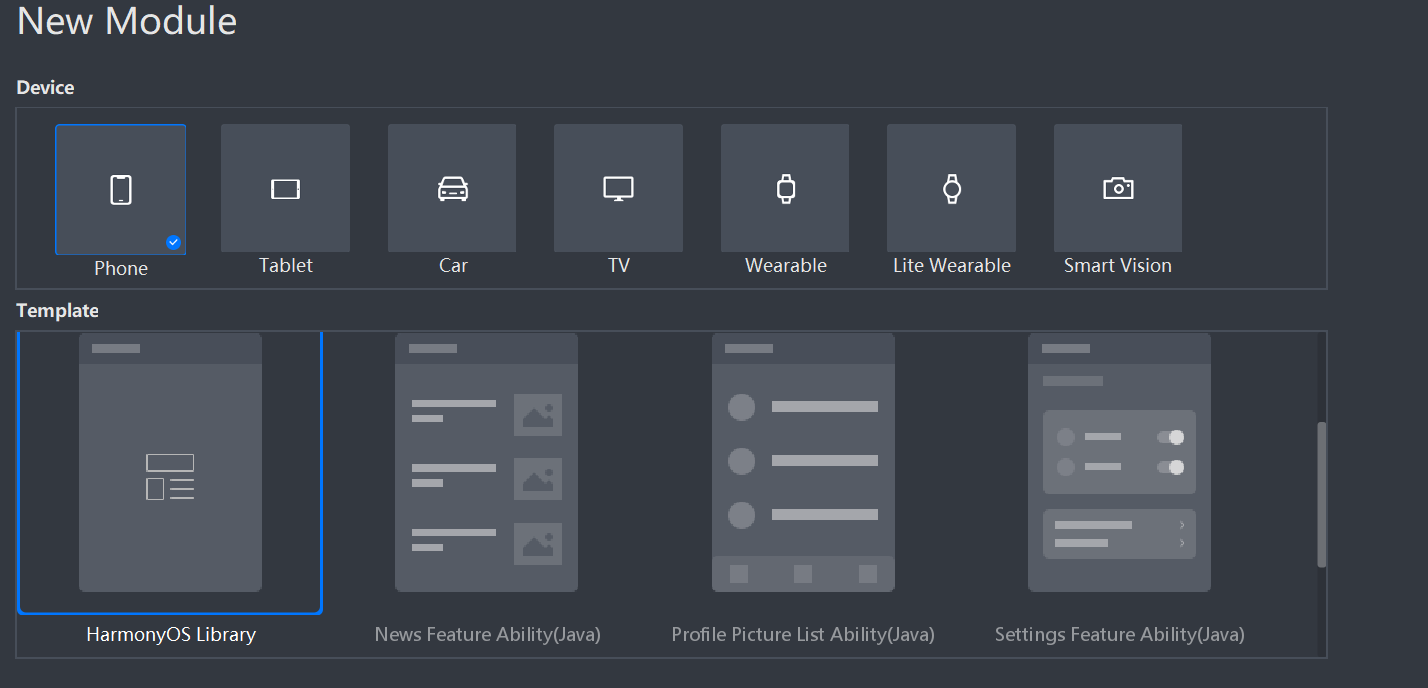
3.1. 新建一个Module
新建一个Module,类型选择HarmonyOS Library,模块名为SwipeLayout,如图
3.2. 新建一个SwipeLayout类
新建一个SwipeLayout类,继承自PositionLayout类
SwipeLayout的主要流程:
1. 首先通过xml的构造方法,为SwipeLayout添加拖拽监听;
2. 将LinkedHashMap<DragEdge, Component> mDragEdges初始化为空,并确定主界面的显示位置;
3. 通过public void addDrag(DragEdge dragEdge, Component child) 方法将可拖拽的方向和对应展示的视图添加到mDragEdges,并设置其初始的ContentPosition;
public void addDrag(DragEdge dragEdge, Component child) {

    mDragEdges.put(dragEdge, child);

    switch (dragEdge) {

        case Left:

            child.setContentPosition(getWidth(), 0);

            break;

        case Right:

            HiLog.info(label, "Log_addDrag" + child.getHeight());

            child.setContentPosition(-child.getWidth(), 0);

            break;

        case Top:

            child.setContentPosition(0, getHeight());

            break;

        case Bottom:

            child.setContentPosition(0, -child.getHeight());

            break;

    }

    child.setVisibility(INVISIBLE);

    addComponent(child, 0);

}
4.在拖拽动作的监听回调方法中完成对视图的更新
A.在update回调中设置打开和关闭的边界以及边界内的位置刷新
if (getSurfaceView().getContentPositionY() + dragInfo.yOffset <= 0) {

    close();

} else if (getSurfaceView().getContentPositionY() + dragInfo.yOffset >= getHeight()) {

    open();

} else {

    getSurfaceView().setContentPositionY(getSurfaceView().getContentPositionY() + (float) dragInfo.yOffset);

    getCurrentBottomView().setContentPositionY(getCurrentBottomView().getContentPositionY() + (float) dragInfo.yOffset);

}
B.在end中判断滑动的距离,如果大于设定的滑动距离则直接将控件展开或者关闭
if (isCloseBeforeDrag && mDragDistanceY < 0) {

    if (Math.abs(mDragDistanceY) >= mWillOpenPercentAfterClose * getBottomViewHeight()) {

        open();

    } else {

        close();

    }

}

if (!isCloseBeforeDrag && mDragDistanceY > 0) {

    if (Math.abs(mDragDistanceY) >= mWillOpenPercentAfterClose * getBottomViewHeight()) {

        close();

    } else {

        open();

    }

}
3.3. 编译HAR包
利用Gradle可以将HarmonyOS Library库模块构建为HAR包,构建HAR包的方法如下:
在Gradle构建任务中,双击PackageDebugHar或PackageReleaseHar任务,构建Debug类型或Release类型的HAR。
待构建任务完成后,可以loadingview> bulid > outputs > har目录中,获取生成的HAR包。
项目源代码地址:https://github.com/isoftstone-dev/SwipeBackLayout
欢迎交流:HWIS-HOS@isoftstone.com
作者:软通田可辉
想了解更多内容,请访问: 51CTO和华为官方战略合作共建的鸿蒙技术社区https://harmonyos.51cto.com
HarmonyOS三方件开发指南(13)-SwipeLayout侧滑删除的更多相关文章
- HarmonyOS三方件开发指南(15)-LoadingView功能介绍
目录: 1. LoadingView组件功能介绍2. Lottie使用方法3. Lottie开发实现4.<HarmonyOS三方件开发指南>系列文章合集 1. LoadingView组件功 ...
- HarmonyOS三方件开发指南(12)——cropper图片裁剪
鸿蒙入门指南,小白速来!0基础学习路线分享,高效学习方法,重点答疑解惑--->[课程入口] 目录:1. cropper组件功能介绍2. cropper使用方法3. cropper组件开发实现4. ...
- HarmonyOS三方件开发指南(14)-Glide组件功能介绍
<HarmonyOS三方件开发指南>系列文章合集 引言 在实际应用开发中,会用到大量图片处理,如:网络图片.本地图片.应用资源.二进制流.Uri对象等,虽然官方提供了PixelMap进行图 ...
- HarmonyOS三方件开发指南(16)-VideoCache 视频缓存
目录: 1.引言 2.功能介绍 3.VideoCache使用指南 4.VideoCache开发指南 5.<HarmonyOS三方件开发指南>系列文章合集 引言 对于视频播放器这个app大家 ...
- HarmonyOS三方件开发指南(17)-BottomNavigationBar
目录: 1.引言 2.功能介绍 3.BottomNavigationBar使用指南 4.BottomNavigationBar开发指南 5.<HarmonyOS三方件开发指南>文章合集 引 ...
- HarmonyOS三方件开发指南(19)-BGABadgeView徽章组件
目录: 1.引言 2.功能介绍 3.BGABadgeView 使用指南 4.BGABadgeView 开发指南 5.<HarmonyOS三方件开发指南>系列文章合集 引言 现在很多的APP ...
- HarmonyOS三方件开发指南(4)——Logger组件
目录: 1. Logger功能介绍 2. Logger使用方法 3. Logger开发实现 4. 源码上传地址 1. Logger功能介绍1.1. ...
- HarmonyOS三方件开发指南(5)——Photoview组件
PhotoView使用说明 1. PhotoView功能介绍1.1 组件介绍: PhotoView是一个继承自Image的组件,不同之处在于:它可以进行图击放大功能,手势缩放功能(暂无 ...
- HarmonyOS三方件开发指南(7)——compress组件
目录:1. 组件compress功能介绍2. 组件compress使用方法3. 组件compress开发实现 1. 组件compress功能介绍1.1. 组件介绍: compress是 ...
随机推荐
- gcc选项 笔记
gcc –E hello.c –o hello.i 使用gcc的选项"-E" 让gcc在预处理结束后停止编译过程. gcc –S hello.i –o hello.s &q ...
- Tomcat简介、安装部署、上线网站
资源池 本章资源:点击这里 提取码:upbf tomcat官网:https://tomcat.apache.org/ jpress博客系统安装包下载地址(不是官网):https://gitee.com ...
- apache和LAMP架构
资源池: httpd依赖包:apr 和 apr-util 下载:点击这里 httpd 下载:点击这里 mysql 下载:点击这里 php 下载: 点击这里 本章资源: 点击这里 资源提取码:u2jv ...
- 解决GraphViz's executables not found
用python做决策树可视化时,出现了下面的错误: 于是安装Graphviz,并将其添加到path的环境变量. Graphviz下载 提取码:fmst 但是已经安装了pydotplus且import之 ...
- TypeScript中 typeof ArrayInstance[number] 剖析
假设这样一个场景,目前业务上仅对接了三方支付 'Alipay', 'Wxpay', 'PayPal', 实际业务 getPaymentMode 会根据不同支付方式进行不同的付款/结算流程. const ...
- Codeforces Round #673 (Div. 2) B. Two Arrays(数学)
题目链接:https://codeforces.com/contest/1417/problem/B 题意 定义 $f(a)$ 为数组 $a$ 中满足: $i < j$ $a_i + a_j = ...
- hdu2157 How many ways??
Time Limit: 2000/1000 MS (Java/Others) Memory Limit: 32768/32768 K (Java/Others) Total Submission ...
- 如何安装Gephi工具
gephi中文版是一款开源免费跨平台基于JVM的复杂网络分析软件,安装后需要安装Java jdk API,否则就会出现gephi打不开的情况 该工具主要用于各种网络和复杂系统,动态和分层图的交互可视化 ...
- CF1475-C. Ball in Berland
CF1475-C. Ball in Berland 题意: 一个班级有\(a\)个男生和\(b\)个女生,现在这个班级有\(k\)对男女愿意一起出席毕业典礼,这里注意\(k\)对男女中可能会有某个男生 ...
- Docker网络模式详解
一.Docker四种工作模式 安装Docker时,它会自动创建三个网络,bridge(创建容器默认连接到此网络). none .hosthost:容器将不会虚拟出自己的网卡,配置自己的IP等,而是使用 ...