
HarmonyOS三方件开发指南(7)——compress组件
目录:
1. 组件compress功能介绍
2. 组件compress使用方法
3. 组件compress开发实现
1. 组件compress功能介绍
1.1. 组件介绍:
compress是一个轻量级图像压缩库。compress允许将大照片压缩成小尺寸的照片,图像质量损失非常小或可以忽略不计。
1.2. 手机模拟器上运行效果:
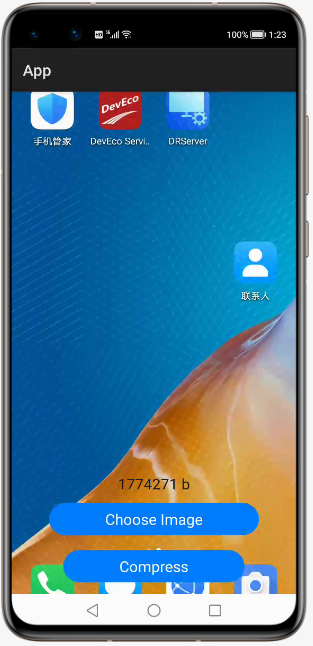
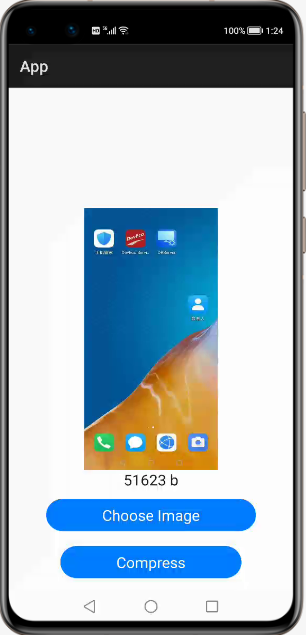
2. 组件compress使用方法
2.1. 添加依赖
将compress-debug.har复制到应用的entry\libs目录下即可(由于build.gradle中已经依赖的libs目录下的*.har,因此不需要再做修改)。
2.2. 设置布局
<DependentLayout

    xmlns:ohos="http://schemas.huawei.com/res/ohos"

    ohos:width="match_parent"

    ohos:height="match_parent"

    ohos:background_element="#FFFFFF">

    <Image

        ohos:id="$+id:image1"

        ohos:height="match_parent"

        ohos:width="match_parent"

        ohos:image_src="$media:dog1.PNG"/>

    <Text

        ohos:id="$+id:text"

        ohos:width="match_content"

        ohos:height="match_content"

        ohos:text=""

        ohos:text_size="19fp"

        ohos:text_color="#1C1C1C"

        ohos:top_padding="8vp"

        ohos:bottom_padding="8vp"

        ohos:right_padding="70vp"

        ohos:left_padding="70vp"

        ohos:center_in_parent="true"

        ohos:align_parent_bottom="true"

        ohos:bottom_margin="120vp"/>

    <Button

        ohos:id="$+id:choose_button"

        ohos:width="match_content"

        ohos:height="match_content"

        ohos:text="Choose Image"

        ohos:text_size="19fp"

        ohos:text_color="#FFFFFF"

        ohos:top_padding="8vp"

        ohos:bottom_padding="8vp"

        ohos:right_padding="70vp"

        ohos:left_padding="70vp"

        ohos:background_element="$graphic:background_button"

        ohos:center_in_parent="true"

        ohos:align_parent_bottom="true"

        ohos:bottom_margin="75vp"/>

    <Button

        ohos:id="$+id:button"

        ohos:width="match_content"

        ohos:height="match_content"

        ohos:text="Compress"

        ohos:text_size="19fp"

        ohos:text_color="#FFFFFF"

        ohos:top_padding="8vp"

        ohos:bottom_padding="8vp"

        ohos:right_padding="70vp"

        ohos:left_padding="70vp"

        ohos:background_element="$graphic:background_button"

        ohos:center_in_parent="true"

        ohos:align_parent_bottom="true"

        ohos:bottom_margin="15vp"/>

</DependentLayout>
2.3. 图像压缩
核心类:Compressor
核心方法:
(1)自定义压缩:
public static File customCompress(Context context, File file, int width, int height, int quality) throws IOException 参数:
context - 应用程序上下文
file - 待压缩图片抽象路径名
width - 压缩后宽度
height - 压缩后高度
quality - 图片压缩质量,范围0~100
结果:
返回压缩后图片抽象路径名。
异常:
发生I/O异常
(2)默认压缩:
public static File defaultCompress(Context context, File file) throws IOException参数:
context - 应用程序上下文
file - 待压缩图片抽象路径名
结果:
返回压缩后图片抽象路径名。
异常:
发生I/O异常
简单示例:
运行示例前需要在模拟器保存一张截图或使用相机功能照一张照片
public void onStart(Intent intent) {

    super.onStart(intent);

    super.setUIContent(ResourceTable.Layout_ability_main);

    // 请求文件的读取权限

    String[] permissions = {"ohos.permission.READ_USER_STORAGE"};

    requestPermissionsFromUser(permissions, 0);

    // 获取压缩按钮并绑定事件

    Button button = (Button) findComponentById(ResourceTable.Id_button);

    if (button != null) {

        // 为按钮设置点击回调

        button.setClickedListener(new Component.ClickedListener() {

            @Override

            public void onClick(Component component) {

                try {

                    File file = new File(System.getProperty("java.io.tmpdir") + File.separator + tmpName);

                    HiLog.error(LOG_LABEL, "old size..." + file.length() +  " ...b");

                    // 默认压缩

                    // File newFile = Compressor.defaultCompress(file);

                    // 自定义压缩

                    File newFile = Compressor.customCompress(getContext(), file, 500, 1000, 60);

                    Text text = (Text) findComponentById(ResourceTable.Id_text);

                    text.setText("size: " + newFile.length() + " b");

                    HiLog.error(LOG_LABEL, "new size..." + newFile.length() +  " ...b");

                    PixelMap newPixelMap = Compressor.decode(newFile);

                    Image image = (Image) findComponentById(ResourceTable.Id_image1);

                    image.setPixelMap(newPixelMap);

                } catch (IOException e) {

                    e.printStackTrace();

                }

            }

        });

    }

    // 获取选择图片按钮并绑定事件

    Button chooseButton = (Button) findComponentById(ResourceTable.Id_choose_button);

    if (chooseButton != null) {

        // 为按钮设置点击回调

        chooseButton.setClickedListener(new Component.ClickedListener() {

            @Override

            public void onClick(Component component) {

                DataAbilityHelper helper = DataAbilityHelper.creator(getContext());

                try {

                    ResultSet resultSet = helper.query(AVStorage.Images.Media.EXTERNAL_DATA_ABILITY_URI, null, null);

                    while (resultSet != null && resultSet.goToNextRow()) {

                        // 互殴媒体库的图片

                        int id = resultSet.getInt(resultSet.getColumnIndexForName(AVStorage.Images.Media.ID));

                        HiLog.error(LOG_LABEL, "id:..." + id +  " ...");

                        Uri uri = Uri.appendEncodedPathToUri(AVStorage.Images.Media.EXTERNAL_DATA_ABILITY_URI, "" + id);

                        // 根据图片的uri打开文件并保存到临时目录中

                        FileDescriptor fileDescriptor = helper.openFile(uri, "r");

                        ImageSource.DecodingOptions decodingOpts = new ImageSource.DecodingOptions();

                        decodingOpts.sampleSize = ImageSource.DecodingOptions.DEFAULT_SAMPLE_SIZE;

                        ImageSource imageSource = ImageSource.create(fileDescriptor, null);

                        PixelMap pixelMap = imageSource.createThumbnailPixelmap(decodingOpts, true);

                        ImagePacker imagePacker = ImagePacker.create();

                        tmpName = UUID.randomUUID().toString();

                        File file = new File(System.getProperty("java.io.tmpdir") + File.separator + tmpName);

                        FileOutputStream outputStream = new FileOutputStream(file);

                        ImagePacker.PackingOptions packingOptions = new ImagePacker.PackingOptions();

                        packingOptions.quality = 100;

                        boolean result = imagePacker.initializePacking(outputStream, packingOptions);

                        result = imagePacker.addImage(pixelMap);

                        long dataSize = imagePacker.finalizePacking();

                        // 显示图片和图片大小

                        Text text = (Text) findComponentById(ResourceTable.Id_text);

                        text.setText("size: " + file.length() + " b");

                        Image image = (Image) findComponentById(ResourceTable.Id_image1);

                        image.setPixelMap(pixelMap);

                    }

                } catch (DataAbilityRemoteException | FileNotFoundException e) {

                    e.printStackTrace();

                }

            }

        });

    }

}
3. 组件compress开发实现
3.1. 拷贝图片制临时目录
传入的图片路径拷贝临时文件到应用的临时目录。
private static File copyToCache(Context context, File imageFile) throws IOException {

    PixelMap pixelMap = decode(imageFile);

    String cachePath = context.getCacheDir() + File.separator + imageFile.getName();

    File cacheFile = new File(cachePath);

    int quality = 100; // 压缩质量

    refreshTmpFile(pixelMap, cacheFile, quality);

    return cacheFile;

}
3.2. 图片解码
对临时目录里的图片进行解码
private static PixelMap decode(File file, int width, int height) {

    ImageSource imageSource = ImageSource.create(file, null);

    mageSource.DecodingOptions decodingOpts = new

ImageSource.DecodingOptions();

    decodingOpts.desiredSize = new Size(width, height);

    return imageSource.createPixelmap(decodingOpts);

}
3.3. 图片编码
按照开发人员设定的规则进行编码,生成新图片
private static void refreshTmpFile(PixelMap pixelMap, File file, int quality)

throws IOException {

    ImagePacker imagePacker = ImagePacker.create();

    ImagePacker.PackingOptions options = new ImagePacker.PackingOptions();

    options.quality = quality;

    imagePacker.initializePacking(new FileOutputStream(file), options);

    imagePacker.addImage(pixelMap);

    imagePacker.finalizePacking();

}
项目源代码地址:https://github.com/isoftstone-dev/Compressor_Harmony
作者:软通田可辉
想了解更多内容,请访问: 51CTO和华为官方战略合作共建的鸿蒙技术社区https://harmonyos.51cto.com
HarmonyOS三方件开发指南(7)——compress组件的更多相关文章
- HarmonyOS三方件开发指南(14)-Glide组件功能介绍
<HarmonyOS三方件开发指南>系列文章合集 引言 在实际应用开发中,会用到大量图片处理,如:网络图片.本地图片.应用资源.二进制流.Uri对象等,虽然官方提供了PixelMap进行图 ...
- HarmonyOS三方件开发指南(19)-BGABadgeView徽章组件
目录: 1.引言 2.功能介绍 3.BGABadgeView 使用指南 4.BGABadgeView 开发指南 5.<HarmonyOS三方件开发指南>系列文章合集 引言 现在很多的APP ...
- HarmonyOS三方件开发指南(12)——cropper图片裁剪
鸿蒙入门指南,小白速来!0基础学习路线分享,高效学习方法,重点答疑解惑--->[课程入口] 目录:1. cropper组件功能介绍2. cropper使用方法3. cropper组件开发实现4. ...
- HarmonyOS三方件开发指南(13)-SwipeLayout侧滑删除
鸿蒙入门指南,小白速来!0基础学习路线分享,高效学习方法,重点答疑解惑--->[课程入口] 目录:1. SwipeLayout组件功能介绍2. SwipeLayout使用方法3. SwipeLa ...
- HarmonyOS三方件开发指南(15)-LoadingView功能介绍
目录: 1. LoadingView组件功能介绍2. Lottie使用方法3. Lottie开发实现4.<HarmonyOS三方件开发指南>系列文章合集 1. LoadingView组件功 ...
- HarmonyOS三方件开发指南(16)-VideoCache 视频缓存
目录: 1.引言 2.功能介绍 3.VideoCache使用指南 4.VideoCache开发指南 5.<HarmonyOS三方件开发指南>系列文章合集 引言 对于视频播放器这个app大家 ...
- HarmonyOS三方件开发指南(17)-BottomNavigationBar
目录: 1.引言 2.功能介绍 3.BottomNavigationBar使用指南 4.BottomNavigationBar开发指南 5.<HarmonyOS三方件开发指南>文章合集 引 ...
- HarmonyOS三方件开发指南(8)——RoundedImage
[小年答谢,新春送礼]免费抽取1000元京东卡+更多新春好礼~查看详情>>> 目录: 1. RoundedImage组件功能介绍 2. RoundedImage使用方法 3. Rou ...
- HarmonyOS三方件开发指南(4)——Logger组件
目录: 1. Logger功能介绍 2. Logger使用方法 3. Logger开发实现 4. 源码上传地址 1. Logger功能介绍1.1. ...
随机推荐
- Java Hash表 数据结构
思考: 数组由于内存地址连续,是一种查询快增删慢的数据结构: 链表由于内存地址不连续,是一种查询慢增删快的数据结构: 那么怎么实现查询又快,增删也快的数据结构呢? 要是把数组和链表结合起来会怎么样? ...
- 为了搞清楚类加载,竟然手撸JVM!
作者:小傅哥 博客:https://bugstack.cn Github:https://github.com/fuzhengwei/CodeGuide/wiki 沉淀.分享.成长,让自己和他人都能有 ...
- 单细胞分析实录(2): 使用Cell Ranger得到表达矩阵
Cell Ranger是一个"傻瓜"软件,你只需提供原始的fastq文件,它就会返回feature-barcode表达矩阵.为啥不说是gene-cell,举个例子,cell has ...
- 关于git的一些零碎知识
git文件的三个状态:已修改,已暂存,已提交git的三个区域: 工作区,暂存区,对象库 git的几个指针(以master为例) 远程有个master,本地有个master,本地有个指针是指向远程的ma ...
- 7.24,《C Primer Plus》复习第十五章第二小题
编写一个程序,通过命令行参数读取两个二进制字符串,对这两个二进制数使用~运算符,&运算符.|运算符,并以二进制字符串形式打印结果(如果无法使用命令行环境,可以通过交互式让程序读取字符串) 编写 ...
- 第二章节 BJROBOT IMU 自动校正 【ROS全开源阿克曼转向智能网联无人驾驶车】
1.把小车平放在地板上,用资料里的虚拟机,打开一个终端 ssh 过去主控端启动roslaunch znjrobot bringup.launch . 2.再打开一个终端,ssh 过去主控端,在 ~/c ...
- 每日一个linux命令5 -- rm
rm命令.rm是常用的命令,该命令的功能为删除一个目录中的一个或多个文件或目录,它也可以将某个目录及其下的所有文件及子目录均删除.对于链接文件,只是删除了链接,原有文件均保持不变. rm是一个危险的命 ...
- Spring(2) --Bean相关
你对Spring中的bean了解吗?都有哪些作用域(Scope)? Spring 官方文档对 bean 的解释是: In Spring, the objects that form the backb ...
- 项目实战--idea中使用Git遇到的坑
问题 在一次代码的更新中,我按照以往的操作点,菜单中VCS下的Update Project,结果报错了,idea自动将我未提交的所有代码驻藏了stash了,全部代码还原了,心里慌了一下,去GitLab ...
- 十八般武艺玩转GaussDB(DWS)性能调优:路径干预
摘要:路径生成是表关联方式确定的主要阶段,本文介绍了几个影响路径生成的要素:cost_param, scan方式,join方式,stream方式,并从原理上分析如何干预路径的生成. 一.cost模型选 ...