docker自动化部署前端项目实战一
docker自动化部署前端项目实战一
本文适用于个人项目,如博客、静态文档,不涉及后台数据交互,以部署文档为例。
思路
利用服务器node脚本,监听github仓库webhook push事件触发post请求,自动拉取最新代码,再用docker接管项目编译、部署。
环境
本文使用云服务器搭建,环境版本:
- OS:CentOS Linux release 8.2.2004
- docker:19.03.12
- node:14.5.0
- git:2.18.4
云服务器如果没有安装以下环境,需要安装。
- docker
- node
- pm2
- git
docker
# Step 1: 安装必要的一些系统工具

sudo yum install -y yum-utils

# Step 2: 添加软件源信息,使用阿里云镜像

sudo yum-config-manager --add-repo http://mirrors.aliyun.com/docker-ce/linux/centos/docker-ce.repo

# Step 3: 安装 docker-ce

sudo yum install docker-ce docker-ce-cli containerd.io

# Step 4: 开启 docker服务

sudo systemctl start docker

# Step 5: 运行 hello-world 项目

sudo docker run hello-world
不出意外,出现hello world,docker安装成功
git
从代码仓库拉取最新代码
yum install git
node
创建js脚本。使用nvm管理node版本,先安装nvm
curl -o- https://raw.githubusercontent.com/nvm-sh/nvm/v0.34.0/install.sh | bash
将nvm设置环境变量
export NVM_DIR="$HOME/.nvm"

[ -s "$NVM_DIR/nvm.sh" ] && \. "$NVM_DIR/nvm.sh"  # This loads nvm

[ -s "$NVM_DIR/bash_completion" ] && \. "$NVM_DIR/bash_completion"  # This loads nvm bash_completion
通过 nvm 安装最新版 node
nvm install node
PM2
安装pm2,服务器后台运行js脚本
npm i pm2 -g
webhook
github 的 webhook 会在当前仓库触发某些事件时,发送一个 post 形式的 http 请求
创建webhook
进入github项目仓库,按下图顺序操作
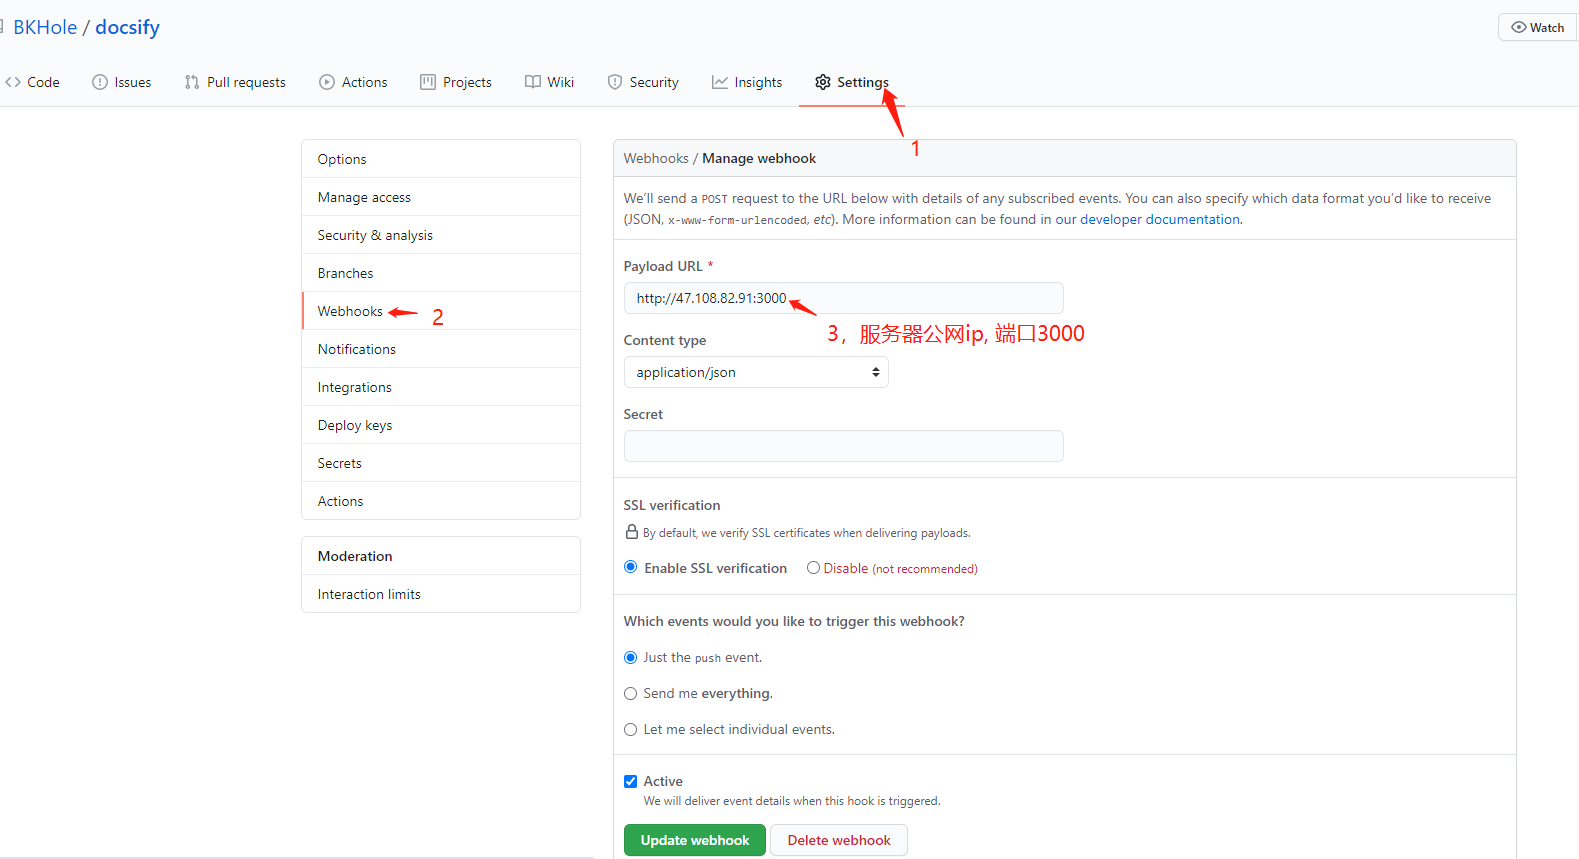
验证webhook配置成功,点击红色感叹号右侧内容,出现如下请求信息

docker部署
创建Dockfile
在这里,将拉取的项目存放在app目录下,Dockerfile内容如下,放到服务器根目录(/root/Dockerfile)
FROM nginx

COPY /app/docsify /usr/share/nginx/html/

EXPOSE 80

CMD ["nginx", "-g", "daemon off;"]
创建 http 服务器
创建index.js,放到服务器根目录(/root/index.js)
const http = require("http")

const { execSync } = require("child_process")

const fs = require("fs")

const path = require("path")

// 递归删除目录

function deleteFolderRecursive(path) {

    if (fs.existsSync(path)) {

        fs.readdirSync(path).forEach(function (file) {

            const curPath = path + "/" + file;

            if (fs.statSync(curPath).isDirectory()) { // recurse

                deleteFolderRecursive(curPath);

            } else { // delete file

                fs.unlinkSync(curPath);

            }

        });

        fs.rmdirSync(path);

    }

}

const resolvePost = req =>

    new Promise(resolve => {

        let chunk = "";

        req.on("data", data => {

            chunk += data;

        });

        req.on("end", () => {

            resolve(JSON.parse(chunk));

        });

    });

http.createServer(async (req, res) => {

    console.log('receive request')

    console.log(req.url)

    if (req.method === 'POST' && req.url === '/') {

        const data = await resolvePost(req);

        const projectDir = path.resolve(`./app/${data.repository.name}`)

        deleteFolderRecursive(projectDir)

        // 拉取仓库最新代码

        execSync(`git clone https://github.com/BKHole/${data.repository.name}.git ${projectDir}`, {

            stdio: 'inherit',

        })

        // 创建 docker 镜像

        execSync(`docker build . -t ${data.repository.name}-image:latest`, {

            stdio: 'inherit',

        })

        // 销毁 docker 容器

        execSync(`docker ps -a -f "name=^${data.repository.name}-container" --format="{{.Names}}" | xargs -r docker stop | xargs -r docker rm`, {

            stdio: 'inherit',

        })

        // 创建 docker 容器

        execSync(`docker run -d -p 88:80 --name ${data.repository.name}-container  ${data.repository.name}-image:latest`, {

            stdio: 'inherit',

        })

        console.log('deploy success')

        res.end('ok')

    }

}).listen(3000, () => {

    console.log('server is ready')

})
解析,
创建docker镜像
docker build . -t docsify-image:latest
- build:创建 docker 镜像
- .:使用当前目录下的 Dockerfile 文件,这里在根目录(/root/)执行
- -t:使用 tag 标记版本
- docsify-image:latest:创建名为 docsify-image 的镜像,并标记为 latest(最新)版本
创建docker容器
docker run -d -p 88:80 --name docsify-container docsify-image:latest
- run:创建并运行 docker 容器
- -d: 后台运行容器
88:80:将当前服务器的 88 端口(冒号前的 88),映射到容器的 80 端口(冒号后的 80) - --name:给容器命名,便于之后定位容器
- docsify-image:latest:基于 docsify-image 最新版本的镜像创建容器
运行node脚本
pm2 start index.js
test
服务器运行pm2 logs查看index.js打印日志
pm2 logs
本地仓库修改文件内容,提交远程仓库,日志出现deploy success,自动化部署成功。

访问http://47.108.82.91:88,记得在云服务器上放开访问端口号
域名访问
在拥有域名的前提下,优先使用域名访问。为什么?域名当然比IP+端口号好记,且美观。
这里为了方便控制,使用nginx-proxy镜像来操作,如下操作docker会自动去镜像仓库拉取,建议服务器80端口给nginx使用,方便以后增加域名和访问端口监听。
docker run -d -p 80:80 -v /var/run/docker.sock:/tmp/docker.sock:ro jwilder/nginx-proxy
然后绑定域名到新建容器,这里使用我的二级域名。
docker run -e VIRTUAL_HOST=libotao.nofoo.cn docsify-image
这里创建容器省略了容器名,
- -e:设置环境变量
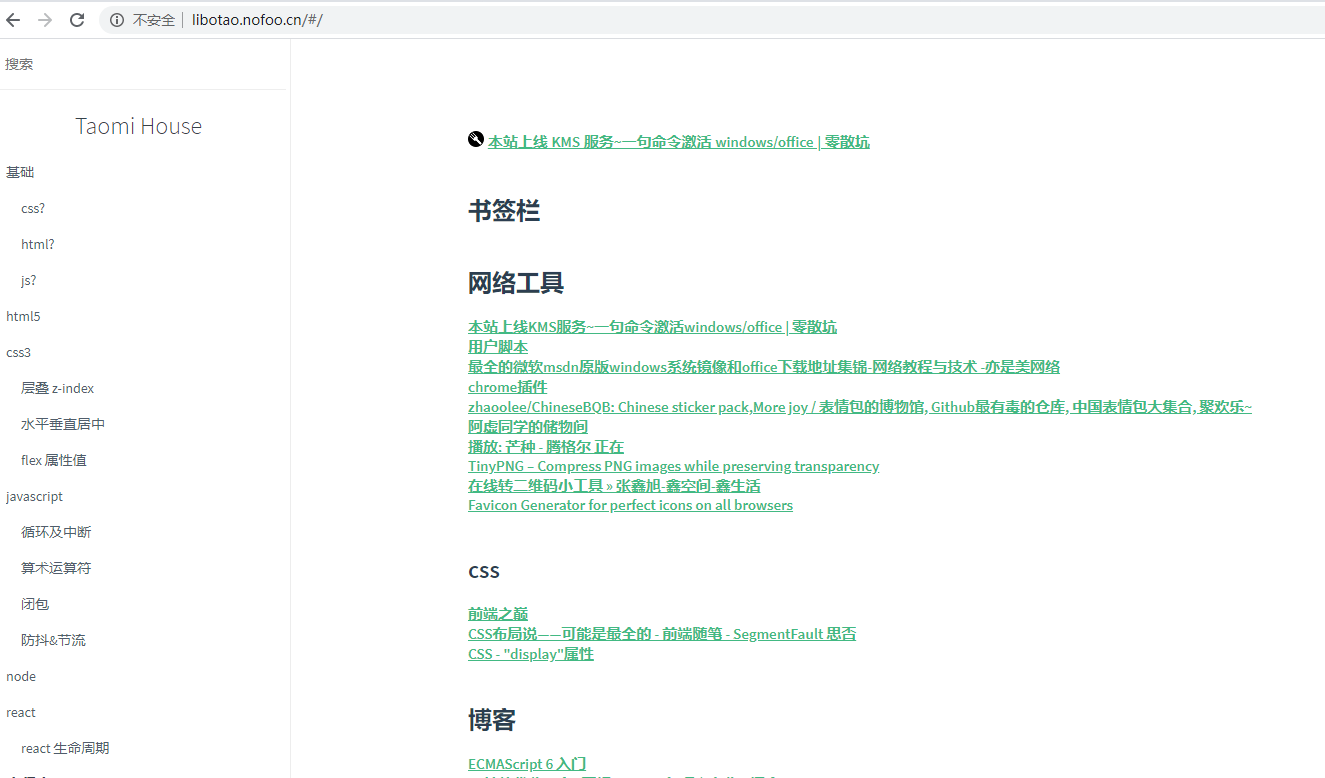
这时,域名已经配置好了,访问http://libotao.nofoo.cn可以看到效果。
前面每次提交内容到github,服务器都会重新拉取最新代码,新建image,销毁container,新建container,访问内容才会更新,为了实现自动化,需要改造一下上面的index.js脚本,
const http = require("http")

const { execSync } = require("child_process")

const fs = require("fs")

const path = require("path")

// 递归删除目录

function deleteFolderRecursive(path) {

    if (fs.existsSync(path)) {

        fs.readdirSync(path).forEach(function (file) {

            const curPath = path + "/" + file;

            if (fs.statSync(curPath).isDirectory()) { // recurse

                deleteFolderRecursive(curPath);

            } else { // delete file

                fs.unlinkSync(curPath);

            }

        });

        fs.rmdirSync(path);

    }

}

const resolvePost = req =>

    new Promise(resolve => {

        let chunk = "";

        req.on("data", data => {

            chunk += data;

        });

        req.on("end", () => {

            resolve(JSON.parse(chunk));

        });

    });

http.createServer(async (req, res) => {

    console.log('receive request')

    console.log(req.url)

    if (req.method === 'POST' && req.url === '/') {

        const data = await resolvePost(req);

        // 项目放在服务器app目录下

        const projectDir = path.resolve(`./app/${data.repository.name}`)

        deleteFolderRecursive(projectDir)

        // 拉取仓库最新代码

        execSync(`git clone https://github.com/BKHole/${data.repository.name}.git ${projectDir}`, {

            stdio: 'inherit',

        })

        // 创建 docker 镜像

        execSync(`docker build . -t ${data.repository.name}-image:latest `, {

            stdio: 'inherit',

        })

        // 销毁 docker 容器

        execSync(`docker ps -a -f "name=^${data.repository.name}-container" --format="{{.Names}}" | xargs -r docker stop | xargs -r docker rm`, {

            stdio: 'inherit',

        })

        // 创建 docker 容器

        execSync(`docker run --name ${data.repository.name}-container -e VIRTUAL_HOST=libotao.nofoo.cn  ${data.repository.name}-image:latest`, {

            stdio: 'inherit',

        })

        console.log('deploy success')

        res.end('ok')

    }

}).listen(3000, () => {

    console.log('server is ready')

})
修改后覆盖之前存放的index.js,然后重启脚本。
pm2 restart index.js
配置完成后,以后每次提交github,都会自动更新,访问域名就会看到最新的内容。
note:本文中使用的端口号都需要在云服务器平台创建安全组策略,放开端口
参考
docker自动化部署前端项目实战一的更多相关文章
- 基于云原生DevOps服务自动化部署前端项目学习总结
本文主要以部署前端Vue项目为例,讲述了如何基于云原生DevOps服务自动化部署前端项目~从开发完成到线上环境,我们只需提交代码即可~ 一.引言 作为一名开发人员,日常工作中我们除了需要负责代码的开发 ...
- Docker打包部署前端项目与负载均衡
设置淘宝镜像 npm install -g cnpm --registry=https://registry.npm.taobao.org //在home/fn1 home/fn2放入项目和nginx ...
- jenkins +gitlab +docker 自动化部署tomcat 项目
实验环境 实验设备 三台服务器 centos 7.X 以上 内存 2-3G左右 192.168.1.195 (jenkins最新+ git 2.8+maven 3.5 +tomcat 8+java1. ...
- 记基于docker+gunicorn部署sanic项目遇到的很多很多坑
前言: 最近有个项目需要上线,是python中sanic网络异步框架写的,并且要求使用docker+nginx来部署项目实现负载均衡,于是乎百度了sanic项目部署,基本上都是基于docker+gun ...
- docker中部署django项目~~Dockfile方式和compose方式
1. 背景: 本机win10上,后端django框架代码与前端vue框架代码联调通过. 2. 目的: 在centos7系统服务器上使用docker容器部署该项目. 3. 方案一:仅使用基 ...
- 微服务项目的docker自动化部署流程
目录 微服务的Docker自动化部署 制作JDK1.8的Docker镜像 Docker常用命令介绍 制作image的一般流程 将本地的image上传至私人仓库 使用Maven插件实现自动化docker ...
- miniFTP项目实战一
项目简介: 在Linux环境下用C语言开发的Vsftpd的简化版本,拥有部分Vsftpd功能和相同的FTP协议,系统的主要架构采用多进程模型,每当有一个新的客户连接到达,主进程就会派生出一个ftp服务 ...
- 在docker中使用nginx部署前端项目
前言 部署了三个nginx用于前端项目, 并使用keepalived部署好热备, 所以总共有5个nginx 创建好nginx的文件和配置 根据上面的指令创建好目录 mkdir /home/web/ng ...
- 品尝阿里云容器服务:初步尝试ASP.NET Core Web API站点的Docker自动化部署
部署场景是这样的,我们基于 ASP.NET Core 2.0 Preview 1 开发了一个用于管理缓存的 Web API ,想通过阿里云容器服务基于 Docker 部署为内网服务. 在这篇博文中分享 ...
随机推荐
- mysql基础之-mysql存储引擎概述(八)
0x01 mysql 存储引擎:存储引擎也通常被称作“表类型” mysql> show engines; --- 查看当前所有所支持的存储引擎 mysql> show table st ...
- 02.快捷键及基本dos命令
无论是使用Windows.Linux操作系统,还是在IDE中,快捷键都是系统本身的标配,事实上,Ctrl+C.V这样的操作,可以帮我们节省大量的时间,如果在IDE中编写代码,除了代码本身,将其余所有的 ...
- Request 对象的主要方法
setAttribute(String name,Object):设置名字为 name 的 request 的参数值 getAttribute(String name):返回由 name 指定的属性值 ...
- filebeat v6.3 多行合并的步骤 多个表达式同时匹配
配置文件位于/etc/filebeat/filebeat.yml,就是filebeat的主配置文件打开文件filebeat.yml,搜索multiline:,默认是注释的,常用的有如下三个配置: mu ...
- <WP8开发学习笔记>动态修改启动时导航的第一个页面(如登录前启动页为LoginPage,登录后变为MainPage)
很多时候我们需要在启动程序的时候根据状态改变初始导航页面,比如程序在启动的时候判断用户是否登录, 如果未登录则跳转到LoginPage.xaml否则跳转到MainPage界面. 这时候就要分析程序的启 ...
- [转] 理解TCP序列号(Sequence Number)和确认号(Acknowledgment Number)
点击阅读原译文 原文见:http://packetlife.net/blog/2010/jun/7/understanding-tcp-sequence-acknowledgment-numbers/ ...
- (六)获取http状态码和处理返回结果
int StatusCode = httpResponse.getStatusLine().getStatusCode(); 处理返回结果: /** * 处理返回结果 * @param respons ...
- pip未找到
命令终端运行 sudo easy_install pip 安装成功后最后会显示 Installed /Library/Python/2.7/site-packages/pip-9.0.1-py2.7. ...
- 使用numpy生成二维正态分布
参考资料: https://www.zhihu.com/question/39823283?sort=created https://www.zhihu.com/question/288946037/ ...
- PowerBuilder中DW如何手动触发事件
调用setitem默认不会触发itemchanged事件 如果想实现可手动触发itemchanged事件 事件格式如下: dw_list.event itemchanged( /*long row*/ ...