基于OpenCV-Python的图像位置校正和版面分析
前言
使用opencv对图像进行操作,要求:(1)定位银行票据的四条边,然后旋正。(2)根据版面分析,分割出小写金额区域。
图像校正
首先是对图像的校正
- 读取图片
- 对图片二值化
- 进行边缘检测
- 对边缘的进行霍夫曼变换
- 将变换结果从极坐标空间投影到笛卡尔坐标得到倾斜角
- 根据倾斜角对主体校正
import os

import cv2

import math

import numpy as np

from scipy import ndimage

filepath = './task1-misc/'

filename = 'bank-bill.bmp'

filename_correct = 'bank-bill-correct.png'

def image_correction(input_path: str, output_path: str) -> bool:

    # 读取图像

    img = cv2.imread(input_path)

    # 二值化

    gray = cv2.cvtColor(img,cv2.COLOR_BGR2GRAY)

    # 边缘检测

    edges = cv2.Canny(gray,50,150,apertureSize = 3)

    #霍夫变换

    lines = cv2.HoughLines(edges,1,np.pi/180,0)

    for rho,theta in lines[0]:

        a = np.cos(theta)   # 将极坐标转换为直角坐标

        b = np.sin(theta)

        x0 = a*rho

        y0 = b*rho

        x1 = int(x0 + 1000*(-b))    # 保证端点够远能够覆盖整个图像

        y1 = int(y0 + 1000 * a)

        x2 = int(x0 - 1000*(-b))

        y2 = int(y0 - 1000 * a)

        if x1 == x2 or y1 == y2:

            continue

        t = float(y2-y1)/(x2-x1)

        # 得到角度后将角度范围调整至-45至45度之间

        rotate_angle = math.degrees(math.atan(t))

        if rotate_angle > 45:

            rotate_angle = -90 + rotate_angle

        elif rotate_angle < -45:

            rotate_angle = 90 + rotate_angle

        # 图像根据角度进行校正

        rotate_img = ndimage.rotate(img, rotate_angle)

        # 在图中画出线

        cv2.line(img, (x1, y1), (x2, y2), (0, 0, 255), 2)

        cv2.imwrite(filepath + 'marked-'+filename_correct, img)

        # 输出图像

        cv2.imwrite(output_path, rotate_img)

        return True

input_path = filepath + filename

output_path = filepath + filename_correct

if image_correction(input_path, output_path):

    print("角度校正成功")
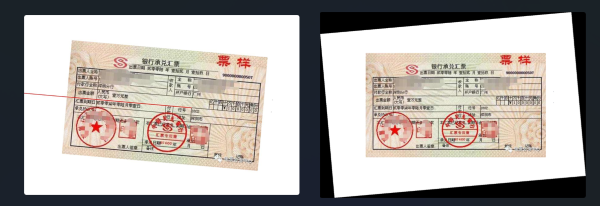
图(左)中的红线斜率和偏置是经过霍夫变换并进行极坐标转换后得到,后续将根据这条线进行角度的校正,校正后的结果如图(右)所示。
为了便于后续操作,我们选择将背景去掉,保存为.png图片。
filename_clear = 'bank-bill-clear.png'

# 去除背景

def remove_background(input_path: str, output_path: str) -> bool:

    # 读取图像

    img = cv2.imread(input_path, cv2.IMREAD_UNCHANGED)

    # 检查是否已经具有 alpha 通道,如果没有则创建一个

    if img.shape[2] == 3:

        alpha_channel = np.ones_like(img[:, :, 0], dtype=img.dtype) * 255

        img = np.dstack((img, alpha_channel))

    # 提取图像的 alpha 通道(透明度)

    alpha_channel = img[:, :, 3]

    # 将白色或黑色(背景)的像素设置为透明

    alpha_channel[(img[:, :, :3] == [255, 255, 255]).all(axis=2)] = 0

    alpha_channel[(img[:, :, :3] == [0, 0, 0]).all(axis=2)] = 0

    # 保存为带有透明通道的 PNG 图像

    cv2.imwrite(output_path, img)

    return True

input_path = filepath + filename_correct

output_path = filepath + filename_clear

if remove_background(input_path, output_path):

    print("去除背景成功")
版面分析与分割金额区域
使用opencv对图像进行版面分析得到表格线的投影。
def detectTable(img, save_path):

    gray_img = cv2.cvtColor(img, cv2.COLOR_BGR2GRAY)

    thresh_img = cv2.adaptiveThreshold(~gray_img,255,cv2.ADAPTIVE_THRESH_MEAN_C,cv2.THRESH_BINARY,15,-2)

    h_img = thresh_img.copy()

    v_img = thresh_img.copy()

    scale = 20

    h_size = int(h_img.shape[1]/scale)

    h_structure = cv2.getStructuringElement(cv2.MORPH_RECT,(h_size,1)) # 形态学因子

    h_erode_img = cv2.erode(h_img,h_structure,1)

    h_dilate_img = cv2.dilate(h_erode_img,h_structure,1)

    # cv2.imshow("h_erode",h_dilate_img)

    v_size = int(v_img.shape[0] / scale)

    v_structure = cv2.getStructuringElement(cv2.MORPH_RECT, (1, v_size))  # 形态学因子

    v_erode_img = cv2.erode(v_img, v_structure, 1)

    v_dilate_img = cv2.dilate(v_erode_img, v_structure, 1)

    mask_img = h_dilate_img+v_dilate_img

    joints_img = cv2.bitwise_and(h_dilate_img,v_dilate_img)

    joints_img = cv2.dilate(joints_img,None,iterations=3)

    cv2.imwrite(os.path.join(save_path, "joints.png"),joints_img)

    cv2.imwrite(os.path.join(save_path, "mask.png"), mask_img)

    return joints_img, mask_img

img = cv2.imread(os.path.join(filepath, filename_clear))

_, mask_img = detectTable(img, save_path=filepath)
投影得到两张图,一张表示交叉点的投影,另一张表示表格线的投影,如下图所示,后续的边缘检测我们将用到右侧的图。

def find_bound(img):

    # 查找图像中的轮廓

    contours, _ = cv2.findContours(img, cv2.RETR_CCOMP, cv2.CHAIN_APPROX_TC89_L1)

    # 遍历所有轮廓

    site = []

    for contour in contours:

        # 计算边界矩形

        x, y, w, h = cv2.boundingRect(contour)

        if 20 < w < 35 and  20 <h < 35:

            site.append((x, y, w, h),)

    site.sort(key=lambda x: (x[0], x[1], x[2], x[3]))

    return site

site = find_bound(mask_img)
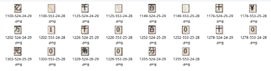
对mask.png,使用边缘检测,获取各个边缘的位置信息,根据所得的位置信息,在bank-bill-clear.png(对原图矫正角度并去除背景)中裁剪,并限制裁剪的图像块长宽在(20,35)的区间范围(实际尝试中并不能检测到金额区域的完整边缘,而是金额区域每个方形的边缘,(20,35)表示每个方形的长宽区间范围,如下图所示)。
save_path = './task1-result'

if os.path.exists(save_path) is False:

    os.makedirs(save_path)

for i in site:

    x, y, w, h = i

    cv2.imwrite(os.path.join(save_path, f"{x}-{y}-{w}-{h}.png"), img[y:y+h, x:x+w])
(x0, y0, w, h) = site[0]

x, y = x0+(w+2)*11, y0+h*2

cv2.imwrite(os.path.join(save_path, "res.png"), img[y0:y, x0:x])
对裁剪的图像块的坐标进行排序,推测出完整金额的具体位置,并再次裁剪,得到最后结果

运行环境
numpy==1.26.2

opencv_contrib_python==4.6.0.66

opencv_python==4.6.0.66

scipy==1.11.4
参考文献
基于OpenCV-Python的图像位置校正和版面分析的更多相关文章
- Opencv python图像处理-图像相似度计算
一.相关概念 一般我们人区分谁是谁,给物品分类,都是通过各种特征去辨别的,比如黑长直.大白腿.樱桃唇.瓜子脸.王麻子脸上有麻子,隔壁老王和儿子很像,但是儿子下巴涨了一颗痣和他妈一模一样,让你确定这是你 ...
- Java基于opencv—透视变换矫正图像
很多时候我们拍摄的照片都会产生一点畸变的,就像下面的这张图 虽然不是很明显,但还是有一点畸变的,而我们要做的就是把它变成下面的这张图 效果看起来并不是很好,主要是四个顶点找的不准确,会有一些偏差,而且 ...
- 基于opencv+python的二维码识别
花了2天时间终于把二维码识别做出来了,不过效果一般,后面会应用在ROS辅助定位上,废话少说先上图: 具体过程参考了这位大神的博客:http://blog.csdn.net/qq_25491201/ar ...
- opencv python:图像直方图 histogram
直接用matplotlib画出直方图 def plot_demo(image): plt.hist(image.ravel(), 256, [0, 256]) # image.ravel()将图像展开 ...
- openCV—Python(5)—— 图像几何变换
一.函数简单介绍 1.warpAffine-图像放射变换(平移.旋转.缩放) 函数原型:warpAffine(src, M, dsize, dst=None, flags=None, borderMo ...
- opencv python:图像梯度
一阶导数与Soble算子 二阶导数与拉普拉斯算子 图像边缘: Soble算子: 二阶导数: 拉普拉斯算子: import cv2 as cv import numpy as np # 图像梯度(由x, ...
- opencv python:图像金字塔
图像金字塔原理 expand = 扩大+卷积 拉普拉斯金字塔 PyrDown:降采样 PyrUp:还原 example import cv2 as cv import numpy as np # 图像 ...
- opencv python:图像二值化
import cv2 as cv import numpy as np import matplotlib.pyplot as plt # 二值图像就是将灰度图转化成黑白图,没有灰,在一个值之前为黑, ...
- opencv+python实现图像锐化
突然发现网上都是些太繁琐的方法,我就找opencv锐化函数咋这么墨迹. 直接上代码: kernel = np.array([[0, -1, 0], [-1, 5, -1], [0, -1, 0]], ...
- Python图像处理丨基于OpenCV和像素处理的图像灰度化处理
摘要:本篇文章讲解图像灰度化处理的知识,结合OpenCV调用cv2.cvtColor()函数实现图像灰度操作,使用像素处理方法对图像进行灰度化处理. 本文分享自华为云社区<[Python图像处理 ...
随机推荐
- OKR之剑·实战篇06:OKR致胜法宝-氛围&业绩双轮驱动(下)
作者:vivo 互联网平台产品研发团队 本文是<OKR 之剑>系列之实战第 6 篇-- 本文介绍团队营造氛围的方法与实践.在业绩方面的探索与输出,在两方面分别总结了一些经验分享给大家. 一 ...
- 图解 Promise 实现原理(四)—— Promise 静态方法实现
本文首发于 vivo互联网技术 微信公众号 链接:https://mp.weixin.qq.com/s/Lp_5BXdpm7G29Z7zT_S-bQ作者:Morrain 了用法,原生提供了Promis ...
- Centos7 kubeadm安装k8s
安装环境准备 关闭防火墙 systemctl stop firewalld systemctl disable firewalld 关闭selinux sed -i 's/enforcing/disa ...
- POJ
//poj 2080//题目大意:给定天数,从2000年1月1日经过这些天后的 年 月 日 及 星期几//代码参照大牛的写的,本人还是处于菜鸟阶段,思路很好#include<stdio.h> ...
- confiparse遇到特殊字符的解析处理
一.背景:confiparse类解析mysql密码时发现包含特殊字符时出现报错的情况:配置文件如下: 代码如下: import configparser import os #读取配置 conf=co ...
- Go-包-package-modules-import
- Blazor SSR/WASM IDS/OIDC 单点登录授权实例5 - Winform 端授权
目录: OpenID 与 OAuth2 基础知识 Blazor wasm Google 登录 Blazor wasm Gitee 码云登录 Blazor SSR/WASM IDS/OIDC 单点登录授 ...
- [转帖]Oracle AWR报告提取方法
https://www.cnblogs.com/jyzhao/p/4030022.html 本文旨在用来指导项目人员自行提取Oracle数据库的AWR报告. 1.当前连接实例的AWR报告提取:@?/r ...
- [转帖]crontab 定时任务,免交互式编写任务文件
https://www.jianshu.com/p/8eab68bcfc8e 正常添加定时任务是在命令行使用命令 crontab -ecrontab -e编写完的文件怎么找到?文件默认保存在/var/ ...
- [转帖]QPS 最高提升 91% | 腾讯云 TKE 基于 Cilium eBPF 提升 k8s Service 性能
https://my.oschina.net/cncf/blog/5121393 朱瑜坚,腾讯云后台工程师,主要负责腾讯云 TKE 容器网络的构建和相关网络组件的设计.开发和维护工作.张浩,腾讯云 ...