分布式执行引擎Ray-部署
1. Ray集群
Ray 有多种部署模式,包括单机,k8s,VM等。
在单机下,可以直接用ray.init来快速启动ray的运行环境,但是如果要在多节点上执行,则必须先部署Ray Cluster。
一个Ray集群包含:一组worker节点连接到同一个Ray Head 节点。Ray的集群大小可以固定也可以根据资源使用进行扩缩容。
1.1. 核心概念
Ray Cluster
Ray Cluster包含2种类型的节点:Head与Worker。典型的master-slave结构。

每个节点内都会运行Raylet进程,用于支持分布式调度和内存管理。Head node会运行额外的进程(上图蓝色部分)
Worker节点的数目可以基于资源资源的需求自动扩展,这部分可以在Ray Cluster的配置里指定。Head node上的Autoscaler会完成此类工作。
如果是运行在k8s,则ray node是以pod的方式运行。
用户可以提交job到ray集群,也可以以交互式的方式连接到head node,并执行ray.init。
Head node
每个Ray cluster都需要有1个head node,它与worker节点类似,但是会运行额外的进程来管理集群,例如autoscaler和Ray Driver进程(运行Ray jobs)。Ray也可能会将task与actors调度在head node,除非配置更改此行为。
Worker node
Worker节点不运行任何head node的管理进程,仅用于执行用户在Ray task与actors里指定的代码。它们会参与到分布式调度,以及对象的存储与分发。
Autoscaling
Ray autoscaler是运行在head node上的进程(如果是运行在k8s上,则是head pod的一个sidecar container)。
如果资源的需求超出了当前集群的capacity,则autoscaler会尝试增加worker节点的数量。如果worker节点处于idle状态,autoscaler会从cluster移除掉worker node。
需要注意的是,autoscaler仅对task和actor资源的需求生效,并不对应用的metric以及物理资源的使用量生效。
Ray Jobs
一个Ray Job是单个application:包含了一组Ray tasks,objects以及actors。执行Python script的worker称为job的driver。
有3种方式在Ray cluster上运行一个job:
- (推荐的方式)使用Ray Job API提交job
- 直接在Ray Cluster上运行driver script,可以在任意节点执行,主要用于interactive开发
- 使用Ray Client(在一个driver script内)远程连接到cluster

1.2. 资源
Ray提供的一个能力是:让同一套代码可以从laptop扩展到集群,且不需要修改代码。
其中,Ray Resources便是实现此能力的关键。它将物理资源抽象出来,使用resource来代表计算资源,同时底层系统基于resource的请求实现调度与autoscaling。
在Ray里,一个resource是一个KV pair。Key表示resource名称,value表示数量(浮点型)。为了方便起见,Ray原生有对CPU,GPU以及memory的resource 类型。CPU,GPU和memory称为pre-defined resources。除此之外,Ray也支持自定义资源。
1.2.1. 物理资源与逻辑资源
物理资源是底层物理机提供的资源(例如CPU,GPU),逻辑资源是由系统定义的虚拟资源。
Ray resources是逻辑资源,且不需要与物理资源1:1 映射。例如,我们可以启动1个带3个GPU 的Ray head node,例如ray start --head --num-gpus=3。即使其底层物理资源为0。Ray resources主要用于在scheduling时的管理控制。
使用逻辑资源有几个含义:
- Task或actor的资源需求不需要受限于实际物理资源的限制。例如,Ray可以允许一个num_cpu=1的task启动并允许其内部运行多线程任务。控制task或actor用多少资源是用户的责任
- Ray并不提供task或actor的CPU资源隔离。例如,Ray并不会单独为num_cpus=1的task预留物理CPU资源并单独给到这个task,而是让操作系统调度并执行task。如果有需要的话,我们可以使用操作系统API例如sched_setaffinity将1个task绑定到1个物理CPU
- Ray提供了GPU的隔离,实现的方式是自动设置CUDA_VISIBLE_DEVICES环境变量的形式,也是大部分ML框架实现GPU分配的模式
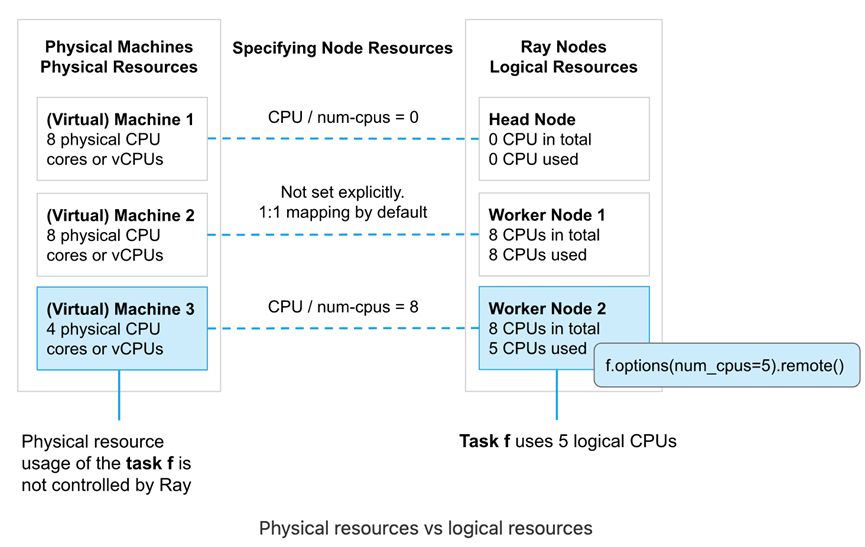
1.2.2 指定节点资源
默认情况下,Ray节点启动时会指定CPU,GPU以及内存资源。其资源量是由Ray自动检测并设置为物理资源同等量。例如,假设我们使用ray start --head启动节点,则CPU逻辑资源与机器CPU物理资源是同等的。不过,我们也可以在启动节点时手动指定逻辑资源量。
方式参考:
https://docs.ray.io/en/latest/ray-core/scheduling/resources.html
1.3. Ray内存管理
Ray application使用内存有几种方式:
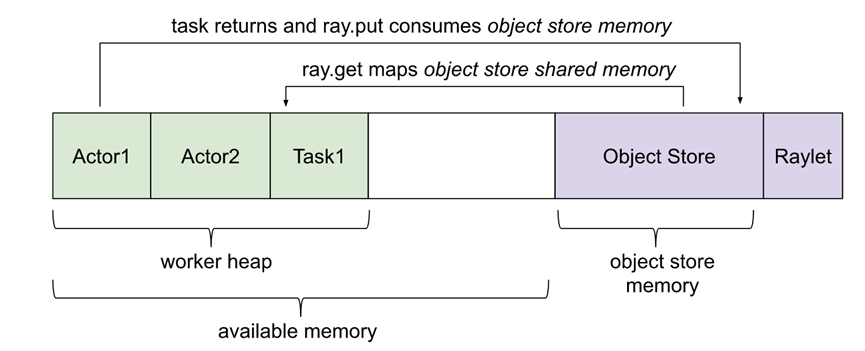
Ray系统内存:由Ray内部使用
l GCS:用于存储node list以及actors。这块内存使用量一般很少
l Raylet:C++进程raylet使用的内存。此进程运行在所有节点。内存使用量无法自行控制,不过一般使用量很少
Application内存:由application使用的内存
l Worker heap:application使用的内存(例如 Python代码或Tensorflow)。一般由application的resident set size(RSS)减去其shared memory usage(SHR)(例如top命令展示)可以计算。减去SHR的原因是由于object store shared memory在OS层认为是与其他worker共享的。不减去SHR会造成内存使用量的double counting
l Object store memory:当application在object store创建object时(例如ray.put),以及从remote function返回value时,使用的内存。在每个节点上都会有object store server运行。在Ray 1.3+版本后,如果object store满了,则会溢写到磁盘
l Object store shared memory:当application使用ray.get读objects时使用的内存。需要注意的是,如果一个obj已经存在此节点上,则不会导致额外的内存分配的工作。这个机制运行了大型obj可以高效的跨actors与tasks共享。

1.3.2. Object Ref Counting
Ray实现了分布式ref counting,所以在一个集群内,任何ObjectRef都会绑定到object store内的对象。
2. VM部署
Ray提供了命令可以方便快速地在AWS,GCP,Azure以及On-Prem部署Ray集群。使用的方式是:配置文件+命令行。下面我们在AWS节点上进行部署。
2.1. AWS EC2部署
Ray Cli提供了自动部署在EC2上的命令,非常方便,使用方式参考文档:
https://docs.ray.io/en/latest/cluster/vms/getting-started.html#vm-cluster-quick-start
#首先安装Python依赖

pip install -U "ray[default]" boto3

# 然后配置EC2 credentials

# 下载示例example-full.yaml

wget https://raw.githubusercontent.com/ray-project/ray/master/python/ray/autoscaler/aws/example-full.yaml
对 example-full.yaml 做了部分修改(region为ap-northeast-1),示例如下:
# An unique identifier for the head node and workers of this cluster.

cluster_name: ray-tang

# The maximum number of workers nodes to launch in addition to the head

# node.

max_workers: 2

# The autoscaler will scale up the cluster faster with higher upscaling speed.

# E.g., if the task requires adding more nodes then autoscaler will gradually

# scale up the cluster in chunks of upscaling_speed*currently_running_nodes.

# This number should be > 0.

upscaling_speed: 1.0

# This executes all commands on all nodes in the docker container,

# and opens all the necessary ports to support the Ray cluster.

# Empty string means disabled.

docker:

    image: "rayproject/ray-ml:latest-gpu"

    container_name: "ray_container"

    pull_before_run: True

    run_options:   # Extra options to pass into "docker run"

        - --ulimit nofile=65536:65536

# If a node is idle for this many minutes, it will be removed.

idle_timeout_minutes: 60

# Cloud-provider specific configuration.

provider:

    type: aws

    region: ap-northeast-1

    availability_zone: ap-northeast-1a

    cache_stopped_nodes: True # If not present, the default is True.

# How Ray will authenticate with newly launched nodes.

auth:

    ssh_user: ubuntu

    ssh_private_key: /home/ec2-user/ray/tangaws-tokyo.pem

# Tell the autoscaler the allowed node types and the resources they provide.

# The key is the name of the node type, which is just for debugging purposes.

# The node config specifies the launch config and physical instance type.

available_node_types:

    ray.head.default:

        resources: {}

        node_config:

            InstanceType: m5.2xlarge

            ImageId: ami-0ca4854a18755c1e2 # Deep Learning AMI (Ubuntu)

            # You can provision additional disk space with a conf as follows

            BlockDeviceMappings:

                - DeviceName: /dev/sda1

                  Ebs:

                      VolumeSize: 100

            KeyName: tangaws-tokyo

            SubnetId: subnet-05450f0445a02b17e

            IamInstanceProfile:

                Arn: arn:aws:iam::113343415039:instance-profile/ec2admin

            # Additional options in the boto docs.

    ray.worker.default:

        min_workers: 2

        max_workers: 4

        resources: {}

        node_config:

            InstanceType: m5.2xlarge

            ImageId: ami-0ca4854a18755c1e2 # Deep Learning AMI (Ubuntu)

            BlockDeviceMappings:

                - DeviceName: /dev/sda1

                  Ebs:

                      VolumeSize: 150

            KeyName: tangaws-tokyo

            SubnetId: subnet-05450f0445a02b17e

            IamInstanceProfile:

                Arn: arn:aws:iam::113343415039:instance-profile/ec2admin

# Specify the node type of the head node (as configured above).

head_node_type: ray.head.default

file_mounts: {

}

cluster_synced_files: []

# Whether changes to directories in file_mounts or cluster_synced_files in the head node

# should sync to the worker node continuously

file_mounts_sync_continuously: False

# Patterns for files to exclude when running rsync up or rsync down

rsync_exclude:

    - "**/.git"

    - "**/.git/**"

rsync_filter:

    - ".gitignore"

initialization_commands: []

# List of shell commands to run to set up nodes.

setup_commands:

    - conda install --insecure -y python=3.10.0

    - pip install -U "ray[default]==2.2.0"

    - pip3 install boto3 pyarrow pandas

head_setup_commands: []

worker_setup_commands: []

head_start_ray_commands:

    - ray stop

    - ray start --head --port=6379 --object-manager-port=8076 --autoscaling-config=~/ray_bootstrap_config.yaml

worker_start_ray_commands:

    - ray stop

- ray start --address=$RAY_HEAD_IP:6379 --object-manager-port=8076
创建集群:
# Create or update the cluster. When the command finishes, it will print

# out the command that can be used to SSH into the cluster head node.

ray up example-full-modified.yaml

# Get a remote shell on the head node.

ray attach example-full-modified.yaml

# Try running a Ray program.

python -c 'import ray; ray.init()'

exit

# Tear down the cluster.

ray down example-full-modified.yaml
2.2. 使用方式
部署完后,打印的相关信息:
Local node IP: 10.0.0.7

--------------------

Ray runtime started.

--------------------

Next steps

  To connect to this Ray runtime from another node, run

    ray start --address='10.0.0.7:6379'

  Alternatively, use the following Python code:

    import ray

    ray.init(address='auto')

  To connect to this Ray runtime from outside of the cluster, for example to

  connect to a remote cluster from your laptop directly, use the following

  Python code:

    import ray

    ray.init(address='ray://<head_node_ip_address>:10001')

  To see the status of the cluster, use

    ray status

  To monitor and debug Ray, view the dashboard at

    127.0.0.1:8265

  If connection fails, check your firewall settings and network configuration.

  To terminate the Ray runtime, run

    ray stop

Shared connection to 35.77.86.25 closed.

  New status: up-to-date

Useful commands

  Monitor autoscaling with

    ray exec /home/ec2-user/ray/example-full-modified.yaml 'tail -n 100 -f /tmp/ray/session_latest/logs/monitor*'

  Connect to a terminal on the cluster head:

    ray attach /home/ec2-user/ray/example-full-modified.yaml

  Get a remote shell to the cluster manually:

    ssh -tt -o IdentitiesOnly=yes -i /home/ec2-user/ray/tangaws-tokyo.pem ubuntu@13.114.178.198 docker exec -it ray_container /bin/bash
然后我们可以使用ray status查看集群状态,例如:
======== Autoscaler status: 2023-01-09 02:02:27.353483 ========

Node status

---------------------------------------------------------------

Healthy:

 1 ray.head.default

 2 ray.worker.default

Pending:

 (no pending nodes)

Recent failures:

 (no failures)

Resources

---------------------------------------------------------------

Usage:

 0.0/24.0 CPU

 0.00/63.151 GiB memory

 0.00/27.541 GiB object_store_memory

Demands:

 (no resource demands)
可以看到集群内有1个head节点,以及2个worker节点。对应的就是3个ec2实例。
2.3. 访问集群
# 首先启动集群

ray start --address='10.0.0.7:6379'

# 由于我们是从外部连接集群,所以要指定address

import ray

ray.init(address='ray://10.0.0.7:10001')

ds = ray.data.read_parquet([

    "s3://anonymous@air-example-data/ursa-labs-taxi-data/downsampled_2009_01_data.parquet",

    "s3://anonymous@air-example-data/ursa-labs-taxi-data/downsampled_2009_02_data.parquet"

])
3. k8s部署
使用KubeRay Operator是推荐的部署ray集群的到k8s的方式。它提供了kubernetes原生的方式管理Ray集群。在k8s下,每个Ray cluster包含1个head pod和多个worker pod。Autoscaling的支持是可选的,可以让KubeRay Operator根据Ray workload自动扩展Ray pods。

3.1. 创建eks集群
首先创建一个aws eks集群:
# 安装eksctl

参考文档:

https://docs.aws.amazon.com/eks/latest/userguide/eksctl.html

# 安装kubectl

参考文档:

https://docs.aws.amazon.com/zh_cn/eks/latest/userguide/eksctl.html

# 创建eks集群

eksctl create cluster --name ray-cluster --region ap-northeast-1 --vpc-private-subnets subnet-01bfb19b3bee01da6,subnet-0749fe7a61246b7bf,subnet-09c3bf76529bb7728 --without-nodegroup

# 更新kubeconfig配置

aws eks update-kubeconfig --region ap-northeast-1 --name ray-cluster

kubectl get svc

NAME         TYPE        CLUSTER-IP   EXTERNAL-IP   PORT(S)   AGE

kubernetes   ClusterIP   172.20.0.1   <none>        443/TCP   12m
然后增加2个m5.4xlarge节点,每个节点200GB EBS卷。
3.2. 部署ray cluster
参考官网:
https://docs.ray.io/en/latest/cluster/kubernetes/getting-started.html#kuberay-quickstart
# This creates the KubeRay operator and all of the resources it needs.

kubectl create -k "github.com/ray-project/kuberay/ray-operator/config/default?ref=v0.3.0&timeout=90s"

# Note that we must use "kubectl create" in the above command. "kubectl apply" will not work due to https://github.com/ray-project/kuberay/issues/271

# You may alternatively clone the KubeRay GitHub repo and deploy the operator's configuration from your local file system.
确认kuberay-operator正常运行在ray-system的namespace下:
kubectl -n ray-system get pod --selector=app.kubernetes.io/component=kuberay-operator

NAME                              READY   STATUS    RESTARTS   AGE

kuberay-operator-99cdbc68-jspt4   1/1     Running   0          67s
在有了kuberay-operator后,我们即可开始部署ray cluster。首先我们需要创建一个RayCluster Custom Resource(CR)。
下面的部署会将资源部署到默认的namespace里:
# Deploy a sample Ray Cluster CR from the KubeRay repo:

kubectl apply -f https://raw.githubusercontent.com/ray-project/kuberay/master/ray-operator/config/samples/ray-cluster.autoscaler.yaml

# 可能需要下载这个yaml文件并加入headGroupSpec: serviceType: ClusterIP 的配置

# 而后即可看到部署的head与worker pod

$ kubectl get pods

NAME                                             READY   STATUS    RESTARTS   AGE

raycluster-autoscaler-head-8lbhn                 2/2     Running   0          43m

raycluster-autoscaler-worker-small-group-h47qm   1/1     Running   0          43m
3.3. 在集群运行Application
3.3.1. 使用kubectl exec
最直接的方式是使用exec直接进入到head pod。
# 首先检查是否有head pod

> kubectl get pods --selector=ray.io/cluster=raycluster-autoscaler --selector=ray.io/node-type=head -o custom-columns=POD:metadata.name --no-headers

raycluster-autoscaler-head-8lbhn

# 使用kubectl exec的方式执行python代码

kubectl exec raycluster-autoscaler-head-8lbhn -it -c ray-head -- python -c "import ray; ray.init()"

2023-01-04 19:37:55,573    INFO worker.py:1231 -- Using address 127.0.0.1:6379 set in the environment variable RAY_ADDRESS

2023-01-04 19:37:55,574    INFO worker.py:1352 -- Connecting to existing Ray cluster at address: 10.0.5.183:6379...

2023-01-04 19:37:55,579    INFO worker.py:1535 -- Connected to Ray cluster. View the dashboard at http://10.0.5.183:8265
也可以通过下面的方式进入到head的python shell做开发:
kubectl exec raycluster-autoscaler-head-8lbhn -it -c ray-head -- python
更推荐的方式是使用Ray Jobs。
3.3.2. Ray Job提交
在客户端提交Job到Ray Cluster时,首先要确保Ray Job的端口是客户端可以访问到的。Ray监听job提交的端口是基于的Head pod的Dashboard Server。
首先,我们需要找到Ray head pod的位置。KubeRay operator配置了k8s service指向Ray head pod,这个service可以让用户与Ray cluster做交互式操作。
首先检查head service:
$ kubectl get service raycluster-autoscaler-head-svc

NAME                             TYPE        CLUSTER-IP     EXTERNAL-IP   PORT(S)                       AGE

raycluster-autoscaler-head-svc   ClusterIP   172.20.120.4   <none>        6379/TCP,8265/TCP,10001/TCP   17h
然后我们可以使用端口转发的方式访问Ray Dashboard(默认端口为8265)
kubectl port-forward service/raycluster-autoscaler-head-svc 8265:8265
然后我们即可提交job到Ray cluster,例如:
$ ray job submit --address http://localhost:8265 -- python -c "import ray; ray.init(); print(ray.cluster_resources())"

Job submission server address: http://localhost:8265

-------------------------------------------------------

Job 'raysubmit_3gFEKMvZQw8FEuVM' submitted successfully

-------------------------------------------------------

Next steps

  Query the logs of the job:

    ray job logs raysubmit_3gFEKMvZQw8FEuVM

  Query the status of the job:

    ray job status raysubmit_3gFEKMvZQw8FEuVM

  Request the job to be stopped:

    ray job stop raysubmit_3gFEKMvZQw8FEuVM

Tailing logs until the job exits (disable with --no-wait):

2023-01-04 22:21:28,706    INFO worker.py:1231 -- Using address 10.0.5.183:6379 set in the environment variable RAY_ADDRESS

2023-01-04 22:21:28,706    INFO worker.py:1352 -- Connecting to existing Ray cluster at address: 10.0.5.183:6379...

2023-01-04 22:21:28,716    INFO worker.py:1535 -- Connected to Ray cluster. View the dashboard at http://10.0.5.183:8265

{'object_store_memory': 811156684.0, 'node:10.0.5.183': 1.0, 'CPU': 2.0, 'memory': 3000000000.0, 'node:10.0.1.154': 1.0}

------------------------------------------

Job 'raysubmit_3gFEKMvZQw8FEuVM' succeeded

------------------------------------------
分布式执行引擎Ray-部署的更多相关文章
- 高性能分布式执行框架——Ray
Ray是UC Berkeley AMP实验室新推出的高性能分布式执行框架,它使用了和传统分布式计算系统不一样的架构和对分布式计算的抽象方式,具有比Spark更优异的计算性能. Ray目前还处于实验室阶 ...
- DRDS分布式SQL引擎—执行计划介绍
摘要: 本文着重介绍 DRDS 执行计划中各个操作符的含义,以便用户通过查询计划了解 SQL 执行流程,从而有针对性的调优 SQL. DRDS分布式SQL引擎 — 执行计划介绍 前言 数据库系统中,执 ...
- 带你玩转Flink流批一体分布式实时处理引擎
摘要:Apache Flink是为分布式.高性能的流处理应用程序打造的开源流处理框架. 本文分享自华为云社区<[云驻共创]手把手教你玩转Flink流批一体分布式实时处理引擎>,作者: 萌兔 ...
- Presto 来自Facebook的开源分布式查询引擎
Presto是一个分布式SQL查询引擎, 它被设计为用来专门进行高速.实时的数据分析.它支持标准的ANSI SQL,包括复杂查询.聚合(aggregation).连接(join)和窗口函数(windo ...
- 一文搞定FastDFS分布式文件系统配置与部署
Ubuntu下FastDFS分布式文件系统配置与部署 白宁超 2017年4月15日09:11:52 摘要: FastDFS是一个开源的轻量级分布式文件系统,功能包括:文件存储.文件同步.文件访问(文件 ...
- Hadoop分布式HA的安装部署
Hadoop分布式HA的安装部署 前言 单机版的Hadoop环境只有一个namenode,一般namenode出现问题,整个系统也就无法使用,所以高可用主要指的是namenode的高可用,即存在两个n ...
- HBase 1.2.6 完全分布式集群安装部署详细过程
Apache HBase 是一个高可靠性.高性能.面向列.可伸缩的分布式存储系统,是NoSQL数据库,基于Google Bigtable思想的开源实现,可在廉价的PC Server上搭建大规模结构化存 ...
- HHVM,高性能的PHP执行引擎
HHVM (HipHop Virtual Machine) 是 Facebook 开源的 PHP 执行引擎. HHVM 采用一种JIT(just-in-time)的编译机制实现了高性能,同时又保持对 ...
- Spark SQL概念学习系列之分布式SQL引擎
不多说,直接上干货! parkSQL作为分布式查询引擎:两种方式 除了在Spark程序里使用Spark SQL,我们也可以把Spark SQL当作一个分布式查询引擎来使用,有以下两种使用方式: 1.T ...
- JVM(6) 字节码执行引擎
编译器(javac)将Java源文件(.java文件)编译成Java字节码(.class文件). 类加载器负责加载编译后的字节码,并加载到运行时数据区(Runtime Data Area) 通过类加载 ...
随机推荐
- [rCore学习笔记 02]Ubuntu 22虚拟机安装
写在前面 本随笔是非常菜的菜鸡写的.如有问题请及时提出. 可以联系:1160712160@qq.com GitHhub:https://github.com/WindDevil (目前啥也没有 Ubu ...
- 《Operating Systems: Three Easy Pieces》阅读记录
OSTEP virtualization 进程 process 进程 API 进程 API 相关术语 进程状态 statu 机制:受限直接执行 进程调度:介绍 调度:多级反馈队列 MLFQ 调度:比例 ...
- 双指针 & 双向搜索
双指针 根据人类直觉这个东西需要满足单调性,所以预处理的时候大概率需要排序. 好像常与二分结合使用? 可以用在序列.链表(存储位置)或者树.图上(存储结点). 或者用于其他算法(eg:单调队列.差分) ...
- 使用 useRequestEvent Hook 访问请求事件
title: 使用 useRequestEvent Hook 访问请求事件 date: 2024/7/23 updated: 2024/7/23 author: cmdragon excerpt: 摘 ...
- 安装jieba中文分词库
插入一条: 有个更快安装下载jieba的方法,用镜像下载,非常快,2秒就行 pip install jieba -i https://pypi.douban.com/simple/ 1.打开官方网站: ...
- 【Vue】分组类型排名查询功能
一.书接上回: https://www.cnblogs.com/mindzone/p/17749725.html 这个效果被否决了,产品要求一定要UI的来,UI效果如图: 按人为主体的时候,固定有4个 ...
- 【Hibernate】06 查询API
三种查询API - Query 不需要SQL语句,但是要HQL语句 - Criteria 不需要任何QL语句,直接调用即可 - SQLQuery 调用底层的SQL语句实现 什么是HQL? Hibern ...
- Trump 黑马 or 搅局者? 讲座视频分享
沈逸-特朗普能走多远 https://www.bilibili.com/video/BV1r7411t7VS/?spm_id_from=333.788.videocard.2 国际关系 对 ...
- 电脑时间不同步导致的上网报错:core/proxy/vmess/encoding: failed to read response header > websocket: close 1006 (abnormal closure): unexpected EOF
报错内容: 2023/12/16 14:08:56 [Warning] [775541588] xxxxx.com/core/app/proxyman/outbound: failed to proc ...
- 最新版gym-0.26.2下Atari环境的安装以及环境版本v0,v4,v5的说明
强化学习的游戏仿真环境可以分为连续控制和非连续控制两类,其中连续控制的以mujoco为主,而非连续控制的以Atari游戏为主,本文对gym下的Atari环境的游戏环境版本进行一定的介绍. 参考:[转载 ...