虹软2.0免费离线人脸识别 Demo [C++]
环境: win10(10.0.16299.0)+ VS2017
sdk版本:ArcFace v2.0
OPENCV3.43版本
x64平台Debug、Release配置都已通过编译
下载地址:https://download.csdn.net/download/cngwj/10763108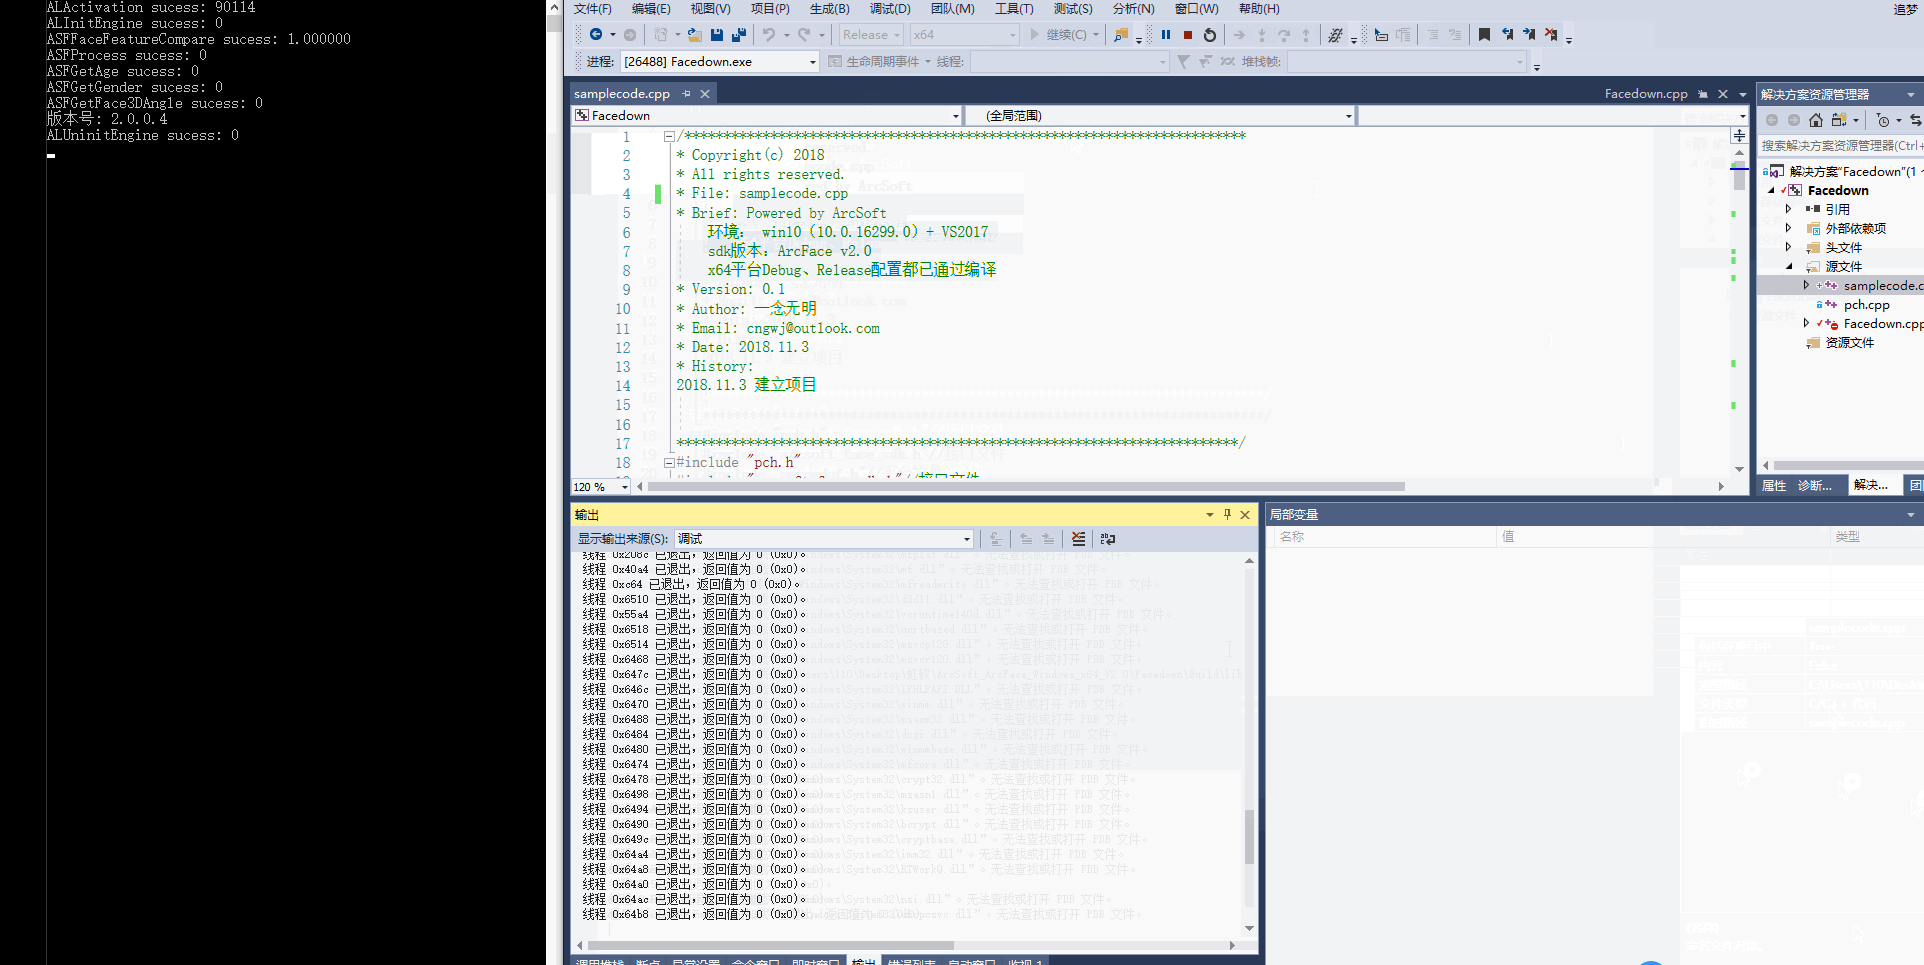
配置过程
->0x01 下载sdk:
虹安sdk https://ai.arcsoft.com.cn

->0x02 工程配置:
1、 添加工程的头文件目录:
a) 右键单击工程名, 选择属性---配置属性---c/c++---常规---附加包含目录
b) 添加头文件存放目录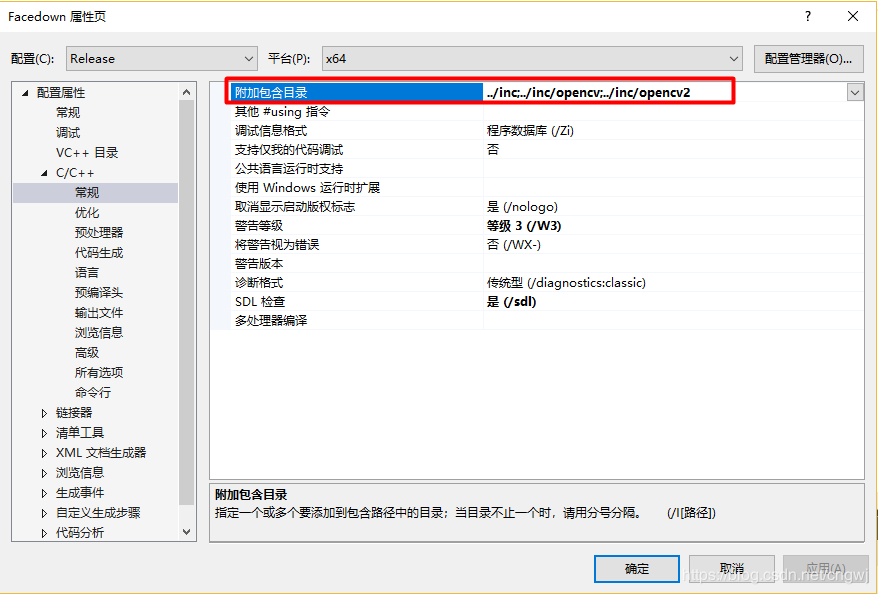
2、 添加文件引用的 lib 静态库路径:
a) 右键单击工程名,选择属性---配置属性---链接器---常规---附加库目录
b) 添加 lib 文件存放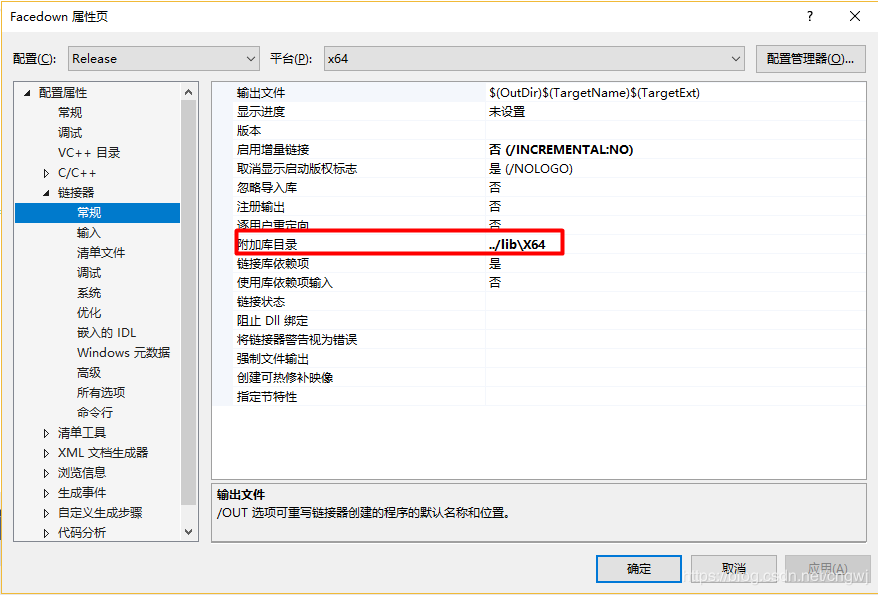
3、 添加工程引用的 lib 库:
a) 右键单击工程名,选择属性---配置属性---链接器---输入---附加依赖项
b) 添加依赖的 lib 库名称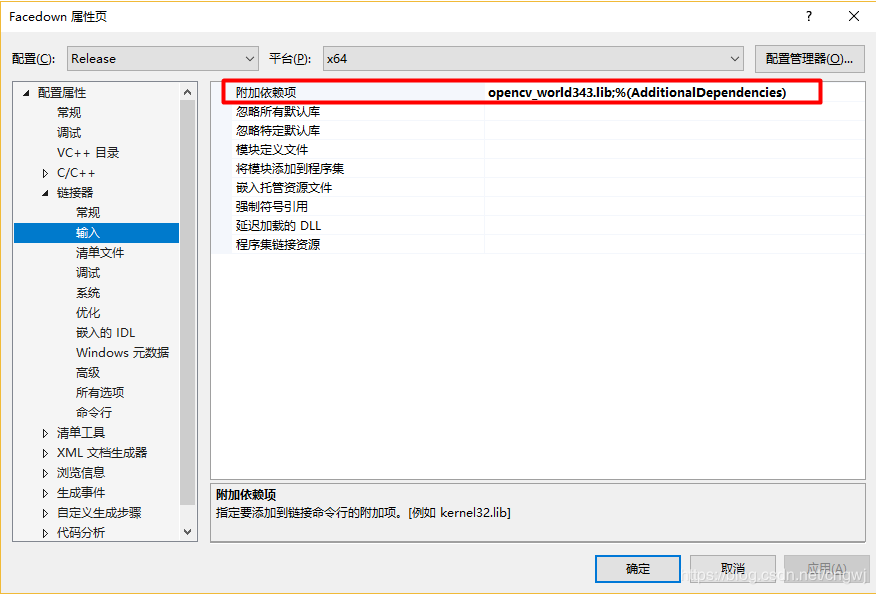
4、自定义可执行文件输出目录
5、 添加工程引用的 dll 动态库:
a) 把引用的 dll 放到工程的可执行文件所在的目录下(复制到Build目录)

6、添加自己申请的APPID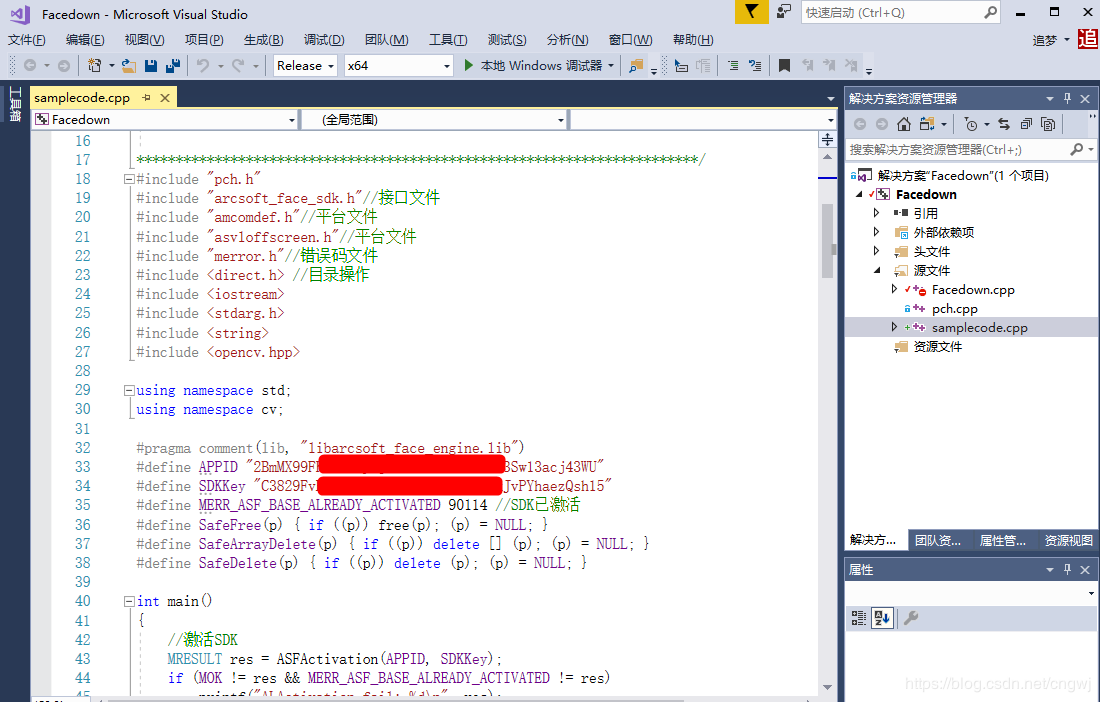
/************************************************************************

* Copyright(c) 2018

* All rights reserved.

* File: samplecode.cpp

* Brief: Powered by ArcSoft

环境: win10(10.0.16299.0)+ VS2017

sdk版本:ArcFace v2.0

x64平台Debug、Release配置都已通过编译

* Version: 0.1

* Author: 一念无明

* Email: cngwj@outlook.com

* Date: 2018.11.3

* History:

2018.11.3 建立项目

************************************************************************/

#include "pch.h"

#include "arcsoft_face_sdk.h"//接口文件

#include "amcomdef.h"//平台文件

#include "asvloffscreen.h"//平台文件

#include "merror.h"//错误码文件

#include <direct.h> //目录操作

#include <iostream>

#include <stdarg.h>

#include <string>

#include <opencv.hpp>

using namespace std;

using namespace cv;

#pragma comment(lib, "libarcsoft_face_engine.lib")

#define APPID ""

#define SDKKey ""

#define MERR_ASF_BASE_ALREADY_ACTIVATED 90114 //SDK已激活

#define SafeFree(p) { if ((p)) free(p); (p) = NULL; }

#define SafeArrayDelete(p) { if ((p)) delete [] (p); (p) = NULL; }

#define SafeDelete(p) { if ((p)) delete (p); (p) = NULL; }

int main()

{

//激活SDK

MRESULT res = ASFActivation(APPID, SDKKey);

if (MOK != res && MERR_ASF_BASE_ALREADY_ACTIVATED != res)

printf("ALActivation fail: %d\n", res);

else

printf("ALActivation sucess: %d\n", res);

//初始化引擎

MHandle handle = NULL;

MInt32 mask = ASF_FACE_DETECT | ASF_FACERECOGNITION | ASF_AGE | ASF_GENDER | ASF_FACE3DANGLE;

res = ASFInitEngine(ASF_DETECT_MODE_IMAGE, ASF_OP_0_ONLY, 16, 5, mask, &handle);

if (res != MOK)

printf("ALInitEngine fail: %d\n", res);

else

printf("ALInitEngine sucess: %d\n", res);

// 人脸检测

IplImage* img = cvLoadImage("../Build\\1.bmp");//图片宽度需符合4的倍数

IplImage* img1 = cvLoadImage("../Build\\2.bmp");

if (img && img1)

{

ASF_MultiFaceInfo detectedFaces1 = { 0 };//多人脸信息;

ASF_SingleFaceInfo SingleDetectedFaces1 = { 0 };

ASF_FaceFeature feature1 = { 0 };

ASF_FaceFeature copyfeature1 = { 0 };

res = ASFDetectFaces(handle, img->width, img->height, ASVL_PAF_RGB24_B8G8R8, (MUInt8*)img->imageData, &detectedFaces1);

if (MOK == res)

{

SingleDetectedFaces1.faceRect.left = detectedFaces1.faceRect[0].left;

SingleDetectedFaces1.faceRect.top = detectedFaces1.faceRect[0].top;

SingleDetectedFaces1.faceRect.right = detectedFaces1.faceRect[0].right;

SingleDetectedFaces1.faceRect.bottom = detectedFaces1.faceRect[0].bottom;

SingleDetectedFaces1.faceOrient = detectedFaces1.faceOrient[0];

//单人脸特征提取

res = ASFFaceFeatureExtract(handle, img->width, img->height, ASVL_PAF_RGB24_B8G8R8, (MUInt8*)img->imageData, &SingleDetectedFaces1, &feature1);

if (res == MOK)

{

//拷贝feature

copyfeature1.featureSize = feature1.featureSize;

copyfeature1.feature = (MByte *)malloc(feature1.featureSize);

memset(copyfeature1.feature, 0, feature1.featureSize);

memcpy(copyfeature1.feature, feature1.feature, feature1.featureSize);

}

else

printf("ASFFaceFeatureExtract 1 fail: %d\n", res);

}

else

printf("ASFDetectFaces 1 fail: %d\n", res);

//第二张人脸提取特征

ASF_MultiFaceInfo	detectedFaces2 = { 0 };

ASF_SingleFaceInfo SingleDetectedFaces2 = { 0 };

ASF_FaceFeature feature2 = { 0 };

res = ASFDetectFaces(handle, img1->width, img1->height, ASVL_PAF_RGB24_B8G8R8, (MUInt8*)img1->imageData, &detectedFaces2);

if (MOK == res)

{

SingleDetectedFaces2.faceRect.left = detectedFaces2.faceRect[0].left;

SingleDetectedFaces2.faceRect.top = detectedFaces2.faceRect[0].top;

SingleDetectedFaces2.faceRect.right = detectedFaces2.faceRect[0].right;

SingleDetectedFaces2.faceRect.bottom = detectedFaces2.faceRect[0].bottom;

SingleDetectedFaces2.faceOrient = detectedFaces2.faceOrient[0];

res = ASFFaceFeatureExtract(handle, img1->width, img1->height, ASVL_PAF_RGB24_B8G8R8, (MUInt8*)img1->imageData, &SingleDetectedFaces2, &feature2);

if (MOK != res)

printf("ASFFaceFeatureExtract 2 fail: %d\n", res);

}

else

printf("ASFDetectFaces 2 fail: %d\n", res);

// 单人脸特征比对

MFloat confidenceLevel;

res = ASFFaceFeatureCompare(handle, ©feature1, &feature2, &confidenceLevel);

if (res != MOK)

printf("ASFFaceFeatureCompare fail: %d\n", res);

else

printf("ASFFaceFeatureCompare sucess: %lf\n", confidenceLevel);

// 人脸信息检测

MInt32 processMask = ASF_AGE | ASF_GENDER | ASF_FACE3DANGLE;

res = ASFProcess(handle, img1->width, img1->height, ASVL_PAF_RGB24_B8G8R8, (MUInt8*)img1->imageData, &detectedFaces1, processMask);

if (res != MOK)

printf("ASFProcess fail: %d\n", res);

else

printf("ASFProcess sucess: %d\n", res);

// 获取年龄

ASF_AgeInfo ageInfo = { 0 };

res = ASFGetAge(handle, &ageInfo);

//printf("年龄: %d\n", ageInfo);

if (res != MOK)

printf("ASFGetAge fail: %d\n", res);

else

printf("ASFGetAge sucess: %d\n", res);

// 获取性别

ASF_GenderInfo genderInfo = { 0 };

res = ASFGetGender(handle, &genderInfo);

if (res != MOK)

printf("ASFGetGender fail: %d\n", res);

else

printf("ASFGetGender sucess: %d\n", res);

// 获取3D角度

ASF_Face3DAngle angleInfo = { 0 };

res = ASFGetFace3DAngle(handle, &angleInfo);

if (res != MOK)

printf("ASFGetFace3DAngle fail: %d\n", res);

else

printf("ASFGetFace3DAngle sucess: %d\n", res);

SafeFree(copyfeature1.feature);	//释放内存

}

//获取版本信息

const ASF_VERSION* pVersionInfo = ASFGetVersion(handle);

printf("版本号: %s\n", pVersionInfo->Version);

//反初始化

res = ASFUninitEngine(handle);

if (res != MOK)

printf("ALUninitEngine fail: %d\n", res);

else

printf("ALUninitEngine sucess: %d\n", res);

getchar();

return 0;

}
用其它照片测试需要注意图片的宽度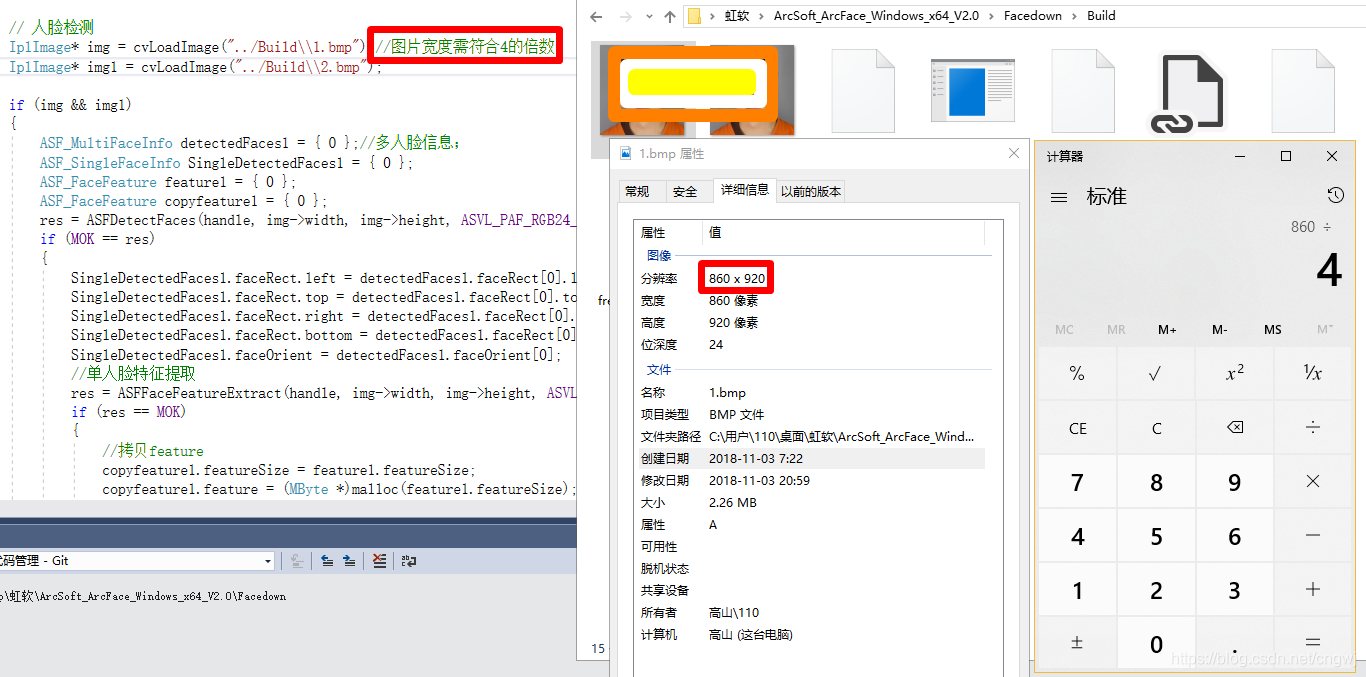
&待续
虹软2.0免费离线人脸识别 Demo [C++]的更多相关文章
- 虹软2.0版本离线人脸识别C#类库分享
目前只封装了人脸检测部分的类库,供大家交流学习,肯定有问题,希望大家在阅读使用的时候及时反馈,谢谢!使用虹软技术开发完成 戳这里下载SDKgithub:https://github.com/dayAn ...
- python3+虹软2.0 离线人脸识别 demo
python3+虹软2.0的所有功能整合测试完成,并对虹软所有功能进行了封装,现提供demo主要功能,1.人脸识别2.人脸特征提取3.特征比对4.特征数据存储与比对其他特征没有添加 虹软SDK下载戳这 ...
- C#版免费离线人脸识别——虹软ArcSoft V3.0
[温馨提示] 本文共678字(不含代码),8张图.预计阅读时间需要6分钟. 1. 前言 人脸识别&比对发展到今天,已经是一个非常成熟的技术了,而且应用在生活的方方面面,比如手机.车站.天网等. ...
- 基于Arcface 免费离线人脸识别 2.0 Demo C#
本来打算做个C#版demo,但没用成功.使用虹软最新人脸识别技术开发完成 过程如下: 1. 传入一张单人脸照片: 2.调用检测人脸函数ASFDetectFaces,成功返回人脸信息的指针: 3.使用 ...
- python3+arcface2.0 离线人脸识别 demo
python3+虹软2.0的所有功能整合测试完成,并对虹软所有功能进行了封装,现提供demo主要功能,1.人脸识别2.人脸特征提取3.特征比对4.特征数据存储与比对其他特征没有添加 sdk 下载请戳这 ...
- C# 离线人脸识别Demo 使用ArcFace 2.0开发完成
环境: win7以上 VS2013以上 sdk版本:ArcFace v2.0 x86 x64平台Debug.Release配置都已通过编译 下载地址:https://github ...
- 人脸识别Demo解析C#
概述 不管你注意到没有,人脸识别已经走进了生活的角角落落,钉钉已经支持人脸打卡,火车站实名认证已经增加了人脸自助验证通道,更别提各个城市建设的『智能城市』和智慧大脑了.在人脸识别业界,通常由人脸识别提 ...
- 转:基于开源项目OpenCV的人脸识别Demo版整理(不仅可以识别人脸,还可以识别眼睛鼻子嘴等)【模式识别中的翘楚】
文章来自于:http://blog.renren.com/share/246648717/8171467499 基于开源项目OpenCV的人脸识别Demo版整理(不仅可以识别人脸,还可以识别眼睛鼻子嘴 ...
- 人脸识别demo使用教程
最近在研究虹软家的arcface 人脸识别 demo,现在就给大家分享一下官方的demo**工程如何使用? **1.下载代码:git clone https://github.com/asdfqwra ...
随机推荐
- jquery的$post方法不发送空数组的解决办法
问题:jquery里的ajax在提交post请求时,如果数据里有一个空数组,则这个空数组不会提交上去 技术上的解决办法如下: 源代码: var params = { type : , ids:[] } ...
- PHP 变量类型的强制转换 & 创建空对象
PHP 在变量定义中不需要(或不支持)明示的类型定义:变量类型是根据使用该变量的上下文所决定的. 也就是说,如果把一个字符串值赋给变量 var,var 就成了一个字符串.如果又把一个整型值赋给 var ...
- 面试题:JS中map的陷阱
题目: ['2', '3', '4'].map(parseInt); 请说出上面代码的执行结果 错误回答: [2, 3, 4] 真正答案: [2, NaN, NaN] 解析: 因为 map 的算子是有 ...
- spring boot log4j2与三方依赖库log4j冲突无法初始化问题解决方法
因为从Spring Boot 1.4开始,spring boot就不支持log4j了,必须是log4j2或者logback,具体两者如何配置以及NDC的支持可以参考spring boot精华版. 这里 ...
- vertica导出导入数据
直接开. 导出dat vsql -U dbadmin -wlizhenghua -At -F'|' -c "select * from APP_INTER_BOSS_CDR_COUNT_T& ...
- Install Apache Maven on Ubuntu
Download the Apache maven from this link https://maven.apache.org/download.cgi, extract the download ...
- 怎么删除git本地分支以及Bitbucket的远程分支?
1. 如果分支只是本地分支,则可以使用 -d (如果分支已合并),例如 git branch -d <branch name>如果分支包含不计划合并的代码,请改用 -D (即使有没有mer ...
- Icons - Material Design各种ICON图标大全
Icons - Material Design https://material.io/tools/icons/?icon=account_balance&style=baseline
- hexo在github和coding.net部署并分流(一)
安装GIT和Node.JS 首先在自己的电脑上安装好git和node.js,这一步怎么做自己搜索,安装软件都是下一步下一步,应该不难,GIT安装完成后打开git cmd输入 git config -- ...
- LuoguP5221 Product
题目地址 题目链接 题解 注,下方\((i,j)\)均指\(gcd(i,j)\),以及证明过程有一定的跳步,请确保自己会莫比乌斯反演的基本套路. 介绍本题的\(O(n)\)和\(O(n\sqrt{n} ...
