day16-Python运维开发基础(os / os.path / shutil模块)
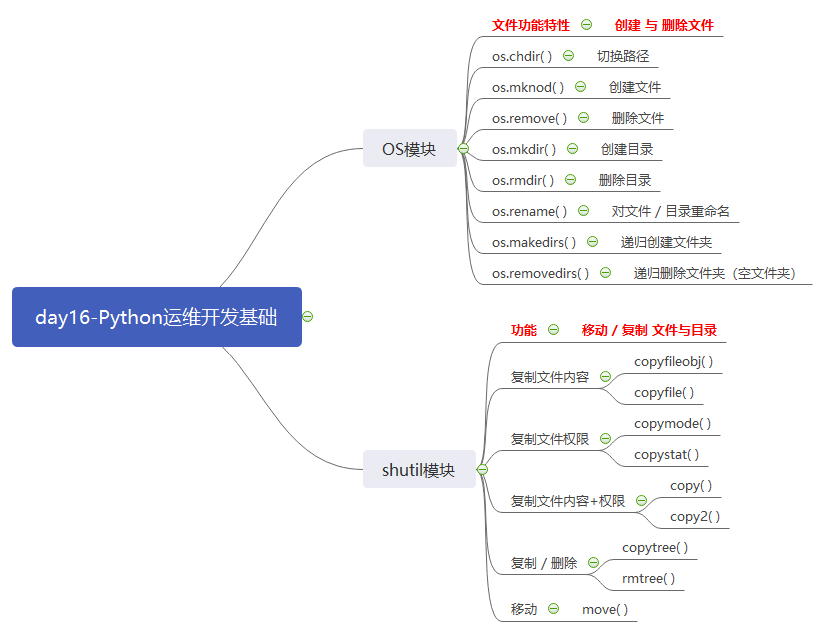
1. OS模块与shutil模块
os :新建/删除
shutil: 复制/移动
# ### os模块 与 shutil模块

"""

os     新建/删除

shutil 复制/移动

"""

import os

os.chdir("/home/wangwen/mywork")

#os.mknod   创建文件

# os.mknod("ceshi111.txt")

#os.remove  删除文件

# os.remove("ceshi111.txt")

#os.mkdir   创建目录(文件夹)

# os.mkdir("ceshi200")

#os.rmdir   删除目录(文件夹)

# os.rmdir("ceshi200")

#os.rename  对文件,目录重命名

# os.rename("ceshi100","ceshi1001")

#os.makedirs   递归创建文件夹

# os.makedirs("a/b/c/d/e/f")

#os.removedirs 递归删除文件夹(空文件夹)

# os.removedirs("a/b/c/d/e/f")

# ### shutil

import shutil

# 1. 单纯仅仅复制文件内容

#copyfileobj(fsrc, fdst[, length=16*1024])  复制文件 (length的单位是字符(在r模式下,read单位是字符个数,在rb模式read单位是字节个数))

# fp1 = open("ceshi100.py",mode="r",encoding="utf-8")

# fp2 = open("ceshi101.py",mode="w",encoding="utf-8")

# shutil.copyfileobj(fp1,fp2)

#copyfile(src,dst)   #单纯的仅复制文件内容 , 底层调用了 copyfileobj

# shutil.copyfile("ceshi101.py","ceshi102.py")

# 2. 单纯仅仅复制文件权限

#copymode(src,dst)   #单纯的仅复制文件权限 , 不包括内容  (虚拟机共享目录都是默认777)

# shutil.copymode("ceshi102.py","103.py")

#copystat(src,dst)   #复制所有状态信息,包括权限,修改时间等,不包括内容

# shutil.copystat("ceshi102.py","104.py")

# 3. 文件内容 + 文件权限

#copy(src,dst)       #复制文件权限和内容

# shutil.copy("ceshi102.py","105.py")

#copy2(src,dst)      #复制文件权限和内容,还包括权限,时间等

# shutil.copy2("ceshi102.py","106.py")

# 4.复制 / 删除

#copytree(src,dst)   #拷贝文件夹里所有内容(递归拷贝)

# shutil.copytree("ceshi1001","ceshi1002")

#rmtree(path)        #删除当前文件夹及其中所有内容(递归删除)

# shutil.rmtree("ceshi1002")

# 5.移动 move(path1,paht2)   #移动文件或者文件夹

# 移动文件夹

# shutil.move("ceshi1001","../ceshi1003")

# 移动文件

shutil.move("104.py","../111.py")
os模块 与 shutil模块 示例代码
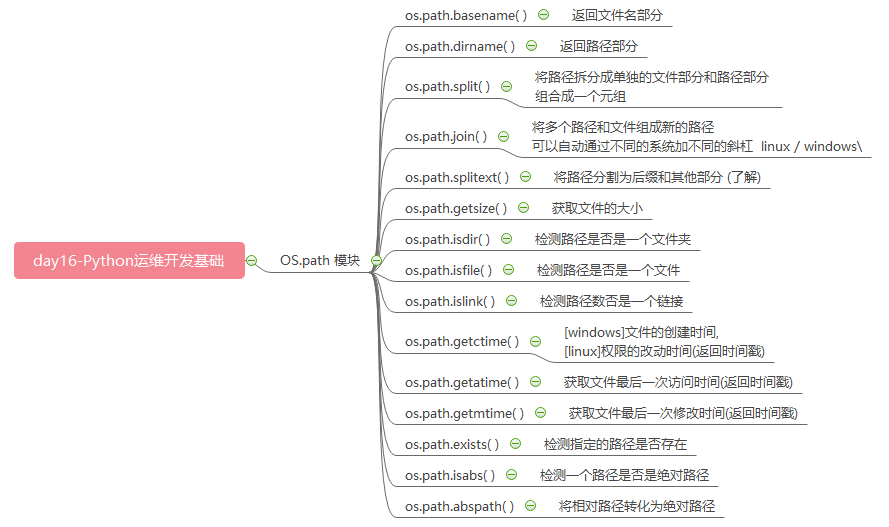
2. os.path 模块
# ### os.path

import os

strvar = "/home/wangwen/mywork/ceshi1.py"

#basename() 返回文件名部分

res = os.path.basename(strvar)

print(res)

#dirname()  返回路径部分

res = os.path.dirname(strvar)

print(res)

#split() 将路径拆分成单独的文件部分和路径部分 组合成一个元组

res = os.path.split(strvar)

print(res)

#join()  将多个路径和文件组成新的路径 可以自动通过不同的系统加不同的斜杠  linux / windows\

path1 = "home"

path2 = "wangwen"

path3 = "mywork"

# 方法一

pathvar = path1 + os.sep + path2 + os.sep + path3

print(pathvar)

# 方法二

pathvar = os.path.join(path1,path2,path3)

print(pathvar)

# d:\home\wangwen\mywork

# D:\gongxiang8\day16

# /home/wangwen/mywork/

#splitext() 将路径分割为后缀和其他部分 (了解)

strvar = "/home/wangwen/mywork/ceshi1.py"

res = os.path.splitext(strvar)

print(res)

# 用字符串中的split也可以分割出后缀部分

a,b = strvar.split(".")

print(a,b)

#getsize()  获取文件的大小

res = os.path.getsize("1.py")

print(res)

# ### isdir / isfile / islink

#isdir()    检测路径是否是一个文件夹

res = os.path.isdir("ceshi100")

print(res)

#isfile()   检测路径是否是一个文件

res = os.path.isfile("1.py")

print(res)

#islink()   检测路径数否是一个链接

res = os.path.islink("/home/wangwen/ceshi200/ceshi100")

print(res)

# ### getctime / getmtime / getatime

#getctime() [windows]文件的创建时间,[linux]权限的改动时间(返回时间戳)

pathvar = "/home/wangwen/mywork/103.py"

res = os.path.getctime(pathvar)

print(res)

import time

str_time = time.ctime(res)

print(str_time)

#getmtime() 获取文件最后一次修改时间(返回时间戳)

res = os.path.getmtime(pathvar)

print(res)

import time

str_time = time.ctime(res)

print(str_time)

#getatime() 获取文件最后一次访问时间(返回时间戳)

res = os.path.getatime(pathvar)

print(res)

import time

str_time = time.ctime(res)

print(str_time)

#exists()   检测指定的路径是否存在

pathvar = "/home/wangwen/mywork/10323223.py"

res = os.path.exists(pathvar)

print(res)

#isabs()    检测一个路径是否是绝对路径

pathvar = "."

res = os.path.isabs(pathvar)

print(res)

#abspath()  将相对路径转化为绝对路径

res = os.path.abspath(pathvar)

print(res)

# 结合使用

if not os.path.isabs(pathvar):

    pathnew = os.path.abspath(pathvar)

    print(pathnew)
os.path 模块 示例代码
# ### 如何计算一个文件夹中所有文件的大小

import os

pathvar = "/mnt/hgfs/gongxiang8/day16/ceshi100"

# (1)获取文件夹中所有的文件名称

lst = os.listdir(pathvar)

print(lst)

"""

拼接路径,计算文件大小

res = os.path.join(pathvar,"1.txt")

print(res) # "/mnt/hgfs/gongxiang8/day16/ceshi100/1.txt"

res2 = os.path.getsize(res)

print(res2)

"""

# (2)计算所有文件的大小 [缺陷:不能计算文件夹中的内容]

size = 0

for i in lst:

    pathnew = os.path.join(pathvar,i)

    # 判断是否是文件

    if os.path.isfile(pathnew):

        print(i,"[是文件]")

        size += os.path.getsize(pathnew)

    # 判断是否是文件夹

    elif os.path.isdir(pathnew):

        print(i,"[是文件夹]")

# (3)使用递归计算文件夹中所有文件大小

def getallsize(pathvar):

    size = 0

    lst = os.listdir(pathvar)

    for i in lst:

        # 路径 + 文件名 => 绝对路径

        pathnew = os.path.join(pathvar,i)

        if os.path.isfile(pathnew):

            # 计算文件大小

            size += os.path.getsize(pathnew)

        elif os.path.isdir(pathnew):

            size += getallsize(pathnew)

    return size

res = getallsize(pathvar)

print(res)
如何计算一个文件夹中所有文件的大小 示例代码
3. tarfile 压缩模块

# ### tarfile 压缩模块 后缀为.tar  |  .tar.gz  |   .tar.bz2

import tarfile

# ### 1.创建tar压缩包 [官方: 理论上可以压缩到最小的模式是bz2]

# (1) 创建压缩包

""".tar的压缩包,只打包不压缩 276480"""

tf = tarfile.open("ceshi1029.tar","w",encoding="utf-8")

# (2) 写入文件到压缩包中

tf.add("/bin/ntfscmp","ntfscmp")

tf.add("/bin/openvt","openvt")

tf.add("/bin/grep","tmp/grep")

# (3) 关闭压缩包

tf.close()

# 2.创建.tar.gz压缩包 120462

tf = tarfile.open("ceshi1030.tar.gz","w:gz",encoding="utf-8")

tf.add("/bin/ntfscmp","ntfscmp")

tf.add("/bin/openvt","openvt")

tf.add("/bin/grep","tmp/grep")

tf.close()

# 3.创建.tar.bz2压缩包 115728

tf = tarfile.open("ceshi1031.tar.bz2","w:bz2",encoding="utf-8")

tf.add("/bin/ntfscmp","ntfscmp")

tf.add("/bin/openvt","openvt")

tf.add("/bin/grep","tmp/grep")

tf.close()

# ### 2.解压压缩包

tf = tarfile.open("ceshi1030.tar.gz","r",encoding="utf-8")

# extract(文件,路径)

# tf.extract("ntfscmp","ceshi1030")

# extractall(路径)

tf.extractall("ceshi1030")

tf.close()

# ### 3.追加文件 支持with语法

with  tarfile.open("ceshi1029.tar","a",encoding="utf-8") as tf :

    tf.add("/bin/gzip","gzip")

# error tarfile中的追加,只能是对只打包不压缩的包进行追加,其他的模式不可以;

"""

with tarfile.open("ceshi1031.tar.bz2","a",encoding="utf-8") as tf:

    tf.add("/bin/gzip","gzip")

"""

# ### 4.查看压缩包中的内容

with  tarfile.open("ceshi1029.tar","r",encoding="utf-8") as tf :

    lst = tf.getnames()

    print(lst)

# ### 如何解决tarfile中存在的缺陷?(不能追加文件到已经压缩的包)

"""

(1) 先解压所有文件到文件夹

(2) 把想要追加的内容复制到文件夹中

(3) 经过过滤筛选,重新打包压缩

"""

import os

# 获取当前脚本所在的路径

pathvar = os.getcwd()

# print(res) # /mnt/hgfs/gongxiang8/day16

# 压缩包路径

path1 = os.path.join(pathvar,"ceshi1031.tar.bz2")

print(path1)

# 解压的路径

path2 = os.path.join(pathvar,"ceshi1031")

# (1) 先解压所有文件到文件夹

with tarfile.open( path1 , "r",encoding="utf-8") as tf:

    tf.extractall(path2)

# (2) 把想要追加的内容复制到文件夹中

mybin = "cp -a /bin/ip " + path2 # cp -a /bin/ip /mnt/hgfs/gongxiang8/day16/ceshi1031

os.system(mybin)

# (3) 经过过滤筛选,重新打包压缩

lst = os.listdir(path2)

print(lst)

with tarfile.open(path1,"w:bz2",encoding="utf-8") as tf:

    for i in lst:

        if i != "openvt":

            # 拼接绝对路径

            pathnew = os.path.join(path2,i)

            # add(路径,别名)

            tf.add(pathnew,i)
tarfile 压缩模块 示例代码
day16
day16-Python运维开发基础(os / os.path / shutil模块)的更多相关文章
- Python运维开发基础09-函数基础【转】
上节作业回顾 #!/usr/bin/env python3 # -*- coding:utf-8 -*- # author:Mr.chen # 实现简单的shell命令sed的替换功能 import ...
- Python运维开发基础08-文件基础【转】
一,文件的其他打开模式 "+"表示可以同时读写某个文件: r+,可读写文件(可读:可写:可追加) w+,写读(不常用) a+,同a(不常用 "U"表示在读取时, ...
- Python运维开发基础06-语法基础【转】
上节作业回顾 (讲解+温习120分钟) #!/usr/bin/env python3 # -*- coding:utf-8 -*- # author:Mr.chen # 添加商家入口和用户入口并实现物 ...
- Python运维开发基础05-语法基础【转】
上节作业回顾(讲解+温习90分钟) #!/usr/bin/env python # -*- coding:utf-8 -*- # author:Mr.chen import os,time Tag = ...
- Python运维开发基础04-语法基础【转】
上节作业回顾(讲解+温习90分钟) #!/usr/bin/env python3 # -*- coding:utf-8 -*- # author:Mr.chen # 仅用列表+循环实现“简单的购物车程 ...
- Python运维开发基础03-语法基础 【转】
上节作业回顾(讲解+温习60分钟) #!/usr/bin/env python3 # -*- coding:utf-8 -*- # author:Mr.chen #只用变量和字符串+循环实现“用户登陆 ...
- Python运维开发基础10-函数基础【转】
一,函数的非固定参数 1.1 默认参数 在定义形参的时候,提前给形参赋一个固定的值. #代码演示: def test(x,y=2): #形参里有一个默认参数 print (x) print (y) t ...
- Python运维开发基础07-文件基础【转】
一,文件的基础操作 对文件操作的流程 [x] :打开文件,得到文件句柄并赋值给一个变量 [x] :通过句柄对文件进行操作 [x] :关闭文件 创建初始操作模板文件 [root@localhost sc ...
- Python运维开发基础02-语法基础【转】
上节作业回顾(讲解+温习60分钟) #!/bin/bash #user login User="yunjisuan" Passwd="666666" User2 ...
- Python运维开发基础01-语法基础【转】
开篇导语 整个Python运维开发教学采用的是最新的3.5.2版,当遇到2.x和3.x版本的不同点时,会采取演示的方式,让同学们了解. 教学预计分为四大部分,Python开发基础,Python开发进阶 ...
随机推荐
- Wireshark 查看指定进程的网络包
Wireshark 查看指定进程的网络包 打开任务管理器,右键筛选列,选中PID(进程标识符): 找到该进程对应的PID,如1200: 在cmd中执行netstat -ano|findstr 1200 ...
- java集合知识点
若不重写equals方法,则调用的是object对象的equals方法,相当于==比较,比较的是对象的内存地址 |------Collection接口:单列集合,用来存储一个一个对象 |------L ...
- Java IO流详解(四)——字符流Reader和Writer
前面一章介绍了字节流的使用,提到了字节流在处理utf-8编码的中文可能会出现乱码的情况(其他编码的中文同样会出现乱码),所以Java针对这一情况提供了字符流. 但是字符流只能处理字符,不能用来处理 . ...
- leetcode 0214
目录 ✅ 965. 单值二叉树 描述 解答 c++ updated dfs c++ py py 生成器 ✅ 762. 二进制表示中质数个计算置位 描述 解答 cpp other cpp mine ja ...
- UNICODE UTF编码方式解析
先明确几个概念 基础概念部分 1.字符编码方式CEF(Character Encoding Form) 对符号进行编码,便于处理与显示 常用的编码方式有 GB2312(汉字国标码 2字节) ASCII ...
- 用apt-get解决dpkg过程中出现的依赖问题
dpkg命令不解决依赖问题,这点对新手很不友好 当使用dpkg -i *.deb 安装出现依赖问题的时候,可以尝试如下解决方法: apt-get -f -y install # 复制粘贴回车,inst ...
- 3000 - No Mycat Database selected
今天在linux上搭建好mycat后,用Navicat连接出现如下错误 尝试很多方式发现并没有什么用,后面改用SQLyog连接就可以正常使用了!!!
- Hibernate面试题(七)--load与get区别
1. load方式是延迟加载,只有属性被访问的时候才会调用sql语句 get方式是非延迟加载,无论后面的代码是否会访问到属性,马上执行sql语句 2. 都通过id=500去获取对象1. get方式会返 ...
- Community Cloud零基础学习(一)启用以及简单配置
本篇参考: https://trailhead.salesforce.com/en/content/learn/trails/communities https://trailhead.salesfo ...
- push 、pop 、unshift 、shift
push .pop : 操作数组后面 unshift .shift :操作数组前面 push.unshift : 字母多的添加 pop .shift : 字母少的删除 push.unshift : 添 ...