
Spring Boot项目简单上手+swagger配置+项目发布(可能是史上最详细的)
Spring Boot项目简单上手+swagger配置
1、项目实践
项目结构图

项目整体分为四部分:1、source code 2、sql-mapper 3、application.properties 4、pom.xml
工作量主要集中在1,2;3,4主要是一些配置项,依赖库的添加。
(1)建表语句:
CREATE TABLE `city` (

  `id` int(10) unsigned NOT NULL AUTO_INCREMENT COMMENT '城市编号',

  `province_id` int(10) unsigned NOT NULL COMMENT '省份编号',

  `city_name` varchar(25) DEFAULT NULL COMMENT '城市名称',

  `description` varchar(25) DEFAULT NULL COMMENT '描述',

  PRIMARY KEY (`id`)

) ENGINE=InnoDB AUTO_INCREMENT=81 DEFAULT CHARSET=utf8;
(2)controller 代码
package org.spring.springboot.controller;

import static springfox.documentation.builders.PathSelectors.regex;

import io.swagger.annotations.ApiOperation;

import io.swagger.annotations.ApiResponse;

import io.swagger.annotations.ApiResponses;

import java.util.ArrayList;

import java.util.List;

import org.spring.springboot.domain.City;

import org.spring.springboot.service.CityService;

import org.springframework.beans.factory.annotation.Autowired;

import org.springframework.context.annotation.Bean;

import org.springframework.http.MediaType;

import org.springframework.ui.Model;

import org.springframework.web.bind.annotation.RequestBody;

import org.springframework.web.bind.annotation.RequestMapping;

import org.springframework.web.bind.annotation.RequestMethod;

import org.springframework.web.bind.annotation.RequestParam;

import org.springframework.web.bind.annotation.RestController;

import springfox.documentation.builders.RequestHandlerSelectors;

import springfox.documentation.service.ApiInfo;

import springfox.documentation.service.Contact;

import springfox.documentation.spi.DocumentationType;

import springfox.documentation.spring.web.plugins.Docket;

import springfox.documentation.swagger2.annotations.EnableSwagger2;

/**

 * Created by bysocket on 07/02/2017.

 */

@RequestMapping("/api")

@RestController

public class CityRestController {

    @Autowired

    private CityService cityService;

    @RequestMapping(value = "/checkcity", method = RequestMethod.GET, produces = "application/json")

    public List<City> findOneCity(@RequestParam(value = "cityName", required = true) String cityName) {

        return cityService.findCityByName(cityName);

    }

//    @RequestMapping(value = "/api/addcity", method = RequestMethod.POST)

//    public int addCity(@RequestParam(value = "City", required = true) City city) {

//        return cityService.save(city);

//    }

    @RequestMapping(value = "/addcity", method = RequestMethod.POST)

    public int addCity(@RequestBody City city) {

        return cityService.save(city);

    }

}
(3)application.properties文件配置
## 数据库连接

spring.datasource.url=jdbc:mysql://localhost:3306/springbootdb?useUnicode=true&characterEncoding=utf8

spring.datasource.username=root

spring.datasource.password=111111

spring.datasource.driver-class-name=com.mysql.jdbc.Driver

## Mybatis 配置

mybatis.typeAliasesPackage=org.spring.springboot.domain

mybatis.mapperLocations=classpath:mapper/*.xml
(4)pom.xml文件添加依赖配置
<groupId>springboot</groupId>

    <artifactId>springboot-mybatis</artifactId>

    <version>0.0.1-SNAPSHOT</version>

    <name>springboot-mybatis :: 整合 Mybatis Demo</name>

   <!-- <packaging>jar</packaging>-->

    <packaging>war</packaging>

    <!-- Spring Boot 启动父依赖 -->

    <parent>

        <groupId>org.springframework.boot</groupId>

        <artifactId>spring-boot-starter-parent</artifactId>

        <version>1.5.1.RELEASE</version>

    </parent>

    <properties>

        <mybatis-spring-boot>1.2.0</mybatis-spring-boot>

        <mysql-connector>5.1.39</mysql-connector>

    </properties>

    <dependencies>

        <!-- Spring Boot Web 依赖 -->

        <dependency>

            <groupId>org.springframework.boot</groupId>

            <artifactId>spring-boot-starter-web</artifactId>

        </dependency>

        <!-- Spring Boot Test 依赖 -->

        <dependency>

            <groupId>org.springframework.boot</groupId>

            <artifactId>spring-boot-starter-test</artifactId>

            <scope>test</scope>

        </dependency>

        <!-- Spring Boot Mybatis 依赖 -->

        <dependency>

            <groupId>org.mybatis.spring.boot</groupId>

            <artifactId>mybatis-spring-boot-starter</artifactId>

            <version>${mybatis-spring-boot}</version>

        </dependency>

        <!-- MySQL 连接驱动依赖 -->

        <dependency>

            <groupId>mysql</groupId>

            <artifactId>mysql-connector-java</artifactId>

            <version>${mysql-connector}</version>

        </dependency>

        <!--因配置外部TOMCAT 而配置-->

        <dependency>

            <groupId>org.springframework.boot</groupId>

            <artifactId>spring-boot-starter-tomcat</artifactId>

            <scope>provided</scope>

        </dependency>

        <!-- Junit -->

        <dependency>

            <groupId>junit</groupId>

            <artifactId>junit</artifactId>

            <version>4.12</version>

        </dependency>

        <dependency>

            <groupId>io.springfox</groupId>

            <artifactId>springfox-swagger2</artifactId>

            <version>2.6.1</version>

            <scope>compile</scope>

        </dependency>

        <dependency>

            <groupId>io.springfox</groupId>

            <artifactId>springfox-swagger-ui</artifactId>

            <version>2.6.1</version>

            <scope>compile</scope>

        </dependency>

    </dependencies>

    <!-- 打包war增加的build模块 -->

    <build>

    <plugins>

      <plugin>

        <groupId>org.springframework.boot</groupId>

        <artifactId>spring-boot-maven-plugin</artifactId>

        <executions>

          <execution>

            <goals>

              <goal>repackage</goal>

            </goals>

          </execution>

        </executions>

      </plugin>

    </plugins>

</build>
参考文章
https://www.w3cschool.cn/springboot/springboot-fwsi24l6.html
2、spring boot + swagger
这部分主要为项目添加最近比较流行的swagger,就是通过注释,使项目自动生成接口文档
在原来的项目的基础上,主要增加了两部分内容,1,实体类 为每个参数增加“注释”;2,在controller类中添加注释;3,添加依赖;如下图
首先添加swagger依赖,执行maven—>update projrct
<dependency>

    <groupId>io.springfox</groupId>

    <artifactId>springfox-swagger2</artifactId>

    <version>2.6.1</version>

    <scope>compile</scope>

</dependency>

<dependency>

    <groupId>io.springfox</groupId>

    <artifactId>springfox-swagger-ui</artifactId>

    <version>2.6.1</version>

    <scope>compile</scope>

</dependency>
1,实体类添加的内容为红圈处
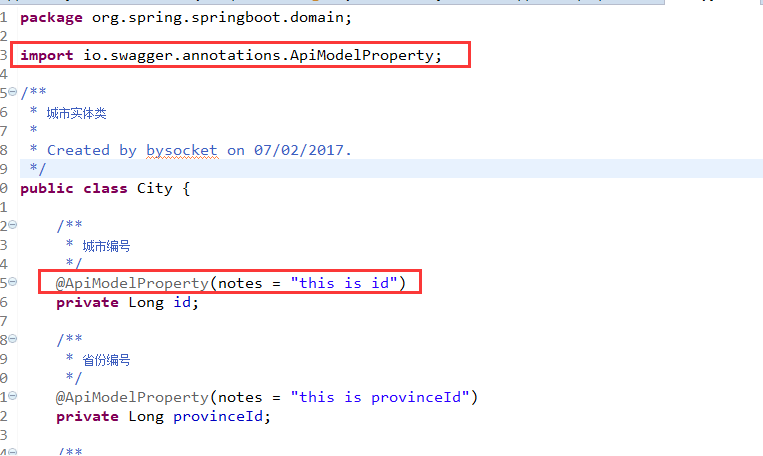
2,参见下面代码粗红体字
package org.spring.springboot.controller;

import static springfox.documentation.builders.PathSelectors.regex;

import io.swagger.annotations.ApiOperation;

import io.swagger.annotations.ApiResponse;

import io.swagger.annotations.ApiResponses;

import java.util.ArrayList;

import java.util.List;

import org.spring.springboot.domain.City;

import org.spring.springboot.service.CityService;

import org.springframework.beans.factory.annotation.Autowired;

import org.springframework.context.annotation.Bean;

import org.springframework.http.MediaType;

import org.springframework.ui.Model;

import org.springframework.web.bind.annotation.RequestBody;

import org.springframework.web.bind.annotation.RequestMapping;

import org.springframework.web.bind.annotation.RequestMethod;

import org.springframework.web.bind.annotation.RequestParam;

import org.springframework.web.bind.annotation.RestController;

import springfox.documentation.builders.RequestHandlerSelectors;

import springfox.documentation.service.ApiInfo;

import springfox.documentation.service.Contact;

import springfox.documentation.spi.DocumentationType;

import springfox.documentation.spring.web.plugins.Docket;

import springfox.documentation.swagger2.annotations.EnableSwagger2;

/**

 * Created by bysocket on 07/02/2017.

 */

@RequestMapping("/api")

@RestController

@EnableSwagger2

public class CityRestController {

    @Autowired

    private CityService cityService;

    @Bean

    public Docket demoApi() {

        return new Docket(DocumentationType.SWAGGER_2).select()

                .apis(RequestHandlerSelectors.basePackage("org.spring.springboot.controller")).paths(regex("/api.*")).build()

                .apiInfo(metaData());

    }

    private ApiInfo metaData() {

        ApiInfo apiInfo = new ApiInfo("Spring Boot REST API Demo by Torre Yang", "Spring Boot REST API for Simple Demo", "1.0",

                "termsOfServiceUrl",

                new Contact("Torre Yang", "https://github.com/Testworm/",

                        "klyweiwei@163.com"),

                "Apache License Version 2.0", "https://www.apache.org/licenses/LICENSE-2.0");

        return apiInfo;

    }


    @RequestMapping(value = "/checkcity", method = RequestMethod.GET, produces = "application/json")

    public List<City> findOneCity(@RequestParam(value = "cityName", required = true) String cityName) {

        return cityService.findCityByName(cityName);

    }

//    @RequestMapping(value = "/api/addcity", method = RequestMethod.POST)

//    public int addCity(@RequestParam(value = "City", required = true) City city) {

//        return cityService.save(city);

//    }


    @ApiOperation(value = "增加城市", response = org.spring.springboot.domain.City.class, responseContainer = "city")

    @ApiResponses(value = { @ApiResponse(code = 200, message = "Successfully retrieved list"),

            @ApiResponse(code = 401, message = "You are not authorized to view the resource"),

            @ApiResponse(code = 403, message = "Accessing the resource you were trying to reach is forbidden"),

            @ApiResponse(code = 404, message = "The resource you were trying to reach is not found") })

    @RequestMapping(value = "/addcity", method = RequestMethod.POST)

    public int addCity(@RequestBody City city) {

        return cityService.save(city);

    }

}
注意:如果是服务器通过java -jar ***.jar,则swagger地址为:http://192.168.5.129:8080/swagger-ui.html#/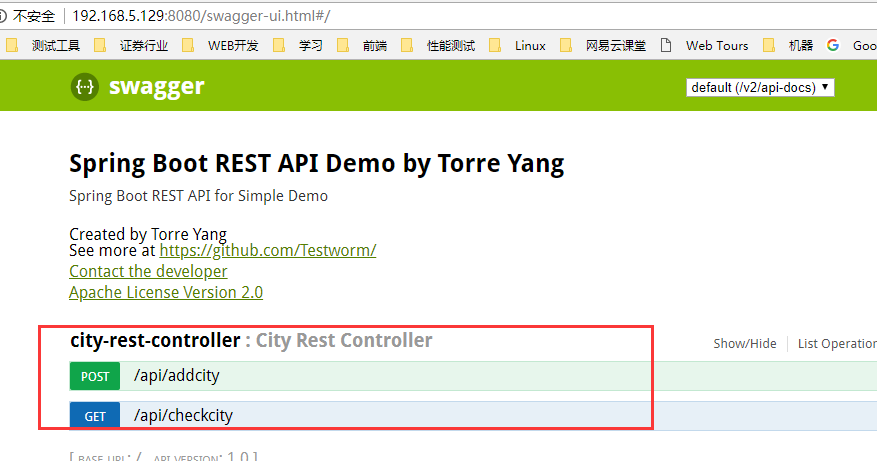
如果是发布到tomcat,则需要添加webapps下面的项目文件名到端口后面,即标红处
http://192.168.5.129:8080/springboot/swagger-ui.html#/
参考文档:
https://www.jianshu.com/p/edaeb90c500c
3、springboot项目简单部署到服务器
项目的发布,可以有两种方式;1,war包放置tomcat下发布 2,打包成jar包发布至服务器
1、打包生成war包方法
(1)配置pom.xml文件,主要是增加配置;
<packaging>war</packaging>
 <!--因配置外部TOMCAT 而配置-->

<dependency>

            <groupId>org.springframework.boot</groupId>

            <artifactId>spring-boot-starter-tomcat</artifactId>

            <scope>provided</scope>

        </dependency>
(2)重新build方法
package org.spring.springboot;

import org.mybatis.spring.annotation.MapperScan;

import org.spring.springboot.dao.CityDao;

import org.spring.springboot.domain.City;

import org.springframework.boot.CommandLineRunner;

import org.springframework.boot.SpringApplication;

import org.springframework.boot.autoconfigure.SpringBootApplication;

import org.springframework.boot.builder.SpringApplicationBuilder;

import org.springframework.boot.web.support.SpringBootServletInitializer;

/**

 * Spring Boot 应用启动类

 */

// Spring Boot 应用的标识

@SpringBootApplication

// mapper 接口类扫描包配置

@MapperScan("org.spring.springboot.dao")

public class Application extends SpringBootServletInitializer{

    @Override

    protected SpringApplicationBuilder configure(SpringApplicationBuilder builder) {

        return builder.sources(Application.class);

    }

    public static void main(String[] args) {

        // 程序启动入口

        // 启动嵌入式的 Tomcat 并初始化 Spring 环境及其各 Spring 组件

        SpringApplication.run(Application.class,args);

    }

}
2、打包生产jar包;有两种方法
方法1,通过run as —>maven clean & maven install
第一次打包遇到一个问题;
启动SpringBoot的可执行jar 报错:target\spring-boot-hello-1.0-SNAPSHOT.jar中没有主清单属性
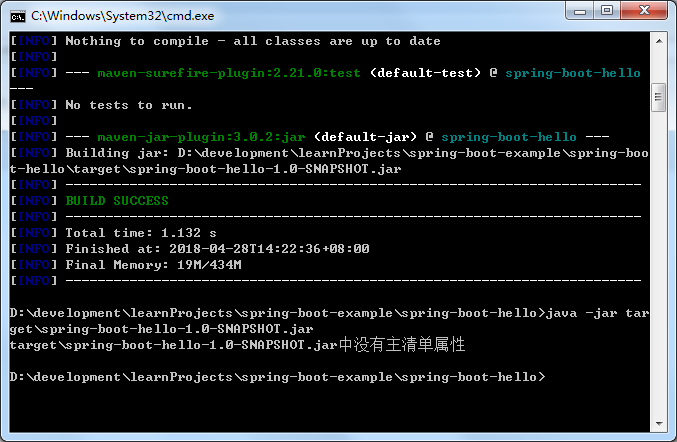
增加标红处依赖

<build>
  <finalName>包名</finalName>  <!-- 定义包名>

    <plugins>

      <plugin>

        <groupId>org.springframework.boot</groupId>

        <artifactId>spring-boot-maven-plugin</artifactId>

        <executions>

          <execution>

            <goals>

              <goal>repackage</goal>

            </goals>

          </execution>

        </executions>

      </plugin>

    </plugins>

</build>
<!-- 下面这个部分是非常重要的>
<repositories>

        <repository>

            <id>spring-milestone</id>

            <url>http://repo.spring.io/libs-release</url>

        </repository>

</repositories>
原因可能是因为:
查看了MANIFEST.MF,发现没有Main-Class属性,我想了一下,就试着去SpringBoot的官方文档上找找,果然有讲这一部分,spring-boot-maven-plugin的打包过程与直接使用maven-jar-plugin不同,所以我们在使用spring-boot-maven-plugin时需要指定的执行项,或者我们在打包时指定,使用 mvn package spring-boot:repackage来打包也可以执行。
方法2,通过run as —>maven build.. 打包
第一步:使用debug configurations 配置的方式打包
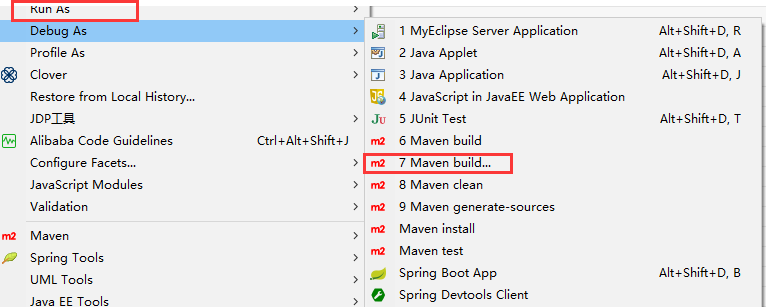
第二步:显示出debug configuratons 的页面,
1选中Maven Bulid 下面的项目;
2 Goals选项中输入package
3 点击Debug按钮。
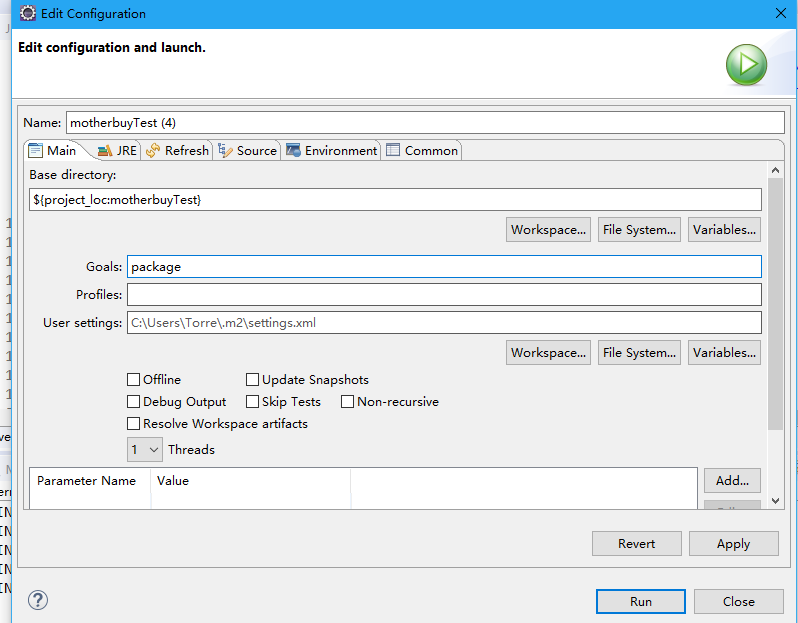
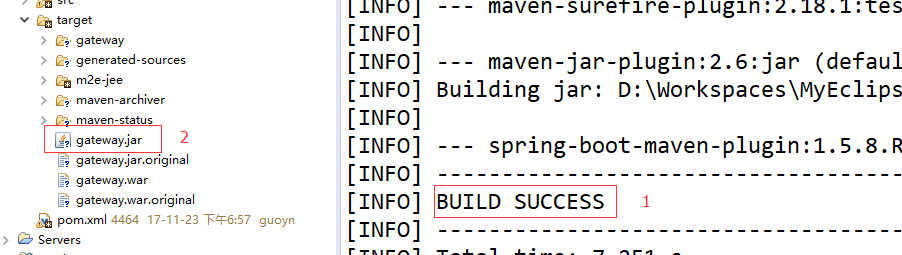
第三步:控制台输出了 1处的信息:BUILD SUCCESS
2项目的target文件夹下处理了 gateway.jar说明jar包打包完毕。
第四步测试jar包是否可用
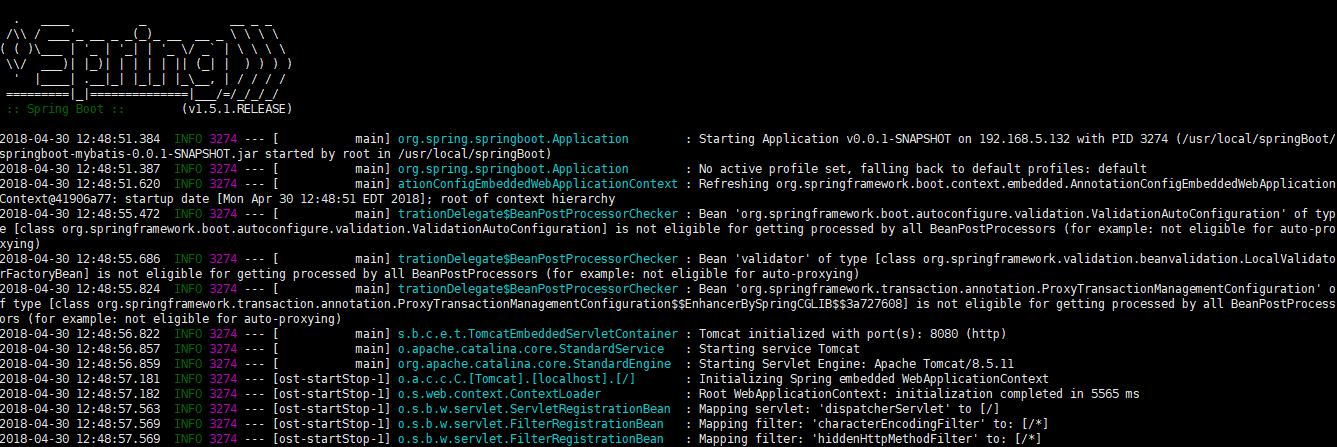
使用命令窗体,切入到jar存在的目录;执行java –jar ***.jar
第五步查看启动结果

参考文献:
https://blog.csdn.net/qq_35893120/article/details/79898595
https://www.cnblogs.com/lfalex0831/p/8967428.html
https://blog.csdn.net/zhoucheng05_13/article/details/77915294
Spring Boot项目简单上手+swagger配置+项目发布(可能是史上最详细的)的更多相关文章
- Spring Boot学习笔记---Spring Boot 基础及使用idea搭建项目
最近一段时间一直在学习Spring Boot,刚进的一家公司也正好有用到这个技术.虽然一直在学习,但是还没有好好的总结,今天周末先简单总结一下基础知识,等有时间再慢慢学习总结吧. Spring Boo ...
- Spring Boot学习笔记——Spring Boot与MyBatis的集成(项目示例)
1.准备数据库环境 # 创建数据库 CREATE DATABASE IF NOT EXISTS zifeiydb DEFAULT CHARSET utf8 COLLATE utf8_general_c ...
- Vue+Spring Boot 前后端分离的商城项目开源啦!
新蜂商城 Vue 移动端版本开源啦! 去年开源新蜂商城项目后,就一直在计划这个项目 Vue 版本的改造,2020 年开始开发并且自己私下一直在测试,之前也有文章介绍过测试过程和存在的问题,修改完成后, ...
- 《Asp.Net Core3 + Vue3入坑教程》-Net Core项目搭建与Swagger配置步骤
简介 <Asp.Net Core3 + Vue3入坑教程> 此教程仅适合新手入门或者前后端分离尝试者.可以根据图文一步一步进操作编码也可以选择直接查看源码.每一篇文章都有对应的源码 教程后 ...
- Spring Boot实践——基础和常用配置
借鉴:https://blog.csdn.net/j903829182/article/details/74906948 一.Spring Boot 启动注解说明 @SpringBootApplica ...
- Spring boot运行原理-自定义自动配置类
在前面SpringBoot的文章中介绍了SpringBoot的基本配置,今天我们将给大家讲一讲SpringBoot的运行原理,然后根据原理我们自定义一个starter pom. 本章对于后续继续学习S ...
- Spring Boot源码探索——自动配置的内部实现
前面写了两篇文章 <Spring Boot自动配置的魔法是怎么实现的>和 <Spring Boot起步依赖:定制starter>,分别分析了Spring Boot的自动配置和起 ...
- Spring Boot Mybatis简单使用
Spring Boot Mybatis简单使用 步骤说明 build.gradle:依赖添加 application.properties:配置添加 代码编写 测试 build.gradle:依赖添加 ...
- 自定义的Spring Boot starter如何设置自动配置注解
本文首发于个人网站: 在Spring Boot实战之定制自己的starter一文最后提到,触发Spring Boot的配置过程有两种方法: spring.factories:由Spring Boot触 ...
随机推荐
- FortiGate密码恢复
1.需求 1.若设备的密码忘记,需要用配置线进行密码恢复: 2.密码恢复需要重启设备,并在设备的底层菜单界面上操作,会造成网络中断,请在方便断网时操作: 3.密码恢复后配置不会改变. 2.操作步骤 1 ...
- 【centos】centos安装g++
gcc在Centos下的安装:使用的是以下语句:yum install gcc 以为安装g++,类似的应该使用:yum install g++ 可是提示:command is not found 查询 ...
- 【nlp】中文分词基础原则及正向最大匹配法、逆向最大匹配法、双向最大匹配法的分析
分词算法设计中的几个基本原则: 1.颗粒度越大越好:用于进行语义分析的文本分词,要求分词结果的颗粒度越大,即单词的字数越多,所能表示的含义越确切,如:“公安局长”可以分为“公安 局长”.“公安局 长” ...
- 使用mybatis-generator-core工具自动生成mybatis实体
我们可以使用mybatis-generator-core这个工具将数据库对象转换成mybatis对象,具体步骤如下. 1.mybatis-generator-core下载 下载地址:http://do ...
- LAB3 整数相加
//yuec2 Yue Cheng package lab3; public class Fraction { int numerator; int denominator; //obeject wi ...
- sqlserver DBA面试题
1.sqlserver 2008 R2 on windows server 2008 R2群集中,有节点A.B,现在需要停机新添加一个节点C进来替换现有节点B,请列出必要的步骤. 2.sqlserve ...
- 26- java的String 转json
https://www.cnblogs.com/nihaorz/p/5885307.html Gjson 下载:https://download.csdn.net/download/qq_394515 ...
- bug定位
*:first-child { margin-top: 0 !important; } body>*:last-child { margin-bottom: 0 !important; } /* ...
- python 数据类型 之 集合
集合是一个数学概念:由一个或多个确定的元素所构成的整体叫做集合 集合的三个特性: 1.确定性 (element必须可hash,不可变类型是可hash的) 2.互异性(集合中element 不能重复) ...
- hdu 1257 && hdu 1789(简单DP或贪心)
第一题;http://acm.hdu.edu.cn/showproblem.php?pid=1257 贪心与dp傻傻分不清楚,把每一个系统的最小值存起来比较 #include<cstdio> ...