
springboot用于web开发
1.使用SpringBoot;
1)创建SpringBoot应用,选中我们需要的模块;
2)SpringBoot已经默认将这些场景配置好了,只需要在配置文件中指定少量配置就可以运行起来
3)自己编写业务代码;
自动配置原理?
xxxxAutoConfiguration:帮我们给容器中自动配置组件;
xxxxProperties:配置类来封装配置文件的内容;
2.SpringBoot对静态资源的映射规则
2.1"/**" 访问当前项目的任何资源,都去(静态资源的文件夹)找映射
"classpath:/META‐INF/resources/",

"classpath:/resources/",

"classpath:/static/",

"classpath:/public/"

"/":当前项目的根路径

(classpath指的是java或者resources目录下)
2.2欢迎页; 静态资源文件夹下的所有index.html页面;被"/**"映射
localhost:8080/ 找index页面
2.3所有的 **/favicon.ico 都是在静态资源文件下找
3.模板引擎
JSP、Velocity、Freemarker、Thymeleaf
SpringBoot推荐的Thymeleaf;
语法更简单,功能更强大;
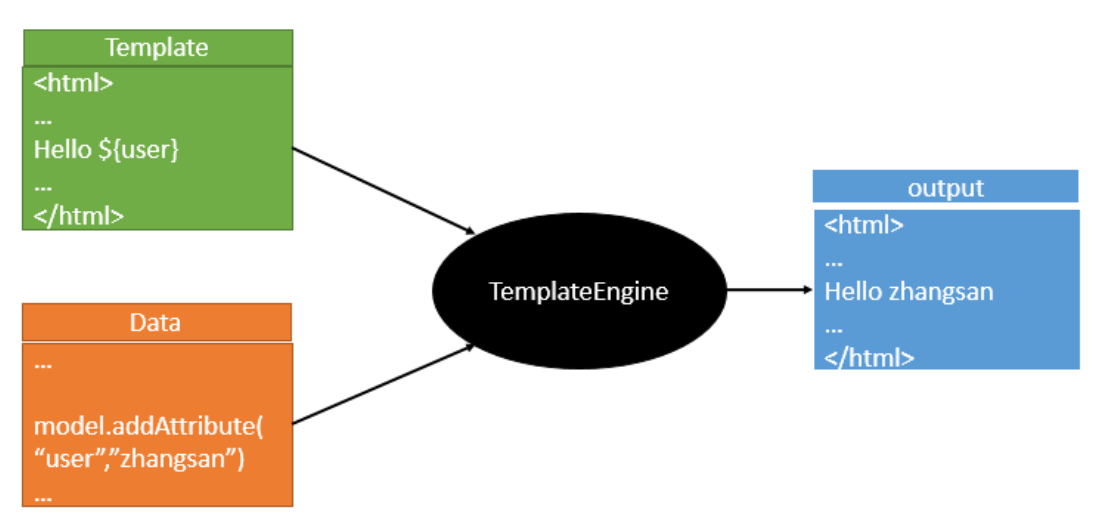
3.1pom文件中引入thymeleaf:
<!--切换thymeleaf版本-->

<properties>

    <thymeleaf.version>3.0.9.RELEASE</thymeleaf.version>

    <!‐‐ 布局功能的支持程序 thymeleaf3主程序 layout2以上版本 ‐‐>

    <!‐‐ thymeleaf2 layout1‐‐>

    <thymeleaf‐layout‐dialect.version>2.2.2</thymeleaf‐layout‐dialect.version>

</properties>

<dependency>

    <groupId>org.springframework.boot</groupId>

    <artifactId>spring‐boot‐starter‐thymeleaf</artifactId

</dependency>
3.2Thymeleaf使用
(只要我们把HTML页面放在classpath:/templates/,thymeleaf就能自动渲染)
@ConfigurationProperties(prefix = "spring.thymeleaf")

public class ThymeleafProperties {

    private static final Charset DEFAULT_ENCODING = Charset.forName("UTF‐8");

    private static final MimeType DEFAULT_CONTENT_TYPE = MimeType.valueOf("text/html");

    public static final String DEFAULT_PREFIX = "classpath:/templates/";

    public static final String DEFAULT_SUFFIX = ".html";

}
3.3举例
package com.zy.controller;

import org.springframework.stereotype.Controller;

import org.springframework.web.bind.annotation.RequestMapping;

import org.springframework.web.bind.annotation.ResponseBody;

import java.util.Map;

@Controller

public class Hello {

    // 1.测试hello world

    @RequestMapping("/hello")

    @ResponseBody

    public String hello(){

        return "hello";

    }

    // 2.测试thymeleaf

    @RequestMapping("/success")

    public String success(Map<String, String> map) {

        map.put("one","good");

        return "success";

    }

}
<!DOCTYPE html>
<!--导入thymeleaf的名称空间-->

<html lang="en" xmlns="http://www.thymeleaf.org">

<head>

    <meta charset="UTF-8">

    <title>Title</title>

</head>

<body>

    <a href="www.baidu.com">百度一下</a>

    <!-- thymeleaf动态取值 -->

    <div th:text="${one}"></div>

</body>

</html>
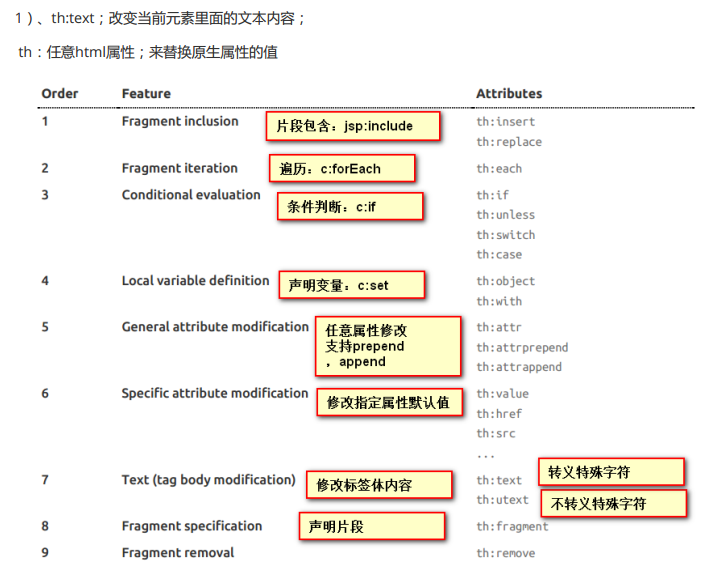
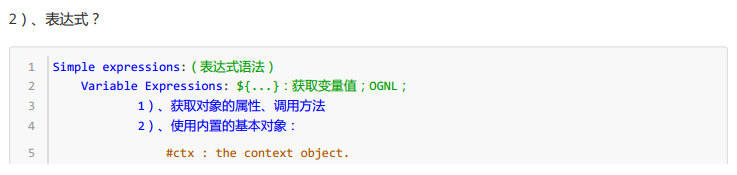
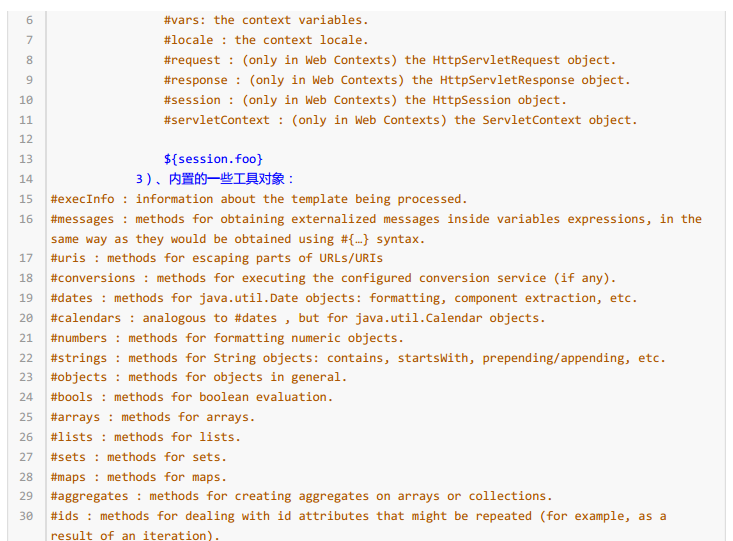
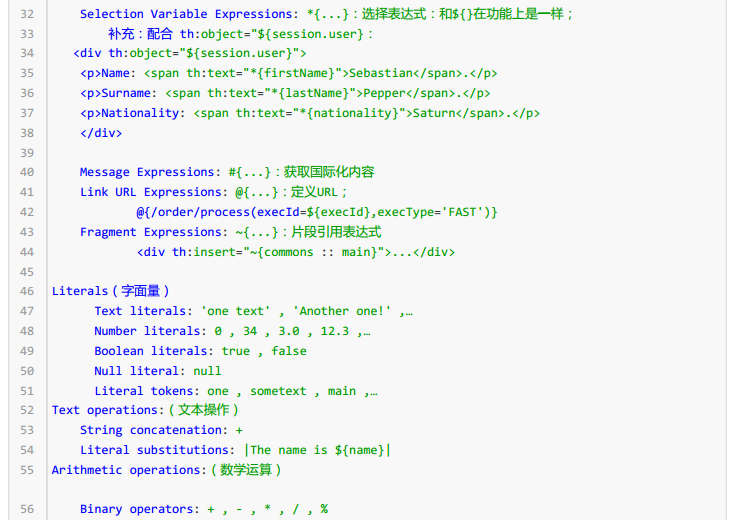
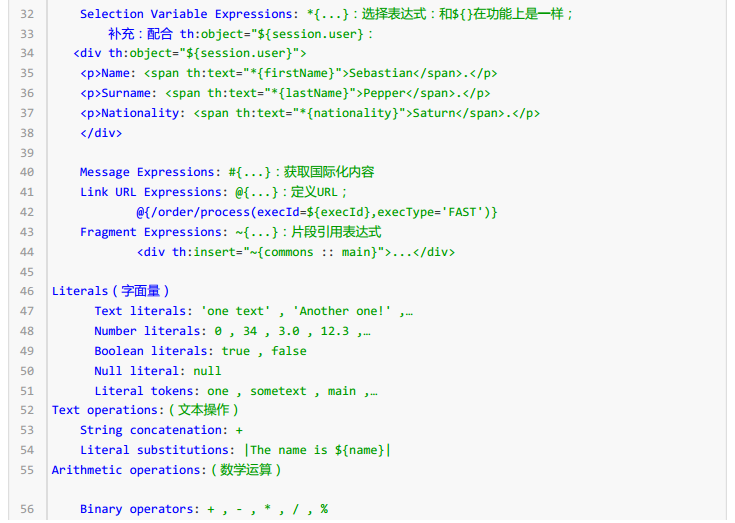
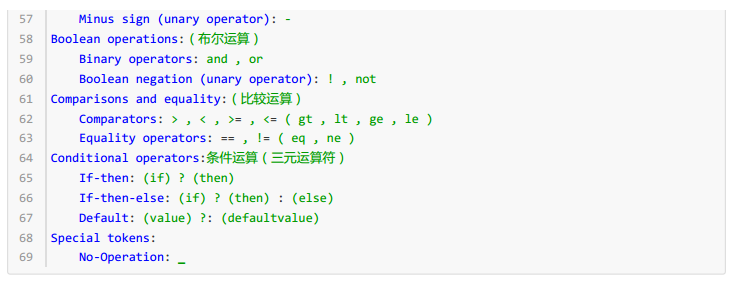
4.thymeleaf语法规则
5.扩展SpringMVC
编写一个配置类(@Configuration),是WebMvcConfigurerAdapter类型;不能标注@EnableWebMvc;
既保留了所有的自动配置,也能用我们扩展的配置;
//使用WebMvcConfigurerAdapter可以来扩展SpringMVC的功能

@Configuration

public class MyMvcConfig extends WebMvcConfigurerAdapter {

    @Override

    public void addViewControllers(ViewControllerRegistry registry) {

        // super.addViewControllers(registry);

        //浏览器发送 /atguigu 请求来到 success

        registry.addViewController("/atguigu").setViewName("success");

    }

}
原理:
1)、WebMvcAutoConfiguration是SpringMVC的自动配置类
2)、在做其他自动配置时会导入;@Import(EnableWebMvcConfiguration.class)
3)、容器中所有的WebMvcConfigurer都会一起起作用;
4)、我们的配置类也会被调用;
效果:SpringMVC的自动配置和我们的扩展配置都会起作用;
6.全面接管SpringMVC;
SpringBoot对SpringMVC的自动配置不需要了,所有都是我们自己配置;所有的SpringMVC的自动配置都失效了
我们需要在配置类中添加@EnableWebMvc即可;
//不使用springboot对springMVC的自动配置

@EnableWebMvc

@Configuration

public class MyMvcConfig extends WebMvcConfigurerAdapter {

    @Override

    public void addViewControllers(ViewControllerRegistry registry) {

        // super.addViewControllers(registry);

        //浏览器发送 /atguigu 请求来到 success

        registry.addViewController("/atguigu").setViewName("success");

    }

}
7.如何修改SpringBoot的默认配置
模式:
1)、SpringBoot在自动配置很多组件的时候,先看容器中有没有用户自己配置的(@Bean、@Component)如
果有就用用户配置的,如果没有,才自动配置;如果有些组件可以有多个(ViewResolver)将用户配置的和自己默
认的组合起来;
2)、在SpringBoot中会有非常多的xxxConfigurer帮助我们进行扩展配置
3)、在SpringBoot中会有很多的xxxCustomizer帮助我们进行定制配置
8.配置嵌入式Servlet容器
SpringBoot默认使用Tomcat作为嵌入式的Servlet容器
8.1修改配置文件application.yaml
server:

  tomcat:

    uri-encoding: utf-8

  port: 8081
8.2编写一个EmbeddedServletContainerCustomizer:嵌入式的Servlet容器的定制器;来修改Servlet容器的配置
@Bean //一定要将这个定制器加入到容器中

public EmbeddedServletContainerCustomizer embeddedServletContainerCustomizer(){

    return new EmbeddedServletContainerCustomizer() {

        //定制嵌入式的Servlet容器相关的规则

        @Override

        public void customize(ConfigurableEmbeddedServletContainer container) {

            container.setPort(8083);

        }

    };

}
9.springboot中注册Servlet三大组件【Servlet、Filter、Listener】
package com.atguigu.springboot.servlet;

/**
* 定义servlet
*
*/

import javax.servlet.ServletException;

import javax.servlet.http.HttpServlet;

import javax.servlet.http.HttpServletRequest;

import javax.servlet.http.HttpServletResponse;

import java.io.IOException;

public class MyServlet extends HttpServlet {

    //处理get请求

    @Override

    protected void doGet(HttpServletRequest req, HttpServletResponse resp) throws ServletException, IOException {

        doPost(req,resp);

    }

    @Override

    protected void doPost(HttpServletRequest req, HttpServletResponse resp) throws ServletException, IOException {

        resp.getWriter().write("Hello MyServlet");

    }

}
package com.atguigu.springboot.filter;

/**
* 定义filter
*
*/

import javax.servlet.*;

import java.io.IOException;

public class MyFilter implements Filter {

    @Override

    public void init(FilterConfig filterConfig) throws ServletException {

    }

    @Override

    public void doFilter(ServletRequest request, ServletResponse response, FilterChain chain) throws IOException, ServletException {

        System.out.println("MyFilter process...");

        chain.doFilter(request,response);

    }

    @Override

    public void destroy() {

    }

}
package com.atguigu.springboot.listener;

/**
* 定义listener
*
*/

import javax.servlet.ServletContextEvent;

import javax.servlet.ServletContextListener;

public class MyListener implements ServletContextListener {

    @Override

    public void contextInitialized(ServletContextEvent sce) {

        System.out.println("contextInitialized...web应用启动");

    }

    @Override

    public void contextDestroyed(ServletContextEvent sce) {

        System.out.println("contextDestroyed...当前web项目销毁");

    }

}
package com.atguigu.springboot.config;

/**
* 注册servlet,filter,listener
*
*/

import com.atguigu.springboot.filter.MyFilter;

import com.atguigu.springboot.listener.MyListener;

import com.atguigu.springboot.servlet.MyServlet;

import org.springframework.boot.context.embedded.ConfigurableEmbeddedServletContainer;

import org.springframework.boot.context.embedded.EmbeddedServletContainerCustomizer;

import org.springframework.boot.web.servlet.FilterRegistrationBean;

import org.springframework.boot.web.servlet.ServletListenerRegistrationBean;

import org.springframework.boot.web.servlet.ServletRegistrationBean;

import org.springframework.context.annotation.Bean;

import org.springframework.context.annotation.Configuration;

import java.util.Arrays;

@Configuration

public class MyServerConfig {

    //注册三大组件

    @Bean

    public ServletRegistrationBean myServlet(){

        ServletRegistrationBean registrationBean = new ServletRegistrationBean(new MyServlet(),"/myServlet");

        registrationBean.setLoadOnStartup(1);

        return registrationBean;

    }

    @Bean

    public FilterRegistrationBean myFilter(){

        FilterRegistrationBean registrationBean = new FilterRegistrationBean();

        registrationBean.setFilter(new MyFilter());

        registrationBean.setUrlPatterns(Arrays.asList("/hello","/myServlet"));

        return registrationBean;

    }

    @Bean

    public ServletListenerRegistrationBean myListener(){

        ServletListenerRegistrationBean<MyListener> registrationBean = new ServletListenerRegistrationBean<>(new MyListener());

        return registrationBean;

    }

    //配置嵌入式的Servlet容器

    @Bean

    public EmbeddedServletContainerCustomizer embeddedServletContainerCustomizer(){

        return new EmbeddedServletContainerCustomizer() {

            //定制嵌入式的Servlet容器相关的规则

            @Override

            public void customize(ConfigurableEmbeddedServletContainer container) {

                container.setPort(8083);

            }

        };

    }

}
10.springboot中引入其他web容器,jetty,或者undertow
10.1默认使用tomcat容器的pom配置
<dependency>

    <groupId>org.springframework.boot</groupId>

    <artifactId>spring‐boot‐starter‐web</artifactId>

    <!--引入web模块默认就是使用嵌入式的Tomcat作为Servlet容器-->

</dependency>
10.2使用jetty容器的pom配置(用于需要长时间连接的场景,如聊天)
<!‐‐ 引入web模块 ‐‐>

<dependency>

    <groupId>org.springframework.boot</groupId>

    <artifactId>spring‐boot‐starter‐web</artifactId>

    <exclusions>

        <exclusion>

            <artifactId>spring‐boot‐starter‐tomcat</artifactId>

            <groupId>org.springframework.boot</groupId>

        </exclusion>

    </exclusions>

</dependency>

<!‐‐引入jetty容器‐‐>

<dependency>

    <artifactId>spring‐boot‐starter‐jetty</artifactId>

    <groupId>org.springframework.boot</groupId>

</dependency>
10.3使用Undertow容器的pom配置
<!‐‐ 引入web模块 ‐‐>

<dependency>

    <groupId>org.springframework.boot</groupId>

    <artifactId>spring‐boot‐starter‐web</artifactId>

    <exclusions>

        <exclusion>

            <artifactId>spring‐boot‐starter‐tomcat</artifactId>

            <groupId>org.springframework.boot</groupId>

        </exclusion>

    </exclusions>

</dependency>

<!‐‐引入Undertow容器‐‐>

<dependency>

    <artifactId>spring‐boot‐starter‐undertow</artifactId>

    <groupId>org.springframework.boot</groupId>

</dependency>
springboot用于web开发的更多相关文章
- 10个用于Web开发的最好 Python 框架
Python 是一门动态.面向对象语言.其最初就是作为一门面向对象语言设计的,并且在后期又加入了一些更高级的特性.除了语言本身的设计目的之外,Python标准 库也是值得大家称赞的,Python甚至还 ...
- SpringBoot学习(七)-->SpringBoot在web开发中的配置
SpringBoot在web开发中的配置 Web开发的自动配置类:在Maven Dependencies-->spring-boot-1.5.2.RELEASE.jar-->org.spr ...
- SpringBoot:Web开发
西部开源-秦疆老师:基于SpringBoot 2.1.6 的博客教程 , 基于atguigu 1.5.x 视频优化 秦老师交流Q群号: 664386224 未授权禁止转载!编辑不易 , 转发请注明出处 ...
- SpringBoot之WEB开发-专题二
SpringBoot之WEB开发-专题二 三.Web开发 3.1.静态资源访问 在我们开发Web应用的时候,需要引用大量的js.css.图片等静态资源. 默认配置 Spring Boot默认提供静态资 ...
- springboot java web开发工程师效率
基础好工具 idea iterm2 和 oh-my-zsh git 热加载 java web项目每次重启时间成本太大. 编程有一个过程很重要, 就是试验, 在一次次试验中探索, 积累素材优化调整程序模 ...
- SpringBoot(四) Web开发 --- Thymeleaf、JSP
Spring Boot提供了spring-boot-starter-web为Web开发予以支持,spring-boot-starter-web为我们提供了嵌入的Tomcat以及Spring MVC的依 ...
- SpringBoot(四) -- SpringBoot与Web开发
一.发开前准备 1.创建一个SpringBoot应用,引入我们需要的模块 2.SpringBoot已经默认将这些场景配置好了,只需要在配置文件中指定少量配置,就能运行起来 3.编写业务代码 二.静态资 ...
- SpringBoot与Web开发
web开发1).创建SpringBoot应用,选中我们需要的模块:2).SpringBoot已经默认将这些场景已经配置好了,只需要在配置文件中指定少量配置就可以运行起来3).自己编写业务代码: 自动配 ...
- SpringBoot日记——Web开发篇
准备开始实战啦!~~~~ 我们先来看,SpringBoot的web是如何做web开发的呢?通常的步骤如下: 1.创建springboot应用,指定模块: 2.配置部分参数配置: 3.编写业务代码: 为 ...
随机推荐
- 基于Oracle的EntityFramework的WEBAPI2的实现(四)——自动生成在线帮助文档
打开我们项目中的Area文件夹,正常情况下,我们会发现已经有了一个名字叫做[HelpPage]的区域(Area),这个区域是vs帮助我们自动建立的,它是一个mvc(不是webapi),它有普通的Con ...
- docker怎么破?
为什么要装docker? 因为linux服务器不好用,很多操作不好进行,比如安装包没有管理员权限 docker可以访问本地显卡,比一般的virtual box 或者VMware都要好 怎么装docke ...
- 揭晓UX(用户体验)最大的秘密
我是佩恩和特勒的粉丝已经多年了.我第一次在现实中看到他们是在上个月,被他们的表演完全迷住了. 我真的很喜欢佩恩和特勒,他们经常“回拉窗帘”,并揭示他们是怎么完成他们的魔法.其他魔术师营造神秘主义和虚假 ...
- (转)winform安装项目、安装包的制作、部署
本文转载自:http://zhan.renren.com/cxymst?gid=3602888498037535727&from=post&checked=true 1,解决方案—添加 ...
- 建立SIP通话
建立SIP: 点击下的出现的页面: 选择submit,只用填写用户名和密码就OK了,secret是密码,填写完以后记得应用 创建完毕以后,使用xlite去连接:xlite的配置:域名是asterisk ...
- 【BZOJ】1218: [HNOI2003]激光炸弹(前缀和)
题目 题目描述 输入输出格式 输入格式: 输入文件名为input.txt 输入文件的第一行为正整数n和正整数R,接下来的n行每行有3个正整数,分别表示 xi,yi ,vi . 输出格式: 输出文件名为 ...
- PHP中使用mkdir创建多级目录的方法
function mkdirs($dir) { if(!is_dir($dir)) { if(!mkdirs(dirname($dir))){ return false; ...
- python学习笔记(十二):发送邮件
我们在开发程序的时候,有时候需要开发一些自动化的任务,执行完之后,将结果自动的发送一份邮件,python发送邮件使用smtplib模块,是一个标准包,直接import导入使用即可,代码如下: impo ...
- Julia - 循环
while 循环 当 while 后的条件成立的话,执行循环体内的语句,直到条件不成立,跳出循环 如果条件一直成立,或者循环体中的语句没有能让条件不成立的,则是死循环 julia> i = 1; ...
- python学习——练习题(10)
""" 题目:暂停一秒输出,并格式化当前时间. """ import sys import time def answer1(): &quo ...