
【OpenCV】SIFT原理与源码分析:关键点搜索与定位
《SIFT原理与源码分析》系列文章索引:http://www.cnblogs.com/tianyalu/p/5467813.html
由前一步《DoG尺度空间构造》,我们得到了DoG高斯差分金字塔:
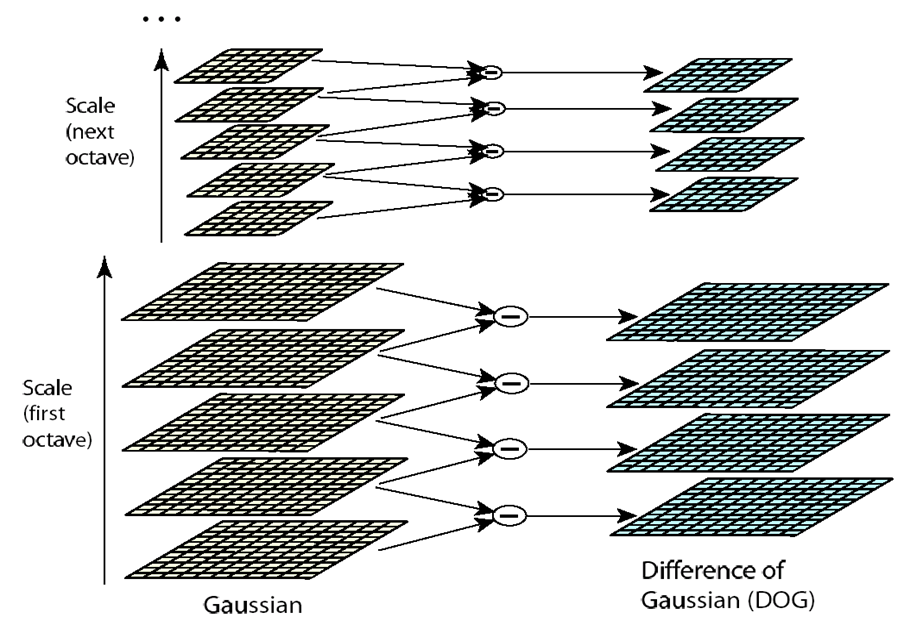
如上图的金字塔,高斯尺度空间金字塔中每组有五层不同尺度图像,相邻两层相减得到四层DoG结果。关键点搜索就在这四层DoG图像上寻找局部极值点。
DoG局部极值点
寻找DoG极值点时,每一个像素点和它所有的相邻点比较,当其大于(或小于)它的图像域和尺度域的所有相邻点时,即为极值点。如下图所示,比较的范围是个3×3的立方体:中间的检测点和它同尺度的8个相邻点,以及和上下相邻尺度对应的9×2个点——共26个点比较,以确保在尺度空间和二维图像空间都检测到极值点。
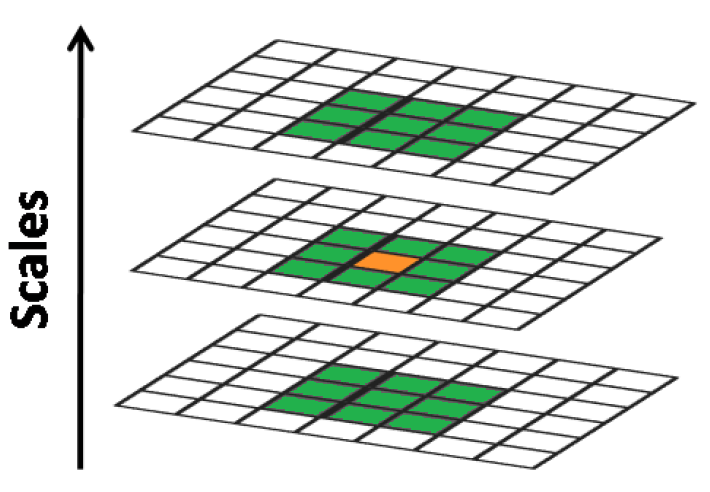
在一组中,搜索从每组的第二层开始,以第二层为当前层,第一层和第三层分别作为立方体的的上下层;搜索完成后再以第三层为当前层做同样的搜索。所以每层的点搜索两次。通常我们将组Octaves索引以-1开始,则在比较时牺牲了-1组的第0层和第N组的最高层
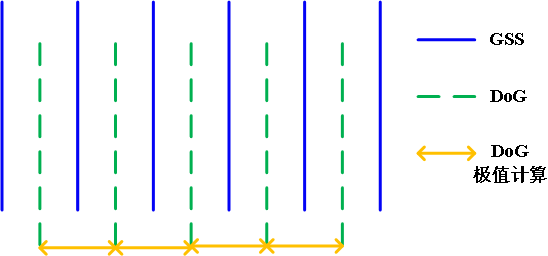
高斯金字塔,DoG图像及极值计算的相互关系如上图所示。
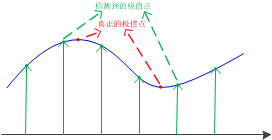
关键点精确定位


// Detects features at extrema in DoG scale space.  Bad features are discarded

// based on contrast and ratio of principal curvatures.

// 在DoG尺度空间寻特征点(极值点)

void SIFT::findScaleSpaceExtrema( const vector<Mat>& gauss_pyr, const vector<Mat>& dog_pyr,

                                  vector<KeyPoint>& keypoints ) const

{

    int nOctaves = (int)gauss_pyr.size()/(nOctaveLayers + );

    // The contrast threshold used to filter out weak features in semi-uniform

    // (low-contrast) regions. The larger the threshold, the less features are produced by the detector.

    // 过滤掉弱特征的阈值 contrastThreshold默认为0.04

    int threshold = cvFloor(0.5 * contrastThreshold / nOctaveLayers *  * SIFT_FIXPT_SCALE);

    const int n = SIFT_ORI_HIST_BINS; //

    float hist[n];

    KeyPoint kpt;

    keypoints.clear();

    for( int o = ; o < nOctaves; o++ )

        for( int i = ; i <= nOctaveLayers; i++ )

        {

            int idx = o*(nOctaveLayers+)+i;

            const Mat& img = dog_pyr[idx];

            const Mat& prev = dog_pyr[idx-];

            const Mat& next = dog_pyr[idx+];

            int step = (int)img.step1();

            int rows = img.rows, cols = img.cols;

            for( int r = SIFT_IMG_BORDER; r < rows-SIFT_IMG_BORDER; r++)

            {

                const short* currptr = img.ptr<short>(r);

                const short* prevptr = prev.ptr<short>(r);

                const short* nextptr = next.ptr<short>(r);

                for( int c = SIFT_IMG_BORDER; c < cols-SIFT_IMG_BORDER; c++)

                {

                    int val = currptr[c];

                    // find local extrema with pixel accuracy

                    // 寻找局部极值点,DoG中每个点与其所在的立方体周围的26个点比较

                    // if (val比所有都大 或者 val比所有都小)

                    if( std::abs(val) > threshold &&

                       ((val >  && val >= currptr[c-] && val >= currptr[c+] &&

                         val >= currptr[c-step-] && val >= currptr[c-step] &&

                         val >= currptr[c-step+] && val >= currptr[c+step-] &&

                         val >= currptr[c+step] && val >= currptr[c+step+] &&

                         val >= nextptr[c] && val >= nextptr[c-] &&

                         val >= nextptr[c+] && val >= nextptr[c-step-] &&

                         val >= nextptr[c-step] && val >= nextptr[c-step+] &&

                         val >= nextptr[c+step-] && val >= nextptr[c+step] &&

                         val >= nextptr[c+step+] && val >= prevptr[c] &&

                         val >= prevptr[c-] && val >= prevptr[c+] &&

                         val >= prevptr[c-step-] && val >= prevptr[c-step] &&

                         val >= prevptr[c-step+] && val >= prevptr[c+step-] &&

                         val >= prevptr[c+step] && val >= prevptr[c+step+]) ||

                        (val <  && val <= currptr[c-] && val <= currptr[c+] &&

                         val <= currptr[c-step-] && val <= currptr[c-step] &&

                         val <= currptr[c-step+] && val <= currptr[c+step-] &&

                         val <= currptr[c+step] && val <= currptr[c+step+] &&

                         val <= nextptr[c] && val <= nextptr[c-] &&

                         val <= nextptr[c+] && val <= nextptr[c-step-] &&

                         val <= nextptr[c-step] && val <= nextptr[c-step+] &&

                         val <= nextptr[c+step-] && val <= nextptr[c+step] &&

                         val <= nextptr[c+step+] && val <= prevptr[c] &&

                         val <= prevptr[c-] && val <= prevptr[c+] &&

                         val <= prevptr[c-step-] && val <= prevptr[c-step] &&

                         val <= prevptr[c-step+] && val <= prevptr[c+step-] &&

                         val <= prevptr[c+step] && val <= prevptr[c+step+])))

                    {

                        int r1 = r, c1 = c, layer = i;

                        // 关键点精确定位

                        if( !adjustLocalExtrema(dog_pyr, kpt, o, layer, r1, c1,

                                                nOctaveLayers, (float)contrastThreshold,

                                                (float)edgeThreshold, (float)sigma) )

                            continue;

                        float scl_octv = kpt.size*0.5f/( << o);

                        // 计算梯度直方图

                        float omax = calcOrientationHist(

                            gauss_pyr[o*(nOctaveLayers+) + layer],

                            Point(c1, r1),

                            cvRound(SIFT_ORI_RADIUS * scl_octv),

                            SIFT_ORI_SIG_FCTR * scl_octv,

                            hist, n);

                        float mag_thr = (float)(omax * SIFT_ORI_PEAK_RATIO);

                        for( int j = ; j < n; j++ )

                        {

                            int l = j >  ? j -  : n - ;

                            int r2 = j < n- ? j +  : ;

                            if( hist[j] > hist[l]  &&  hist[j] > hist[r2]  &&  hist[j] >= mag_thr )

                            {

                                float bin = j + 0.5f * (hist[l]-hist[r2]) /

                                (hist[l] - *hist[j] + hist[r2]);

                                bin = bin <  ? n + bin : bin >= n ? bin - n : bin;

                                kpt.angle = (float)((.f/n) * bin);

                                keypoints.push_back(kpt);

                            }

                        }

                    }

                }

            }

        }

}
删除边缘效应
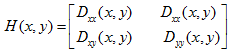
 为最大特征值,
 为最小特征值,那么: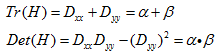
 表示最大特征值与最小特征值的比值,则有: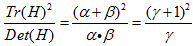
 也会增加。我们只需要去掉比率大于一定值的特征点。Lowe论文中去掉r=10的点。
// Interpolates a scale-space extremum's location and scale to subpixel
// accuracy to form an image feature. Rejects features with low contrast.
// Based on Section 4 of Lowe's paper.
// 特征点精确定位
static bool adjustLocalExtrema( const vector<Mat>& dog_pyr, KeyPoint& kpt, int octv,
int& layer, int& r, int& c, int nOctaveLayers,
float contrastThreshold, float edgeThreshold, float sigma )
{
const float img_scale = .f/(*SIFT_FIXPT_SCALE);
const float deriv_scale = img_scale*0.5f;
const float second_deriv_scale = img_scale;
const float cross_deriv_scale = img_scale*0.25f; float xi=, xr=, xc=, contr;
int i = ; //三维子像元插值
for( ; i < SIFT_MAX_INTERP_STEPS; i++ )
{
int idx = octv*(nOctaveLayers+) + layer;
const Mat& img = dog_pyr[idx];
const Mat& prev = dog_pyr[idx-];
const Mat& next = dog_pyr[idx+]; Vec3f dD((img.at<short>(r, c+) - img.at<short>(r, c-))*deriv_scale,
(img.at<short>(r+, c) - img.at<short>(r-, c))*deriv_scale,
(next.at<short>(r, c) - prev.at<short>(r, c))*deriv_scale); float v2 = (float)img.at<short>(r, c)*;
float dxx = (img.at<short>(r, c+) +
img.at<short>(r, c-) - v2)*second_deriv_scale;
float dyy = (img.at<short>(r+, c) +
img.at<short>(r-, c) - v2)*second_deriv_scale;
float dss = (next.at<short>(r, c) +
prev.at<short>(r, c) - v2)*second_deriv_scale;
float dxy = (img.at<short>(r+, c+) -
img.at<short>(r+, c-) - img.at<short>(r-, c+) +
img.at<short>(r-, c-))*cross_deriv_scale;
float dxs = (next.at<short>(r, c+) -
next.at<short>(r, c-) - prev.at<short>(r, c+) +
prev.at<short>(r, c-))*cross_deriv_scale;
float dys = (next.at<short>(r+, c) -
next.at<short>(r-, c) - prev.at<short>(r+, c) +
prev.at<short>(r-, c))*cross_deriv_scale; Matx33f H(dxx, dxy, dxs,
dxy, dyy, dys,
dxs, dys, dss); Vec3f X = H.solve(dD, DECOMP_LU); xi = -X[];
xr = -X[];
xc = -X[]; if( std::abs( xi ) < 0.5f && std::abs( xr ) < 0.5f && std::abs( xc ) < 0.5f )
break; //将找到的极值点对应成像素(整数)
c += cvRound( xc );
r += cvRound( xr );
layer += cvRound( xi ); if( layer < || layer > nOctaveLayers ||
c < SIFT_IMG_BORDER || c >= img.cols - SIFT_IMG_BORDER ||
r < SIFT_IMG_BORDER || r >= img.rows - SIFT_IMG_BORDER )
return false;
} /* ensure convergence of interpolation */
// SIFT_MAX_INTERP_STEPS:插值最大步数,避免插值不收敛,程序中默认为5
if( i >= SIFT_MAX_INTERP_STEPS )
return false; {
int idx = octv*(nOctaveLayers+) + layer;
const Mat& img = dog_pyr[idx];
const Mat& prev = dog_pyr[idx-];
const Mat& next = dog_pyr[idx+];
Matx31f dD((img.at<short>(r, c+) - img.at<short>(r, c-))*deriv_scale,
(img.at<short>(r+, c) - img.at<short>(r-, c))*deriv_scale,
(next.at<short>(r, c) - prev.at<short>(r, c))*deriv_scale);
float t = dD.dot(Matx31f(xc, xr, xi)); contr = img.at<short>(r, c)*img_scale + t * 0.5f;
if( std::abs( contr ) * nOctaveLayers < contrastThreshold )
return false; /* principal curvatures are computed using the trace and det of Hessian */
//利用Hessian矩阵的迹和行列式计算主曲率的比值
float v2 = img.at<short>(r, c)*.f;
float dxx = (img.at<short>(r, c+) +
img.at<short>(r, c-) - v2)*second_deriv_scale;
float dyy = (img.at<short>(r+, c) +
img.at<short>(r-, c) - v2)*second_deriv_scale;
float dxy = (img.at<short>(r+, c+) -
img.at<short>(r+, c-) - img.at<short>(r-, c+) +
img.at<short>(r-, c-)) * cross_deriv_scale;
float tr = dxx + dyy;
float det = dxx * dyy - dxy * dxy; //这里edgeThreshold可以在调用SIFT()时输入;
//其实代码中定义了 static const float SIFT_CURV_THR = 10.f 可以直接使用
if( det <= || tr*tr*edgeThreshold >= (edgeThreshold + )*(edgeThreshold + )*det )
return false;
} kpt.pt.x = (c + xc) * ( << octv);
kpt.pt.y = (r + xr) * ( << octv);
kpt.octave = octv + (layer << ) + (cvRound((xi + 0.5)*) << );
kpt.size = sigma*powf(.f, (layer + xi) / nOctaveLayers)*( << octv)*; return true;
}
至此,SIFT第二步就完成了。参见《SIFT原理与源码分析》
本文转自:http://blog.csdn.net/xiaowei_cqu/article/details/8087239
【OpenCV】SIFT原理与源码分析:关键点搜索与定位的更多相关文章
- OpenCV SIFT原理与源码分析
http://blog.csdn.net/xiaowei_cqu/article/details/8069548 SIFT简介 Scale Invariant Feature Transform,尺度 ...
- 【OpenCV】SIFT原理与源码分析:关键点描述
<SIFT原理与源码分析>系列文章索引:http://www.cnblogs.com/tianyalu/p/5467813.html 由前一篇<方向赋值>,为找到的关键点即SI ...
- 【OpenCV】SIFT原理与源码分析:DoG尺度空间构造
原文地址:http://blog.csdn.net/xiaowei_cqu/article/details/8067881 尺度空间理论 自然界中的物体随着观测尺度不同有不同的表现形态.例如我们形 ...
- 【OpenCV】SIFT原理与源码分析:方向赋值
<SIFT原理与源码分析>系列文章索引:http://www.cnblogs.com/tianyalu/p/5467813.html 由前一篇<关键点搜索与定位>,我们已经找到 ...
- 【OpenCV】SIFT原理与源码分析
SIFT简介 Scale Invariant Feature Transform,尺度不变特征变换匹配算法,是由David G. Lowe在1999年(<Object Recognition f ...
- OpenCV学习笔记(27)KAZE 算法原理与源码分析(一)非线性扩散滤波
http://blog.csdn.net/chenyusiyuan/article/details/8710462 OpenCV学习笔记(27)KAZE 算法原理与源码分析(一)非线性扩散滤波 201 ...
- ConcurrentHashMap实现原理及源码分析
ConcurrentHashMap实现原理 ConcurrentHashMap源码分析 总结 ConcurrentHashMap是Java并发包中提供的一个线程安全且高效的HashMap实现(若对Ha ...
- HashMap和ConcurrentHashMap实现原理及源码分析
HashMap实现原理及源码分析 哈希表(hash table)也叫散列表,是一种非常重要的数据结构,应用场景及其丰富,许多缓存技术(比如memcached)的核心其实就是在内存中维护一张大的哈希表, ...
- (转)ReentrantLock实现原理及源码分析
背景:ReetrantLock底层是基于AQS实现的(CAS+CHL),有公平和非公平两种区别. 这种底层机制,很有必要通过跟踪源码来进行分析. 参考 ReentrantLock实现原理及源码分析 源 ...
随机推荐
- Unity —— 通过鼠标点击控制物体移动
//ClickMove - - 通过鼠标点击控制物体移动 using System.Collections; using System.Collections.Generic; using Unity ...
- Unity ScriptableObject自定义属性显示
1. 继承Editor,重写OnInspectorGUI方法 Editor官方文档 需求 将TestClass中intData属性和stringData按指定格式显示. 实现 定义一个测试类TestC ...
- 420. Count and Say【LintCode java】
Description The count-and-say sequence is the sequence of integers beginning as follows: 1, 11, 21, ...
- hadoop之mapper类妙用
1. Mapper类 首先 Mapper类有四个方法: (1) protected void setup(Context context) (2) Protected void map(KEYIN k ...
- kaldi DNN在线解码 aishell为例
在kaldi 的工具集里有好几个程序可以用于在线识别.这些程序都位在src/onlinebin文件夹里,他们是由src/online文件夹里的文件编译而成(你现在可以用make ext 命令进行编译) ...
- #Ubuntu 18.04 安装tensorflow-gpu 1.9
参考 https://tensorflow.google.cn/install/install_linux http://nvidia.com/cuda http://developer.nvidia ...
- java 不同数据类型的相互转化
在工作中经常会遇到需要将数据类型转化的情况,今天抽出时间总结一下. date——string Date date = new Date(); DateFormat dateformat = new S ...
- “Hello World!”团队——Final发布用户使用报告
博客内容: 1.用户体验报告表 2.用户评论截图 3.总结 一.用户体验报告表 用户使用报告 用户类别 用户姓名(化名) 性别 用户职业 使用频次 用户评论 新增用户 小小静 女 中学信息技术老师 8 ...
- java一些知识
类名前只有两种修饰符:不写(即default,但不能把default写上去)或public.默认不写则此类只能被同一包下的类调用以生成相应的实例.但若是public,则可以被不同包下的类调用以生成其实 ...
- Struts2(六)
以下内容是基于导入struts2-2.3.32.jar包来讲的 1.OGNL OGNL是Object-Graph Navigation Language的缩写,全称为对象图导航语言,是一种功能强大的表 ...