
【OpenCV】SIFT原理与源码分析:关键点描述
《SIFT原理与源码分析》系列文章索引:http://www.cnblogs.com/tianyalu/p/5467813.html
SIFT描述子h(x,y,θ)是对关键点附近邻域内高斯图像梯度统计的结果,是一个三维矩阵,但通常用一个矢量来表示。矢量通过对三维矩阵按一定规律排列得到。
描述子采样区域
 ,如下图所示:
源码
    Point pt(cvRound(ptf.x), cvRound(ptf.y));

    //计算余弦,正弦,CV_PI/180:将角度值转化为幅度值

    float cos_t = cosf(ori*(float)(CV_PI/));

    float sin_t = sinf(ori*(float)(CV_PI/));

    float bins_per_rad = n / .f;

    float exp_scale = -.f/(d * d * 0.5f); //d:SIFT_DESCR_WIDTH 4

    float hist_width = SIFT_DESCR_SCL_FCTR * scl;  // SIFT_DESCR_SCL_FCTR: 3

                                                   // scl: size*0.5f

    // 计算图像区域半径mσ(d+1)/2*sqrt(2)

    // 1.4142135623730951f 为根号2

    int radius = cvRound(hist_width * 1.4142135623730951f * (d + ) * 0.5f);

    cos_t /= hist_width;

    sin_t /= hist_width;
区域坐标轴旋转
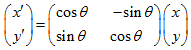
源码
//计算采样区域点坐标旋转

    for( i = -radius, k = ; i <= radius; i++ )

        for( j = -radius; j <= radius; j++ )

        {

            /*

             Calculate sample's histogram array coords rotated relative to ori.

             Subtract 0.5 so samples that fall e.g. in the center of row 1 (i.e.

             r_rot = 1.5) have full weight placed in row 1 after interpolation.

             */

            float c_rot = j * cos_t - i * sin_t;

            float r_rot = j * sin_t + i * cos_t;

            float rbin = r_rot + d/ - 0.5f;

            float cbin = c_rot + d/ - 0.5f;

            int r = pt.y + i, c = pt.x + j;

            if( rbin > - && rbin < d && cbin > - && cbin < d &&

               r >  && r < rows -  && c >  && c < cols -  )

            {

                float dx = (float)(img.at<short>(r, c+) - img.at<short>(r, c-));

                float dy = (float)(img.at<short>(r-, c) - img.at<short>(r+, c));

                X[k] = dx; Y[k] = dy; RBin[k] = rbin; CBin[k] = cbin;

                W[k] = (c_rot * c_rot + r_rot * r_rot)*exp_scale;

                k++;

            }

        }
计算采样区域梯度直方图

源码
//计算梯度直方图

    for( k = ; k < len; k++ )

    {

        float rbin = RBin[k], cbin = CBin[k];

        float obin = (Ori[k] - ori)*bins_per_rad;

        float mag = Mag[k]*W[k];

        int r0 = cvFloor( rbin );

        int c0 = cvFloor( cbin );

        int o0 = cvFloor( obin );

        rbin -= r0;

        cbin -= c0;

        obin -= o0;

        //n为SIFT_DESCR_HIST_BINS:8,即将360°分为8个区间

        if( o0 <  )

            o0 += n;

        if( o0 >= n )

            o0 -= n;

        // histogram update using tri-linear interpolation

        // 双线性插值

        float v_r1 = mag*rbin, v_r0 = mag - v_r1;

        float v_rc11 = v_r1*cbin, v_rc10 = v_r1 - v_rc11;

        float v_rc01 = v_r0*cbin, v_rc00 = v_r0 - v_rc01;

        float v_rco111 = v_rc11*obin, v_rco110 = v_rc11 - v_rco111;

        float v_rco101 = v_rc10*obin, v_rco100 = v_rc10 - v_rco101;

        float v_rco011 = v_rc01*obin, v_rco010 = v_rc01 - v_rco011;

        float v_rco001 = v_rc00*obin, v_rco000 = v_rc00 - v_rco001;

        int idx = ((r0+)*(d+) + c0+)*(n+) + o0;

        hist[idx] += v_rco000;

        hist[idx+] += v_rco001;

        hist[idx+(n+)] += v_rco010;

        hist[idx+(n+)] += v_rco011;

        hist[idx+(d+)*(n+)] += v_rco100;

        hist[idx+(d+)*(n+)+] += v_rco101;

        hist[idx+(d+)*(n+)] += v_rco110;

        hist[idx+(d+)*(n+)+] += v_rco111;

    }
关键点描述源码
// SIFT关键点特征描述

// SIFT描述子是关键点领域高斯图像提取统计结果的一种表示

static void calcSIFTDescriptor( const Mat& img, Point2f ptf, float ori, float scl,

                               int d, int n, float* dst )

{

    Point pt(cvRound(ptf.x), cvRound(ptf.y));

    //计算余弦,正弦,CV_PI/180:将角度值转化为幅度值

    float cos_t = cosf(ori*(float)(CV_PI/));

    float sin_t = sinf(ori*(float)(CV_PI/));

    float bins_per_rad = n / .f;

    float exp_scale = -.f/(d * d * 0.5f); //d:SIFT_DESCR_WIDTH 4

    float hist_width = SIFT_DESCR_SCL_FCTR * scl;  // SIFT_DESCR_SCL_FCTR: 3

                                                   // scl: size*0.5f

    // 计算图像区域半径mσ(d+1)/2*sqrt(2)

    // 1.4142135623730951f 为根号2

    int radius = cvRound(hist_width * 1.4142135623730951f * (d + ) * 0.5f);

    cos_t /= hist_width;

    sin_t /= hist_width;

    int i, j, k, len = (radius*+)*(radius*+), histlen = (d+)*(d+)*(n+);

    int rows = img.rows, cols = img.cols;

    AutoBuffer<float> buf(len* + histlen);

    float *X = buf, *Y = X + len, *Mag = Y, *Ori = Mag + len, *W = Ori + len;

    float *RBin = W + len, *CBin = RBin + len, *hist = CBin + len;

    //初始化直方图

    for( i = ; i < d+; i++ )

    {

        for( j = ; j < d+; j++ )

            for( k = ; k < n+; k++ )

                hist[(i*(d+) + j)*(n+) + k] = .;

    }

    //计算采样区域点坐标旋转

    for( i = -radius, k = ; i <= radius; i++ )

        for( j = -radius; j <= radius; j++ )

        {

            /*

             Calculate sample's histogram array coords rotated relative to ori.

             Subtract 0.5 so samples that fall e.g. in the center of row 1 (i.e.

             r_rot = 1.5) have full weight placed in row 1 after interpolation.

             */

            float c_rot = j * cos_t - i * sin_t;

            float r_rot = j * sin_t + i * cos_t;

            float rbin = r_rot + d/ - 0.5f;

            float cbin = c_rot + d/ - 0.5f;

            int r = pt.y + i, c = pt.x + j;

            if( rbin > - && rbin < d && cbin > - && cbin < d &&

               r >  && r < rows -  && c >  && c < cols -  )

            {

                float dx = (float)(img.at<short>(r, c+) - img.at<short>(r, c-));

                float dy = (float)(img.at<short>(r-, c) - img.at<short>(r+, c));

                X[k] = dx; Y[k] = dy; RBin[k] = rbin; CBin[k] = cbin;

                W[k] = (c_rot * c_rot + r_rot * r_rot)*exp_scale;

                k++;

            }

        }

    len = k;

    fastAtan2(Y, X, Ori, len, true);

    magnitude(X, Y, Mag, len);

    exp(W, W, len);

    //计算梯度直方图

    for( k = ; k < len; k++ )

    {

        float rbin = RBin[k], cbin = CBin[k];

        float obin = (Ori[k] - ori)*bins_per_rad;

        float mag = Mag[k]*W[k];

        int r0 = cvFloor( rbin );

        int c0 = cvFloor( cbin );

        int o0 = cvFloor( obin );

        rbin -= r0;

        cbin -= c0;

        obin -= o0;

        //n为SIFT_DESCR_HIST_BINS:8,即将360°分为8个区间

        if( o0 <  )

            o0 += n;

        if( o0 >= n )

            o0 -= n;

        // histogram update using tri-linear interpolation

        // 双线性插值

        float v_r1 = mag*rbin, v_r0 = mag - v_r1;

        float v_rc11 = v_r1*cbin, v_rc10 = v_r1 - v_rc11;

        float v_rc01 = v_r0*cbin, v_rc00 = v_r0 - v_rc01;

        float v_rco111 = v_rc11*obin, v_rco110 = v_rc11 - v_rco111;

        float v_rco101 = v_rc10*obin, v_rco100 = v_rc10 - v_rco101;

        float v_rco011 = v_rc01*obin, v_rco010 = v_rc01 - v_rco011;

        float v_rco001 = v_rc00*obin, v_rco000 = v_rc00 - v_rco001;

        int idx = ((r0+)*(d+) + c0+)*(n+) + o0;

        hist[idx] += v_rco000;

        hist[idx+] += v_rco001;

        hist[idx+(n+)] += v_rco010;

        hist[idx+(n+)] += v_rco011;

        hist[idx+(d+)*(n+)] += v_rco100;

        hist[idx+(d+)*(n+)+] += v_rco101;

        hist[idx+(d+)*(n+)] += v_rco110;

        hist[idx+(d+)*(n+)+] += v_rco111;

    }

    // finalize histogram, since the orientation histograms are circular

    // 最后确定直方图,目标方向直方图是圆的

    for( i = ; i < d; i++ )

        for( j = ; j < d; j++ )

        {

            int idx = ((i+)*(d+) + (j+))*(n+);

            hist[idx] += hist[idx+n];

            hist[idx+] += hist[idx+n+];

            for( k = ; k < n; k++ )

                dst[(i*d + j)*n + k] = hist[idx+k];

        }

    // copy histogram to the descriptor,

    // apply hysteresis thresholding

    // and scale the result, so that it can be easily converted

    // to byte array

    float nrm2 = ;

    len = d*d*n;

    for( k = ; k < len; k++ )

        nrm2 += dst[k]*dst[k];

    float thr = std::sqrt(nrm2)*SIFT_DESCR_MAG_THR;

    for( i = , nrm2 = ; i < k; i++ )

    {

        float val = std::min(dst[i], thr);

        dst[i] = val;

        nrm2 += val*val;

    }

    nrm2 = SIFT_INT_DESCR_FCTR/std::max(std::sqrt(nrm2), FLT_EPSILON);

    for( k = ; k < len; k++ )

    {

        dst[k] = saturate_cast<uchar>(dst[k]*nrm2);

    }

}
至此SIFT描述子生成,SIFT算法也基本完成了~参见《SIFT原理与源码分析》
【OpenCV】SIFT原理与源码分析:关键点描述的更多相关文章
- 【OpenCV】SIFT原理与源码分析:关键点搜索与定位
<SIFT原理与源码分析>系列文章索引:http://www.cnblogs.com/tianyalu/p/5467813.html 由前一步<DoG尺度空间构造>,我们得到了 ...
- OpenCV SIFT原理与源码分析
http://blog.csdn.net/xiaowei_cqu/article/details/8069548 SIFT简介 Scale Invariant Feature Transform,尺度 ...
- 【OpenCV】SIFT原理与源码分析:DoG尺度空间构造
原文地址:http://blog.csdn.net/xiaowei_cqu/article/details/8067881 尺度空间理论 自然界中的物体随着观测尺度不同有不同的表现形态.例如我们形 ...
- 【OpenCV】SIFT原理与源码分析:方向赋值
<SIFT原理与源码分析>系列文章索引:http://www.cnblogs.com/tianyalu/p/5467813.html 由前一篇<关键点搜索与定位>,我们已经找到 ...
- 【OpenCV】SIFT原理与源码分析
SIFT简介 Scale Invariant Feature Transform,尺度不变特征变换匹配算法,是由David G. Lowe在1999年(<Object Recognition f ...
- OpenCV学习笔记(27)KAZE 算法原理与源码分析(一)非线性扩散滤波
http://blog.csdn.net/chenyusiyuan/article/details/8710462 OpenCV学习笔记(27)KAZE 算法原理与源码分析(一)非线性扩散滤波 201 ...
- ConcurrentHashMap实现原理及源码分析
ConcurrentHashMap实现原理 ConcurrentHashMap源码分析 总结 ConcurrentHashMap是Java并发包中提供的一个线程安全且高效的HashMap实现(若对Ha ...
- HashMap和ConcurrentHashMap实现原理及源码分析
HashMap实现原理及源码分析 哈希表(hash table)也叫散列表,是一种非常重要的数据结构,应用场景及其丰富,许多缓存技术(比如memcached)的核心其实就是在内存中维护一张大的哈希表, ...
- (转)ReentrantLock实现原理及源码分析
背景:ReetrantLock底层是基于AQS实现的(CAS+CHL),有公平和非公平两种区别. 这种底层机制,很有必要通过跟踪源码来进行分析. 参考 ReentrantLock实现原理及源码分析 源 ...
随机推荐
- NO.04--我的使用心得之使用vue绑定class名
今天聊一聊这个话题,其实方式有很多种,我今天介绍几种我使用到的,各位看官耐心看: 一.用 变量形式 绑定单个 Class 名 在 vue 中绑定单个 class 名还好说,直接写就可以了 <te ...
- Mybatis中的几种注解映射
1. 普通映射 2. @Select("select * from mybatis_Student where id=#{id}") 3. public Student getS ...
- MongoDB开启权限认证
MongoDB默认安装完后,如果在配置文件中没有加上auth = true,是没有用户权限认证的,这样对于一个数据库来说是相对不安全的,尤其是在外网的情况下. 接下来是配置权限的过程: //切入到 ...
- DNS递归查询与迭代查询
注:一般TCP/IP的应用层或者OSI的会话.表示.应用层把数据称为数据或者信息,到了传输层把数据称为报文,到了最底层就是比特流了也就是字节流 DNS递归查询与迭代查询 基础知识 1.域名系统 2 ...
- OA系统与Exchange 日历打通
目前我碰到好几个案例是希望将客户以后的OA系统与Exchange中的日历系统相结合,比如致远或者泛微的OA系统. 客户的需求如下: 1.有了OA系统 2.客户使用Outlook当邮件客户端 3.客户希 ...
- asp.net mvc 使用Ajax调用Action 返回数据【转】
使用asp.net mvc 调用Action方法很简单. 一.无参数方法. 1.首先,引入jquery-1.5.1.min.js 脚本,根据版本不同大家自行选择. <script src=& ...
- Linux java项目冲突不能正常运行
部署项目,在windows环境部署到Tomcat能够正常运行,部署到Linux环境下只能访问一些html资源,不能正常运行. 解决步骤: 1.清除webapps目录下所有文件夹,将war包上传至web ...
- scrum立会报告+燃尽图(第三周第四次)
此作业要求参见:https://edu.cnblogs.com/campus/nenu/2018fall/homework/2286 项目地址:https://coding.net/u/wuyy694 ...
- Python学习之路8 - 内置方法
abs(-230) #取绝对值 all([0,1,-5]) #如果参数里面的所有值都为真就返回真,否则返回假 any([0,1,-5]) #如果参数里面有一个值为真则返回真,否则返回假 ascii([ ...
- 关于window.open弹出窗口被阻止的问题
原文:http://blog.csdn.net/fanfanjin/article/details/6858168 在web编程过程中,经常会遇到一些页面需要弹出窗口,但是在服务器端用window.o ...