SpringBoot整合JavaFx(十三)
SpringBoot整合JavaFx(十三)
在Java中,基本上万物可springboot… 整合了spring全家桶,你可以很方便整合它的生态框架。
JavaFx也能整合springboot,下面我就演示javafx+springboot操作数据库吧,学习了下面的方式,针对其他main工程也适用。
整合过程主要分三步:
1、引入springboot依赖
2、配置
3、加载fxml时注入bean
特别注意第三点,使用javafx提供的控制器工厂能轻松注入。开发模式类似MVC,只不过视图变成了fxml。
一、配置
用IDEA初始化一个springboot项目,,Maven依赖如下
   <?xml version="1.0" encoding="UTF-8"?>

<project xmlns="http://maven.apache.org/POM/4.0.0" xmlns:xsi="http://www.w3.org/2001/XMLSchema-instance"

         xsi:schemaLocation="http://maven.apache.org/POM/4.0.0 https://maven.apache.org/xsd/maven-4.0.0.xsd">

    <modelVersion>4.0.0</modelVersion>

    <groupId>top.lingkang</groupId>

    <artifactId>springboot-javafx-demo</artifactId>

    <version>0.0.1-SNAPSHOT</version>

    <name>springboot-javafx-demo</name>

    <description>Demo project for Spring Boot</description>

    <properties>

        <java.version>1.8</java.version>

        <project.build.sourceEncoding>UTF-8</project.build.sourceEncoding>

        <project.reporting.outputEncoding>UTF-8</project.reporting.outputEncoding>

        <spring-boot.version>2.3.7.RELEASE</spring-boot.version>

    </properties>

    <dependencies>

        <dependency>

            <groupId>org.springframework.boot</groupId>

            <artifactId>spring-boot-starter-data-jdbc</artifactId>

        </dependency>

        <dependency>

            <groupId>org.springframework.boot</groupId>

            <artifactId>spring-boot-devtools</artifactId>

            <scope>runtime</scope>

            <optional>true</optional>

        </dependency>

        <dependency>

            <groupId>mysql</groupId>

            <artifactId>mysql-connector-java</artifactId>

            <scope>runtime</scope>

        </dependency>

        <dependency>

            <groupId>org.projectlombok</groupId>

            <artifactId>lombok</artifactId>

            <optional>true</optional>

        </dependency>

        <dependency>

            <groupId>org.springframework.boot</groupId>

            <artifactId>spring-boot-starter-test</artifactId>

            <scope>test</scope>

            <exclusions>

                <exclusion>

                    <groupId>org.junit.vintage</groupId>

                    <artifactId>junit-vintage-engine</artifactId>

                </exclusion>

            </exclusions>

        </dependency>

    </dependencies>

    <dependencyManagement>

        <dependencies>

            <dependency>

                <groupId>org.springframework.boot</groupId>

                <artifactId>spring-boot-dependencies</artifactId>

                <version>${spring-boot.version}</version>

                <type>pom</type>

                <scope>import</scope>

            </dependency>

        </dependencies>

    </dependencyManagement>

    <build>

        <plugins>

            <plugin>

                <groupId>org.apache.maven.plugins</groupId>

                <artifactId>maven-compiler-plugin</artifactId>

                <version>3.8.1</version>

                <configuration>

                    <source>1.8</source>

                    <target>1.8</target>

                    <encoding>UTF-8</encoding>

                </configuration>

            </plugin>

            <plugin>

                <groupId>org.springframework.boot</groupId>

                <artifactId>spring-boot-maven-plugin</artifactId>

                <version>2.3.7.RELEASE</version>

                <configuration>

                    <mainClass>top.lingkang.springbootjavafxdemo.SpringbootJavafxDemoApplication</mainClass>

                </configuration>

                <executions>

                    <execution>

                        <id>repackage</id>

                        <goals>

                            <goal>repackage</goal>

                        </goals>

                    </execution>

                </executions>

            </plugin>

        </plugins>

    </build>

</project>
配置application.properties
spring.main.web-application-type=none

spring.main.allow-bean-definition-overriding=true

# 应用名称

spring.application.name=springboot-javafx-demo

# 数据库驱动:

spring.datasource.driver-class-name=com.mysql.cj.jdbc.Driver

# 数据源名称

spring.datasource.name=defaultDataSource

# 数据库连接地址

spring.datasource.url=jdbc:mysql://localhost:3306/test?serverTimezone=UTC

# 数据库用户名&密码:

spring.datasource.username=root

spring.datasource.password=123456
二、编写启动类
import javafx.application.Application;

import javafx.fxml.FXMLLoader;

import javafx.scene.Scene;

import javafx.scene.layout.VBox;

import javafx.stage.Stage;

import javafx.util.Callback;

import org.springframework.boot.SpringApplication;

import org.springframework.boot.autoconfigure.SpringBootApplication;

import org.springframework.context.ConfigurableApplicationContext;

import java.net.URL;

@SpringBootApplication

public class SpringbootJavafxDemoApplication extends Application {

	// 任何地方都可以通过这个applicationContext获取springboot的上下文

    public static ConfigurableApplicationContext applicationContext;

    private static String[] args;

    @Override

    public void start(Stage primaryStage) throws Exception {

        URL resource = getClass().getResource("/fxml/login.fxml");

        if (resource == null) {

            throw new Exception();

        }

        // 加载 fxml 下面的逻辑可以单独封装

        FXMLLoader loader = new FXMLLoader(resource);

        loader.setControllerFactory(new Callback<Class<?>, Object>() {

            @Override

            public Object call(Class<?> param) {

                // 控制器工厂提供bean注入,此处的缺点是不能根据bean名字注入,只能通过class类型注入bean

                // 解决方案:

                // 1、SpringbootJavafxDemoApplication.applicationContext.getBean("Bean Name", Bean.class);

                // 2、@Autowired private ApplicationContext applicationContext;

                // Object bean_name = applicationContext.getBean("bean Name", Bean.class);

                return applicationContext.getBean(param);

            }

        });

        // 加载

        VBox root = loader.load();

        primaryStage.setScene(new Scene(root));

        primaryStage.show();

    }

    public static void main(String[] args) {

        SpringbootJavafxDemoApplication.args = args;

        launch(args);

    }

    @Override

    public void init() throws Exception {

        // 启动springboot

        applicationContext = SpringApplication.run(SpringbootJavafxDemoApplication.class, args);

    }

    @Override

    public void stop() throws Exception {

        // 关闭springboot

        applicationContext.stop();

    }

}
/fxml/login.fxml内容如下:
<?xml version="1.0" encoding="UTF-8"?>

<?import javafx.scene.control.*?>

<?import javafx.scene.layout.AnchorPane?>

<?import javafx.scene.layout.VBox?>

<?import javafx.scene.text.Font?>

<VBox maxHeight="-Infinity" maxWidth="-Infinity" minHeight="-Infinity" minWidth="-Infinity" prefHeight="330.0"

      fx:controller="top.oneit.jdownload.controller.LoginController"

      prefWidth="430.0" xmlns="http://javafx.com/javafx/11" xmlns:fx="http://javafx.com/fxml/1">

    <AnchorPane prefHeight="330.0" prefWidth="430.0" style="-fx-background-color: white;">

        <children>

            <Label layoutX="99.0" layoutY="183.0" text="账 号:">

                <font>

                    <Font size="14.0"/>

                </font>

            </Label>

            <Label layoutX="99.0" layoutY="217.0" text="密 码:">

                <font>

                    <Font size="14.0"/>

                </font>

            </Label>

            <Button fx:id="loginButton" layoutX="97.0" layoutY="270.0" mnemonicParsing="false" prefHeight="35.0" prefWidth="236.0"

                    style="-fx-background-color: #1EC6FC;" text="登  录" textAlignment="CENTER" textFill="WHITE">

                <font>

                    <Font size="14.0"/>

                </font>

            </Button>

            <CheckBox layoutX="98.0" layoutY="243.0" mnemonicParsing="false" text="自动登录" textFill="#a6a6a6"/>

            <CheckBox layoutX="188.0" layoutY="243.0" mnemonicParsing="false" text="记住密码" textFill="#a6a6a6"/>

            <Label layoutX="277.0" layoutY="242.0" text="找回密码" textFill="#a6a6a6">

                <font>

                    <Font size="14.0"/>

                </font>

            </Label>

            <TextField layoutX="146.0" layoutY="183.0" prefHeight="23.0" prefWidth="182.0"/>

            <PasswordField layoutX="146.0" layoutY="216.0" prefHeight="23.0" prefWidth="182.0"/>

        </children>

    </AnchorPane>

</VBox>
编写一个controller触发按钮事件
import javafx.event.ActionEvent;

import javafx.event.EventHandler;

import javafx.fxml.FXML;

import javafx.fxml.Initializable;

import javafx.scene.control.Button;

import org.springframework.beans.factory.annotation.Autowired;

import org.springframework.jdbc.core.JdbcTemplate;

import org.springframework.stereotype.Controller;

import java.net.URL;

import java.util.List;

import java.util.ResourceBundle;

/**

 * @author lingkang

 * @date 2021/11/9

 */

@Controller

public class LoginController implements Initializable {

    @FXML

    private Button loginButton;

    @Autowired

    private JdbcTemplate jdbcTemplate;

    @Override

    public void initialize(URL url, ResourceBundle resourceBundle) {

        loginButton.setOnAction(new EventHandler<ActionEvent>() {

            @Override

            public void handle(ActionEvent actionEvent) {

                List res = jdbcTemplate.queryForList("select * from t_user");

                if (!res.isEmpty()) {

                    System.out.println(res.toString());

                }

                System.out.println("你点击了我!");

            }

        });

    }

}
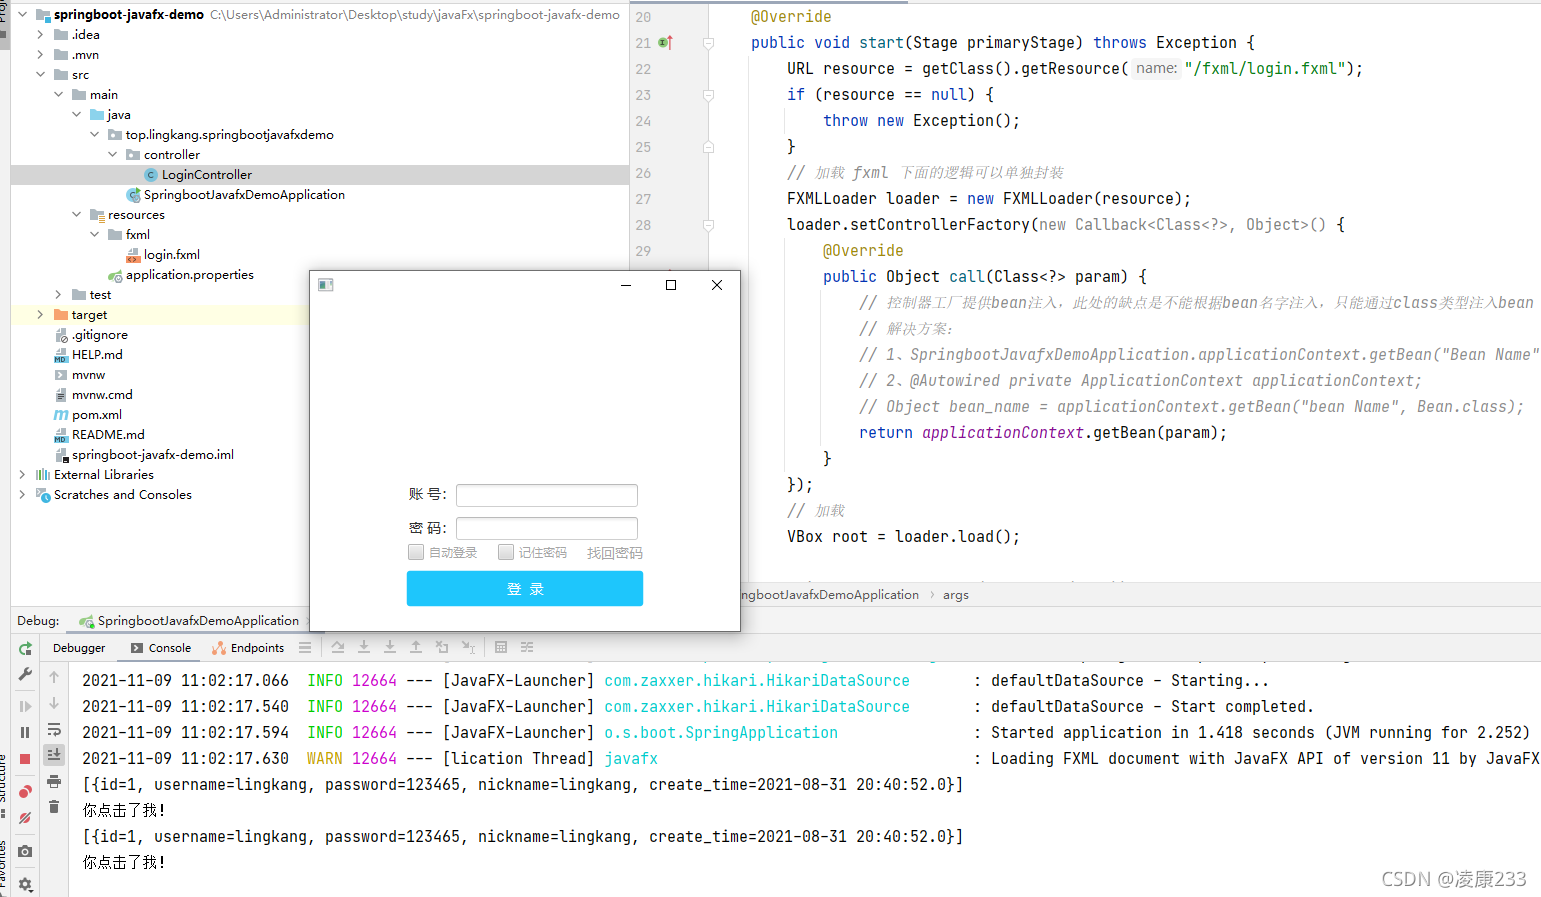
三、效果
四、一键三连
创作不易,你觉得对你有帮助请给我点个赞!一健三连…谢谢啦!
SpringBoot整合JavaFx(十三)的更多相关文章
- springboot整合javafx
原文(原码)参考地址: https://github.com/roskenet/springboot-javafx-support https://github.com/spartajet/javaf ...
- 很详细的SpringBoot整合UEditor教程
很详细的SpringBoot整合UEditor教程 2017年04月10日 20:27:21 小宝2333 阅读数:21529 版权声明:本文为博主原创文章,未经博主允许不得转载. https: ...
- SpringBoot整合SpringBatch
一.引入依赖 pom.xml <?xml version="1.0" encoding="UTF-8"?> <project xmlns=&q ...
- spring-boot整合mybatis(1)
sprig-boot是一个微服务架构,加快了spring工程快速开发,以及简便了配置.接下来开始spring-boot与mybatis的整合. 1.创建一个maven工程命名为spring-boot- ...
- SpringBoot整合Mybatis之项目结构、数据源
已经有好些日子没有总结了,不是变懒了,而是我一直在奋力学习springboot的路上,现在也算是完成了第一阶段的学习,今天给各位总结总结. 之前在网上找过不少关于springboot的教程,都是一些比 ...
- springboot整合mq接收消息队列
继上篇springboot整合mq发送消息队列 本篇主要在上篇基础上进行activiemq消息队列的接收springboot整合mq发送消息队列 第一步:新建marven项目,配置pom文件 < ...
- springboot整合mybaits注解开发
springboot整合mybaits注解开发时,返回json或者map对象时,如果一个字段的value为空,需要更改springboot的配置文件 mybatis: configuration: c ...
- SpringBoot整合Redis、ApachSolr和SpringSession
SpringBoot整合Redis.ApachSolr和SpringSession 一.简介 SpringBoot自从问世以来,以其方便的配置受到了广大开发者的青睐.它提供了各种starter简化很多 ...
- SpringBoot整合ElasticSearch实现多版本的兼容
前言 在上一篇学习SpringBoot中,整合了Mybatis.Druid和PageHelper并实现了多数据源的操作.本篇主要是介绍和使用目前最火的搜索引擎ElastiSearch,并和Spring ...
- SpringBoot整合Kafka和Storm
前言 本篇文章主要介绍的是SpringBoot整合kafka和storm以及在这过程遇到的一些问题和解决方案. kafka和storm的相关知识 如果你对kafka和storm熟悉的话,这一段可以直接 ...
随机推荐
- python第6章 学习笔记
# 第6章 学习笔记## 简介 Python代码在执行时是按照自上向下顺序执行的. 通过流程控制语句,可以改变程序的执行顺序,也可以让指定的程序反复执行多次 流程控制语句分成两大类:条件判断语句,循环 ...
- 临时表、视图与系统函数_Lab2
MySQL数据库操作 Lab1.md body { font-family: var(--vscode-markdown-font-family, -apple-system, BlinkMacSys ...
- 基于ZXing.NET实现的二维码生成和识别客户端
一.前言 ZXing.Net的一个可移植软件包,是一个开源的.多格式的1D/2D条形码图像处理库,最初是用Java实现的.已经过大量优化和改进,它已经被手动移植.它与.Net 2.0..Net 3.5 ...
- 2023华为杯·第二届中国研究生网络安全创新大赛初赛复盘 Writeup
A_Small_Secret 题目压缩包中有个提示和另一个压缩包On_Zen_with_Buddhism.zip,提示内容如下: 除了base64还有什么编码 MFZWIYLEMFSA==== asd ...
- Go类型嵌入介绍和使用类型嵌入模拟实现“继承”
Go类型嵌入介绍和使用类型嵌入模拟实现"继承" 目录 Go类型嵌入介绍和使用类型嵌入模拟实现"继承" 一.独立的自定义类型 二.继承 三.类型嵌入 3.1 什么 ...
- TechEmpower 22轮Web框架 性能评测:.NET 8 战绩斐然
自从2022年7月第21轮公布的测试以后,一年后 的2023年10月17日 发布了 TechEmpower 22轮测试报告 刚刚发布:Round 22 results - TechEmpower Fr ...
- 数据结构与算法 | 记忆化搜索(Memorize Search)
在本系列的文章中已经写了二叉树(Binary Tree).深搜(DFS)与广搜(BFS).哈希表(Hash Table)等等,计划接下来要写的是动态规划(Dynamic Programming,DP) ...
- 一个基于.NET Core开源、跨平台的仓储管理系统
前言 今天给大家推荐一个基于.NET Core开源.跨平台的仓储管理系统,数据库支持MSSQL/MySQL:ZEQP.WMS. 仓储管理系统介绍 仓储管理系统(Warehouse Management ...
- MODBUS转PROFINET网关TS-180 网关连接西门子 PLC 和工业称重仪表
随着科技的高速发展,工业自动化行业对日益多样的称重需求越来越高,上海某公司在国内的一个 工业自动化项目中,监控中心系统需要远程实时采集工业称重仪表测量的各种称重参数.该系统使用的是 西门子 S7-30 ...
- 什么是Session;request.getSession().setAttribute()
Session:会话控制,是服务器为了保存用户状态而创建的一个特殊的对象.=>用于存储信息的一个对象 当我们在服务端使用session时,首先要获取session,下面这个图就对服务器获取ses ...