微信小程序+和风天气完成天气预报
《冷暖预知》天气小程序
学无止境,以玩儿玩儿的心态去学习!
前一天晚上写的,写的不太好,第二天马上修改了,如有差错,请多指教。
花半天时间完成简单的小程序应用。适合小程序初学者。
步骤:
- 申请小程序帐号: 小程序注册入口, 具体操作按照官网步骤执行,相信你会看的很明白的(-
- 安装微信开发者工具,打开工具填写信息:①项目目录为自己要开发小程序的位置②AppId在微信管理后台的设置-开发设置中③项目名称自己起,填写完成点击完成;
- 看到默认的初始小程序Hello Horld是不是很兴奋,以上步骤不是我们今天研究的重点,下面进行我们的关键:
- 在index.wxml中写我们的结构,index.wxss中写css样式,在index.js中写我们的逻辑内容。前提是要有css3和javascript的基础哦!!!
- 在index.js中定义两个方法:getLocation()获取用户的地理位置,getWeather()获取天气的方法;
- 和风天气提供免费天气接口(无偿打广告,哈哈~~),免费版只能获取3天的天气情况,开发文档
废话不多说,直接上代码~~~
代码
1.页面结构 index.wxml部分
<!--index.wxml-->

<view class="container">

  <view class="weather yesterday">

    <view>

      <view class='date'>今天</view>

      <view class='location'>{{basic.location}}/{{basic.parent_city}}</view>

      <view class='tmp'>{{today.tmp_min}}℃~{{today.tmp_max}}℃</view>

      <view class='cond_txt'>{{today.cond_txt_d}}</view>

    </view>

    <view>

      <view class='weather_icon'>

        <image src='{{todyIcon}}'></image>

      </view>

      <view class='lastUpdateDate'>最后更新:{{update}}</view>

    </view>

  </view>

  <view class="weather today">

    <view>

      <text>明天</text>

       <view class='location'>{{basic.location}}/{{basic.parent_city}}</view>

      <view class='tmp'>{{tomorrow.tmp_min}}℃~{{tomorrow.tmp_max}}℃</view>

      <view class='cond_txt'>{{tomorrow.cond_txt_d}}</view>

    </view>

    <view>

      <view class='weather_icon'>

        <image src='{{tomorrowIcon}}'></image>

      </view>

      <view class='lastUpdateDate'>最后更新:{{update}}</view>

      </view>

  </view>

  <view class="weather tomorrow">

    <view>

      <text>后天</text>

       <view class='location'>{{basic.location}}/{{basic.parent_city}}</view>

      <view class='tmp'>{{afterTomor.tmp_min}}℃~{{afterTomor.tmp_max}}℃</view>

      <view class='cond_txt'>{{afterTomor.cond_txt_d}}</view>

    </view>

    <view>

    <view class='weather_icon'>

        <image src='{{afterTomorIcon}}'></image>

      </view>

      <view class='lastUpdateDate'>最后更新:{{update}}</view>

    </view>

  </view>

</view>
2.页面样式index.wxss部分
/**index.wxss**/

.container {

  height: 100%;

  width: 100%;

  display: flex;

  flex-direction: column;

  align-items: center;

  justify-content: space-between;

  padding: 10px 15px;

  box-sizing: border-box;

}

.weather{

  height: 110px;

  width: 100%;

  margin-bottom: 10px;

  border-radius: 5px;

  color: #FFF;

  padding: 5PX 15px;

  display: flex;

  font-size: 14px;

  box-sizing: border-box;

}

.weather>view{

  flex: 1;

}

.weather>view>view{

  margin: 5px 0;

}

.yesterday{

  background-color: #30BCAF;

}

.today{

  background-color: #78A4be;

}

.tomorrow{

  background-color: #FCB654;

}

.location,.cond_txt{

  font-size: 14px;

}

.date,.tmp{

  font-weight: bold;

}

.weather_icon{

  text-align: center;

  height: 65px;

}

.weather_icon image{

  width: 75px;

  height: 100%;

}

.lastUpdateDate{

  font-size: 10px;

  text-align: center;

}
3.页面行为index.js部分
//index.js

//获取应用实例

const app = getApp()

Page({

  data: {

    update: '',

    basic:{},

    today:{},

    tomorrow:{},

    afterTomor:{},

    todyIcon:'../../imgs/weather/999.png',

    tomorrowIcon:'../../imgs/weather/999.png',

    afterTomorIcon:'../../imgs/weather/999.png'

  },

  onShow: function () {

    this.getLocation();

  },

  //事件处理函数

  bindViewTap: function() {

    wx.navigateTo({

      url: '../logs/logs'

    })

  },

  getLocation:function(){

    var that = this;

    wx.getLocation({

      type: 'wgs84',

      success: function (res) {

        var latitude = res.latitude

        var longitude = res.longitude

        that.getWeatherInfo(latitude, longitude);

      }

    })

  },

  getWeatherInfo: function (latitude, longitude){

    var _this = this;

    var key = '';//你自己的key

    //需要在微信公众号的设置-开发设置中配置服务器域名

    var url = 'https://free-api.heweather.com/s6/weather?key='+key+'&location=' + longitude + ',' + latitude;

    wx.request({

      url: url,

      data: {},

      method: 'GET',

      success: function (res) {

        var daily_forecast_today = res.data.HeWeather6[0].daily_forecast[0];//今天预报

        var daily_forecast_tomorrow = res.data.HeWeather6[0].daily_forecast[1];//明天天预报

        var daily_forecast_afterTomor = res.data.HeWeather6[0].daily_forecast[2];//后天预报

        var basic = res.data.HeWeather6[0].basic;

        var update = res.data.HeWeather6[0].update.loc;//更新时间

        _this.setData({

          update:update,

          basic:basic,

          today: daily_forecast_today,

          tomorrow:daily_forecast_tomorrow,

          afterTomor: daily_forecast_afterTomor,

          todyIcon: '../../imgs/weather/' + daily_forecast_today.cond_code_d+'.png', //在和风天气中下载天气的icon图标,根据cond_code_d显示相应的图标

          tomorrowIcon: '../../imgs/weather/' + daily_forecast_tomorrow.cond_code_d+'.png',

          afterTomorIcon: '../../imgs/weather/' + daily_forecast_afterTomor.cond_code_d+'.png'

        });

      }

    })

  }

})
效果
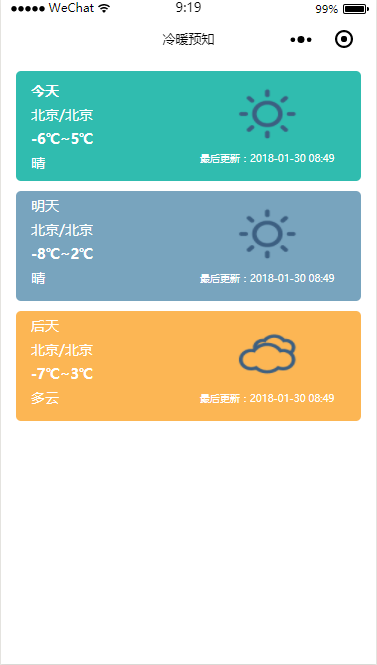
大功搞成,这样就有了自己的天气预报了,天气变冷,大家注意身体哦,身体是革命的本钱!!!
扫码查看小程序

美食垂类小程序

微信小程序+和风天气完成天气预报的更多相关文章
- 微信小程序项目实战之天气预报
概述 微信小程序项目实战之天气预报 详细 代码下载:http://www.demodashi.com/demo/10634.html 一.准备工作 1.注册微信小程序 2.注册和风天气账号 3.注册百 ...
- 微信小程序踩坑集合
1:官方工具:https://mp.weixin.qq.com/debug/w ... tml?t=1476434678461 2:简易教程:https://mp.weixin.qq.com/debu ...
- 近期热门微信小程序demo源码下载汇总
近期微信小程序demo源码下载汇总,乃小程序学习分析必备素材!点击标题即可下载: 即速应用首发!原创!电商商场Demo 优质微信小程序推荐 -秀人美女图 图片下载.滑动翻页 微信小程序 - 新词 GE ...
- 鸿蒙的远程交互组件应用及微信小程序的远程交互组件应用
注:鸿蒙的远程交互组件应用相对复杂 ,访问网络时,首先要配置网络权限,华为官方文档有问题,在此引用我老师配置的模板,见附件 过程:1.导入鸿蒙的网络请求模块fetch 2.发起对服务器的请求(在这过程 ...
- 微信小程序学习指南
作者:初雪链接:https://www.zhihu.com/question/50907897/answer/128494332来源:知乎著作权归作者所有.商业转载请联系作者获得授权,非商业转载请注明 ...
- 微信小程序实战:天气预报
接触微信小程序也有一段时间了,以天气预报练一下手. 主要实现了以下功能: (1) 首页图标式菜单,便于以后扩展功能 (2)首页顶部滚动消息 (3)页面右上角三点菜单转发功能,便于小程序的传播 (4)天 ...
- 【微信小程序】——实战开发之和风(含demo)
微信小程序之和风 序 凑了一把微信小程序的热闹!12月,小程序正式发布,很火,但随之而来的是各种冷水,唱衰之调随处可见.但作为一个小前端,岂能有新技术却弃之不顾之理,更何况是微信出品的?抱着学习和研究 ...
- 两天撸一个天气应用微信小程序
更新说明: I.气象数据由百度地图开放平台修改为了和风天气,需要注册账号获取 key: II.d0e51c8 版本之后为小程序云开发版本,若未开通云开发功能,为不影响小程序正常运行,可以将版本号回退到 ...
- 微信小程序开发实战-天气小程序
园龄6年8个月了,还一篇文章都没写过,惭愧! 最近周末做了个天气预报小程序,在这里整理一下开发过程和注意点,给对小程序开发感兴趣的伙伴们提供点参考. 废话不多说,先上图最终效果: 下面进入正文: 第一 ...
随机推荐
- 跨域WebApi的Jquery EasyUI的数据交互
目录 1 大概思路... 1 2 创建WebAPI 1 3 创建CrossMainController并编写... 1 4 Nuget安装microso ...
- BASIC-3 字母图形 循环 字符串
基础练习 字母图形 时间限制:1.0s 内存限制:256.0MB 问题描述 利用字母可以组成一些美丽的图形,下面给出了一个例子: ABCDEFG BABCDEF CBABCD ...
- thinkphp->add方法错误
$group_id=$model->add($add); 以上这句代码如果执行成功,返回它存储的id,但是,会有一种情况一直返回1. 代码完全没有问题,检查数据库发现有两个主键id,删除一个就O ...
- vim 简单笔记
vim编辑器Linux系统常用的一种编辑器 有三种模式 命令模式:插入模式:编辑模式 1 插入模式的基本操作: 从命令模式切入到插入模式只需要注意有三个字母aio就可以了 a是在当前光标后插入 ...
- react 开发知识准备
react react使用教程 babel babel 可用于ES6转换为ES5,jsx转换为原生js. ES6 ES6 语法 webpack webpack打包工具,它把不同的.相互依赖的静态资源都 ...
- 数据结构-栈 C和C++的实现
在数据结构中,栈是一种桶状结构,每次往桶里放数据,最后放的数据最先被拿出来,最先放进去的数据最后才能出来(FILO) C语言: 一.文件清单: MyStack.h: #ifndef _MYSTACK_ ...
- deeplearning.ai 卷积神经网络 Week 1 卷积神经网络 听课笔记
1. 传统的边缘检测(比如Sobel)手工设计了3*3的filter(或者叫kernel)的9个权重,在深度学习中,这9个权重都是学习出来的参数,会比手工设计的filter更好,不但可以提取90度.0 ...
- GDKOI2016 游记
2016.2.19~2.15强行广州koi被虐…… DAY 0 19日下午到达,第六次入住中大西苑宾馆,怂逼抽签抽中外交大使特殊职位,然后就一边看<死神>一边等石门两位室友啦.必须吐槽宾馆 ...
- Vijos P1113 不高兴的津津【模拟】
不高兴的津津 描述 津津上初中了.妈妈认为津津应该更加用功学习,所以津津除了上学之外,还要参加妈妈为她报名的各科复习班.另外每周妈妈还会送她去学习朗诵.舞蹈和钢琴.但是津津如果一天上课超过八个小时就会 ...
- 2017ecjtu-summer training #11 POJ 1018
Communication System Time Limit: 1000MS Memory Limit: 10000K Total Submissions: 29218 Accepted: ...