LNMP安装部署开源IP管理工具phpipam

↑ 此 logo 为 png透明版,有需要可自行保留 ↑
说明:
phpIPAM是一个开源的Web IP地址管理应用程序。 其目标是提供轻便简单的IP地址管理应用程序。
它是基于ajax的使用jQuery库,它使用PHP脚本和javascript以及一些HTML5 / CSS3功能,因此一些现代浏览器首选能够快速,正确地显示javascript。
体验地址:https://demo.phpipam.net/login/
1、数据库 mariadb 安装
//依赖安装
yum install -y apr* autoconf automake bison bzip2 bzip2* compat*  \

cpp curl curl-devel fontconfig fontconfig-devel freetype freetype*  \

freetype-devel gcc gcc-c++ gd gettext gettext-devel glibc kernel  \

kernel-headers keyutils keyutils-libs-devel krb5-devel libcom_ \

err-devel libpng libpng-devel libjpeg* libsepol-devel libselinux-devel  \

libstdc++-devel libtool* libgomp libxml2 libxml2-devel libXpm* libtiff  \

libtiff* cmake mpfr ncurses* ntp openssl openssl-devel patch pcre-devel  \

perl php-common  php-gd policycoreutils telnet t1lib t1lib* nasm nasm*  zlib-devel
//mariadb安装
Screen                               //是用Screen会话管理,避免异常(如果是远程主机建议养成这个习惯)

groupadd -r mysql                 //创建用户组 mysql

useradd -g mysql -s /sbin/nologin mysql   //创建用户mysql并指定用户组,同时禁止登陆系统

mkdir /usr/local/mariadb            //创建mysql安装目录

mkdir -p /data/mariadb             //创建数据库存放目录

chown -Rf mysql:mysql /data/mariadb/   //所有者、所有者修改为 mysql
//开始编译
cmake . -DCMAKE_INSTALL_PREFIX=/usr/local/mariadb \

-DMYSQL_DATADIR=/data/mariadb \

-DSYSCONFDIR=/etc \

-DWITHOUT_TOKUDB= \

-DWITH_INNOBASE_STORAGE_ENGINE= \

-DWITH_ARCHIVE_STPRAGE_ENGINE= \

-DWITH_BLACKHOLE_STORAGE_ENGINE= \

-DWIYH_READLINE= \

-DWIYH_SSL=system \

-DVITH_ZLIB=system \

-DWITH_LOBWRAP= \

-DMYSQL_UNIX_ADDR=/tmp/mysql.sock \
make
make install
说明:
-DCMAKE_INSTALL_PREFIX= //指定安装目录
-DMYSQL_DATADIR= //指定数据库存放目录
-DSYSCONFDIR= //配置文件所在目录,一般 /etc
make && make install //生成二进制文件并安装
rm -rf /etc/my.cnf //删除默认配置文件
//生成系统数据文件、新的配置文件
./scripts/mysql_install_db --user=mysql --basedir=/usr/local/mariadb --datadir=/data/mariadb

cd /usr/local/mariadb
//创建连接
ln -s my.cnf /etc/my.cnf
//复制开机程序到系统开机目录
cp ./support-files/mysql.server /etc/rc.d/init.d/mysqld
//赋予可执行权限
chmod /etc/rc.d/init.d/mysqld
//修改配置,其实我看过脚本,这个不修改也是可以的
vim /etc/rc.d/init.d/mysqld

basedir=/usr/local/mysql

datadir=/data/mysql
service mysqld start //启动mysql数据库
chkconfig mysqld on //添加到启动项
vim /etc/profile //在文末添加变量
export PATH=$PATH:/usr/local/mysql/bin
source /etc/profile //配置文件即时生效
//创建连接文件
ln -s /usr/local/mariadb/lib/mysql /usr/lib/mariadb  (可以忽略)

mkdir /var/lib/mariadb     (可用忽略)

ln -s /tmp/mysql.sock /var/lib/mariadb/mysql.sock

ln -s /usr/local/mariadb/include/mysql /usr/include/mariadb
bin/mysql_secure_installation //初始化mysql
mysql -u root -p //回车输入root密码(数据库root,不是登陆系统的root)我是root123
CREATE USER phpipam@localhost IDENTIFIED BY 'phpipamadmin'; //创建phpipam用户及密码
Exit / quit //退出数据
2、PHP 安装
cd php-7.2.

./configure --prefix=/usr/local/php \

--with-config-file-path=/usr/local/php/etc \

--with-mysql-sock=/tmp/mysql.sock \

--with-pdo-mysql=/usr/local/mariadb \
--enable-mysqlnd \

--with-gd \

--with-png-dir=/usr/share/libpng \

--with-jpeg-dir=/usr/share/jpeg \

--with-freetype-dir=/usr/share/freetype \

--with-xpm-dir=/usr/ \

--with-zlib-dir=/usr/share/zlib \

--with-iconv \

--enable-libxml \

--enable-xml \

--enable-bcmath \

--enable-shmop \

--enable-sysvsem \

--enable-inline-optimization \

--enable-opcache \

--enable-mbregex \

--enable-fpm \

--enable-mbstring \

--enable-ftp \

--with-openssl \

--enable-pcntl \

--enable-sockets \

--with-xmlrpc \

--enable-zip \

--enable-soap \

--with-pear \

--with-gettext \

--enable-session \

--with-curl \

--enable-ctype
make -j  && make install

rm -rf /etc/php.ini

ln -s /usr/local/php/etc/php.ini /etc/php.ini

cp php.ini-production /usr/local/php/etc/php.ini

cd  /usr/local/php/etc/

cp  php-fpm.conf.default  php-fpm.conf

ln -s /usr/local/php/etc/php-fpm.conf /etc/php-fpm.conf

cp /usr/local/src/php-7.2./sapi/fpm/init.d.php-fpm /etc/rc.d/init.d/php-fpm

chmod  /etc/rc.d/init.d/php-fpm

chkconfig php-fpm on
vim php.ini
disable_functions = passthru,system,chroot,scandir,chgrp,chown,shell_exec,proc_open,proc_get_status,ini_alter,ini_alter,ini_restore,dl,openlog,syslog,readlink,symlink,popepassthru,stream_socket_server,escapeshellcmd,dll,popen,disk_free_space,checkdnsrr,checkdnsrr,getservbyname,getservbyport,disk_total_space
//开启gmp模块
把 ;extension=gmp 左边分号去掉
vim php-fpm.conf ,找到 这一行 “;pid = run/php-fpm.pid”,去掉分号“;”
在文末修改为 include=/usr/local/php/etc/php-fpm.d/www.conf.default
vim php-fpm.d/www.conf.default 找到
user = nobody 改成 user = www
group = nobody 改成 group = www
;listen.owner = nobody 改成 listen.owner = www
;listen.group = nobody 改成 listen.group = www
;listen.mode = 0660 改成 listen.mode = 0660
listen = 127.0.0.1:9000
listen = /var/run/php-fpm.sock
注:此时执行systemctl restart php-fpm会报错,我们执行systemctl status -l php-fpm.service可以看到报错信息
报错提示找不到用户www,所以我们要创建用户及用户组 www
groupadd -r www

 useradd -g www -s /sbin/nologin www

 systemctl restart php-fpm //没有报错,说明成功重启

 systemctl status -l php-fpm //查看状态,如下图

 chmod  /var/run/php-fpm.sock

 chown www:www /var/run/php-fpm.sock
3、安装几个软包
cd zlib-1.2.

./configure --prefix=/usr/local/zlib

make -j 4 && make install

cd pcre-8.42

./configure --prefix=/usr/local/pcre

make -j 4 && make install

cd openssl-1.0.1h

./config --prefix=/usr/local/openssl

make -j 4 && make install

vim /etc/profile

export PATH=$PATH:/usr/local/mysql/bin:/usr/local/openssl/bin
4、安装 Nginx
cd nginx-1.15.

./configure \

--prefix=/usr/local/nginx \

--without-http_memcached_module \

--user=www \

--group=www \

--with-http_stub_status_module \

--with-http_ssl_module \

--with-http_gzip_static_module \

--with-openssl=/usr/local/src/openssl-1.0.1h \

--with-zlib=/usr/local/src/zlib-1.2.  \

--with-pcre=/usr/local/src/pcre-8.42
make -j 4 && make install
vim /etc/rc.d/init.d/nginx //Nginx 源码安装会没有启动文件,所以手动创建它
#!/bin/bash

# nginx - this script starts and stops the nginx daemon

# chkconfig: - 85 15

# description: Nginx is an HTTP(S) server, HTTP(S) reverse \

# proxy and IMAP/POP3 proxy server

# processname: nginx

# config: /etc/nginx/nginx.conf

# config: /usr/local/nginx/conf/nginx.conf

# pidfile: /usr/local/nginx/logs/nginx.pid

# Source function library.

. /etc/rc.d/init.d/functions

# Source networking configuration.

. /etc/sysconfig/network

# Check that networking is up.

[ "$NETWORKING" = "no" ] && exit 0

nginx="/usr/local/nginx/sbin/nginx"

prog=$(basename $nginx)

NGINX_CONF_FILE="/usr/local/nginx/conf/nginx.conf"

[ -f /etc/sysconfig/nginx ] && . /etc/sysconfig/nginx

lockfile=/var/lock/subsys/nginx

make_dirs() {

# make required directories

user=`$nginx -V 2>&1 | grep "configure arguments:" | sed 's/[^*]*--user=\([^ ]*\).*/\1/g' -`

        if [ -z "`grep $user /etc/passwd`" ]; then

                useradd -M -s /bin/nologin $user

        fi

options=`$nginx -V 2>&1 | grep 'configure arguments:'`

for opt in $options; do

        if [ `echo $opt | grep '.*-temp-path'` ]; then

                value=`echo $opt | cut -d "=" -f 2`

                if [ ! -d "$value" ]; then

                        # echo "creating" $value

                        mkdir -p $value && chown -R $user $value

                fi

        fi

done

}

start() {

[ -x $nginx ] || exit 5

[ -f $NGINX_CONF_FILE ] || exit 6

make_dirs

echo -n $"Starting $prog: "

daemon $nginx -c $NGINX_CONF_FILE

retval=$?

echo

[ $retval -eq 0 ] && touch $lockfile

return $retval

}

stop() {

echo -n $"Stopping $prog: "

killproc $prog -QUIT

retval=$?

echo

[ $retval -eq 0 ] && rm -f $lockfile

return $retval

}

restart() {

#configtest || return $?

stop

sleep 1

start

}

reload() {

#configtest || return $?

echo -n $"Reloading $prog: "

killproc $nginx -HUP

RETVAL=$?

echo

}

force_reload() {

restart

}

configtest() {

$nginx -t -c $NGINX_CONF_FILE

}

rh_status() {

status $prog

}

rh_status_q() {

rh_status >/dev/null 2>&1

}

case "$1" in

start)

        rh_status_q && exit 0

        $1

        ;;

stop)

        rh_status_q || exit 0

        $1

        ;;

restart|configtest)

$1

;;

reload)

        rh_status_q || exit 7

        $1

        ;;

force-reload)

        force_reload

        ;;

status)

        rh_status

        ;;

condrestart|try-restart)

        rh_status_q || exit 0

        ;;

*)

echo $"Usage: $0 {start|stop|status|restart|condrestart|try-restart|reload|force-reload|configtest}"

exit 2

esac
chmod 755 /etc/rc.d/init.d/nginx //赋予文件执行权限
/etc/rc.d/init.d/nginx restart //启动ngin
chkconfig nginx on //添加开机启动
systemctl status -l nginx //查看ngin状态
在浏览器输入服务器IP地址,这里是192.168.20.10
iptables -F //清空防火墙做测试,刷下网页
在清空防火墙后,页面刷出来了,至此:恭喜,Nginx安装成功
vim /usr/local/nginx/conf/nginx.conf
#user  nobody;

user www www;

 ........

server {

        listen       ;

        server_name  localhost;
     server_tokens off;

       #charset koi8-r;

        #access_log  logs/host.access.log  main;

        location / {

            root   html;

            index index.html index.htm index.php;

        }

 location /usr/local/nginx/html/api/{

                try_files $uri $uri/ /usr/local/nginx/html/api/index.php;

 }

location ~ \.php$ {

               fastcgi_pass    unix:/var/run/php-fpm.sock;

                fastcgi_index   index.php;

                include         fastcgi_params;

        }
vim /usr/local/nginx/conf/fastcgi_params //文末加上如下两行
fastcgi_param SCRIPT_FILENAME $document_root$fastcgi_script_name;

fastcgi_param PATH_INFO                $fastcgi_script_name;
// 重启 nginx 和 php-fpm
systemctl restart nginx

systemctl restart php-fpm
5、安装 phpipam(主角登场)
cd phpipam

rm -rf /usr/local/nginx/html/{index.html,50x.html}*

mv ./* /usr/local/nginx/html/

chown -Rf www:www /usr/local/nginx/html

chmod -Rf 755 /usr/local/nginx/html

cd /usr/local/nginx/html/

cp config.dist.php config.php
此时刷新浏览器页面,页面提示需要php-gmp拓展支持(如果没有可以跳过此步)
cd /usr/src/php-7.2./ext/gmp

/usr/local/php/bin/phpize     # php 模块都可以通过这个方式安装,.X 开头源码已包含大部分模块

./configure --with-php-config=/usr/local/php/bin/php-config --with-gmp=/usr/local/gmp/

make -j 4 && make install

systemctl restart nginx

systemctl restart php-fpm
此时刷新浏览器页面,出现如图就可以安装 phpipam 了
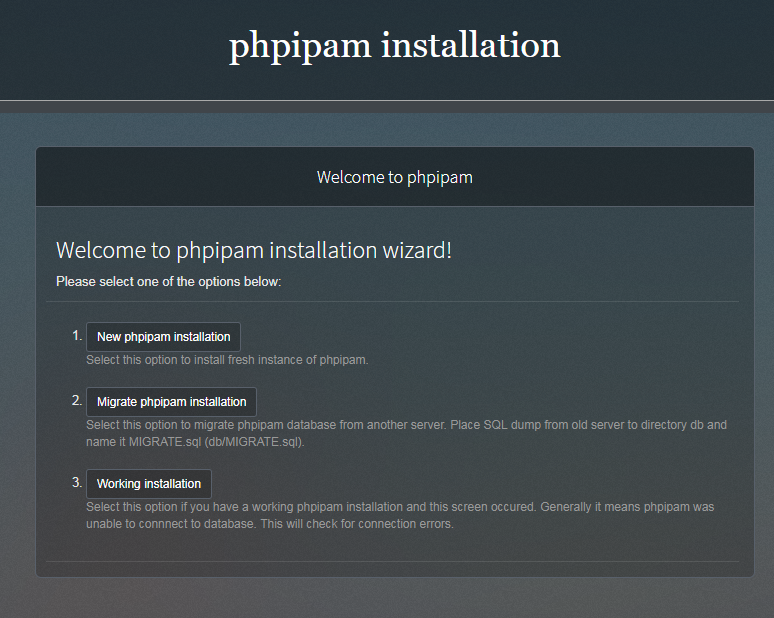
上图 1 选项 : 全新安装 phpipam (第一次部署默认选这个)
上图 2 选项 : 迁移安装 phpipam (一般重装系统或者升级的时候选这个)
7、开始安装 phpipam (由于英文界面,如果陌生可以用谷歌浏览器,自带翻译)
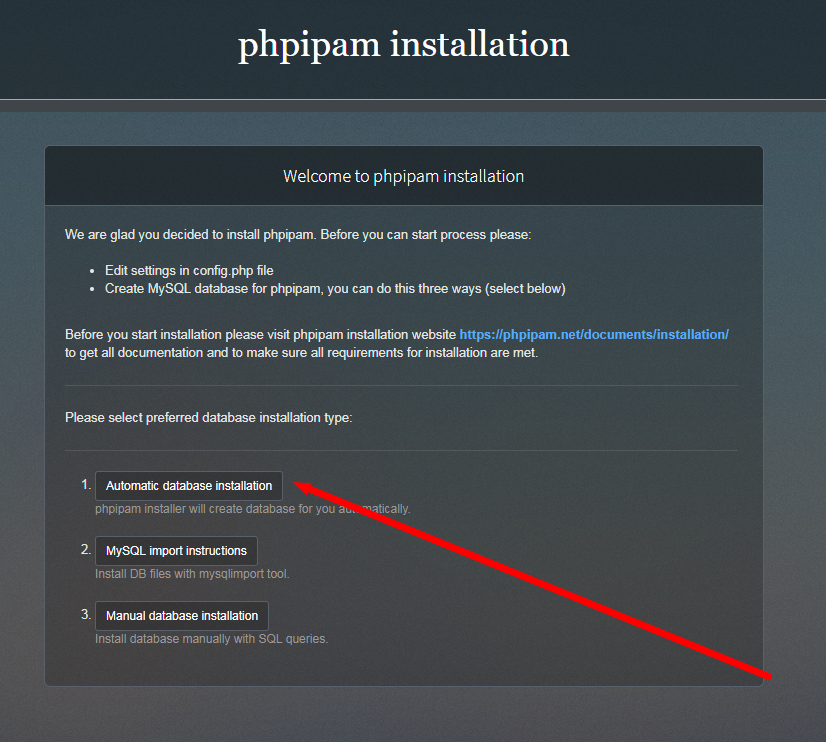
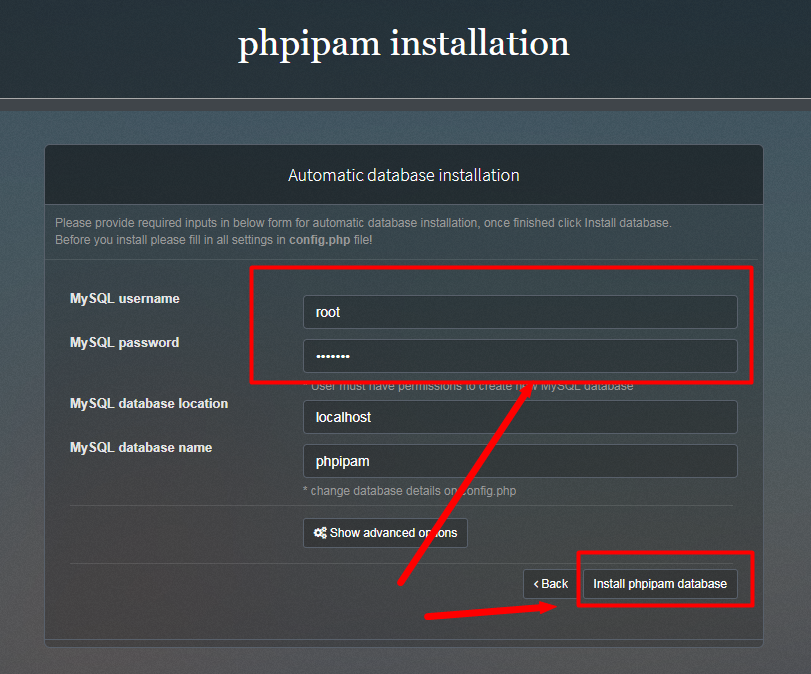
选项 1 :自动安装数据库,第一次安装都选这个(后续需要手动输入 数据 root 账号及密码)

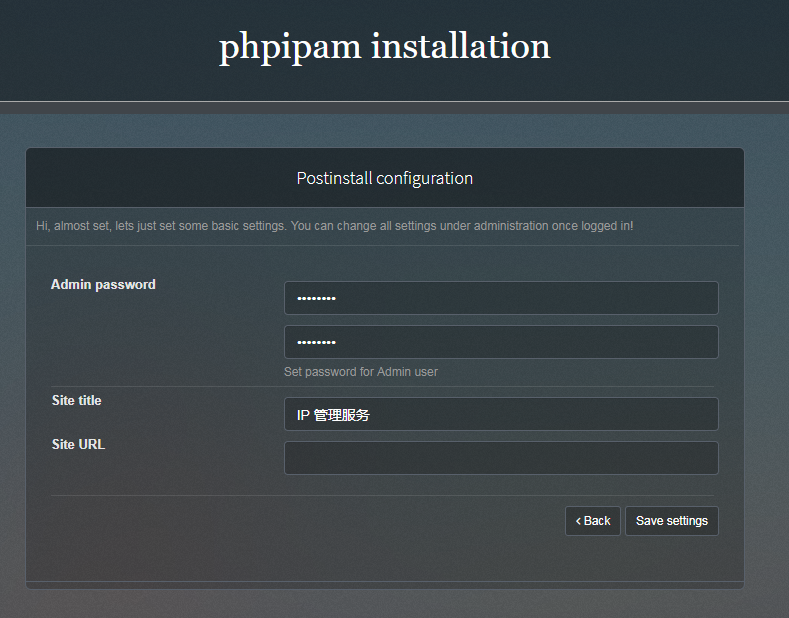
首次登陆需要设置 admin 账号密码 ,同时可以设置标题
登陆界面预览
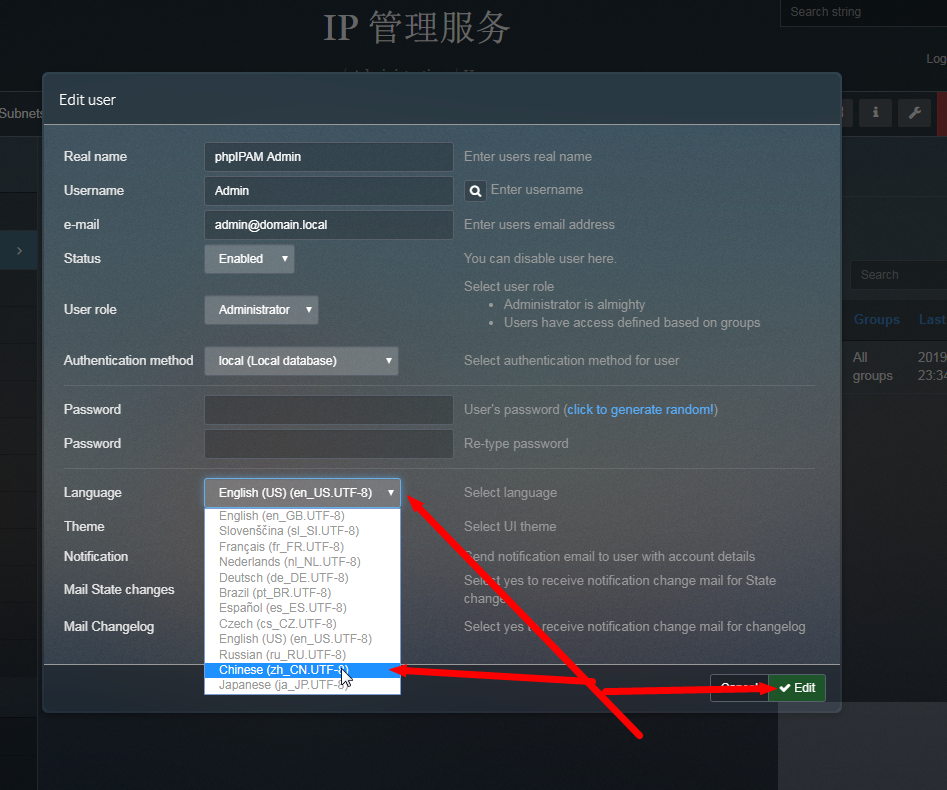
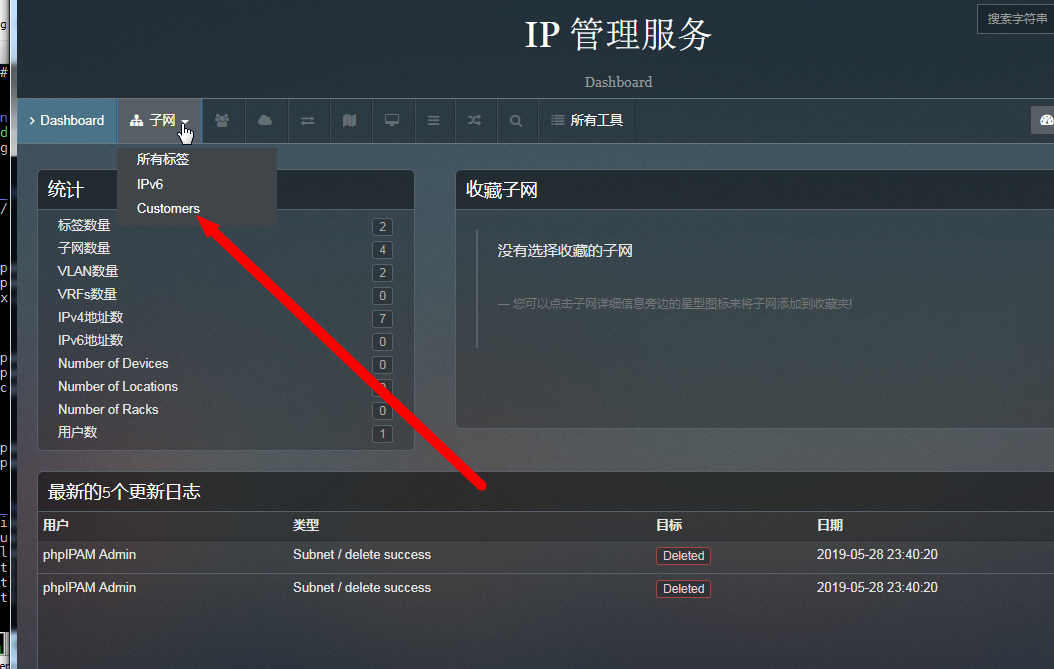
修改 admin 语言,改成中文(如图操作),修改后需要退出重新登陆

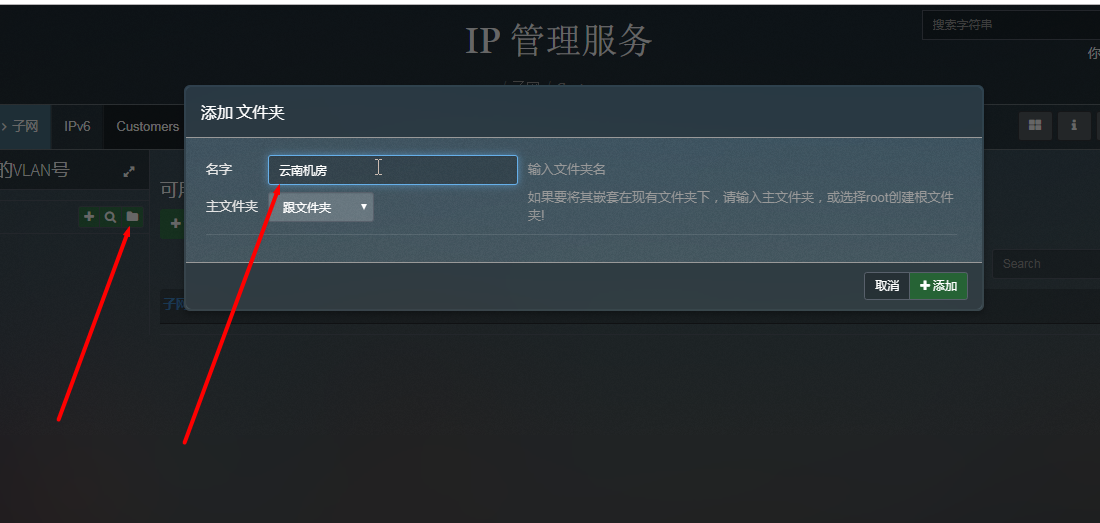
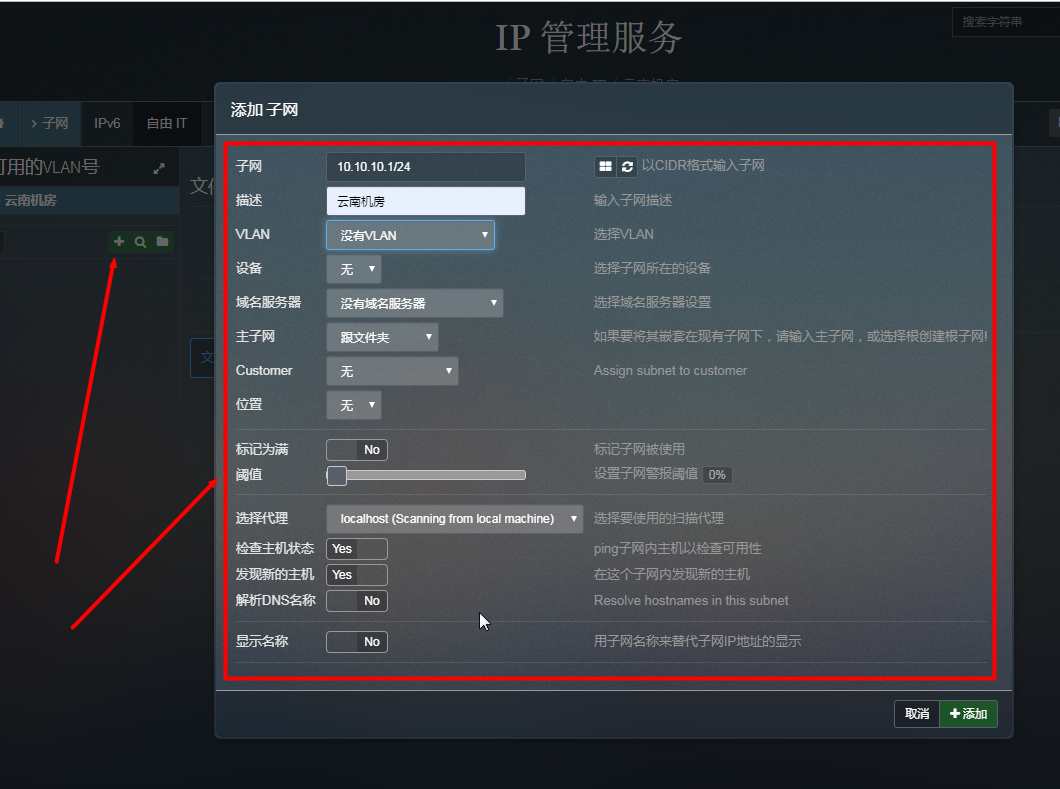
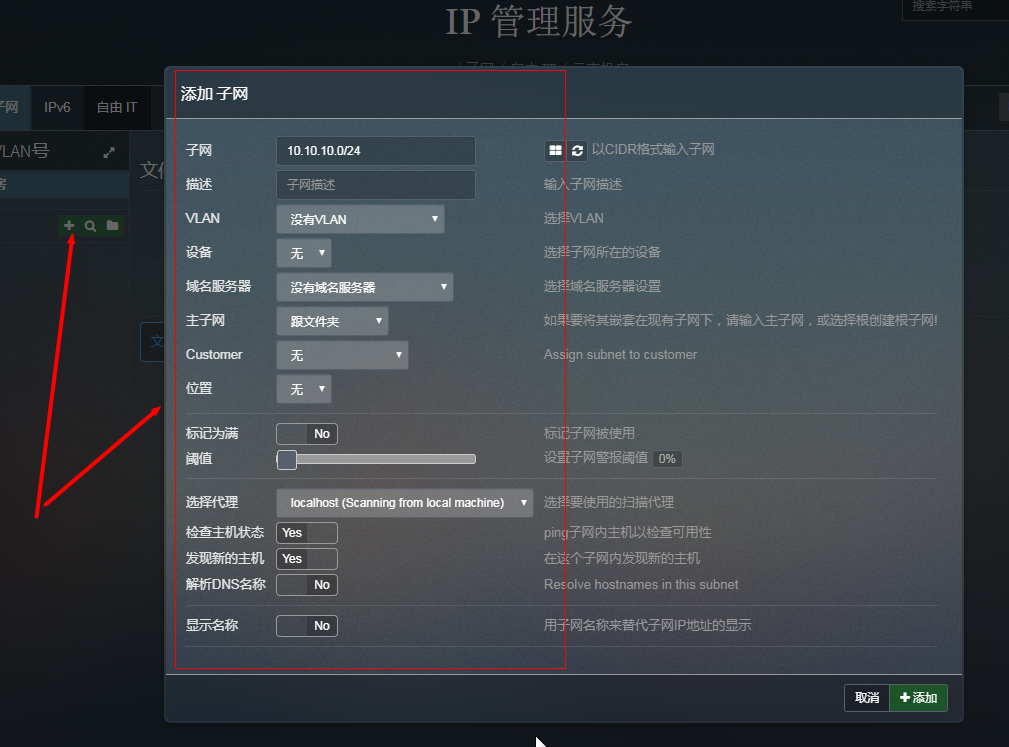
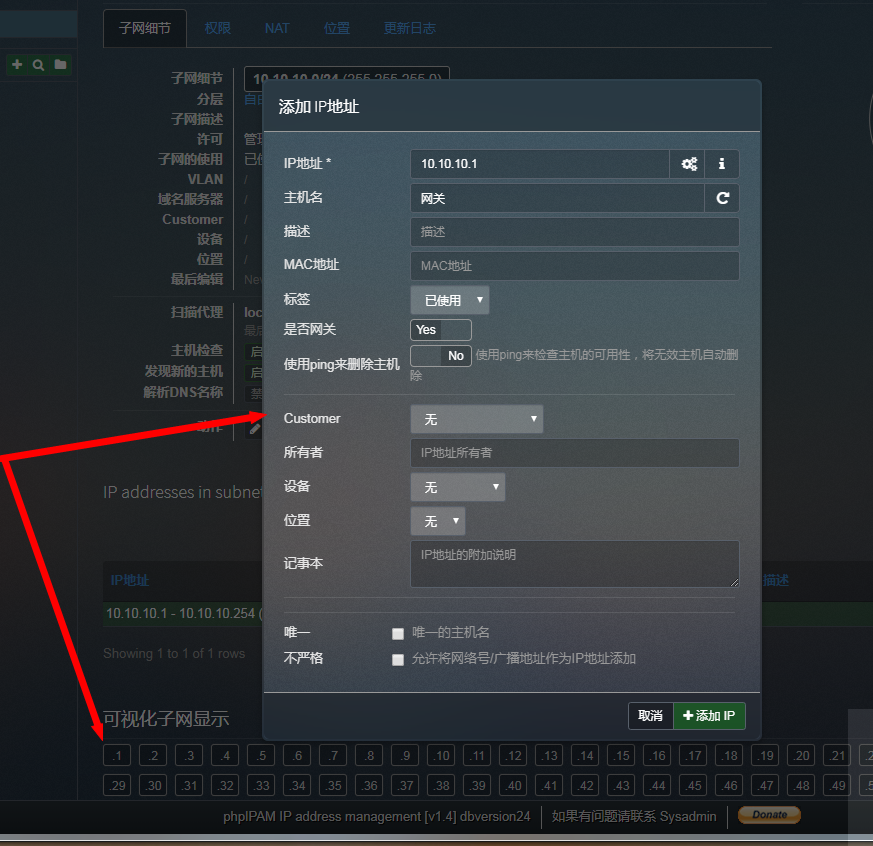
子网创建(添加),默认会自带一些测试子网,可以手动删除
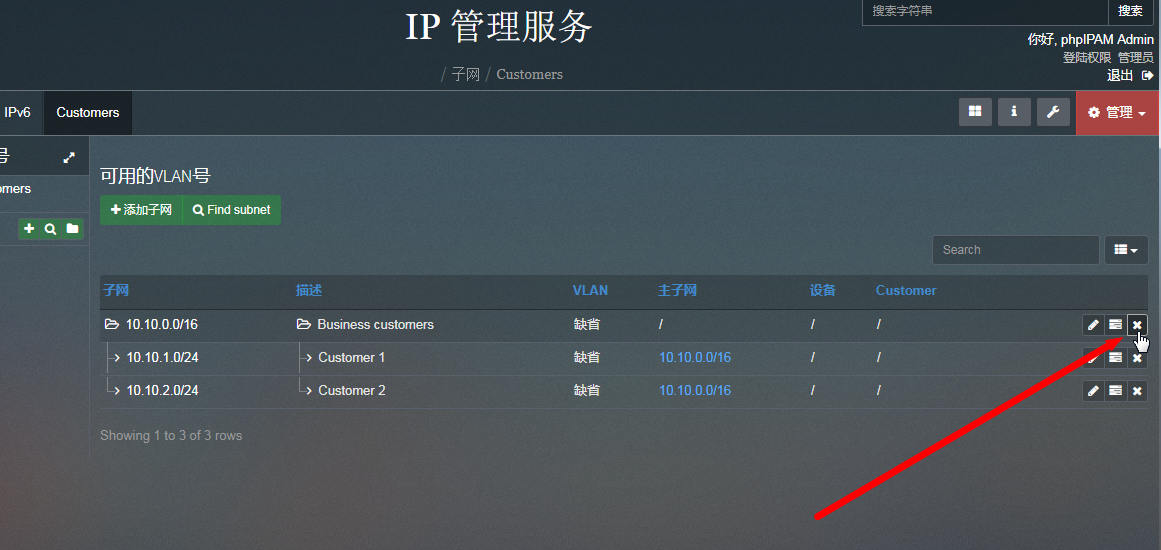
子网页面预览
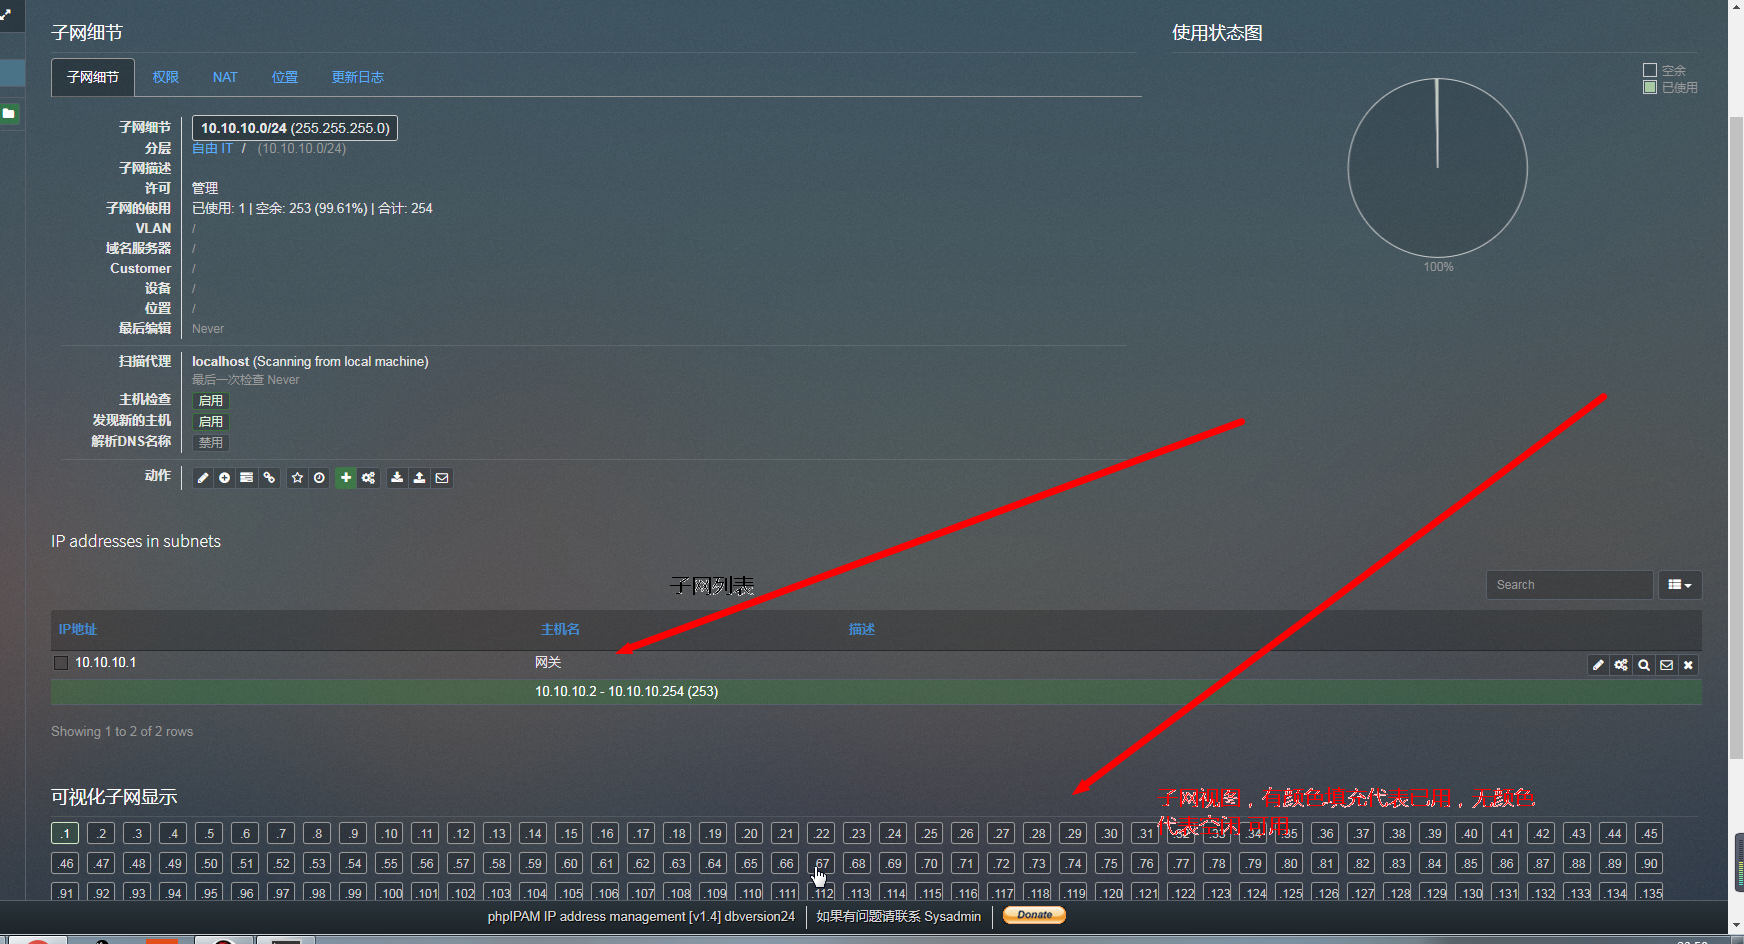
选中对应的 IP 可以进行编辑
主机发现及在线检测:这个在添加子网的时候可以勾选模块,但需要计划任务来执行
检查主机是否在线脚本(实际路径根据自己安装为准,都是在phpipam目录下):/usr/local/nginx/html/functions/scripts/pingCheck.php
发现子网主机脚本(实际路径根据自己安装为准,都是在phpipam目录下):/usr/local/nginx/html/functions/scripts/discoveryCheck.php
配置计划任务:
systemctl start crond             //启动计划任务程序  crond

crontab -e   //编辑、创建计划任务

*/ * * * * /usr/local/nginx/html/functions/scripts/pingCheck.php  > /dev/null 2>&1

 */ * * * * /usr/local/nginx/html/functions/scripts/discoveryCheck.php  > /dev/null 2>&1

crontab -l        //查看计划任务
升级 phpipam :
1、备份 phpipam 配置文件;备份数据库:
cp   /usr/local/nginx/html/config.php     /root/config.php.bk     // 实际备份路径请根据自己需求更改

# 备份数据库,以防万一
mysqldump -u phpipam -pphpipamadmin phpipam > /root/phpipam_db_2019-7-28.sql # 路径请根据自己需要更改
2、停 nginx 、Mariadb、php-fpm
systemctl  stop nginx

systemctl  stop  mysqld

systemctl  stop  php-fpm
3、去 GitHub 下载最新的 phpipam 源码(https://github.com/phpipam/phpipam)
#  解压源码

unzip   phpipam-master.zip

#  删除 nginx/html 目录下的所有内容

rm -rf /usr/local/nginx/html/*

#  把刚刚解压的出来的内容复制到 nginx/html 下

cp  -R  /usr/loca/nginx/html/   phpipam-master/*

#  修改所有者

chmod -Rf  www:www   /usr/local/nginx/html/*

#  把备份的配置文件复制到 nginx/html 下

cp  /usr/local/nginx/html   /root/config.php.bk

#  启动服务 nginx、Mariadb、php-fpm

systemctl  start nginx

systemctl  start  mysqld

systemctl  start  php-fpm
4、注:升完级后,需要以 admin 的账号登录,刷新数据库
LNMP安装部署开源IP管理工具phpipam的更多相关文章
- 部署开源IP管理工具phpIPAM
一.安装环境程序: yum install httpd mariadb-server php php-cli php-gd php-common php-ldap php-pdo php-pear p ...
- Netbox 开源 IPAM 管理工具搭建详细流程
原文链接:Netbox 开源 IPAM 管理工具搭建详细流程 参考资料:https://netbox.readthedocs.io/en/stable/ PostgreSQL数据库安装 1.yum 下 ...
- 安装memcache集群管理工具
安装memcache集群管理工具magent 一.安装libevent tar xf libevent--stable.tar.gz cd libevent- ./configure --prefix ...
- 搭建KVM环境——07 带GUI的Linux上安装KVM图形界面管理工具
清空yum源缓存,并查看yun源 [root@CentOS2 ~]# yum clean all Loaded plugins: fastestmirror, langpacks Cleaning r ...
- 五大好用的开源MySQL管理工具推荐
众所周知,对于数据库管理工作者(DBA)来说,保持数据正常运行在最佳状态需要具备敏捷.专注.冷静和快速的反应能力.因为数据库几乎是所有应用程序成功运行的核心,由于DBA负责组织数据,因此寻找可靠的工具 ...
- FREE 开源 API 管理工具等
最近学习API 管理工具,发现几个不错的东西,记录如下: 1.IBM 收购NODE 厂家 STRONGLOOP 有一产品LOOPBACK,开源,好! 2.apigee api管理平台 也不错. 3 ...
- 怎样安装pip--python的包管理工具
pip是python的包管理工具,使用它来安装python的模块很方便. pip支持的操作系统:Unix/Linux, OS X, and Windows. 支持的python版本号:2.6, 2.7 ...
- windows下安装php依赖关系管理工具composer
1.安装Composer Composer是PHP的依赖管理工具之一,官方网站 http://getcomposer.org/ .它支持多种安装方式,对于在win下做开发的草来说,最便捷的方式就是下载 ...
- 新浪代码部署手册 git管理工具
目前新浪云上的应用支持通过Git和SVN来部署代码. Git仓库地址 https://git.sinacloud.com/YOUR_APP_NAME SVN仓库地址 https://svn.sinac ...
随机推荐
- CCS+C6678LE开发记录12:UIA组件的安装
在安装了CCS 6.0版本的IDE和最新版的MCSDK后似乎一切都很完美,但事实并非如此. 当我试图编译SDK附带的image_processing (IPC based) demo时出现如下错误: ...
- (转载)Android自定义ProgressDialog进度等待框
Android自定义ProgressDialog进度等待框 作者:无缘公子 字体:[增加 减小] 类型:转载 时间:2016-01-11我要评论 这篇文章主要介绍了Android自定义Progress ...
- LR编写get请求
LR编写简单Get接口 接口必备信息:接口功能.URL.支持格式.http请求方式.请求参数.返回参数 请求地址 http://api.k780.com:88/?app=life.time 请求方式 ...
- ActiveMQ学习笔记(22)----ActiveMQ的优化和使用建议
1. 什么时候使用ActiveMQ 1. 异步通信 2. 一对多通信 3. 做个系统的集成,同构,异构 4. 作为RPC的替代 5. 多个应用相互解耦 6. 作为事件驱动架构的幕后支撑 7. 为了提高 ...
- python3 之 Ellipsis
在翻django 代码的时候无意中看到的, 主要还是在注解时候使用 官方参考:https://docs.python.org/3/library/constants.html#Ellipsis 注意: ...
- [洛谷P2370]yyy2015c01的U盘
题目大意:有n个文件,每个文件有一个大小和价值,有一个容量为s的U盘,要装这些文件.传输文件需要接口,一个大小为k的接口能传输的最大文件的大小为k.问最少要多大的接口,才能使传输的文件价值$\ge p ...
- 紫书 习题 11-9 UVa 12549 (二分图最小点覆盖)
用到了二分图的一些性质, 最大匹配数=最小点覆盖 貌似在白书上有讲 还不是很懂, 自己看着别人的博客用网络流写了一遍 反正以后学白书应该会系统学二分图的,紫书上没讲深. 目前就这样吧. #includ ...
- [luogu] P2787 语文1(chin1)- 理理思维(分块)
P2787 语文1(chin1)- 理理思维 题目背景 蒟蒻HansBug在语文考场上,挠了无数次的头,可脑子里还是一片空白. 题目描述 考试开始了,可是蒟蒻HansBug脑中还是一片空白.哦不!准确 ...
- Java基础学习总结(3)——抽象类
一.抽象类介绍 下面通过一下的小程序深入理解抽象类 因此在类Animal里面只需要定义这个enjoy()方法就可以了,使用abstract关键字把enjoy()方法定义成一个抽象方法,定义如下:pub ...
- Python学习之三【对象和类型&&运算符】
[对象和类型] 学生的属性: 小明 对象 姓名:男 性别: 年龄: 身高: 体重: 籍贯: 五种基本对象类型 字符串 (string),简记为 str 使用 ' ' 或 " " 括 ...