第八章 android-布局
常用的布局实现方式:线性布局,框架布局,表格布局,相对布局,绝对布局
1,线性布局
(1)线性布局是一种很重要的布局,也是经常用到的一种布局
(2)在线性布局中,所有的元素都按照水平竖直的顺序在界面上排序
如果水平排序,则每行包含一个界面元素
如果垂直排序,则每列只包含一个元素

(3)线性布局常用的常用属性:
android:orientation=“vertical”(该属性决定了他的子控件的布局方式)】
android:gravity=“center”(该属性决定了他的子类的xy位置)
常用到的几个属性值:
center_vertical:垂直(y轴)居中)
center_horizontal:水平(x轴)居中
centrer:水平垂直都居中
right:子类控件位于当前布局的右边
left:子类控件位于当前布局的左边
bottom:子类控件位于当前布局的下面
(4)代码操作过程
1)首先为了能完整的体验创建线性布局的过程,首先删除自动建立的res/layout/main.xml文件,然后建立用于显示垂直排列的线性布局的XML文件
2)右键--->xml--->LayoutXML File打开新文件建立向导
3)文件名为:main_vertical.xml
4)保存位置为res/layout
5)双击建立的
关键代码:
横向:
android:orientation="horizontal"
纵向:
android:orientation="vertical"
完整代码:
(1)纵向布局
<?xml version="1.0" encoding="utf-8"?>
<LinearLayout xmlns:android="http://schemas.android.com/apk/res/android"
android:orientation="vertical" android:layout_width="match_parent"
android:layout_height="match_parent"
android:stretchColumns="*"
android:id="@+id/Tablelayout01">
<TextView
android:id="@+id/tv"
android:layout_width="match_parent"
android:layout_height="wrap_content"
android:textSize="40dp"
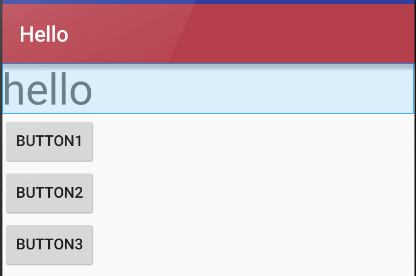
android:text="hello"/> <Button
android:id="@+id/btn"
android:layout_width="wrap_content"
android:layout_height="wrap_content"
android:text="button1"
/>
<Button
android:id="@+id/btn3"
android:layout_width="wrap_content"
android:layout_height="wrap_content"
android:text="button2"
/> <Button
android:id="@+id/btn2"
android:layout_width="wrap_content"
android:layout_height="wrap_content"
android:layout_x="150dp"
android:layout_y="120dp"
android:text="button3"
/> </LinearLayout>
(2)横向布局
完整代码
<?xml version="1.0" encoding="utf-8"?>

<LinearLayout xmlns:android="http://schemas.android.com/apk/res/android"

    android:orientation="horizontal" android:layout_width="match_parent"

    android:layout_height="match_parent"

    android:stretchColumns="*"

    android:id="@+id/Tablelayout01">

<TextView

    android:id="@+id/tv"

    android:layout_width="wrap_content"

    android:layout_height="wrap_content"

    android:textSize="40dp"

    android:text="hello"/>

    <Button

        android:id="@+id/btn"

        android:layout_width="wrap_content"

        android:layout_height="wrap_content"

        android:text="button1"

        />

    <Button

        android:id="@+id/btn3"

        android:layout_width="wrap_content"

        android:layout_height="wrap_content"

        android:text="button2"

        />

    <Button

        android:id="@+id/btn2"

        android:layout_width="wrap_content"

        android:layout_height="wrap_content"

        android:layout_x="150dp"

        android:layout_y="120dp"

        android:text="button3"

        />

</LinearLayout>
效果:

2,框架布局
http://www.cnblogs.com/excellencesy/p/9051441.html
3,表格布局
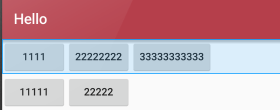
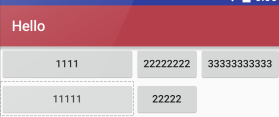
(1)表格布局也是一种常用的界面布局,它将屏幕划分网络,通过指定行和列可以将界面元素添加到网格中
1)网格的边界对用户是不可见的
2)表格布局还支持嵌套,可以将另一个表格布局放置在前一个表格布局的网格中,也可以在表格不居中添加其他的界面布局,例如:线性布局,相对布局等等
(2)表格布局的注意事项
1)向界面中添加一个表格布局,无需修改布局的属性值。其中,id属性为TableLayout01.layout Width 和Layout height属性都是wrap_content
2)向TableLayout中添加一个表格布局,无需修改布局的属相值。其中为
A隐藏从0 开始的索引列:
android:collapseColumns="0,1"
B收缩从零开始的索引列:
android:shrinkColumns="0,2,1"

C拉伸从另开始的索引列:
android:stretchColumns="0"
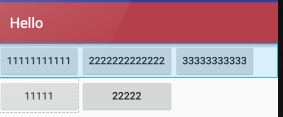
(3) 实例
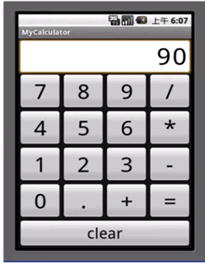
<?xml version="1.0" encoding="utf-8"?>

<TableLayout xmlns:android="http://schemas.android.com/apk/res/android"

    android:orientation="vertical" android:layout_width="match_parent"

    android:layout_height="match_parent"

    android:stretchColumns="*"

    android:id="@+id/Tablelayout01">

    <TextView android:id="@+id/tv"

        android:text="90"

        android:textSize="40dp"

        android:gravity="right"

        android:layout_width="match_parent"

        android:layout_height="50dp"/>

    <TableRow android:id="@+id/tableroe01"

        android:layout_width="wrap_content"

        android:layout_height="wrap_content">

        <Button android:id="@+id/bt1"

            android:text="1"

            android:layout_width="wrap_content"

            android:layout_height="wrap_content"/>

        <Button android:id="@+id/bt2"

            android:text="2"

            android:layout_width="wrap_content"

            android:layout_height="wrap_content"/>

        <Button android:id="@+id/bt3"

            android:text="3"

            android:layout_width="wrap_content"

            android:layout_height="wrap_content"/>

        <Button android:id="@+id/bt4"

            android:text="+"

            android:layout_width="wrap_content"

            android:layout_height="wrap_content"/>

    </TableRow>

    <TableRow android:id="@+id/tablerow02"

        android:layout_height="wrap_content"

        android:layout_width="wrap_content">

        <Button android:id="@+id/bt31"

            android:text="4"

            android:layout_width="wrap_content"

            android:layout_height="wrap_content"/>

        <Button android:id="@+id/bt32"

            android:text="5"

            android:layout_width="wrap_content"

            android:layout_height="wrap_content"/>

        <Button android:id="@+id/bt33"

            android:text="6"

            android:layout_width="wrap_content"

            android:layout_height="wrap_content"/>

        <Button android:id="@+id/bt34"

            android:text="-"

            android:layout_width="wrap_content"

            android:layout_height="wrap_content"/>

    </TableRow>

    <TableRow android:id="@+id/tablerow03"

        android:layout_height="wrap_content"

        android:layout_width="wrap_content">

        <Button android:id="@+id/bt41"

            android:text="7"

            android:layout_width="wrap_content"

            android:layout_height="wrap_content"/>

        <Button android:id="@+id/bt42"

            android:text="8"

            android:layout_width="wrap_content"

            android:layout_height="wrap_content"/>

        <Button android:id="@+id/bt43"

            android:text="9"

            android:layout_width="wrap_content"

            android:layout_height="wrap_content"/>

        <Button android:id="@+id/bt44"

            android:text="*"

            android:layout_width="wrap_content"

            android:layout_height="wrap_content"/>

    </TableRow>

    <TableRow android:id="@+id/tablerow04"

        android:layout_height="wrap_content"

        android:layout_width="wrap_content">

        <Button android:id="@+id/bt21"

            android:text="+"

            android:layout_width="wrap_content"

            android:layout_height="wrap_content"/>

        <Button android:id="@+id/bt22"

            android:text="-"

            android:layout_width="wrap_content"

            android:layout_height="wrap_content"/>

        <Button android:id="@+id/bt23"

            android:text="*"

            android:layout_width="wrap_content"

            android:layout_height="wrap_content"/>

        <Button android:id="@+id/bt24"

            android:text="/"

            android:layout_width="wrap_content"

            android:layout_height="wrap_content"/>

    </TableRow>

    <TableRow android:id="@+id/tablerow05"

        android:layout_height="wrap_content"

        android:layout_width="match_parent">

        <Button android:id="@+id/bt51"

            android:text="center"

            android:layout_width="match_parent"

            android:layout_height="wrap_content"

            android:layout_span="4" />

    </TableRow>

</TableLayout>
4,相对布局
(1)相对布局是一种非常灵活的布局方式,能够通过指定界面元素与其他元素的相对位置关系,确定所有元素的布局位置
(2)能够最大程度保证在各种屏幕类型的手机上正确的显示界面布局
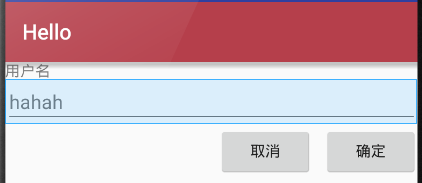
(3)相对布局示例说明
1)添加TextView控件(“用户名”),相对布局会将TextView控件放置在屏幕的最上方
2)然后添加TextView控件,并声明该控件的位置在TextView控件的下面,相对布局会根据TextView的位置确定EditText控件的位置
3)之后添加的第一个Button控件,声明在EditText控件的下方,且在福控件的最右边
4)最后,添加第二个Button控件,声明该控件处于相同的水平位置
关键代码解读:
设置在哪个组件的下面:
android:layout_below="@id/label"
设置在相对布局组件的最右侧:
android:layout_alignParentRight="true"
设置距离左边的组件的距离:
android:layout_marginLeft="10dip"
设置左边的组件是哪个:
android:layout_toLeftOf="@id/cancel"
设置在距离上面组件的距离:
android:layout_alignTop="@id/cancel“
完整代码:
<?xml version="1.0" encoding="utf-8"?>

<RelativeLayout xmlns:android="http://schemas.android.com/apk/res/android"

    android:orientation="vertical" android:layout_width="match_parent"

    android:layout_height="match_parent"

    android:stretchColumns="*"

    android:id="@+id/Tablelayout01">

<TextView

    android:id="@+id/tv"

    android:layout_width="match_parent"

    android:layout_height="wrap_content"

    android:text="用户名"/>

    <EditText

        android:id="@+id/et"

        android:layout_width="match_parent"

        android:layout_height="wrap_content"

        android:layout_below="@id/tv"

        android:hint="hahah"/>

    <Button

        android:id="@+id/btn"

        android:layout_width="wrap_content"

        android:layout_height="wrap_content"

        android:layout_alignParentRight="true"

        android:layout_below="@id/et"

        android:layout_marginLeft="10dip"

        android:text="确定"

        />

    <Button

        android:id="@+id/btn2"

        android:layout_width="wrap_content"

        android:layout_height="wrap_content"

       android:layout_toLeftOf="@id/btn"

        android:layout_alignTop="@id/btn"

        android:text="取消"

        />

</RelativeLayout>
5,绝对布局
(1)绝对布局能通过指定界面元素的坐标位置,来确定用户界面的整体布局
(2)绝对布局是一种不推荐使用的界面布局,因为通过X轴和Y轴确定界面元素的位置后,android紫铜不能根据不同的屏幕对界面元素的位置进行调整,降低了界面布局对不同的类型和尺寸屏幕的适应能力
(3)每一个界面控件都必须指定坐标(X,Y),例如“确认”按钮的坐标是(40,120),“取消”按钮的坐标是(120,120)。坐标原点(0,0),在屏幕的左上角
关键代码解读:
android:layout_x="40dp"

android:layout_y="120dp"
完整代码:
<?xml version="1.0" encoding="utf-8"?>

<AbsoluteLayout xmlns:android="http://schemas.android.com/apk/res/android"

    android:orientation="vertical" android:layout_width="match_parent"

    android:layout_height="match_parent"

    android:stretchColumns="*"

    android:id="@+id/Tablelayout01">

<TextView

    android:id="@+id/tv"

    android:layout_width="match_parent"

    android:layout_height="wrap_content"

    android:layout_x="40dp"

    android:layout_y="40dp"

    android:text="用户名:"/>

    <EditText

        android:id="@+id/et"

        android:layout_width="match_parent"

        android:layout_height="wrap_content"

        android:layout_x="40dp"

        android:layout_y="60dp"

        android:hint="hahah"/>

    <Button

        android:id="@+id/btn"

        android:layout_width="wrap_content"

        android:layout_height="wrap_content"

        android:layout_x="40dp"

        android:layout_y="120dp"

        android:text="确定"

        />

    <Button

        android:id="@+id/btn2"

        android:layout_width="wrap_content"

        android:layout_height="wrap_content"

    android:layout_x="150dp"

        android:layout_y="120dp"

        android:text="取消"

        />

</AbsoluteLayout>
显示结果:

第八章 android-布局的更多相关文章
- 【转】在Android布局中使用include和merge标签
内容转自:http://fengweipeng1208.blog.163.com/blog/static/21277318020138229754135/ 在我们开发android布局时,经常会有很多 ...
- Android成长日记-Android布局优化
Android常用布局 1. LinearLayout(线性布局) 2. RelativeLayout(相对布局) 3. TableLayout(表格布局) 4. AbsoluteLayou(绝对布局 ...
- 【转】Android布局优化之ViewStub
ViewStub是Android布局优化中一个很不错的标签/控件,直接继承自View.虽然Android开发人员基本上都听说过,但是真正用的可能不多. ViewStub可以理解成一个非常轻量级的Vie ...
- Android 布局之LinearLayout
Android 布局之LinearLayout 1 LinearLayout简介 LinearLayout是线程布局.它包括2个方向(android:orientation):“水平”(horizon ...
- Android 布局之RelativeLayout
Android 布局之RelativeLayout 1 RelativeLayout简介 RelativeLayout是相对布局. RelativeLayout布局属性 1.1 与parent相对的属 ...
- Android 布局之TableLayout
Android 布局之TableLayout 1 TableLayout简介 TableLayout是表格布局.TableLayout 可设置的属性包括全局属性及单元格属性. 1.1 全局属性 有以下 ...
- Android 布局之FrameLayout
Android 布局之FrameLayout 1 FrameLayout简介 对于FrameLayout,官方介绍是:FrameLayout is designed to block out an a ...
- Android 布局之GridLayout
Android 布局之GridLayout 1 GridLayout简介 GridLayout是Android4.0新提供的网格矩阵形式的布局控件. GridLayout的继承关系如下:java.la ...
- Xamarin Android布局文件没有智能提示
Xamarin Android布局文件没有智能提示 在Visual Studio 2015中,Android项目的Main.axml文件没有智能提示,不便于布局文件的编写.解决办法:(1)从Xamar ...
- Android布局---相对布局
Android布局分为五大类:相对布局.线性布局.表格布局.帧布局.网格布局 相对布局 语法格式: <RelativeLayout xmlns:android="http://sche ...
随机推荐
- 深入MySQL用户自定义变量:使用详解及其使用场景案例
一.前言 在前段工作中,曾几次收到超级话题积分漏记的用户反馈.通过源码的阅读分析后,发现问题出在高并发分布式场景下的计数器上.计数器的值会影响用户当前行为所获得积分的大小.比如,当用户在某超级话题下连 ...
- C++ Primer 第3章 字符串、向量和数组
C++ Primer 第3章 字符串.向量和数组 C Primer 第3章 字符串向量和数组 1 命名空间的using声明 2 标准库类型string 3 标准库类型vector 4 迭代器介绍 5 ...
- qemu中的网络设置
https://www.cnblogs.com/hukey/p/6436211.html 这个链接里教你怎么操作kvm的各种网络模式,实际操作成
- ubuntu添加新用户并添加管理员权限
Ubuntu创建新用户并增加管理员权限 Family 2014-06-24 22:21:22 $是普通管员,#是系统管理员,在Ubuntu下,root用户默认是没有密码的,因此也就无法使用(据说是为 ...
- [blockchain-035]eos的部署安装智能合约
0.参考资料 https://github.com/EOSIO/eos/wiki 1. eos的github地址 https://github.com/EOSIO/eos 2.下载eos源码 git ...
- 雅礼集训 Day1 T2 折射
折射 题目描述 小\(\mathrm{Y}\)十分喜爱光学相关的问题,一天他正在研究折射. 他在平面上放置了\(n\)个折射装置,希望利用这些装置画出美丽的折线. 折线将从某个装置出发,并且在经过一处 ...
- 【HDU 3336 Count the string】
Time Limit: 2000/1000 MS (Java/Others) Memory Limit: 32768/32768 K (Java/Others)Total Submission( ...
- 部分浏览器上a标签包裹的dom元素显示不正常
在苹果和部分安卓机上出现,pc端和chrome浏览器响应式设计里怎么样也不会出现的访问后a标签包裹的dom元素显示不正常a标签内的hr元素颜色显示不正常hr水平线的颜色被 bootstrap的css的 ...
- 看得懂的区块链,看不清的ICO人心【转】
比特币又开始下跌了,是狂欢尽头还是又一波调整,无从得知,背后的乱象会让监管者继续心烦,而这乱象对我来说,有时候会有些心寒. 你说我怎么可能想到,我一个写程序的人,突然有一天会发现,朋友圈里有一些搞技术 ...
- 倒置函数reverse的用法
倒置字符串函数reverse:用于倒置字符串s中的各个字符的位置,如原来字符串中如果初始值为123456,则通过reverse函数可将其倒置为654321,程序如下:#include<stdio ...