Django pymysql学员管理系统
学员管理系统
项目规划阶段
项目背景
近年来老男孩教育的入学学员数量稳步快速增长,传统的excel统计管理学员信息的方式已经无法满足日渐增长的业务需求。因此公司急需一套方便易用的“学员管理系统”,来提高公司在校学员信息的收集和处理能力。鉴于Python学院全栈x期的学员都聪明伶俐可爱至极,因此公司领导经过慎重考虑特决定将此项目交给大家来开发。
项目需求
本次学员管理系统设计开发,时间紧任务重,希望各位开发人员戒骄戒躁戒烟戒酒,尽快完成项目的开发。
具体需求为:
学员管理系统有三个角色:学生、老师和班级。
学生有姓名和所属班级。
班级信息有:班级名称。
老师信息有:姓名
老师可以带多个班级,每个班级不同阶段也会有不同的老师讲课。
项目周期
越快越好
项目开发阶段
表结构设计

-- 创建班级表

CREATE TABLE class(

  id int auto_increment PRIMARY KEY,

  name CHAR(10) not null

)engine=innodb DEFAULT charset=utf8;

-- 创建学生表

CREATE TABLE student(

  id int auto_increment PRIMARY KEY,

  name CHAR(10) not null,

  class_id INT, FOREIGN KEY (class_id) REFERENCES class(id) ON DELETE CASCADE ON UPDATE CASCADE

)engine=innodb DEFAULT charset=utf8;

-- 创建老师表

CREATE TABLE teacher(

  id int auto_increment PRIMARY KEY,

  name CHAR(10) not null

)engine=innodb DEFAULT charset=utf8;

-- 创建老师和班级关系表

CREATE TABLE teacher2class(

  id INT AUTO_INCREMENT PRIMARY KEY,

  teacher_id INT,FOREIGN KEY (teacher_id) REFERENCES teacher(id) ON DELETE CASCADE ON UPDATE CASCADE ,

  class_id INT,FOREIGN KEY (class_id) REFERENCES class(id) ON DELETE CASCADE ON UPDATE CASCADE

)engine=innodb DEFAULT charset=utf8;
前端部分
使用Bootstrap搭建的管理后台页面
后端部分
视图函数+模板语言+pymysql
班级信息管理
视图函数:
我们把所有的处理请求相关的函数从 urls.py中拿出来,统一放在一个叫views.py的文件中,这样就把代码模块化,实现不同功能的代码放在不同的模块。
urls.py文件中只放置 URL和函数的对应关系
views.py 文件中只放置那些针对不同URL执行的函数
" # 执行上面定义好的SQL语句 cursor.execute(sql) # 拿到所有查询到的结果 # 此处查询结果是一个大列表,里面是一个一个字典 ret = cursor.fetchall() # 关闭连接 cursor.close() conn.close() # 2. 用数据去替换HTML页面中的特殊符号,特殊符号是按照Django模板语言的语法写好的 # render()的第三个参数是一个字典,字典的key是什么,HTML文件中的变量名就写什么 return render(request, "class_list.html", {"class_list": ret})
页面部分
这里用到了Django模板语言的for循环,模板语言部分内容详见页面下方的超链接。
<!-- Table -->

<div class="my-table-wrapper">

  <table class="table table-bordered table-striped">

    <thead>

    <tr>

      <th>#</th>

      <th>班级ID</th>

      <th>班级名称</th>

      <th>操作</th>

    </tr>

    </thead>

    <tbody>

    {% for class in class_list %}

          <tr>

          <td>{{ forloop.counter }}</td>

          <td scope="row">{{ class.id }}</td>

          <td>{{ class.cname }}</td>

          <td class="text-center">

              <a href="/edit_class/?class_id={{ class.id }}" type="button" class="btn btn-sm btn-info" aria-label="Left Align">

              <span class="glyphicon glyphicon-pencil" aria-hidden="true"></span>新页面编辑

            </a>

            <a type="button" class="btn btn-sm btn-success" aria-label="Left Align">

              <span class="glyphicon glyphicon-pencil" aria-hidden="true"></span>编辑

            </a>

          <a href="/delete_class/?class_id={{ class.id }}" type="button" class="btn btn-sm btn-danger" aria-label="Left Align">

            <span class="glyphicon glyphicon-remove" aria-hidden="true"></span>删除

          </a>

          </td>

        </tr>

    {% endfor %}

    </tbody>

  </table>
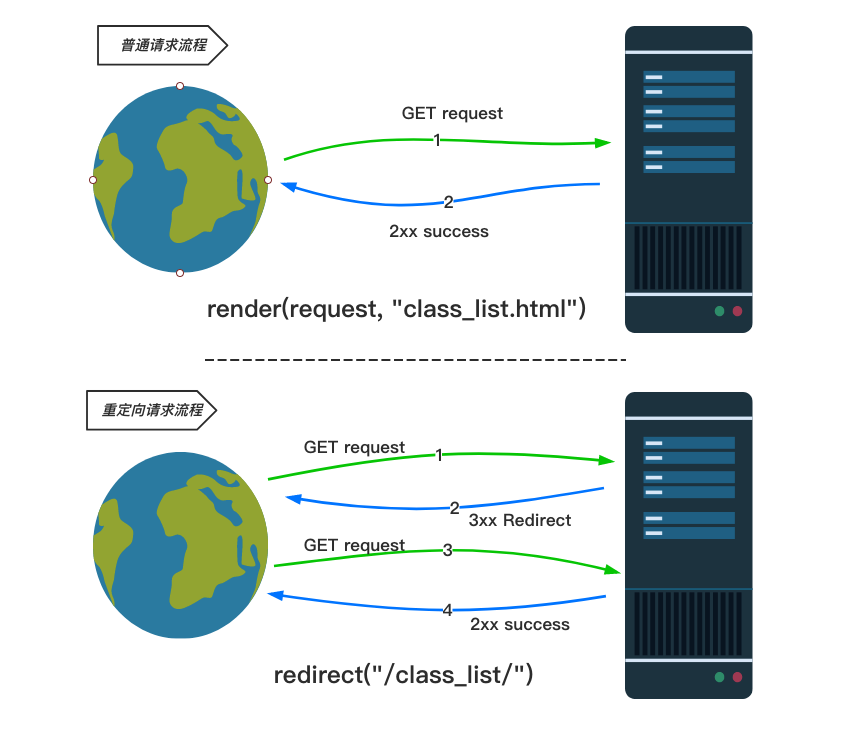
删除班级
后端部分
点击班级列表 表格中 对应班级后面的 删除按钮(a标签),向后端发送get请求,并且携带当前班级的ID。
后端拿到 要删除的班级的ID值,去数据库中执行删除操作。
# 删除班级

def delete_class(request):

    # 根据班级的ID删除

    # 班级ID从哪儿来?  --> 需要页面发起请求的时候携带

    # 页面如何携带要删除的班级的ID? --> 通过给a标签设置href属性时拼接

    # 后端拿到要删除的班级的ID

    class_id = request.GET.get("class_id")

    # 去数据库里删除

    # 连接数据库

    conn = pymysql.connect(host="localhost", user="root", password="root1234", database="s8", charset="utf8")

    # 指定输出的每条数据的类型是字典

    cursor = conn.cursor(cursor=pymysql.cursors.DictCursor)

    # 删除操作的SQL语句

    sql = "delete from class where id=%s;"

    # 执行删除语句

    cursor.execute(sql, class_id)

    # 向数据库提交操作

    conn.commit()

    cursor.close()

    conn.close()

    # 执行完删除操作后跳转回班级列表页面

    return redirect("/class_list/")
页面部分
浏览器发起的GET请求通过在URL后面添加/url/?k1=v1&k2=v2的方式添加参数。
使用Django模板语言的语法将{{ class.id }}拼接到了a标签的href属性中。
这样页面点击这个a标签就能把要删除的班级ID值传递给后端了。
<a href="/delete_class/?class_id={{ class.id }}" type="button" class="btn btn-sm btn-danger" aria-label="Left Align">

  <span class="glyphicon glyphicon-remove" aria-hidden="true"></span>删除

</a
redirect()回复了一个重定向的响应
添加班级
后端部分
# 添加班级

def add_class(request):

    # 如果是POST请求,就表明是页面要提交数据

    if request.method == "POST":

        # 页面使用POST方法提交添加班级的数据

        # 后端取到新班级的名称信息

        class_name = request.POST.get("cname")

        conn = pymysql.connect(host="localhost", user="root", password="root1234", database="s8", charset="utf8")

        # 指定输出的结果类型是字典

        cursor = conn.cursor(cursor=pymysql.cursors.DictCursor)

        # 新增班级的SQL语句

        sql = "insert into class (cname) VALUE (%s);"

        # 执行SQL语句,在数据库中创建一条新的班级记录

        cursor.execute(sql, class_name)

        # 向数据库提交

        conn.commit()

        # 关闭连接

        cursor.close()

        conn.close()

        # 新添加一个班级之后跳转到班级列表页面

        return redirect("/class_list/")

    # 如果不是POST请求就返回添加班级页面

    return render(request, "add_class.html")
页面部分
利用form表单向后端提交新班级的数据,所以add_class.html页面中form表单要填写上action=form action="/add_class/" method="post"> <input type="text" name="cname"> <input type="submit" value="提交"> </form>
编辑班级信息
后端部分
# 新页面编辑班级信息

def edit_class(request):

    # 如果是POST请求

    if request.method == "POST":

        # 从页面POST过来的数据中取到编辑的班级ID

        class_id = request.POST.get("id")

        # 从页面POST过来的数据中取到班级名称

        class_cname = request.POST.get("cname")

        # 去数据库里面更新班级名称

        # 连接数据库

        conn = pymysql.connect(host="localhost", user="root", password="root1234", database="s8", charset="utf8")

        # 获取光标

        cursor = conn.cursor(cursor=pymysql.cursors.DictCursor)

        # 更新班级信息的SQL语句

        sql = "update class set cname=%s where id=%s;"

        # 执行SQL语句

        cursor.execute(sql,(class_cname, class_id))

        # 向数据库提交修改

        conn.commit()

        # 关闭连接

        cursor.close()

        conn.close()

        # 更新完班级信息之后跳转回班级列表页面

        return redirect("/class_list/")

    # 如果不是POST请求,就表明是点击了新页面编辑班级信息的按钮

    # 取到被编辑的班级的ID

    class_id = request.GET.get("class_id")

    # 去数据库里查询当前班级的信息

    conn = pymysql.connect(host="localhost", user="root", password="root1234", database="s8", charset="utf8")

    # 指定输出的单条数据的类型是字典

    cursor = conn.cursor(cursor=pymysql.cursors.DictCursor)

    # 查询的SQL语句

    sql = "select id, cname from class WHERE id=%s;"

    # 执行查询操作

    cursor.execute(sql, class_id)

    # 取单条数据

    ret = cursor.fetchone()

    # 关闭连接

    cursor.close()

    conn.close()

    # 把要编辑的班级的信息 替换 edit_class.html 页面中的特殊符号,最后把页面返回给浏览器

    return render(request, "edit_class.html", {"class_info": ret})
页面部分
编辑班级信息在页面上展示的就是一个form表单,用户更新完班级信息之后要提交,就需要向后端提交表单数据。
这个时候form表单就需要配置好 action="/edit_class/" 和 method="post"。
但是提交的数据里需要告知后端,我更改的是数据库中的哪一条班级信息,所以这里要把班级ID也放到form表单中。
班级ID不应该让用户修改,所以就把班级ID的input框给隐藏掉。
<form action="/edit_class/" method="post">

    <input type="text" name="id" value="{{ class_info.id }}" style="display: none">

    <input type="text" name="cname" value="{{ class_info.cname }}">

    <input type="submit" value="提交">

</form>
学生信息管理功能开发
首先,我们来回顾一下到目前为止我们学过的Django框架相关的内容:
浏览器输入URL到页面展示结果的过程,可以简单参考下图:
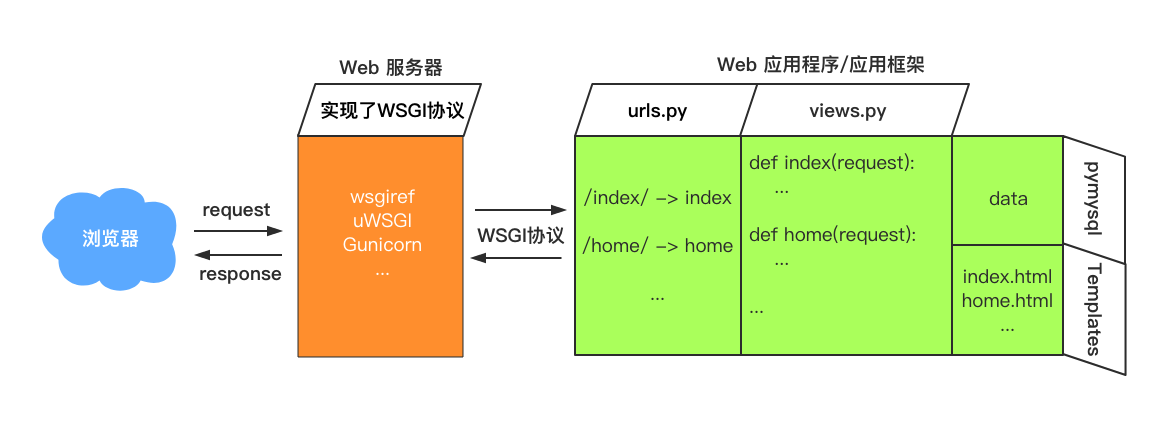
上图中,绿色部分就是我们实际需要开发的那部分。
在上一节课中我们实现了班级信息的增删改查,本节课我们继续开发学生信息管理的功能。
学生信息管理相比于班级信息管理稍微难一点,因为数据库的表结构中学生表通过外键关联了班级表。
所以增删改查的操作需要注意外键部分的相关操作。
学生信息展示(查)
区别于班级信息管理,学生信息因为通过外键关联了班级信息,所以除了要展示学生的姓名还要展示出学生所属班级的名称。
后端部分
def student_list(request):

    conn = pymysql.connect(host="127.0.0.1", port=3306, user="root", passwd="root1234", db="mysite", charset="utf8")

    cursor = conn.cursor(cursor=pymysql.cursors.DictCursor)

    cursor.execute("SELECT student.id, student.name, class.name AS class_name from student LEFT JOIN class ON student.class_id = class.id;")

    student_list = cursor.fetchall()

    cursor.close()

    conn.close()

    return render(request, "student_list.html", {"students": student_list})
前端部分
<table class="table table-bordered table-striped">

  <thead>

  <tr>

    <th>#</th>

    <th>学生姓名</th>

    <th>班级</th>

    <th>操作</th>

  </tr>

  </thead>

  <tbody>

  {% for student in students %}

  <tr>

    <th scope="row">{{ student.id }}</th>

    <td>{{ student.name }}</td>

    <td>{{ student.class_name }}</td>

    <td class="text-center">

      <a type="button" class="btn btn-sm btn-success" aria-label="Left Align">

        <span class="glyphicon glyphicon-pencil" aria-hidden="true"></span>编辑

      </a>

      |

      <a href="/edit_student/?student_id={{ student.id }}/" type="button" class="btn btn-sm btn-success" aria-label="Left Align">

        <span class="glyphicon glyphicon-pencil" aria-hidden="true"></span>新页面编辑

      </a>

      |

      <a href="/delete_student/?student_id={{ student.id }}" type="button" class="btn btn-sm btn-danger" aria-label="Left Align">

        <span class="glyphicon glyphicon-remove" aria-hidden="true"></span>删除

      </a>

    </td>

  </tr>

  {% endfor %}

  </tbody>

</table>
再一次练习了Django模板语言的for循环。
删除学生信息(删)
后端部分
def delete_student(request):

    # 从GET请求的URL中取到要删除的学生ID

    student_id = request.GET.get("student_id")

    # 连接数据库

    conn = pymysql.connect(host="127.0.0.1", port=3306, user="root", passwd="root1234", db="mysite", charset="utf8")

    cursor = conn.cursor(cursor=pymysql.cursors.DictCursor)

    # 删除指定的学生

    sql = "delete from student WHERE id=%s;"

    # 执行SQL语句

    cursor.execute(sql, [student_id, ])

    conn.commit()

    conn.close()

    # 删除成功,跳转到学生列表页

    return redirect("/student_list/")
前端部分
注意在学生信息的页面删除按钮上用模板语言的方式拼接a href="/delete_student/?student_id={{ student.id }}" type="button" class="btn btn-sm btn-danger" aria-label="Left Align"> <span class="glyphicon glyphicon-remove" aria-hidden="true"></span>删除 </a>
添加学生信息(增)
后端部分
def add_student(request):

    # 如果是POST请求表示前端提交数据过来

    if request.method == "POST":

        student_name = request.POST.get("student_name")

        class_id = request.POST.get("class_id")

        conn = pymysql.connect(host="127.0.0.1", port=3306, user="root", passwd="root1234", db="mysite", charset="utf8")

        cursor = conn.cursor(cursor=pymysql.cursors.DictCursor)

        cursor.execute("insert into student(name, class_id) VALUES (%s, %s)", [student_name, class_id])

        conn.commit()

        cursor.close()

        conn.close()

        return redirect("/student_list/")

    # 前端不发送POST请求情况下默认返回新增学生信息页面

    else:

        # 因为我们新添加学生信息的时候需要指定所属的班级

        # 所以需要先查询出所有的班级信息,填充到页面上

        conn = pymysql.connect(host="127.0.0.1", port=3306, user="root", passwd="root1234", db="mysite", charset="utf8")

        cursor = conn.cursor(cursor=pymysql.cursors.DictCursor)

        cursor.execute("select id, name from class")

        class_list = cursor.fetchall()

        cursor.close()

        conn.close()

        return render(request, "add_student.html", {"class_list": class_list})
前端部分
前端页面需要将已经有的班级信息做成可以选择的select框。
<form class="form-horizontal" action="/add_student/" method="post">

  <div class="form-group">

    <label for="inputclassname" class="col-sm-2 control-label">学生姓名</label>

    <div class="col-sm-10">

      <input type="text" class="form-control" name="student_name" id="inputclassname" placeholder="学生姓名">

    </div>

  </div>

  <div class="form-group">

    <label for="selectclass" class="col-sm-2 control-label">班级</label>

    <div class="col-sm-10">

      <select class="form-control" name="class_id">

        {% for class in class_list %}

          <option value="{{ class.id }}">{{ class.name }}</option>

        {% endfor %}

      </select>

    </div>

  </div>

  <div class="form-group">

    <div class="col-sm-offset-2 col-sm-10">

      <button type="submit" class="btn btn-default">提交</button>

    </div>

  </div>

</form>
编辑学生信息(改)
后端部分
def edit_student(request):

    if request.method == "POST":

        student_id = request.POST.get("student_id")

        student_name = request.POST.get("student_name")

        class_id = request.POST.get("class_id")

        # 更新学生表的SQL

        sql = "update student set name=%s, class_id= %s WHERE id=%s;"

        # 连接数据库

        conn = pymysql.connect(host="127.0.0.1", port=3306, user="root", passwd="root1234", db="mysite", charset="utf8")

        cursor = conn.cursor(cursor=pymysql.cursors.DictCursor)

        cursor.execute(sql, [student_name, class_id, student_id])

        cursor.close()

        conn.close()

        # 更新完学生信息之后跳转到学生列表页面

        return redirect("/student_list/")

    else:

        # 要编辑学生信息就需要在页面上把当前学生的信息以及所有的班级信息都展示出来

        # 取到要编辑的学生的ID

        student_id = request.GET.get("student_id")

        # 连接数据库

        conn = pymysql.connect(host="127.0.0.1", port=3306, user="root", passwd="root1234", db="mysite", charset="utf8")

        cursor = conn.cursor(cursor=pymysql.cursors.DictCursor)

        # 取到所有的班级信息

        get_class_sql = "select id, name from class;"

        cursor.execute(get_class_sql)

        class_list = cursor.fetchall()

        get_student_sql = "select id, name, class_id from student where id=%s;"

        cursor.execute(get_student_sql, [student_id, ])

        student = cursor.fetchone()

        cursor.close()

        conn.close()

        return render(request, "edit_student.html", {"class_list": class_list, "student": student})
前端部分
<form class="form-horizontal" action="/edit_student/" method="post">

  <input type="text" name="student_id" value="{{ student.id }}" style="display: none">

  <div class="form-group">

    <label for="inputclassname" class="col-sm-2 control-label">学生姓名</label>

    <div class="col-sm-10">

      <input type="text" class="form-control" name="student_name" id="inputclassname" placeholder="班级名称" value="{{ student.name }}">

    </div>

    <span id="helpBlock2" class="help-block">{{ error }}</span>

  </div>

  <div class="form-group">

      <label for="selectclass" class="col-sm-2 control-label">班级</label>

      <div class="col-sm-10">

        <select class="form-control" name="class_id">

          {% for class in class_list %}

            {% if class.id == student.class_id %}

            <option selected value="{{ class.id }}">{{ class.name }}</option>

            {% else %}

            <option value="{{ class.id }}">{{ class.name }}</option>

            {% endif %}

          {% endfor %}

        </select>

      </div>

    </div>

  <div class="form-group">

    <div class="col-sm-offset-2 col-sm-10">

      <button type="submit" class="btn btn-default">提交</button>

    </div>

  </div>

</form>
老师信息管理
老师信息管理相比于学生信息管理又多了一点,因为我们的数据结构中老师表和班级表是通过teacher2class表进行多对多关联的。
后端部分
注意连表查询操作
def teacher_list(request):

    # 连接数据库

    conn = pymysql.connect(host="127.0.0.1", port=3306, user="root", passwd="root1234", db="mysite", charset="utf8")

    cursor = conn.cursor(cursor=pymysql.cursors.DictCursor)

    sql = "select teacher.id, teacher.name, class.name as cname from teacher LEFT JOIN teacher2class on teacher.id = teacher2class.teacher_id LEFT JOIN class ON teacher2class.class_id = class.id;"

    cursor.execute(sql)

    teacher_list_o = cursor.fetchall()

    # 将查询到的数据类型转换一下

    teacher_list = magic(teacher_list_o)

    return render(request, "teacher_list.html", {"teacher_list": teacher_list})
前端部分
将老师关联的班级信息也展示出来。
<table class="table table-bordered table-striped">

  <thead>

  <tr>

    <th>#</th>

    <th>老师</th>

    <th>班级</th>

    <th>操作</th>

  </tr>

  </thead>

  <tbody>

  {% for teacher in teacher_list %}

  <tr>

    <th scope="row">{{ teacher.id }}</th>

    <td>{{ teacher.name }}</td>

    <td>

      {% for class in teacher.class_list %}

      <span>{{ class }}</span>|

      {% endfor %}

    </td>

    <td class="text-center">

      <a type="button" class="btn btn-sm btn-success m-edit" aria-label="Left Align">

        <span class="glyphicon glyphicon-pencil" aria-hidden="true"></span>编辑

      </a>

      |

      <a href="/edit_teacher/?teacher_id={{ teacher.id }}/" type="button" class="btn btn-sm btn-success" aria-label="Left Align">

        <span class="glyphicon glyphicon-pencil" aria-hidden="true"></span>新页面编辑

      </a>

      |

      <a href="/delete_teacher/?teacher_id={{ teacher.id }}" type="button" class="btn btn-sm btn-danger" aria-label="Left Align">

        <span class="glyphicon glyphicon-remove" aria-hidden="true"></span>删除

      </a>

    </td>

  </tr>

    {% empty %}

    <tr> <td colspan="3" style="text-align: center">空空如也~</td></tr>

  {% endfor %}

  </tbody>

</table>
删除老师信息
后端部分
后端从请求的URL中提取到要删除的老师的ID。
def delete_teacher(request):

    # 从GET请求的URL中取到要删除的老师ID

    teacher_id = request.GET.get("student_id")

    # 连接数据库

    conn = pymysql.connect(host="127.0.0.1", port=3306, user="root", passwd="root1234", db="mysite", charset="utf8")

    cursor = conn.cursor(cursor=pymysql.cursors.DictCursor)

    # 删除指定的老师

    sql = "delete from teacher WHERE id=%s;"

    # 执行SQL语句

    cursor.execute(sql, [teacher_id, ])

    conn.commit()

    conn.close()

    # 删除成功,跳转到老师列表页

    return redirect("/teacher_list/")
前端部分
点击页面上对应老师记录的删除按钮,向后端发送GET请求,将要删除的老师的ID传递给后端。
删除按钮部分HTML代码:
<a href="/delete_teacher/?teacher_id={{ class.id }}" type="button" class="btn btn-sm btn-danger" aria-label="Left Align">

  <span class="glyphicon glyphicon-remove" aria-hidden="true"></span>删除

</a>
新增老师信息
后端部分
这里我们对我们的数据库连接部分的代码做了优化。
from tools.sql_master import create, SQLManager

def add_teacher(request):

    if request.method == "POST":

        class_list = request.POST.getlist("class_id")

        teacher_name = request.POST.get("teacher_name")

        # 创建老师

        teacher_id = create("insert into teacher(name) VALUES (%s)", [teacher_name, ])

        # 更新teacher2class表

        # 多次链接,多次提交

        # for i in class_list:

        #     modify("insert into teacher2class(teacher_id, class_id) VALUES (%s, %s)", [teacher_id, i])

        #

        # # 一次链接,多次提交

        # db = SQLManager()

        # for i in class_list:

        #     db.moddify("insert into teacher2class(teacher_id, class_id) VALUES (%s, %s)", [teacher_id, i])

        # db.close()

        #

        # 一次链接,一次提交

        data_list = []

        for i in class_list:

            tmp = [teacher_id, i]

            data_list.append(tmp)

        db = SQLManager()

        db.multi_modify("insert into teacher2class(teacher_id, class_id) VALUES (%s, %s)", data_list)

        db.close()

        return redirect("/teacher_list/")

    else:

        class_list = get_list("select id, name from class")

        return render(request, "add_teacher.html", {"class_list": class_list})
前端部分
因为我们添加老师信息的时候,需要给老师指定关联的班级信息,所以在页面上需要将现有的班级信息展示出来。
新增老师信息时,输入老师的姓名然后选择关联的班级信息即可。
<form class="form-horizontal" action="/add_teacher/" method="post">

  <div class="form-group">

    <label for="inputclassname" class="col-sm-2 control-label">老师姓名</label>

    <div class="col-sm-10">

      <input type="text" class="form-control" name="teacher_name" id="inputclassname" placeholder="老师姓名">

    </div>

  </div>

  <div class="form-group">

    <label for="selectclass" class="col-sm-2 control-label">班级</label>

    <div class="col-sm-10">

      <select class="form-control" name="class_id" multiple>

        {% for class in class_list %}

          <option value="{{ class.id }}">{{ class.name }}</option>

        {% endfor %}

      </select>

    </div>

  </div>

  <div class="form-group">

    <div class="col-sm-offset-2 col-sm-10">

      <button type="submit" class="btn btn-default">提交</button>

    </div>

  </div>

</form>
编辑老师信息
后端部分
def edit_teacher(request):

    if request.method == "POST":

        teacher_id = request.POST.get("teacher_id")

        class_ids = request.POST.getlist("class_id")

        # 更新

        db = SQLManager()

        teacher_class_ids = db.get_list("select class_id from teacher2class WHERE teacher_id=%s", [teacher_id, ])

        old_class_ids = [i["class_id"] for i in teacher_class_ids]

        # 粗暴更新

        del_id_list = []

        add_id_list = []

        for i in old_class_ids:

            del_id_list.append((teacher_id, i))

        for j in class_ids:

            add_id_list.append((teacher_id, j))

        db.multi_modify("DELETE from teacher2class WHERE teacher_id=%s AND class_id=%s", del_id_list)

        db.multi_modify("insert into teacher2class(teacher_id, class_id) VALUES (%s, %s)", add_id_list)

        db.close()

        return redirect("/teacher_list")

    else:

        teacher_id = request.GET.get("teacher_id")

        with SQLManager() as db:

            class_list = db.get_list("select id, name from class")

            teacher_info = db.get_list("SELECT teacher.id, teacher.name, teacher2class.class_id FROM teacher  LEFT JOIN teacher2class ON teacher.id = teacher2class.teacher_id WHERE teacher.id=%s;", [teacher_id])

        ret = teacher_info[0]

        ret["class_ids"] = [ret["class_id"], ]

        for i in teacher_info[1:]:

            ret["class_ids"].append(i["class_id"])

        return render(request, "edit_teacher.html", {"class_list": class_list, "teacher": ret})
前端部分
<form class="form-horizontal" action="/edit_teacher/" method="post">

  <input type="text" name="teacher_id" value="{{ teacher.id }}" style="display: none">

  <div class="form-group">

    <label for="inputclassname" class="col-sm-2 control-label">学生姓名</label>

    <div class="col-sm-10">

      <input type="text" class="form-control" name="teacher_name" id="inputteachername" placeholder="老师姓名" value="{{ teacher.name }}">

    </div>

    <span id="helpBlock2" class="help-block">{{ error }}</span>

  </div>

  <div class="form-group">

      <label for="selectclass" class="col-sm-2 control-label">班级</label>

      <div class="col-sm-10">

        <select class="form-control" name="class_id" multiple>

          {% for class in class_list %}

            {% if class.id in teacher.class_ids %}

            <option selected value="{{ class.id }}">{{ class.name }}</option>

            {% else %}

            <option value="{{ class.id }}">{{ class.name }}</option>

            {% endif %}

          {% endfor %}

        </select>

      </div>

    </div>

  <div class="form-group">

    <div class="col-sm-offset-2 col-sm-10">

      <button type="submit" class="btn btn-default">提交</button>

    </div>

  </div>

</form>
pymysql操作数据库优化
我们之前使用pymysql操作数据库的操作都是写死在视图函数中的,并且很多都是重复的代码。
我们可以优化一下,把重复的代码提取出来,写成函数:
import pymysql

# 定义一个数据库相关的配置项

DB_CONFIG = {

    "host": "127.0.0.1",

    "port": 3306,

    "user": "root",

    "passwd": "root1234",

    "db": "mysite",

    "charset": "utf8"

}

# 查询多条数据函数

def get_list(sql, args=None):

    conn = pymysql.connect(

        host=DB_CONFIG["host"],

        port=DB_CONFIG["port"],

        user=DB_CONFIG["user"],

        passwd=DB_CONFIG["passwd"],

        db=DB_CONFIG["db"],

        charset=DB_CONFIG["charset"]

    )

    cursor = conn.cursor(cursor=pymysql.cursors.DictCursor)

    cursor.execute(sql, args)

    result = cursor.fetchall()

    cursor.close()

    conn.close()

    return result

# 查询单挑数据函数

def get_one(sql, args=None):

    conn = pymysql.connect(

        host=DB_CONFIG["host"],

        port=DB_CONFIG["port"],

        user=DB_CONFIG["user"],

        passwd=DB_CONFIG["passwd"],

        db=DB_CONFIG["db"],

        charset=DB_CONFIG["charset"]

    )

    cursor = conn.cursor(cursor=pymysql.cursors.DictCursor)

    cursor.execute(sql, args)

    result = cursor.fetchone()

    cursor.close()

    conn.close()

    return result

# 修改记录

def modify(sql, args=None):

    conn = pymysql.connect(

        host=DB_CONFIG["host"],

        port=DB_CONFIG["port"],

        user=DB_CONFIG["user"],

        passwd=DB_CONFIG["passwd"],

        db=DB_CONFIG["db"],

        charset=DB_CONFIG["charset"]

    )

    cursor = conn.cursor(cursor=pymysql.cursors.DictCursor)

    cursor.execute(sql, args)

    conn.commit()

    cursor.close()

    conn.close()

# 创建记录

def create(sql, args=None):

    conn = pymysql.connect(

        host=DB_CONFIG["host"],

        port=DB_CONFIG["port"],

        user=DB_CONFIG["user"],

        passwd=DB_CONFIG["passwd"],

        db=DB_CONFIG["db"],

        charset=DB_CONFIG["charset"]

    )

    cursor = conn.cursor(cursor=pymysql.cursors.DictCursor)

    cursor.execute(sql, args)

    conn.commit()

    # 返回刚才创建的那条数据的ID

    last_id = cursor.lastrowid

    cursor.close()

    conn.close()

    return last_id
这样只要在需要连接数据库做操作的时候,只需要调用我们上面定义好的函数就可以了。
但是这样还是有问题,当我要大批量创建数据的时候,就需要多次调用create方法了,相当于多次连接多次提交。
可以继续优化下,把数据库的连接重用,做到只需一次连接就可执行多次操作。
class SQLManager(object):

    # 初始化实例方法

    def __init__(self):

        self.conn = None

        self.cursor = None

        self.connect()

    # 连接数据库

    def connect(self):

        self.conn = pymysql.connect(

            host=DB_CONFIG["host"],

            port=DB_CONFIG["port"],

            user=DB_CONFIG["user"],

            passwd=DB_CONFIG["passwd"],

            db=DB_CONFIG["db"],

            charset=DB_CONFIG["charset"]

        )

        self.cursor = self.conn.cursor(cursor=pymysql.cursors.DictCursor)

    # 查询多条数据

    def get_list(self, sql, args=None):

        self.cursor.execute(sql, args)

        result = self.cursor.fetchall()

        return result

    # 查询单条数据

    def get_one(self, sql, args=None):

        self.cursor.execute(sql, args)

        result = self.cursor.fetchone()

        return result

    # 执行单条SQL语句

    def moddify(self, sql, args=None):

        self.cursor.execute(sql, args)

        self.conn.commit()

    # 创建单条记录的语句

    def create(self, sql, args=None):

        self.cursor.execute(sql, args)

        self.conn.commit()

        last_id = self.cursor.lastrowid

        return last_id

    # 关闭数据库cursor和连接

    def close(self):

        self.cursor.close()

        self.conn.close()
我们把我们数据库的相关操作都封装成一个类,在用到的时候,只需要生成一个实例,并对实例调用相应的操作方法就可以了。
db = SQLManager()

class_list = db.get_list("select id, name from class")

teacher_info = db.get_list("SELECT teacher.id, teacher.name, teacher2class.class_id FROM teacher  LEFT JOIN teacher2class ON teacher.id = teacher2class.teacher_id WHERE teacher.id=%s;", [teacher_id])

db.close()
但是,我如果要批量执行多个创建操作,虽然只建立了一次数据库连接但是还是会多次提交,可不可以改成一次连接,一次提交呢?
可以,只需要用上pymysql的executemany()方法就可以了。
给我们的 SQLManager类添加一个批量执行的 multi_modify()方法就可以了。
# 执行多条SQL语句

def multi_modify(self, sql, args=None):

    self.cursor.executemany(sql, args)

    self.conn.commit()
现在我们如果一次执行多个创建操作的话就可以使用multi_modify()方法,实现一次连接一次提交了。
最后,我们每次操作完数据库之后都要手动关闭,可不可以写成自动关闭的呢?
联想到我们之前学过的文件操作,使用with语句可以实现缩进结束自动关闭文件句柄的例子。
我们来把我们的数据库连接类SQLManager类再优化下,使其支持with语句操作。
class SQLManager(object):

    # 初始化实例方法

    def __init__(self):

        self.conn = None

        self.cursor = None

        self.connect()

    # 连接数据库

    def connect(self):

        self.conn = pymysql.connect(

            host=DB_CONFIG["host"],

            port=DB_CONFIG["port"],

            user=DB_CONFIG["user"],

            passwd=DB_CONFIG["passwd"],

            db=DB_CONFIG["db"],

            charset=DB_CONFIG["charset"]

        )

        self.cursor = self.conn.cursor(cursor=pymysql.cursors.DictCursor)

    # 查询多条数据

    def get_list(self, sql, args=None):

        self.cursor.execute(sql, args)

        result = self.cursor.fetchall()

        return result

    # 查询单条数据

    def get_one(self, sql, args=None):

        self.cursor.execute(sql, args)

        result = self.cursor.fetchone()

        return result

    # 执行单条SQL语句

    def moddify(self, sql, args=None):

        self.cursor.execute(sql, args)

        self.conn.commit()

    # 执行多条SQL语句

    def multi_modify(self, sql, args=None):

        self.cursor.executemany(sql, args)

        self.conn.commit()

    # 创建单条记录的语句

    def create(self, sql, args=None):

        self.cursor.execute(sql, args)

        self.conn.commit()

        last_id = self.cursor.lastrowid

        return last_id

    # 关闭数据库cursor和连接

    def close(self):

        self.cursor.close()

        self.conn.close()

    # 进入with语句自动执行

    def __enter__(self):

        return self

    # 退出with语句块自动执行

    def __exit__(self, exc_type, exc_val, exc_tb):

        self.close()
现阶段,我们只需要优化到这一步就可以,后面的项目实战中会继续优化。如使用数据库连接池等。
Django pymysql学员管理系统的更多相关文章
- 学员管理系统(简单的Django设计)
学员管理系统(简单的Django设计) 学员管理系统 项目规划阶段 项目背景 近年来老男孩教育的入学学员数量稳步快速增长,传统的excel统计管理学员信息的方式已经无法满足日渐增长的业务需求.因此公司 ...
- Python学习(二十七)—— Django和pymysql搭建学员管理系统
转载自http://www.cnblogs.com/liwenzhou/p/8270250.html 一.学员管理系统 1.项目规划阶段 项目背景 近年来老男孩教育的入学学员数量稳步快速增长,传统的e ...
- Django和pymysql搭建学员管理系统
学员管理系统 项目规划阶段 项目背景 近年来老男孩教育的入学学员数量稳步快速增长,传统的excel统计管理学员信息的方式已经无法满足日渐增长的业务需求.因此公司急需一套方便易用的“学员管理系统”,来提 ...
- python3开发进阶-Django框架学习前的小项目(一个简单的学员管理系统)
''' 自己独立写一个学员管理系统 表结构: 班级表: -id -grade_name 学生表: -id -student_name -grade 关联外键班级表 老师表: -id -teacher_ ...
- Django项目之【学员管理系统】
Django项目[学员管理系统] 项目规划阶段 项目背景 现实生活中,特别是在学校,传统的excel统计管理学员信息的方式已经无法满足日渐增长的业务需求. 因此需一套方便易用的“学员管理系统”,来提高 ...
- django+pymysql搭建一个管理系统(一)
django+pymysql搭建一个管理系统(一) 后续进行代码更新,优化 一.程序架构 二.mysql表单创建 zouye库:存信息相关的 #班级表 create table classes( ci ...
- 【学员管理系统】0x04 数据库连接优化
[学员管理系统]0x04 pymysql数据库连接优化 写在前面 项目详细需求参见:Django项目之[学员管理系统] 优化实现 把操作封装成函数 我们之前使用pymysql操作数据库的操作都是写死 ...
- 【学员管理系统】0x03 老师信息管理功能
[学员管理系统]0x03 老师信息管理功能 老师信息管理相比于学生信息管理又多了一点,因为我们的数据结构中老师表和班级表是通过teacher2class表进行多对多关联的. 写在前面 项目详细需求参见 ...
- 【学员管理系统】0x02 学生信息管理功能
[学员管理系统]0x02 学生信息管理功能 写在前面 项目详细需求参见:Django项目之[学员管理系统] Django框架大致处理流程 捋一下Django框架相关的内容: 浏览器输入URL到页面展示 ...
随机推荐
- Ubuntu系统vi编辑器上下左右键变ABCD的解决方法(转)
首先卸载旧版本的vi编辑器: $sudo apt-get remove vim-common 然后安装新版vi即可: $sudo apt-get install vim Ubuntu自带有几种版本的v ...
- 中文价格识别为数字 java代码
运行效果: public class VoicePriceRecognition { private final static String NOT_HAS_PRICE_CONTENT="n ...
- JavaScript:学习笔记(2)——基本概念与数据类型
JavaScript:学习笔记(2)——基本概念与数据类型 语法 1.区分大小写.Test 和 test 是完全不同的两个变量. 2.语句最好以分号结束,也就是说不以分号结束也可以. 变量 1.JS的 ...
- 流量分析系统----讲解-echarts模拟迁移(结合china.js)
百度 Echarts 地图->模拟迁徙,实现自动切换地图 小航哥注释: 1.本文主要是把模拟迁移的流程讲了一遍,讲的很好.具体实现参考航哥这篇随笔“流量分析系统----实现-echarts模拟迁 ...
- docker helloworld
阿里云镜像: docker官网 docker官方安装文档 配置阿里云镜像后,重启服务,以及检测服务是否正确启动 docker version.info.--help linux帮助命令man ls 镜 ...
- Apache NiFi 开发 安装说明
系统环境: vmware安装的centos6.7虚拟机 jdk1.8版本 maven库3.3.9版本(在使用源码编译启动的时候需要修改配置文件与当前使用的maven版本匹配,最低使用版本好像是3.1. ...
- SQL Server 存储过程 分页查询
Transact-SQL中的存储过程,非常类似于Java语言中的方法,它可以重复调用.当存储过程执行一次后,可以将语句缓存中,这样下次执行的时候直接使用缓存中的语句.这样就可以提高存储过程的性能. Ø ...
- Link
GNU/Linux, Bash, C, PHP, Perl, JavaScript, Vim, Git http://blog.sanctum.geek.nz/about 中文數學詞典 http: ...
- 《Effective MySQL之SQL语句最优化》读书笔记——乱七八糟系列(给自己看)
该书区别于诸如<MySQL技术内幕——InnoDB存储引擎>等书的一大特色是该书主要讲的是MySQL数据库中的索引技术,并分别讲了InnoDB.MyISAM.Memory三个存储引擎.其中 ...
- 在看 jquery 源码中发现的一些优化方向
1. 避免使用 $.fn.each 或 $.each 因为它比原生的 for/while 真的会慢一些,循环次数越多差距越大. 另外,对象的 for-in 比 for 是要快一丢丢的,但数组的 for ...