2.Border Layout 自定义一个Layout来完成布局。
目标:
1.添加控件的函数 void QLayout::addWidget ( QWidget * w )
在这个例子里面我们重载这个函数 void addWidget ( QWidget * w, int position)
2.添加到布局里面的都是QLayoutItem。我们把QLayoutItem和position封装成一个结构体ItemWrapper。
QList <ItemWrapper *> list。 私有变量list来管理布局中控件数量。
阅读官方文档:
To make your own layout manager, implement the functions addItem(), sizeHint(), setGeometry(), itemAt() and takeAt(). You should also implement minimumSize() to ensure your layout isn't resized to zero size if there is too little space. To support children whose heights depend on their widths, implement hasHeightForWidth() and heightForWidth().
1.先考虑布局的尺寸问题(布局的长度和宽度问题)
QSize BorderLayout::sizeHint() const 返回布局的理想的长度和宽度。
QSize BorderLayout::minimumSize() const 空间不够时,布局所需的最小的长度和宽度(布局不能少于这个最小的长度和宽度)
我们设计一个 QSize BorderLayout::calculateSize(SizeType sizeType) const函数来计算
enum SizeType { MinimumSize, SizeHint }
QSize BorderLayout::sizeHint() const { return calculateSize(SizeHint ); }
QSize BorderLayout::minimumSize() const { return calculateSize(MinimumSize); }
calculateSize函数中,我们遍历布局中的每个控件,计算出理想尺寸和最小尺寸
QSize BorderLayout::calculateSize(SizeType sizeType) const

{

    QSize totalSize;

    for(int i=; i<list.size(); i++) {

        ItemWrapper *wrapper = list.at(i);

        QLayoutItem *item = wrapper->item;

        Position position = wrapper->position;

        QSize itemSize;

        if(sizeType == MinimumSize)

            itemSize = item->minimumSize();

        else

            itemSize = item->sizeHint();

        if(position == North || position == South || position == Central) {

            totalSize.rheight() += itemSize.rheight();

        }

        if(position == West || position == East || position == Central) {

            totalSize.rwidth() += itemSize.rwidth();

        }

    }

    return totalSize;

}
2.添加控件的方法,添加控件也就是把控件添加到list中去
void QLayout::addItem ( QLayoutItem * item ) [pure virtual] 这个函数在应用程序中程序员不调用。
void addWidget ( QWidget * w, Position position) 最常用的添加控件方法。我们这里重载该函数,添加一个参数 position
void add(QLayoutItem *item, Position position) 我们实现add函数来添加控件
void BorderLayout::addItem(QLayoutItem *i)

{

    add(i, West);

}

void BorderLayout::addWidget(QWidget *w, Position position)

{

    add(new QWidgetItem (w), position);

}

void BorderLayout::add(QLayoutItem *i, Position position)

{

    list.append(new ItemWrapper(i, position));

}
3.查找和删除控件的方法
QLayoutItem * itemAt(int index) const; 返回索引下的QLayoutItem
QLayoutItem * takeAt(int index); 删除索引下的QLayoutItem 并返回QLayoutItem的值
QLayoutItem * BorderLayout::itemAt(int index) const

{

    ItemWrapper *wrapper = list.value(index);

    if(wrapper)

        return wrapper->item;

    else

        return ;

}

QLayoutItem * BorderLayout::takeAt(int index)

{

    if(index >=  && index < list.size()) {

        ItemWrapper *wrapper = list.takeAt(index);

        return wrapper->item;

    }

    return ;

}
list中takeat函数删除索引是index的值
4.布局中控件的数量,布局的高度是否依赖其宽度,布局的延伸方向。
Qt::Orientations expandingDirections() const;
bool hasHeightForWidth() const;
int count() const;
Qt::Orientations BorderLayout::expandingDirections() const

{

    return Qt::Horizontal | Qt::Vertical;

}

bool BorderLayout::hasHeightForWidth() const

{

    return false;

}

int BorderLayout::count() const

{

    return list.size();

}
5。我们现在知道有多少控件,每个控件的尺寸,整个布局的尺寸。
但是控件摆放在整个布局中那个位置,如何摆放。这里需要void setGeometry(const QRect &rect)函数。
QLayout::setGeometry(rect). 获得布局的整个矩形大小。
然后设施每个QLayoutItem的setGeometry函数。把每个控件放在指定的位置
void BorderLayout::setGeometry(const QRect &rect)

{

    ItemWrapper *center = ;

    int northHeight = ;

    int southHeight = ;

    int centerHeight = ;

    int westWidth = ;

    int eastWidth = ;

    int i = ;

    QLayout::setGeometry(rect);

    for(i = ; i < list.size(); i++) {

        ItemWrapper *wrapper = list.at(i);

        QLayoutItem *item  = wrapper->item;

        Position position = wrapper->position;

        if(position == North) {

            item->setGeometry(QRect(rect.x(), northHeight, rect.width(), item->sizeHint().height()));

            northHeight += item->geometry().height() + spacing();

        }

        else if(position == South) {

            item->setGeometry(QRect(item->geometry().x(), item->geometry().y(), rect.width(),

                              item->sizeHint().height()));

            southHeight += item->geometry().height() + spacing();

            item->setGeometry(QRect(rect.x(), rect.y()+rect.height()-southHeight+spacing(),

                              item->geometry().width(), item->geometry().height()));

        }

        else if(position == Central)

            center = wrapper;

    }

    centerHeight = rect.height() - northHeight - southHeight;

    for(i = ; i < list.size(); i++) {

        ItemWrapper *wrapper = list.value(i);

        QLayoutItem *item  = wrapper->item;

        Position position = wrapper->position;

        if(position == West) {

            item->setGeometry(QRect(westWidth, northHeight, item->sizeHint().width(), centerHeight));

            westWidth += item->geometry().width() + spacing();

        }

        else if(position == East) {

            item->setGeometry(QRect(item->geometry().x(), item->geometry().y(),

                              item->sizeHint().width(), centerHeight));

            eastWidth += item->geometry().width() + spacing();

            item->setGeometry(QRect(rect.width() - eastWidth + spacing(), northHeight,

                              item->geometry().width(), item->geometry().height()));

        }

    }

    if(center) {

        center->item->setGeometry(QRect(westWidth, northHeight,

                                  rect.width() - westWidth - eastWidth, centerHeight));

    }

}
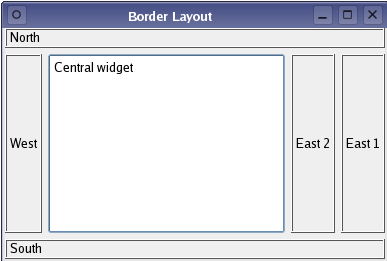
效果图:
源代码: https://github.com/Satius/qt5/tree/master/qtbase/examples/widgets/layouts/borderlayout
2.Border Layout 自定义一个Layout来完成布局。的更多相关文章
- 自定义View(7)官方教程:自定义View(含onMeasure),自定义一个Layout(混合组件),重写一个现有组件
Custom Components In this document The Basic Approach Fully Customized Components Compound Controls ...
- 自定义View Layout过程 (3)
目录 目录 1. 知识基础 具体请看我写的另外一篇文章:(1)自定义View基础 - 最易懂的自定义View原理系列 2. 作用 计算View视图的位置. 即计算View的四个顶点位置:Left.To ...
- Customize the View Items Layout 自定义视图项目布局
In this lesson, you will learn how to customize the default editor layout in a Detail View. For this ...
- 自定义一个更好用的SwipeRefreshLayout(弹力拉伸效果详解)(转载)
转自: 自定义一个更好用的SwipeRefreshLayout(弹力拉伸效果详解) 前言 熟悉SwipeRefreshLayout的同学一定知道,SwipeRefreshLayout是android里 ...
- 在Dynamics CRM中自定义一个通用的查看编辑注释页面
关注本人微信和易信公众号: 微软动态CRM专家罗勇 ,回复162或者20151016可方便获取本文,同时可以在第一时间得到我发布的最新的博文信息,follow me! 注释在CRM中的显示是比较特别, ...
- [WPF 自定义控件]自定义一个“传统”的 Validation.ErrorTemplate
1. 什么是Validaion.ErrorTemplate 数据绑定模型允许您将与您Binding的对象相关联ValidationRules. 如果用户输入的值无效,你可能希望在应用程序 用户界面 ( ...
- Android The layout "activity_main" in layout has no declaration in the base layout folder
报错: The layout "activity_main" in layout has no declaration in the base layout folder; thi ...
- SpringMVC 自定义一个拦截器
自定义一个拦截器方法,实现HandlerInterceptor方法 public class FirstInterceptor implements HandlerInterceptor{ /** * ...
- jQuery Validate 表单验证插件----自定义一个验证方法
一.下载依赖包 网盘下载:https://yunpan.cn/cryvgGGAQ3DSW 访问密码 f224 二.引入依赖包 <script src="../../scripts/j ...
随机推荐
- 把UIImage保存到照片库和沙盒中
1.保存到iOS照片库需要引入QuartzCore.framework框架,具体代码如下: .h文件 #import <QuartzCore/QuartzCore.h> UIImageVi ...
- HTML`CSS_网站页面不同浏览器兼容性问题解决
目前,最为流行的浏览器共有五个:分别是ie,Edge浏览器(属于微软),火狐,谷歌(chrome)Safari和Opera五大浏览器. Trident内核:IE ,360,,猎豹,百度: Gecko内 ...
- css关系选择符
<!Doctype html> <html> <head> <meta http-equiv="Content-Type" content ...
- ①SpringBoot入门教学篇
一.什么是spring boot Spring Boot是由Pivotal团队提供的全新框架,其设计目的是用来简化新Spring应用的初始搭建以及开发过程.该框架使用了特定的方式来进行配置,从而使开发 ...
- Oracle恢复drop误删除的表和建用户操作
一.表的恢复 对误删的表,只要没有使用PURGE永久删除选项,那么从flash back区恢复回来希望是挺大的.一般步骤有: 1.从flash back里查询被删除的表 select * from r ...
- eclipse配置storm1.1.0开发环境并本地跑起来
storm的开发环境搭建比hadoop(参见前文http://www.cnblogs.com/wuxun1997/p/6849878.html)简单,无需安装插件,只需新建一个java项目并配置好li ...
- git diff的使用
有时候可能睡觉时候忘记关电脑了,然后不小心触碰到键盘上某个神秘的按钮了,然后自己也不知道就提交了 就可能很悲剧 那么有时候不知道自己是否改变了哪些文件的内容 这时候就需要用到git diff git ...
- 城市间紧急救援(25 分)(dijstra变形)
城市间紧急救援(25 分) 作为一个城市的应急救援队伍的负责人,你有一张特殊的全国地图.在地图上显示有多个分散的城市和一些连接城市的快速道路.每个城市的救援队数量和每一条连接两个城市的快速道路长度都标 ...
- Train-Alypay-Cloud:蚂蚁金融云知识点
ylbtech-Train-Alypay-Cloud:蚂蚁金融云知识点 1.返回顶部 1. 1.数据库与缓存结合使用https://www.cloud.alipay.com/docs/2/47337 ...
- mysql 无意重启 [Note] /usr/sbin/mysqld: Normal shutdown
情况: 今早发现,昨天下午安装的4台mysql服务器,突然出现,由于在shell窗口 (root@localhost:mysql.sock) [(none)]> 190102 18:12:16 ...