MVC5 网站开发之六 管理员 2、添加、删除、重置密码、修改密码、列表浏览
目录
MVC5 网站开发之六 管理员 2、添加、删除、重置密码、修改密码、列表浏览
一、安装插件。
展示层前端框架以Bootstrap为主,因为Bootstrap的js功能较弱,这里添加一些插件作补充。其实很多js插件可以通过NuGet安装,只是NuGet安装时添加的内容较多,不如自己复制来的干净,所以这里所有的插件都是下载然后复制到项目中。
1、Bootstrap 3 Datepicker 4.17.37
网址:https://eonasdan.github.io/bootstrap-datetimepicker/
下载并解压压缩包->将bootstrap-datetimepicker.js和bootstrap-datetimepicker.min.js复制到Ninesy.Web项目的Scripts文件夹,将bootstrap-datetimepicker.css和bootstrap-datetimepicker.min.css复制到Content文件夹。
2、bootstrap-dialog 3.3.4.1
网址:https://github.com/nakupanda/bootstrap3-dialog
下载并解压压缩包->将.js复制到Ninesy.Web项目的Scripts文件夹,将.css复制到Content文件夹。
3、bootstrap-select 1.10.0
网址:http://silviomoreto.github.io/bootstrap-select/
下载并解压压缩包->将bootstrap-select.js复制到Ninesy.Web项目的Scripts文件夹,和defaults-zh_CN.js重命名为bootstrap-select-zh_CN.js复制到Ninesy.Web项目的Scripts文件夹,将bootstrap-select.css、bootstrap-select.css.map和bootstrap-select.min.css复制到Content文件夹。
4、bootstrap-table 1.10.1
网址:http://bootstrap-table.wenzhixin.net.cn/
下载并解压压缩包->将bootstrap-table.js和bootstrap-table-zh-CN.js复制到Ninesy.Web项目的Scripts文件夹,将bootstrap-table.css复制到Content文件夹。
5、Bootstrap TreeView 1.2.0
网址:https://github.com/jonmiles/bootstrap-treeview
下载并解压压缩包->将bootstrap-treeview.js复制到Ninesy.Web项目的Scripts文件夹,将bootstrap-treeview.css复制到Content文件夹。
6、twbs-pagination
网址:http://esimakin.github.io/twbs-pagination/
下载并解压压缩包->将jquery.twbsPagination.js和jquery.twbsPagination.min.js复制到Ninesy.Web项目的Scripts文件夹。
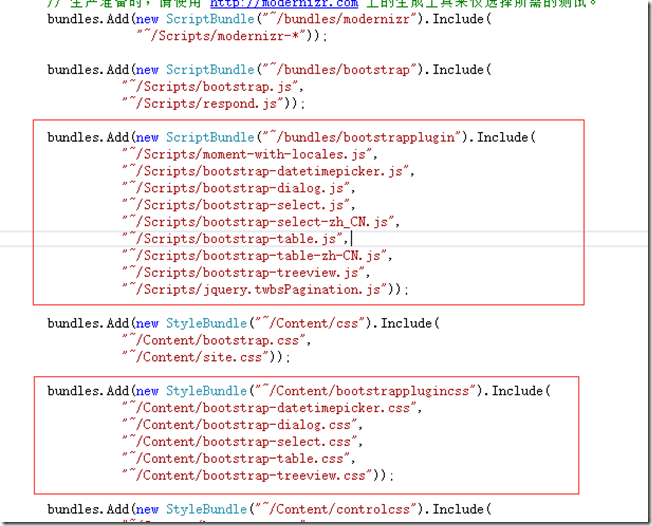
7、对js和css进行捆绑和压缩
打开Ninesky.Web->App_Start->BundleConfig.cs。添加红框内的代码。
二、获取ModelState错误信息的方法
在项目中有些内容是通过AJAX方法提交,如果提交时客户端没有进行验证,在服务器端进行验证时会将错误信息保存在ModelState中,这里需要写一个方法来获取ModelState的错误信息,以便反馈给客户端。
1、Ninesk.Web【右键】->添加->类,输入类名General。
引用命名空间using System.Web.Mvc和System.Text。
添加静态方法GetModelErrorString(),该方法用来获取模型的错误字符串。
using System.Linq;

using System.Text;

using System.Web.Mvc;

namespace Ninesky.Web

{

    /// <summary>

    /// 通用类

    /// </summary>

    public class General

    {

        /// <summary>

        /// 获取模型错误

        /// </summary>

        /// <param name="modelState">模型状态</param>

        /// <returns></returns>

        public static string GetModelErrorString(ModelStateDictionary modelState)

        {

            StringBuilder _sb = new StringBuilder();

            var _ErrorModelState = modelState.Where(m => m.Value.Errors.Count() > );

            foreach(var item in _ErrorModelState)

            {

                foreach (var modelError in item.Value.Errors)

                {

                    _sb.AppendLine(modelError.ErrorMessage);

                }

            }

            return _sb.ToString();

        }

    }

}
三、完善布局页
上次完成了管理员登录,这次要进行登录后的一些功能,要先把后台的布局页充实起来。
打开 Ninesky.Web/Areas/Control/Views/_Layout.cshtml。整成下面的代码。自己渣一样的美工,具体过程就不写了。
<!DOCTYPE html>
<html>
<head>
<meta charset="utf-8" />
<meta name="viewport" content="width=device-width, initial-scale=1.0">
<title>@ViewBag.Title - 系统管理</title>
@Styles.Render("~/Content//controlcss")
@RenderSection("style", required: false)
@Scripts.Render("~/bundles/modernizr")
@Scripts.Render("~/bundles/jquery")
@Scripts.Render("~/bundles/bootstrap")
@RenderSection("scripts", required: false)
</head>
<body>
<div class="navbar navbar-default navbar-fixed-top">
<div class="container">
<div class="navbar-header">
<button type="button" class="navbar-toggle" data-toggle="collapse" data-target=".navbar-collapse">
<span class="icon-bar"></span>
<span class="icon-bar"></span>
<span class="icon-bar"></span>
</button>
@Html.ActionLink("NINESKY 系统管理", "Index", "Home", new { area = "Control" }, new { @class = "navbar-brand" })
</div>
<div class="navbar-collapse collapse">
<ul class="nav navbar-nav">
<li><a><span class="glyphicon glyphicon-user"></span> 用户管理</a></li>
<li><a href="@Url.Action("Index","Admin")"><span class='glyphicon glyphicon-lock'></span> 管理员</a></li>
<li><a><span class="glyphicon glyphicon-list"></span> 栏目设置</a></li>
<li><a><span class="glyphicon glyphicon-cog"></span> 网站设置</a></li>
</ul>
<ul class="nav navbar-nav navbar-right">
<li>
<a href="@Url.Action("MyInfo","Admin")"><span class="glyphicon glyphicon-envelope"></span> @Context.Session["Accounts"].ToString()</a> </li>
<li>
<a href="@Url.Action("Logout","Admin")"><span class="glyphicon glyphicon-log-out"></span> 退出</a>
</li>
</ul>
</div>
</div>
</div> <div class="container body-content">
<div class="row">
<div class="col-lg-3 col-md-3 col-sm-4">@RenderSection("SideNav", false)</div>
<div class="col-lg-9 col-md-9 col-sm-8">@RenderBody()</div>
</div>
<hr />
<footer class="navbar navbar-fixed-bottom text-center bg-primary ">
<p>© Ninesky v0.1 BASE BY 洞庭夕照 http://mzwhj.cnblogs.com</p>
</footer>
</div>
</body>
</html>
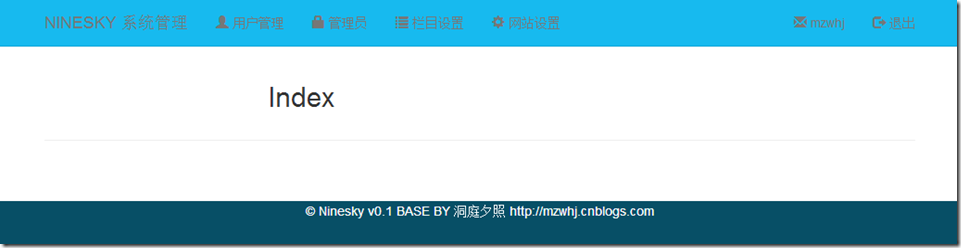
反正效果就是这个样子了。
三、功能实现
按照设想,要在Index界面完成管理员的浏览、添加和删除功能。这些功能采用ajax方式。
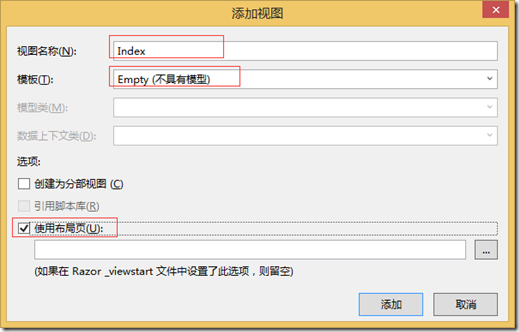
在添加AdminController的时候自动添加了Index()方法。
添加Index视图
在Index方法上右键添加视图
@{

    ViewBag.Title = "管理员";

}

<ol class="breadcrumb">

    <li><span class="glyphicon glyphicon-home"></span>  @Html.ActionLink("首页", "Index", "Home")</li>

    <li class="active">@Html.ActionLink("管理员", "Index", "Admin")</li>

</ol>

@section style{

    @Styles.Render("~/Content/bootstrapplugincss")

}

@section scripts{

    @Scripts.Render("~/bundles/jqueryval")

    @Scripts.Render("~/bundles/bootstrapplugin")

}
添加侧栏导航视图
Ninesky.Web/Areas/Control/Views/Admin【右键】->添加->视图
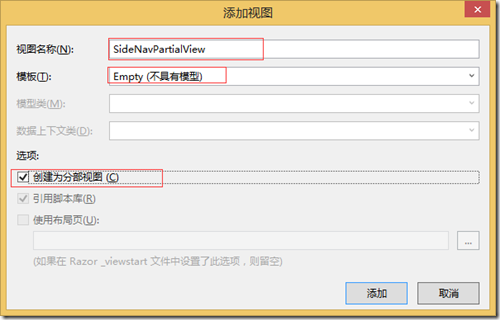
视图代码如下
<div class="panel panel-default">

    <div class="panel-heading">

        <div class="panel-title"><span class="glyphicon glyphicon-lock"></span> 管理员</div>

    </div>

    <div class="panel-body">

        <div class="list-group">

            <div class="list-group-item"><span class="glyphicon glyphicon-list"></span>  @Html.ActionLink("管理","Index")</div>

        </div>

    </div>

</div>
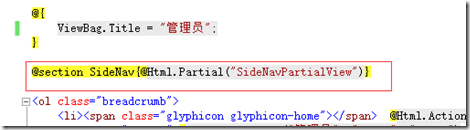
在Index视图中添加@section SideNav{@Html.Partial("SideNavPartialView")}(如图)
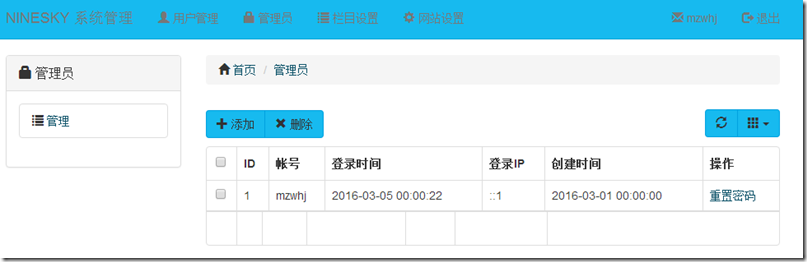
1、管理员列表
在Admin控制器中添加ListJson()方法
/// <summary>

        /// 管理员列表

        /// </summary>

        /// <returns></returns>

        public JsonResult ListJson()

        {

            return Json(adminManager.FindList());

        }
为在index中使用bootstrap-table显示和操作管理员列表,在index视图中添加下图代码。
<div id="toolbar" class="btn-group" role="group">

    <button id="btn_add" class="btn btn-default"><span class="glyphicon glyphicon-plus"></span> 添加</button>

    <button id="btn_del" class="btn btn-default"><span class="glyphicon glyphicon-remove"></span> 删除</button>

</div>

<table id="admingrid"></table>
在@section scripts{ } 中添加js代码
<script type="text/javascript">

        $(document).ready(function () {

            //表格

            var $table = $('#admingrid');

            $table.bootstrapTable({

                toolbar: "#toolbar",

                showRefresh: true,

                showColumns: true,

                showFooter: true,

                method: "post",

                url: "@Url.Action("ListJson")",

                columns: [

                    { title: "state", checkbox: true },

                    { title: "ID", field: "AdministratorID" },

                    { title: "帐号", field: "Accounts" },

                    { title: "登录时间", field: "LoginTime", formatter: function (value) { return moment(value).format("YYYY-MM-DD HH:mm:ss") } },

                    { title: "登录IP", field: "LoginIP" },

                    { title: "创建时间", field: "CreateTime", formatter: function (value) { return moment(value).format("YYYY-MM-DD HH:mm:ss") } },

                    { title: "操作", field: "AdministratorID", formatter: function (value, row, index) { return "<a href=\"javascript:void(0)\" onclick=\"ResetPassword(" + value + ",'" + row.Accounts + "')\">重置密码</a>" } }

                ]

            });

            //表格结束

        });

    </script>

}
显示效果如图:
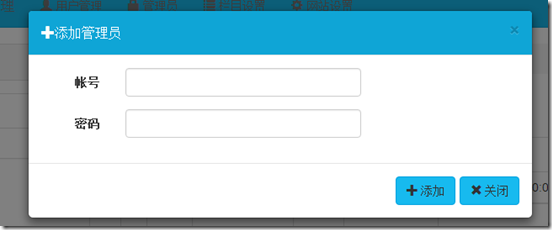
2、添加管理员
在控制器中添加AddPartialView()方法
/// <summary>

        /// 添加【分部视图】

        /// </summary>

        /// <returns></returns>

        public PartialViewResult AddPartialView()

        {

            return PartialView();

        }
Models文件夹【右键】->添加->类,输入类名 AddAdminViewModel。
using System.ComponentModel.DataAnnotations;

namespace Ninesky.Web.Areas.Control.Models

{

    /// <summary>

    /// 添加管理员模型

    /// </summary>

    public class AddAdminViewModel

    {

        /// <summary>

        /// 帐号

        /// </summary>

        [Required(ErrorMessage = "必须输入{0}")]

        [StringLength(, MinimumLength = , ErrorMessage = "{0}长度为{2}-{1}个字符")]

        [Display(Name = "帐号")]

        public string Accounts { get; set; }

        /// <summary>

        /// 密码

        /// </summary>

      [DataType(DataType.Password)]
        [Required(ErrorMessage = "必须输入{0}")]

        [StringLength(,MinimumLength =, ErrorMessage = "{0}长度少于{1}个字符")]

        [Display(Name = "密码")]

        public string Password { get; set; }

    }

}
右键添加视图
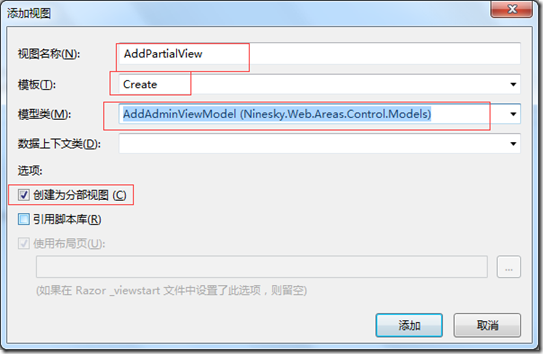
注意:抓图的时候忘记勾上引用脚本库了就抓了,记得勾上。
@model Ninesky.Web.Areas.Control.Models.AddAdminViewModel

@using (Html.BeginForm())

{

    @Html.AntiForgeryToken()

    <div class="form-horizontal">

        @Html.ValidationSummary(true, "", new { @class = "text-danger" })

        <div class="form-group">

            @Html.LabelFor(model => model.Accounts, htmlAttributes: new { @class = "control-label col-md-2" })

            <div class="col-md-10">

                @Html.EditorFor(model => model.Accounts, new { htmlAttributes = new { @class = "form-control" } })

                @Html.ValidationMessageFor(model => model.Accounts, "", new { @class = "text-danger" })

            </div>

        </div>

        <div class="form-group">

            @Html.LabelFor(model => model.Password, htmlAttributes: new { @class = "control-label col-md-2" })

            <div class="col-md-10">

                @Html.EditorFor(model => model.Password, new { htmlAttributes = new { @class = "form-control" } })

                @Html.ValidationMessageFor(model => model.Password, "", new { @class = "text-danger" })

            </div>

        </div>

    </div>

}

@Scripts.Render("~/bundles/jqueryval")
在Index视图 script脚本区域,“//表格结束”后面添加js代码
//表格结束

            //工具栏

            //添加按钮

            $("#btn_add").click(function () {

                var addDialog = new BootstrapDialog({

                    title: "<span class='glyphicon glyphicon-plus'></span>添加管理员",

                    message: function (dialog) {

                        var $message = $('<div></div>');

                        var pageToLoad = dialog.getData('pageToLoad');

                        $message.load(pageToLoad);

                        return $message;

                    },

                    data: {

                        'pageToLoad': '@Url.Action("AddPartialView")'

                    },

                    buttons: [{

                        icon: "glyphicon glyphicon-plus",

                        label: "添加",

                        action: function (dialogItself) {

                            $.post($("form").attr("action"), $("form").serializeArray(), function (data) {

                                if (data.Code == 1) {

                                    BootstrapDialog.show({

                                        message: data.Message,

                                        buttons: [{

                                            icon: "glyphicon glyphicon-ok",

                                            label: "确定",

                                            action: function (dialogItself) {

                                                $table.bootstrapTable("refresh");

                                                dialogItself.close();

                                                addDialog.close();

                                            }

                                        }]

                                    });

                                }

                                else BootstrapDialog.alert(data.Message);

                            }, "json");

                            $("form").validate();

                        }

                    }, {

                        icon: "glyphicon glyphicon-remove",

                        label: "关闭",

                        action: function (dialogItself) {

                            dialogItself.close();

                        }

                    }]

                });

                addDialog.open();

            });

            //添加按钮结束
3、删除管理员
考虑到批量删除,上次写AdministratorManager没有写批量删除方法,这次补上。
打开Ninesky.Core/AdministratorManager.cs, 添加如下代码
/// <summary>

        /// 删除【批量】返回值Code:1-成功,2-部分删除,0-失败

        /// </summary>

        /// <param name="administratorIDList"></param>

        /// <returns></returns>

        public Response Delete(List<int> administratorIDList)

        {

            Response _resp = new Response();

            int _totalDel = administratorIDList.Count;

            int _totalAdmin = Count();

            foreach (int i in administratorIDList)

            {

                if (_totalAdmin > )

                {

                    base.Repository.Delete(new Administrator() { AdministratorID = i }, false);

                    _totalAdmin--;

                }

                else _resp.Message = "最少需保留1名管理员";

            }

            _resp.Data = base.Repository.Save();

            if(_resp.Data == _totalDel)

            {

                _resp.Code = ;

                _resp.Message = "成功删除" + _resp.Data + "名管理员";

            }

            else if (_resp.Data > )

            {

                _resp.Code = ;

                _resp.Message = "成功删除" + _resp.Data + "名管理员";

            }

            else

            {

                _resp.Code = ;

                _resp.Message = "删除失败";

            }

            return _resp;

        }
另外要修改一下Ninesky.DataLibrary.Repository的删除public int Delete(T entity, bool isSave)代码将Remove方式 改为Attach,不然会出错。
/// <summary>

        /// 删除实体

        /// </summary>

        /// <param name="entity">实体</param>

        /// <param name="isSave">是否立即保存</param>

        /// <returns>在“isSave”为True时返回受影响的对象的数目,为False时直接返回0</returns>

        public int Delete(T entity, bool isSave)

        {

            DbContext.Set<T>().Attach(entity);

            DbContext.Entry<T>(entity).State = EntityState.Deleted;

            return isSave ? DbContext.SaveChanges() : ;

        }
打开AdminController 添加DeleteJson(List<int> ids)方法
/// <summary>

        /// 删除

        /// Response.Code:1-成功,2-部分删除,0-失败

        /// Response.Data:删除的数量

        /// </summary>

        /// <returns></returns>

        [HttpPost]

        public JsonResult DeleteJson(List<int> ids)

        {

            int _total = ids.Count();

            Response _res = new Core.Types.Response();

            int _currentAdminID = int.Parse(Session["AdminID"].ToString());

            if (ids.Contains(_currentAdminID))

            {

                ids.Remove(_currentAdminID);

            }

            _res = adminManager.Delete(ids);

            if(_res.Code==&& _res.Data < _total)

            {

                _res.Code = ;

                _res.Message = "共提交删除"+_total+"名管理员,实际删除"+_res.Data+"名管理员。\n原因:不能删除当前登录的账号";

            }

            else if(_res.Code ==)

            {

                _res.Message = "共提交删除" + _total + "名管理员,实际删除" + _res.Data + "名管理员。";

            }

            return Json(_res);

        }
在Index视图 script脚本区域,“//添加按钮结束”后面添加删除js代码
//添加按钮结束

            //删除按钮

            $("#btn_del").click(function () {

                var selected = $table.bootstrapTable('getSelections');

                if ($(selected).length > 0) {

                    BootstrapDialog.confirm("确定删除选中的" + $(selected).length + "位管理员", function (result) {

                        if (result) {

                            var ids = new Array($(selected).length);

                            $.each(selected, function (index, value) {

                                ids[index] = value.AdministratorID;

                            });

                            $.post("@Url.Action("DeleteJson","Admin")", { ids: ids }, function (data) {

                                if (data.Code != 0) {

                                    BootstrapDialog.show({

                                        message: data.Message,

                                        buttons: [{

                                            icon: "glyphicon glyphicon-ok",

                                            label: "确定",

                                            action: function (dialogItself) {

                                                $table.bootstrapTable("refresh");

                                                dialogItself.close();

                                            }

                                        }]

                                    });

                                }

                                else BootstrapDialog.alert(data.Message);

                            }, "json");

                        }

                    });

                }

                else BootstrapDialog.warning("请选择要删除的行");

            });

            //删除按钮结束
4、重置密码
在AdminController中 添加ResetPassword(int id)方法。方法中将密码重置为Ninesky。
/// <summary>

        /// 重置密码【Ninesky】

        /// </summary>

        /// <param name="id">管理员ID</param>

        /// <returns></returns>

        [HttpPost]

        public JsonResult ResetPassword(int id)

        {

            string _password = "Ninesky";

            Response _resp = adminManager.ChangePassword(id, Security.SHA256(_password));

            if (_resp.Code == ) _resp.Message = "密码重置为:" + _password;

            return Json(_resp);

        }
在添加script代码中表格代码段可以看到,这里通过 连接的onclick调用ResetPassword方法,所以ResetPassword方法要放在表格生成前面,不然会出现 方法未定义的错误。

这里把代码放到$(document).ready的前面。
<script type="text/javascript">        //重置密码

        function ResetPassword(id, accounts) {

            BootstrapDialog.confirm("确定重置" + accounts + "的密码", function (result) {

                if (result) {

                    $.post("@Url.Action("ResetPassword", "Admin")", { id: id }, function (data) {

                        BootstrapDialog.alert(data.Message);

                    }, "json");

                }

            });

        };

        //重置密码结束

        $(document).ready(function () {

            //表格
5、修改管理员密码
在在AdminController中 添加MyInfo()方法。
/// <summary>

        /// 我的资料

        /// </summary>

        /// <returns></returns>

        public ActionResult MyInfo()

        {

            return View(adminManager.Find(Session["Accounts"].ToString()));

        }
右键添加视图
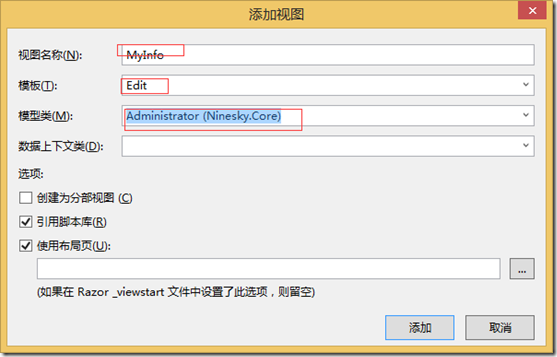
@model Ninesky.Core.Administrator

@{

    ViewBag.Title = "我的资料";

}

@section SideNav{@Html.Partial("SideNavPartialView")}

<ol class="breadcrumb">

    <li><span class="glyphicon glyphicon-home"></span>  @Html.ActionLink("首页", "Index", "Home")</li>

    <li>@Html.ActionLink("管理员", "Index", "Admin")</li>

    <li class="active">我的资料</li>

</ol>

@Html.Raw(ViewBag.Message)

@using (Html.BeginForm())

{

    @Html.AntiForgeryToken()

    <div class="form-horizontal">

        @Html.ValidationSummary(true, "", new { @class = "text-danger" })

        <div class="form-group">

            @Html.LabelFor(model => model.Accounts, htmlAttributes: new { @class = "control-label col-md-2" })

            <div class="col-md-10">

                @Html.DisplayTextFor(model => model.Accounts)

            </div>

        </div>

        <div class="form-group">

            @Html.LabelFor(model => model.Password, htmlAttributes: new { @class = "control-label col-md-2" })

            <div class="col-md-10">

                @Html.EditorFor(model => model.Password, new { htmlAttributes = new { @class = "form-control" } })

                @Html.ValidationMessageFor(model => model.Password, "", new { @class = "text-danger" })

            </div>

        </div>

        <div class="form-group">

            @Html.LabelFor(model => model.LoginIP, htmlAttributes: new { @class = "control-label col-md-2" })

            <div class="col-md-10">

                @Html.DisplayTextFor(model => model.LoginIP)

            </div>

        </div>

        <div class="form-group">

            @Html.LabelFor(model => model.LoginTime, htmlAttributes: new { @class = "control-label col-md-2" })

            <div class="col-md-10">

                @Html.DisplayTextFor(model => model.LoginTime)

            </div>

        </div>

        <div class="form-group">

            @Html.LabelFor(model => model.CreateTime, htmlAttributes: new { @class = "control-label col-md-2" })

            <div class="col-md-10">

                @Html.DisplayTextFor(model => model.CreateTime)

            </div>

        </div>

        <div class="form-group">

            <div class="col-md-offset-2 col-md-10">

                <input type="submit" value="保存" class="btn btn-default" />

            </div>

        </div>

    </div>

}

@section Scripts {

    @Scripts.Render("~/bundles/jqueryval")

}
在在AdminController中 添加处理方法MyInfo(FormCollection form)方法。
[ValidateAntiForgeryToken]

        [HttpPost]

        public ActionResult MyInfo(FormCollection form)

        {

            var _admin = adminManager.Find(Session["Accounts"].ToString());

            if (_admin.Password != form["Password"])

            {

                _admin.Password = Security.SHA256(form["Password"]);

                var _resp = adminManager.ChangePassword(_admin.AdministratorID, _admin.Password);

                if(_resp.Code ==) ViewBag.Message = "<div class=\"alert alert-success\" role=\"alert\"><span class=\"glyphicon glyphicon-ok\"></span>修改密码成功!</div>";

                else ViewBag.Message = "<div class=\"alert alert-danger\" role=\"alert\"><span class=\"glyphicon glyphicon-remove\"></span>修改密码失败!</div>";

            }

            return View(_admin);

        }
==========================================================
管理员功能到此写完。感慨一下:时间太少,熬夜到凌晨真不容易!
代码见:https://ninesky.codeplex.com/SourceControl/latest
代码下载:https://ninesky.codeplex.com 点击SOURCE CODE 点击Download下载源文件。
MVC5 网站开发之六 管理员 2、添加、删除、重置密码、修改密码、列表浏览的更多相关文章
- MVC5 网站开发之六 管理员 1、登录、验证和注销
上次业务逻辑和展示层的架构都写了,可以开始进行具体功能的实现,这次先实现管理员的登录.验证和注销功能. 目录 奔跑吧,代码小哥! MVC5网站开发之一 总体概述 MVC5 网站开发之二 创建项目 MV ...
- MVC5 网站开发之八 栏目功能 添加、修改和删除
本次实现栏目的浏览.添加.修改和删除. 栏目一共有三种类型. 常规栏目-可以添加子栏目,也可以添加内容模型.当不选择内容模型时,不能添加内容. 单页栏目-栏目只有一个页面,可以设置视图. 链接栏目-栏 ...
- MVC5 网站开发之七 用户功能 3用户资料的修改和删除
这次主要实现管理后台界面用户资料的修改和删除,修改用户资料和角色是经常用到的功能,但删除用户的情况比较少,为了功能的完整性还是坐上了.主要用到两个action "Modify"和& ...
- MVC5 网站开发之七 用户功能 2 用户添加和浏览
目录 MVC5网站开发之一 总体概述 MVC5 网站开发之二 创建项目 MVC5 网站开发之三 数据存储层功能实现 MVC5 网站开发之四 业务逻辑层的架构和基本功能 MVC5 网站开发之五 展示层架 ...
- MVC5 网站开发之九 网站设置
网站配置一般用来保存网站的一些设置,写在配置文件中比写在数据库中要合适一下,因为配置文件本身带有缓存,随网站启动读入缓存中,速度更快,而保存在数据库中要单独为一条记录创建一个表,结构不够清晰,而且读写 ...
- MVC5网站开发之一 总体概述
由于前几次都没能写完,这次年底总算有自由时间了,又想继续捣鼓一下.于是下载了VS 2015专业版(不知为什么我特别钟爱专业版,而不喜欢企业版).由于以前的教训,我这次决定写一个极简的Deom,简到什么 ...
- MVC5 网站开发之二 创建项目
昨天对项目的思路大致理了一下,今天先把解决方案建立起来.整个解决包含Ninesky.Web.Ninesky.Core,Ninesky.DataLibrary等3个项目.Ninesky.Web是web应 ...
- MVC5 网站开发之三 数据存储层功能实现
数据存储层在项目Ninesky.DataLibrary中实现,整个项目只有一个类Repository. 目录 奔跑吧,代码小哥! MVC5网站开发之一 总体概述 MVC5 网站开发之二 创建项目 ...
- MVC5 网站开发之四 业务逻辑层的架构和基本功能
业务逻辑层在Ninesky.Core中实现,主要功能封装一些方法通过调用数据存储层,向界面层提供服务. 目录 奔跑吧,代码小哥! MVC5网站开发之一 总体概述 MVC5 网站开发之二 创建项目 ...
随机推荐
- 先说IEnumerable,我们每天用的foreach你真的懂它吗?
我们先思考几个问题: 为什么在foreach中不能修改item的值? 要实现foreach需要满足什么条件? 为什么Linq to Object中要返回IEnumerable? 接下来,先开始我们的正 ...
- mac osx 安装redis扩展
1 php -v查看php版本 2 brew search php|grep redis 搜索对应的redis ps:如果没有brew 就根据http://brew.sh安装 3 brew ins ...
- 《Django By Example》第三章 中文 翻译 (个人学习,渣翻)
书籍出处:https://www.packtpub.com/web-development/django-example 原作者:Antonio Melé (译者注:第三章滚烫出炉,大家请不要吐槽文中 ...
- 深入理解CSS中的margin负值
前面的话 margin属性在实际中非常常用,也是平时踩坑较多的地方.margin折叠部分相信不少人都因为这样那样的原因中过招.margin负值也是很常用的功能,很多特殊的布局方法都依赖于它.它看似简单 ...
- InstallShield 脚本语言学习笔记
InstallShield脚本语言是类似C语言,利用InstallShield的向导或模板都可以生成基本的脚本程序框架,可以在此基础上按自己的意愿进行修改和添加. 一.基本语法规则 ...
- 基于改进人工蜂群算法的K均值聚类算法(附MATLAB版源代码)
其实一直以来也没有准备在园子里发这样的文章,相对来说,算法改进放在园子里还是会稍稍显得格格不入.但是最近邮箱收到的几封邮件让我觉得有必要通过我的博客把过去做过的东西分享出去更给更多需要的人.从论文刊登 ...
- Effective java笔记(二),所有对象的通用方法
Object类的所有非final方法(equals.hashCode.toString.clone.finalize)都要遵守通用约定(general contract),否则其它依赖于这些约定的类( ...
- BPM配置故事之案例11-操作外部数据源
小明:可以获取ERP数据了-- 老李:哦,这么快?小伙子,我非常看好你,来来,别急着走,再陪我聊会-- 小明:--您老人家不是又要改流程吧? 老李:没有没有,哎嘿嘿嘿,我们这不都是为公司效率着想嘛,这 ...
- ORACLE从共享池删除指定SQL的执行计划
Oracle 11g在DBMS_SHARED_POOL包中引入了一个名为PURGE的新存储过程,用于从对象库缓存中刷新特定对象,例如游标,包,序列,触发器等.也就是说可以删除.清理特定SQL的执行计划 ...
- 在Linux虚拟机下配置jdk的环境变量
1.到Oracle公司的官网里下载好jdk,网址 http://www.oracle.com/technetwork/java/javase/downloads/jdk8-downloads-2133 ...