【C++】从零开始的CS:GO逆向分析2——配置GLFW+IMGUI环境并创建透明窗口
1.配置glfw
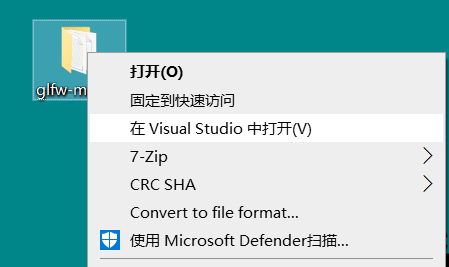
解压后使用Visual Studio打开文件夹

选择全部重新生成,然后选择 安装->glfw
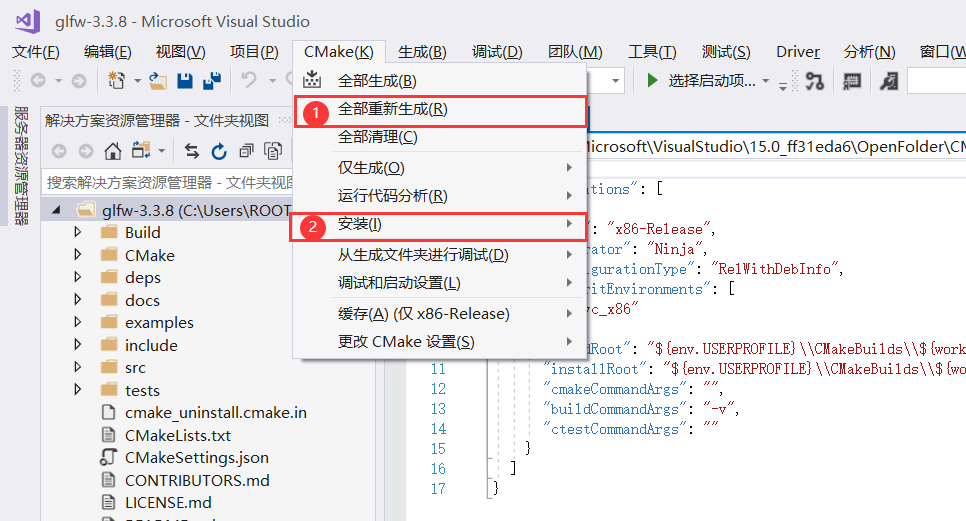
在下面的生成信息可以看到需要的文件生成的位置

打开后,将include、lib文件夹复制到自己的工程文件夹

加入后配置自己的工程
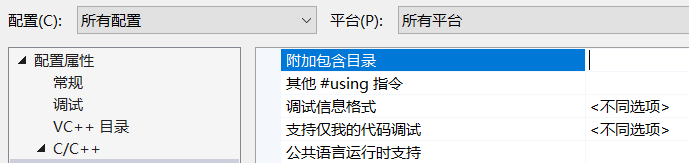
项目属性->c/c++ ->常规 下的附加包含目录,输入$(ProjectDir)include 添加
项目属性->链接器->常规 下的附加库目录 ,输入$(ProjectDir)lib 添加
项目属性->链接器->输入 下的附加依赖项 输入 glfw3.lib;opengl32.lib; 添加
配置好后,用代码测试一下
#include <GLFW/glfw3.h>

#pragma comment(lib,"glfw3.lib")

int main(void)

{

    GLFWwindow* window;

    /* Initialize the library */

    if (!glfwInit())

        return -1;

    /* Create a windowed mode window and its OpenGL context */

    window = glfwCreateWindow(640, 480, "Hello World", NULL, NULL);

    if (!window)

    {

        glfwTerminate();

        return -1;

    }

    /* Make the window's context current */

    glfwMakeContextCurrent(window);

    /* Loop until the user closes the window */

    while (!glfwWindowShouldClose(window))

    {

        /* Render here */

        glClear(GL_COLOR_BUFFER_BIT);

        /* Swap front and back buffers */

        glfwSwapBuffers(window);

        /* Poll for and process events */

        glfwPollEvents();

    }

    glfwTerminate();

    return 0;

}
如果出现一个窗口则说明配置正确,配置有问题的可以检查一下包含的目录 是不是 自己复制到的目录
2.配置IMGUI+glfw
打开glfw下载Binaries
把文件夹里的glew32s.lib复制到自己项目的lib文件夹里
把GL文件夹复制到之前的include文件夹里
在项目属性->链接器->输入 下的附加依赖项 中增加 glew32s.lib;
在项目属性 ->c/c++ ->预处理器 的预处理定义下增加GLEW_STATIC
在实例代码中增加头文件 #include<GL/glew.h>
在

if (!glfwInit())

    return -1;

后增加代码

glewInit(); (增加的代码),成功运行则配置成功
下载IMGUI
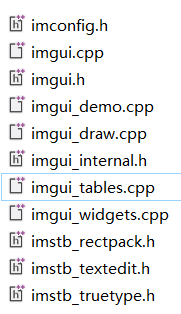
在自己项目的include文件夹下新建一个imgui文件夹,将imgui-master中以下的文件复制进去
打开imgui的example项目,找到example_glfw_opengl3,在自己项目include文件夹中,创建这五个同名文件,将内容保存进去(其实就是把这几个文件也复制过去)

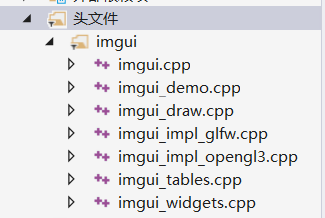
在自己的项目中新建筛选器(imgui),添加现有项,将include/imgui文件夹里的cpp文件都添加进去
测试代码,如果正常创建则环境正常
// Dear ImGui: standalone example application for GLFW + OpenGL 3, using programmable pipeline

// (GLFW is a cross-platform general purpose library for handling windows, inputs, OpenGL/Vulkan/Metal graphics context creation, etc.)

// If you are new to Dear ImGui, read documentation from the docs/ folder + read the top of imgui.cpp.

// Read online: https://github.com/ocornut/imgui/tree/master/docs

#include "imgui/imgui.h"

#include "imgui/imgui_impl_glfw.h"

#include "imgui/imgui_impl_opengl3.h"

#include <stdio.h>

#if defined(IMGUI_IMPL_OPENGL_ES2)

#include <GLES2/gl2.h>

#endif

#include <GLFW/glfw3.h> // Will drag system OpenGL headers

// [Win32] Our example includes a copy of glfw3.lib pre-compiled with VS2010 to maximize ease of testing and compatibility with old VS compilers.

// To link with VS2010-era libraries, VS2015+ requires linking with legacy_stdio_definitions.lib, which we do using this pragma.

// Your own project should not be affected, as you are likely to link with a newer binary of GLFW that is adequate for your version of Visual Studio.

#if defined(_MSC_VER) && (_MSC_VER >= 1900) && !defined(IMGUI_DISABLE_WIN32_FUNCTIONS)

#pragma comment(lib, "legacy_stdio_definitions")

#endif

static void glfw_error_callback(int error, const char* description)

{

    fprintf(stderr, "Glfw Error %d: %s\n", error, description);

}

int main(int, char**)

{

    // Setup window

    glfwSetErrorCallback(glfw_error_callback);

    if (!glfwInit())

        return 1;

    // Decide GL+GLSL versions

#if defined(IMGUI_IMPL_OPENGL_ES2)

    // GL ES 2.0 + GLSL 100

    const char* glsl_version = "#version 100";

    glfwWindowHint(GLFW_CONTEXT_VERSION_MAJOR, 2);

    glfwWindowHint(GLFW_CONTEXT_VERSION_MINOR, 0);

    glfwWindowHint(GLFW_CLIENT_API, GLFW_OPENGL_ES_API);

#elif defined(__APPLE__)

    // GL 3.2 + GLSL 150

    const char* glsl_version = "#version 150";

    glfwWindowHint(GLFW_CONTEXT_VERSION_MAJOR, 3);

    glfwWindowHint(GLFW_CONTEXT_VERSION_MINOR, 2);

    glfwWindowHint(GLFW_OPENGL_PROFILE, GLFW_OPENGL_CORE_PROFILE);  // 3.2+ only

    glfwWindowHint(GLFW_OPENGL_FORWARD_COMPAT, GL_TRUE);            // Required on Mac

#else

    // GL 3.0 + GLSL 130

    const char* glsl_version = "#version 130";

    glfwWindowHint(GLFW_CONTEXT_VERSION_MAJOR, 3);

    glfwWindowHint(GLFW_CONTEXT_VERSION_MINOR, 0);

    //glfwWindowHint(GLFW_OPENGL_PROFILE, GLFW_OPENGL_CORE_PROFILE);  // 3.2+ only

    //glfwWindowHint(GLFW_OPENGL_FORWARD_COMPAT, GL_TRUE);            // 3.0+ only

#endif

    // Create window with graphics context

    GLFWwindow* window = glfwCreateWindow(1280, 720, "Dear ImGui GLFW+OpenGL3 example", NULL, NULL);

    if (window == NULL)

        return 1;

    glfwMakeContextCurrent(window);

    glfwSwapInterval(1); // Enable vsync

    // Setup Dear ImGui context

    IMGUI_CHECKVERSION();

    ImGui::CreateContext();

    ImGuiIO& io = ImGui::GetIO(); (void)io;

    //io.ConfigFlags |= ImGuiConfigFlags_NavEnableKeyboard;     // Enable Keyboard Controls

    //io.ConfigFlags |= ImGuiConfigFlags_NavEnableGamepad;      // Enable Gamepad Controls

    // Setup Dear ImGui style

    ImGui::StyleColorsDark();

    //ImGui::StyleColorsLight();

    // Setup Platform/Renderer backends

    ImGui_ImplGlfw_InitForOpenGL(window, true);

    ImGui_ImplOpenGL3_Init(glsl_version);

    // Load Fonts

    // - If no fonts are loaded, dear imgui will use the default font. You can also load multiple fonts and use ImGui::PushFont()/PopFont() to select them.

    // - AddFontFromFileTTF() will return the ImFont* so you can store it if you need to select the font among multiple.

    // - If the file cannot be loaded, the function will return NULL. Please handle those errors in your application (e.g. use an assertion, or display an error and quit).

    // - The fonts will be rasterized at a given size (w/ oversampling) and stored into a texture when calling ImFontAtlas::Build()/GetTexDataAsXXXX(), which ImGui_ImplXXXX_NewFrame below will call.

    // - Read 'docs/FONTS.md' for more instructions and details.

    // - Remember that in C/C++ if you want to include a backslash \ in a string literal you need to write a double backslash \\ !

    //io.Fonts->AddFontDefault();

    //io.Fonts->AddFontFromFileTTF("../../misc/fonts/Roboto-Medium.ttf", 16.0f);

    //io.Fonts->AddFontFromFileTTF("../../misc/fonts/Cousine-Regular.ttf", 15.0f);

    //io.Fonts->AddFontFromFileTTF("../../misc/fonts/DroidSans.ttf", 16.0f);

    //io.Fonts->AddFontFromFileTTF("../../misc/fonts/ProggyTiny.ttf", 10.0f);

    //ImFont* font = io.Fonts->AddFontFromFileTTF("c:\\Windows\\Fonts\\ArialUni.ttf", 18.0f, NULL, io.Fonts->GetGlyphRangesJapanese());

    //IM_ASSERT(font != NULL);

    // Our state

    bool show_demo_window = true;

    bool show_another_window = false;

    ImVec4 clear_color = ImVec4(0.45f, 0.55f, 0.60f, 1.00f);

    // Main loop

    while (!glfwWindowShouldClose(window))

    {

        // Poll and handle events (inputs, window resize, etc.)

        // You can read the io.WantCaptureMouse, io.WantCaptureKeyboard flags to tell if dear imgui wants to use your inputs.

        // - When io.WantCaptureMouse is true, do not dispatch mouse input data to your main application, or clear/overwrite your copy of the mouse data.

        // - When io.WantCaptureKeyboard is true, do not dispatch keyboard input data to your main application, or clear/overwrite your copy of the keyboard data.

        // Generally you may always pass all inputs to dear imgui, and hide them from your application based on those two flags.

        glfwPollEvents();

        // Start the Dear ImGui frame

        ImGui_ImplOpenGL3_NewFrame();

        ImGui_ImplGlfw_NewFrame();

        ImGui::NewFrame();

        // 1. Show the big demo window (Most of the sample code is in ImGui::ShowDemoWindow()! You can browse its code to learn more about Dear ImGui!).

        if (show_demo_window)

            ImGui::ShowDemoWindow(&show_demo_window);

        // 2. Show a simple window that we create ourselves. We use a Begin/End pair to created a named window.

        {

            static float f = 0.0f;

            static int counter = 0;

            ImGui::Begin("Hello, world!");                          // Create a window called "Hello, world!" and append into it.

            ImGui::Text("This is some useful text.");               // Display some text (you can use a format strings too)

            ImGui::Checkbox("Demo Window", &show_demo_window);      // Edit bools storing our window open/close state

            ImGui::Checkbox("Another Window", &show_another_window);

            ImGui::SliderFloat("float", &f, 0.0f, 1.0f);            // Edit 1 float using a slider from 0.0f to 1.0f

            ImGui::ColorEdit3("clear color", (float*)&clear_color); // Edit 3 floats representing a color

            if (ImGui::Button("Button"))                            // Buttons return true when clicked (most widgets return true when edited/activated)

                counter++;

            ImGui::SameLine();

            ImGui::Text("counter = %d", counter);

            ImGui::Text("Application average %.3f ms/frame (%.1f FPS)", 1000.0f / ImGui::GetIO().Framerate, ImGui::GetIO().Framerate);

            ImGui::End();

        }

        // 3. Show another simple window.

        if (show_another_window)

        {

            ImGui::Begin("Another Window", &show_another_window);   // Pass a pointer to our bool variable (the window will have a closing button that will clear the bool when clicked)

            ImGui::Text("Hello from another window!");

            if (ImGui::Button("Close Me"))

                show_another_window = false;

            ImGui::End();

        }

        // Rendering

        ImGui::Render();

        int display_w, display_h;

        glfwGetFramebufferSize(window, &display_w, &display_h);

        glViewport(0, 0, display_w, display_h);

        glClearColor(clear_color.x * clear_color.w, clear_color.y * clear_color.w, clear_color.z * clear_color.w, clear_color.w);

        glClear(GL_COLOR_BUFFER_BIT);

        ImGui_ImplOpenGL3_RenderDrawData(ImGui::GetDrawData());

        glfwSwapBuffers(window);

    }

    // Cleanup

    ImGui_ImplOpenGL3_Shutdown();

    ImGui_ImplGlfw_Shutdown();

    ImGui::DestroyContext();

    glfwDestroyWindow(window);

    glfwTerminate();

    return 0;

}
至此,环境配置完毕
让鼠标事件透过创建的窗口
glfwWindowHint(GLFW_MOUSE_PASSTHROUGH, GLFW_TRUE);

让窗口透明
glfwWindowHint(GLFW_TRANSPARENT_FRAMEBUFFER, true);

置顶窗口
glfwWindowHint(GLFW_FLOATING, true);

禁止更改窗口大小
glfwWindowHint(GLFW_RESIZABLE, false);

窗口最大化
glfwWindowHint(GLFW_MAXIMIZED, true);

设置没有标题栏
glfwSetWindowAttrib(window, GLFW_DECORATED, false);
删除掉没有用的代码,删掉界面显示的代码,设置窗口透明,设置窗口最大化,设置鼠标通过,设置窗口不允许resize,就可以得到一个透明的窗口,即下面的代码
#include <stdio.h>

#include<Windows.h>

#include <GLFW/glfw3.h>

#include "imgui/imgui.h"

#include "imgui/imgui_impl_glfw.h"

#include "imgui/imgui_impl_opengl3.h"

#include "imgui/alifont.hpp"

static void glfw_error_callback(int error, const char* description)

{

    fprintf(stderr, "Glfw Error %d: %s\n", error, description);

}

int main()

{

    glfwSetErrorCallback(glfw_error_callback);

    if (!glfwInit())

        return 1;

    GLFWmonitor *monitor = glfwGetPrimaryMonitor();

    //###########################设置窗口###########################


    const char* glsl_version = "#version 130";

    int Height = glfwGetVideoMode(monitor)->height;

    int Width = glfwGetVideoMode(monitor)->width;

    glfwWindowHint(GLFW_FLOATING, true);

    glfwWindowHint(GLFW_RESIZABLE, false);

    glfwWindowHint(GLFW_MAXIMIZED, true);

    glfwWindowHint(GLFW_TRANSPARENT_FRAMEBUFFER, true);

    glfwWindowHint(GLFW_MOUSE_PASSTHROUGH, GLFW_TRUE);

    //###########################设置窗口###########################

    GLFWwindow* window = glfwCreateWindow(Width, Height, "titile", NULL, NULL);

    if (window == NULL)

        return 1;

    glfwSetWindowAttrib(window, GLFW_DECORATED, false); //设置没有标题栏

    ShowWindow(GetConsoleWindow(), SW_HIDE);

    glfwMakeContextCurrent(window);

    glfwSwapInterval(1);

    IMGUI_CHECKVERSION();

    ImGui::CreateContext();

    ImGuiIO& io = ImGui::GetIO(); (void)io;

    ImGui::StyleColorsDark();

    ImGui_ImplGlfw_InitForOpenGL(window, true);

    ImGui_ImplOpenGL3_Init(glsl_version);

    while (!glfwWindowShouldClose(window))

    {

        glfwPollEvents();

        glClear(GL_COLOR_BUFFER_BIT);

        ImGui_ImplOpenGL3_NewFrame();

        ImGui_ImplGlfw_NewFrame();

        ImGui::NewFrame();

        ImGui::Render();

        int display_w, display_h;

        glfwGetFramebufferSize(window, &display_w, &display_h);

        glViewport(0, 0, display_w, display_h);

        ImGui_ImplOpenGL3_RenderDrawData(ImGui::GetDrawData());

        glfwSwapBuffers(window);

    }

    // Cleanup

    ImGui_ImplOpenGL3_Shutdown();

    ImGui_ImplGlfw_Shutdown();

    ImGui::DestroyContext();

    glfwDestroyWindow(window);

    glfwTerminate();

    return 0;

}
至此,已经配置好了glfw+imgui的环境,并且创建了透明窗口,下一章用第一篇里的偏移值做点事
【C++】从零开始的CS:GO逆向分析2——配置GLFW+IMGUI环境并创建透明窗口的更多相关文章
- 【C++】从零开始的CS:GO逆向分析1——寻找偏移与基址的方法
[C++]从零开始的CS:GO逆向分析1--寻找偏移与基址的方法 前言:此文章主要用于提供方法与思路,fps游戏基本都能如此找偏移,文章里找的偏移比较少,主要用来演示寻找思路,文章的后记中会附一个 ...
- 【C++】从零开始的CS:GO逆向分析3——写出一个透视
[C++]从零开始的CS:GO逆向分析3--写出一个透视 本篇内容包括: 1. 透视实现的方法介绍 2. 通过进程名获取进程id和进程句柄 3. 通过进程id获取进程中的模块信息(模块大小,模块地址, ...
- IM通信协议逆向分析、Wireshark自定义数据包格式解析插件编程学习
相关学习资料 http://hi.baidu.com/hucyuansheng/item/bf2bfddefd1ee70ad68ed04d http://en.wikipedia.org/wiki/I ...
- RE-1 逆向分析基础
逆向分析基础 0x01-0x0C 本笔记使用汇编指令为x86架构下汇编指令,ARM架构汇编指令不做介绍 0x01. 关于RE 逆向工程(Reverse Engineering RE) 逆向分析方法: ...
- 技术分享:逆向分析ATM分离器
文章内容仅供技术交流,请勿模仿操作! 背景(作者) 每一次外出时, Elizabeth和我总是格外的小心,同时把我们身上的钱藏在特殊的皮带上面,这样还不够,我们还采取了“狡兔三窟”的方式来藏身上带的银 ...
- C++反汇编与逆向分析技术揭秘
C++反汇编-继承和多重继承 学无止尽,积土成山,积水成渊-<C++反汇编与逆向分析技术揭秘> 读书笔记 一.单类继承 在父类中声明为私有的成员,子类对象无法直接访问,但是在子类对象的 ...
- TI(德州仪器) TMS320C674x逆向分析之一
一.声明 作者并不懂嵌入式开发,整个逆向流程都是根据自身逆向经验,一步一步摸索出来,有什么错误请批评指正,或者有更好的方法请不吝赐教.个人写作水平有限,文中会尽量把过程写清楚,有问题或是写的不清楚的地 ...
- 一文了解安卓APP逆向分析与保护机制
"知物由学"是网易云易盾打造的一个品牌栏目,词语出自汉·王充<论衡·实知>.人,能力有高下之分,学习才知道事物的道理,而后才有智慧,不去求问就不会知道."知物 ...
- Android逆向分析(2) APK的打包与安装背后的故事
前言 上一次我们反编译了手Q,并遇到了Apktool反编译直接crash的问题,虽然笔者很想在这次解决这个问题,但在解决途中,发现该保护依赖于很多知识,所以本次先插入一下,正所谓知其然知其所以然,授之 ...
随机推荐
- 二分法求最长子序列长度(STL)(nlogn)
声明: 正如标题所说,只是求长度,应对题目要求,请自行判断,用错代码概不负责! 本蒟蒻的代码可能有错,有错误还请各位dalao请指出 运用了upper_bound()和lower_bound()函数 ...
- 分享一些小tips
谷歌浏览器破解 google拓展商店中hackbar地址 https://chrome.google.com/webstore/detail/djmoeoifnlhjolebkehmpaocfnipk ...
- python shutil相关操作
python shutil模块常用操作 高级的 文件.文件夹.压缩包 处理模块 1.将文件内容拷贝至另一个文件中 shutil.copyfileobj(src, dist, length=16*102 ...
- SAM复杂度证明
关于$SAM$的复杂度证明(大部分是对博客的我自己的理解和看法) 这部分是我的回忆,可省略 先回忆一下$SAM$ 我所理解的$SAM$,首先扒一张图 初始串$aabbabd$ 首先发现,下图里的$S- ...
- C#实现访问OPC UA服务器
OPC UA服务器支持三种认证方式,分别是匿名认证.用户认证和证书认证.其中匿名认证安全等级最低,访问不做任何校验.用户认证访问时,OPC UA客户端需要提供用户名及密码认证,只有用户名和密码正确才允 ...
- 优雅退出在Golang中的实现
背景 为什么需要优雅关停 在Linux下运行我们的go程序,通常有这样2种方式: 前台启动.打开终端,在终端中直接启动某个进程,此时终端被阻塞,按CTRL+C退出程序,可以输入其他命令,关闭终端后程序 ...
- Docker 08 部署Elasticsearch
参考源 https://www.bilibili.com/video/BV1og4y1q7M4?spm_id_from=333.999.0.0 https://www.bilibili.com/vid ...
- C# 使用SIMD向量类型加速浮点数组求和运算(1):使用Vector4、Vector<T>
作者: 目录 一.缘由 二.使用向量类型 2.1 基本算法 2.2 使用大小固定的向量(如 Vector4) 2.2.1 介绍 2.2.2 用Vector4编写浮点数组求和函数 2.3 使用大小与硬件 ...
- Mybatis-Plus高级之LambdaQueryWrapper,Wrappers.<实体类>lambdaQuery的使用
一.前言 小编今天又来分享干货了,绝对的干净又卫生,大伙请放心食用哈!Mybatis-Plus我们经常使用,但是里面的很多功能,小编开始只是知道一点点,做个增删改查没问题.小编在新项目中发现,大神们不 ...
- C++一些新的特性的理解(二)
1 C++11多线程thread 重点: join和detach的使用场景 thread构造函数参数 绑定c函数 绑定类函数 线程封装基础类 互斥锁mutex condition notify.wai ...