
【Android】4.4 示例--列出手机上的所有联系人
分类:C#、Android、VS2015;创建日期:2016-02-06
项目名:DesignerWalkthrough
模板:Blank App(Android)
功能:列出手机上的所有联系人。
说明:该例子提前使用了第9章介绍的列表视图。
运行效果:
下图是在模拟器(Galaxy_Api19)下看到的运行效果:
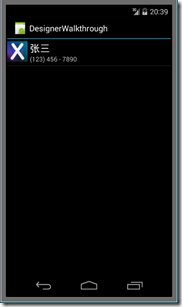
注意:需要先在模拟器的通讯录中添加联系人,然后才能看到运行效果。
主要设计步骤:
(1)在ListItem.axml中设计列表项模板
新建VS2015项目,模板:“Blank App (Android)”,项目名:DesignerWalkthrough
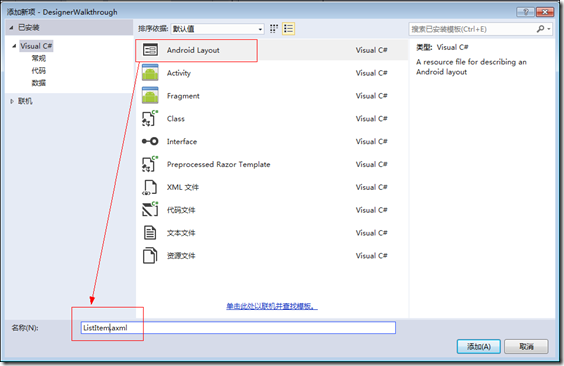
鼠标右击Resources/layout文件夹,【添加】à【新建项】,在弹出的窗口中,选择【Android Layout】模板,文件名:ListItem.axml,单击【添加】按钮。
拖放Placeholder.png到drawable文件夹下。
从【工具箱】中拖放【ImageView】控件到设计界面中。
从【工具箱】中拖放【LinearLayout (Vertical)】控件到设计界面中,放到【ImageView】的下方。
从【工具箱】中拖放【Text (Large)】控件到设计界面中,放到【LinearLayout (Vertical)】内。
从【工具箱】中拖放【Text (Small)】控件到【Text (Large)】的下方。
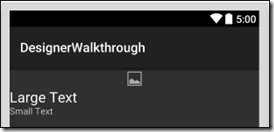
下面修改布局,目标是:将ImageView放到两个Text的左边:
缩小ImageView的宽度,然后修改根目录下的LinearLayout控件,在【属性】窗口中,将其【orientation】属性改为“horizontal”,即得到下面的效果:
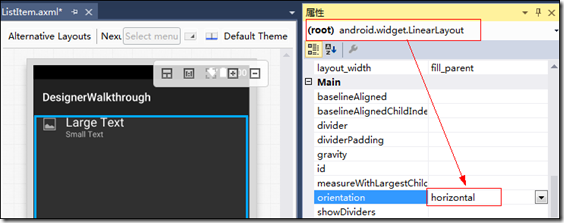
技巧:利用【文档大纲(Document Outline)】选择要操作的控件,然后再利用【属性】窗口设置对应的属性。
设置ImageView的属性:
src:选择icon.png图片,得到该属性的值为“@drawable/icon”。
paddingLeft:0dp
paddingTop:5dp
paddingRight:5dp
paddingBottom:0dp
layoutWidth:50dp
layoutHeight:50dp
adjustViewBounds:true
minWidth:25dp
minHeight:25dp
设置LinearLayout1的属性:
paddingLeft:0dp
paddingTop:5dp
paddingRight:5dp
paddingBottom:0dp
最终得到的结果如下:
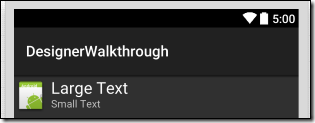
最终得到的【Source】选项卡中对应的XML如下:
<?xml version="1.0" encoding="utf-8"?>

<LinearLayout xmlns:android="http://schemas.android.com/apk/res/android"

    android:orientation="horizontal"

    android:layout_width="fill_parent"

    android:layout_height="fill_parent">

    <ImageView

        android:src="@drawable/icon"

        android:layout_width="50dp"

        android:layout_height="50dp"

        android:id="@+id/imageView1"

        android:adjustViewBounds="true"

        android:paddingLeft="0dp"

        android:paddingRight="5dp"

        android:paddingBottom="0dp"

        android:paddingTop="5dp"

        android:minHeight="25dp"

        android:minWidth="25dp" />

    <LinearLayout

        android:orientation="vertical"

        android:layout_width="match_parent"

        android:layout_height="wrap_content"

        android:id="@+id/linearLayout1"

        android:paddingTop="5dp"

        android:paddingBottom="5dp"

        android:paddingLeft="0dp"

        android:paddingRight="0dp">

        <TextView

            android:text="Large Text"

            android:textAppearance="?android:attr/textAppearanceLarge"

            android:layout_width="match_parent"

            android:layout_height="wrap_content"

            android:id="@+id/textView1" />

        <TextView

            android:text="Small Text"

            android:textAppearance="?android:attr/textAppearanceSmall"

            android:layout_width="match_parent"

            android:layout_height="wrap_content"

            android:id="@+id/textView2" />

    </LinearLayout>

</LinearLayout>
(2)在Main.axml中添加列表
打开Main.axml。
删除默认添加的按钮。
从【工具箱】中拖放一个ListView到设计界面中,然后修改属性:
id:@+id/listViewContacts
最后得到的XML如下:
<?xml version="1.0" encoding="utf-8"?>

<LinearLayout xmlns:android="http://schemas.android.com/apk/res/android"

    android:orientation="vertical"

    android:layout_width="fill_parent"

    android:layout_height="fill_parent"

    android:minWidth="25px"

    android:minHeight="25px">

    <ListView

        android:minWidth="25px"

        android:minHeight="25px"

        android:layout_width="match_parent"

        android:layout_height="match_parent"

        android:id="@+id/listViewContacts" />

</LinearLayout>
(3)修改权限配置
修改项目属性,添加【READ_CONTACTS】权限:
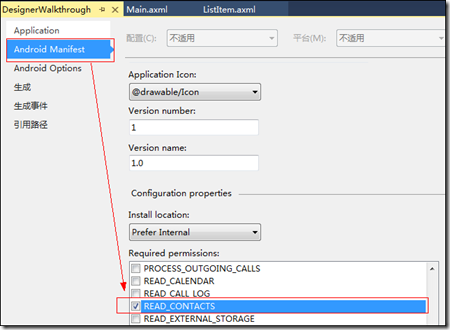
修改后,得到的AndroidMinifest.xml内容如下:
<?xml version="1.0" encoding="utf-8"?>

<manifest xmlns:android="http://schemas.android.com/apk/res/android" package="DesignerWalkthrough.DesignerWalkthrough" android:versionCode="1" android:versionName="1.0" android:installLocation="auto">

    <uses-sdk />

    <application android:label="DesignerWalkthrough" android:icon="@drawable/Icon"></application>

    <uses-permission android:name="android.permission.READ_CONTACTS" />

</manifest>
(4)添加ContactsAdapter.cs
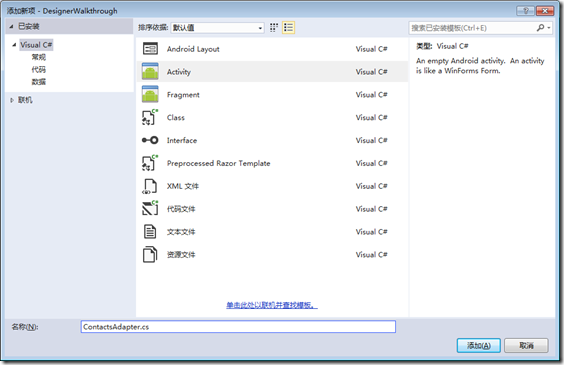
选择【Class】模板,输入文件名,然后将ContactsAdapter.cs的代码改为下面的内容:
using Android.Views;

using Android.Widget;

using Android.Content;

using Android.App;

using Android.Provider;

using System.Collections.Generic;

namespace DesignerWalkthrough

{

    public class ContactsAdapter : BaseAdapter

    {

        List<Contact> _contactList;

        Activity _activity;

        public ContactsAdapter(Activity activity)

        {

            _activity = activity;

            FillContacts();

        }

        public override int Count

        {

            get { return _contactList.Count; }

        }

        public override Java.Lang.Object GetItem(int position)

        {

            return null;

        }

        public override long GetItemId(int position)

        {

            return _contactList[position].Id;

        }

        public override View GetView(int position, View convertView, ViewGroup parent)

        {

            var view = convertView ?? _activity.LayoutInflater.Inflate(Resource.Layout.ListItem, parent, false);

            var contactName = view.FindViewById<TextView>(Resource.Id.textView1);

            var textView2 = view.FindViewById<TextView>(Resource.Id.textView2);

            var contactImage = view.FindViewById<ImageView>(Resource.Id.imageView1);

            textView2.Text = _contactList[position].Number;

            contactName.Text = _contactList[position].DisplayName;

            if (_contactList[position].PhotoId == null)

            {

                contactImage = view.FindViewById<ImageView>(Resource.Id.imageView1);

                contactImage.SetImageResource(Resource.Drawable.Placeholder);

            }

            else

            {

                var contactUri = ContentUris.WithAppendedId(ContactsContract.Contacts.ContentUri, _contactList[position].Id);

                var contactPhotoUri = Android.Net.Uri.WithAppendedPath(contactUri, ContactsContract.Contacts.Photo.ContentDirectory);

                contactImage.SetImageURI(contactPhotoUri);

            }

            return view;

        }

        void FillContacts()

        {

            var uri = ContactsContract.Contacts.ContentUri;

            string[] projection = {

                ContactsContract.Contacts.InterfaceConsts.Id,

                ContactsContract.Contacts.InterfaceConsts.DisplayName,

                ContactsContract.Contacts.InterfaceConsts.PhotoId

            };

            var cursor = _activity.ContentResolver.Query(uri, projection, null, null, null);

            _contactList = new List<Contact>();

            if (cursor.MoveToFirst())

            {

                do

                {

                    _contactList.Add(new Contact

                    {

                        Id = cursor.GetLong(cursor.GetColumnIndex(projection[])),

                        DisplayName = cursor.GetString(cursor.GetColumnIndex(projection[])),

                        PhotoId = cursor.GetString(cursor.GetColumnIndex(projection[])),

                        Number = "(123) 456 - 7890"

                    });

                } while (cursor.MoveToNext());

            }

        }

        class Contact

        {

            public long Id { get; set; }

            public string DisplayName { get; set; }

            public string PhotoId { get; set; }

            public string Number { get; set; }

        }

    }

}
(5)修改MainActivity.cs
将MainActivity.cs的代码改为下面的内容:
using Android.App;

using Android.Widget;

using Android.OS;

namespace DesignerWalkthrough

{

    [Activity(Label = "DesignerWalkthrough",

        Theme = "@android:style/Theme.DeviceDefault.Light",

        MainLauncher = true, Icon = "@drawable/icon")]

    public class MainActivity : Activity

    {

        protected override void OnCreate(Bundle bundle)

        {

            base.OnCreate(bundle);

            SetContentView(Resource.Layout.Main);

            var contactsAdapter = new ContactsAdapter(this);

            var contactsListView = FindViewById<ListView>(Resource.Id.listViewContacts);

            contactsListView.Adapter = contactsAdapter;

        }

    }

}
(6)运行
选择一种模拟器,然后按<F5>键调试运行。
【Android】4.4 示例--列出手机上的所有联系人的更多相关文章
- Android popupwindow在低版本手机上无法显示
popupwindow偶尔的显示失效(在低版本Android系统的手机上,测试机6.0)实在是坑害了不少人,害,而且坑了for a long time.本小白就是其中一个受害者. 百度了N久N多还是没 ...
- android的开发 华为手机上不显示menu键
android的开发,华为手机上不显示menu键解决办法: 在AndroidManifest.xml中讲targetSdkVersion改为9. <uses-sdk android:minSdk ...
- HTML5定稿了,终于有一种编程语言开发的程序可以在Android和IOS两种设备上运行了
2007 年 W3C (万维网联盟)立项 HTML5,直至 2014 年 10 月底,这个长达八年的规范终于正式封稿. 过去这些年,HTML5 颠覆了 PC 互联网的格局,优化了移动互联网的体验,接下 ...
- 如何在 Android 手机上实现抓包?
如何在 Android 手机上实现抓包? http://www.zhihu.com/question/20467503 我想知道某个应用究竟在数据提交到哪里,提交了什么.网上的教程太复杂,不想麻烦.有 ...
- 利用exif.js解决ios或Android手机上传竖拍照片旋转90度问题
html5+canvas进行移动端手机照片上传时,发现ios手机上传竖拍照片会逆时针旋转90度,横拍照片无此问题:Android手机没这个问题. 因此解决这个问题的思路是:获取到照片拍摄的方向角,对非 ...
- 如何在Android手机上进行自动化测试(下)
版权声明:允许转载,但转载必须保留原链接:请勿用作商业或者非法用途 前言 通过阅读本篇教程,你将会了解到: 如何使用Poco对Android原生应用进行测试 Poco支持直接对任何Android原生应 ...
- Mac电脑如何读取Android手机上的文件
问题 一般Android手机用usb数据线连接到windows操作系统的电脑上后,会自动将手机存储卡以移动存储的方式显示在电脑里. 但是如果操作系统是Mac的,就没有这个存储设备.问题来了,Mac电脑 ...
- 如何通过wifi在android手机上安装调试应用
如何通过wifi在android手机上安装调试应用 1. 首先还是要打开手机的usb调试选项,并通过usb线连接手机.2. 然后执行“adb tcpip 5555”,把adb从usb模式切换到tcpi ...
- delphi xe5 android 手机上使用sqlite
本篇我们介绍一下在android手机上怎样使用sqlite数据库,这里用Navigator实现 增删改查. 1.新建firemonkey mobile application 2.选择blank ap ...
随机推荐
- 浅析Android线程模型一 --- 转
摘要:随着中国移动在8月份相继发布基于Google Android的OPhone平台和手机网上应用商店Mobile Market,以及各大手机生产厂商在2009年北京国际通信展?上展出了各自基于And ...
- Asp.net 生成静态页面
http://www.cnblogs.com/tonycall/archive/2009/07/18/1526079.html Asp.net 生成静态页面(简单用法) 第一次发表,有什么错误,请大家 ...
- 使用Android编写录制视频小程序演示样例
主要实现录制功能的类:Camera类和MediaRecorder类.功能描写叙述:首先进入视频录制界面,点击录像button进入录像功能界面,点击录制開始录制视频, 点击停止button,将录制的视频 ...
- 事务的四大特性ACID介绍
事务是恢复和并发控制的基本单位.ACID 事务应该具有4个属性:原子性.一致性.隔离性.持续性.这四个属性通常称为ACID特性. 原子性(atomicity).一个事务是一个不可分割的工作单位,事务中 ...
- WebApi 数据保护操作未成功。这可能是由于未为当前线程的用户上下文加载用户配置文件导致的。当线程执行模拟时,可能会出现此情况。","ExceptionType":"System.Security.Cryptography.CryptographicException","StackTrace
在调用System.Security.Cryptography.ProtectedData.Protect方法来保护私密信息时,IIS可能会报以下错误:CryptographicException: ...
- Unity3D - 资源管理
一直没有总结过Unity的资源管理,都是随用随看文档.今天有人问起,总结一下.加深对Unity资源管理的理解. 主要參考了Unity官方文档之Resources和AssetBundle. Unity有 ...
- webservice系统学习笔记7-使用handler实现过滤器/拦截器效果
handler可以作用于客户端,也可以作用了服务端 handler分为:1.LogicalHandler:只能获取到soap消息的body. 2.SOAPHandler:可以获取SOAPMessage ...
- asp web api json 序列化后 把私有字段信息也返回了解决办法
serialization returns private properties Are your types marked as [Serializable]? Serializable means ...
- Mysql 5.7 从节点配置多线程主从复制
Mysql 采用多线程进行复制是从 Mysql 5.6 开始支持的内容,但是 5.6 版本下有缺陷,虽然支持多线程,但是每个数据库只能一个线程,也就是说如果我们只有一个数据库,则主从复制时也只有一个线 ...
- url-pattern / /*匹配
http://hi.baidu.com/atell/item/522112d3db45081fd90e44e1 struts2中配置为 <url-pattern>/*</url-pa ...