巅峰对决!Spring Boot VS .NET 6
原文作者:Putu Prema
原文链接: https://medium.com/@putuprema/spring-boot-vs-asp-net-core-a-showdown-1d38b89c6c2d
Spring Boot 和 ASP.NET Core 都是企业中流行的 Web 框架, 对于喜欢 C# 的人会使用 ASP.NET Core, 而对于 Java 或 Kotlin 等基于 JVM 的语言,Spring Boot 是最受欢迎的。
这本文中,会对比这两个框架在以下方面有何不同:
- 控制器
- 模型绑定和验证
- 异常处理
- 数据访问
- 依赖注入
- 认证与授权
- 性能
基础项目
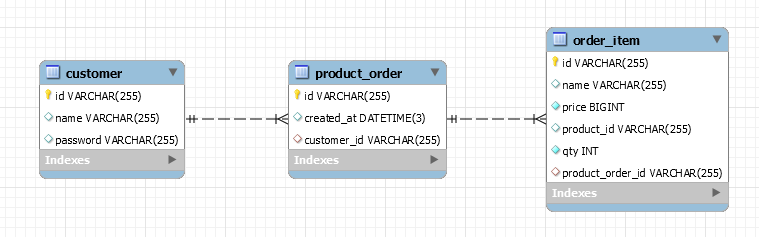
这是一个有关订单的基础项目, 非常简单的后端 api, 客户可以创建一个订单来购买一个或多个产品, 我使用了 MySQL 作为数据库,下面是实体关系图。
这里使用的框架版本分别是, Spring Boot (v2.5.5) 和 .NET 6, 让我们开始对比吧!
1.控制器
控制器是负责处理传入请求的层, 为了在 Spring Boot 中定义一个控制器,我创建了一个类 ProductOrderController, 然后使用了 @RestController 和 @RequestMapping 注解, 然后在控制器的每个方法上, 可以使用下面的注解来定义支持的 HTTP 方法和路径(可选)。
- @GetMapping
- @PostMapping
- @PutMapping
- @DeleteMapping
- @PatchMapping
如果要绑定到路径变量, 我们可以将参数添加到用@PathVariable 注释的控制器方法中,并指定与参数同名的路由路径模板,下面的 getOrderById() 方法,我们将id绑定为路径变量。
@RestController

@RequestMapping("/v1/orders")

class ProductOrderController(

    private val productOrderService: IProductOrderService

) {

    @GetMapping

    fun getOrders(query: ProductOrderQuery): List<ProductOrderDto> = when {

        query.productId?.isNotEmpty() == true -> productOrderService.getByProductId(query.productId!!)

        query.customerId?.isNotEmpty() == true -> productOrderService.getByCustomerId(query.customerId!!)

        else -> productOrderService.getAllOrders()

    }

    @GetMapping("{id}")

    fun getOrderById(@PathVariable id: String): ProductOrderDto = productOrderService.getById(id)

}
在 .NET Core 中, 控制器和上面是相似的, 首先创建一个 ProductOrderController类, 并继承 ControllerBase ,标记 [ApiController] 特性, 然后通过 [Route] 特性指定基本路径, 然后在控制器的每个方法上, 可以使用下面的特性来定义支持的 HTTP 方法和路径(可选)。
[ApiController]

[Route("v1/orders")]

public class ProductOrderController : ControllerBase

{

    private readonly IProductOrderService _productOrderService;

    public ProductOrderController(IProductOrderService productOrderService)

    {

        _productOrderService = productOrderService;

    }

    [HttpGet]

    public async Task<List<ProductOrderDto>> GetOrders([FromQuery] ProductOrderQuery query)

    {

        List<ProductOrderDto> orders;

        if (!string.IsNullOrEmpty(query.ProductId))

        {

            orders = await _productOrderService.GetAllByProductId(query.ProductId);

        }

        else if (!string.IsNullOrEmpty(query.CustomerId))

        {

            orders = await _productOrderService.GetAllByCustomerId(query.CustomerId);

        }

        else

        {

            orders = await _productOrderService.GetAll();

        }

        return orders;

    }

    [HttpGet("{id}")]

    public async Task<ProductOrderDto> GetOrderById(string id) => await _productOrderService.GetById(id);

}
模型绑定和验证
在 Spring Boot 中, 我们只需要给控制器的方法的参数加上下面的注解
- @RequestParam → 从查询字符串绑定
- @RequestBody → 从请求体绑定
- @RequestHeader → 从请求头绑定
对比表单的请求,不需要给参数加注解就可以绑定。
@RestController

@RequestMapping("/v1/customer")

class CustomerController(

    private val customerService: CustomerService

) {

    @PostMapping("/register")

    fun register(@Valid @RequestBody form: RegisterForm) = customerService.register(form)

    @PostMapping("/login")

    fun login(@Valid @RequestBody form: LoginForm) = customerService.login(form)

}

@RestController

@RequestMapping("/v1/orders")

class ProductOrderController(

    private val productOrderService: IProductOrderService

) {

    @GetMapping

    fun getOrders(query: ProductOrderQuery): List<ProductOrderDto> {

      ...

    }

}
如果要对参数进行验证, 需要添加 spring-boot-starter-validation 依赖项, 然后给 DTO 的属性加上 @NotEmpty、@Length 等注解, 最后给DTO加上 @Valid 即可。
.NET Core 和上面类似, 同样你可以使用下面的特性标记控制器的方法
- [FromQuery] → 从查询字符串绑定
- [FromRoute] → 从路由数据绑定
- [FromForm] → 从表单数据绑定
- [FromBody] → 从请求体绑定
- [FromHeader] → 从请求头绑定
[Route("v1/customer")]

    [ApiController]

    public class CustomerController : ControllerBase

    {

        [HttpPost("register")]

        public async Task<AuthResultDto> Register([FromBody] RegisterForm form) => await _customerService.Register(form);

        [HttpPost("login")]

        public async Task<AuthResultDto> Login([FromBody] LoginForm form) => await _customerService.Login(form);

    }

    [Route("v1/orders")]

    [ApiController]

    public class ProductOrderController : ControllerBase

    {

        [HttpGet]

        public async Task<List<ProductOrderDto>> GetOrders([FromQuery] ProductOrderQuery query)

        {

          .....

        }

    }
模型验证也是类似的, 给 DTO 的属性上加上 [Required]、[MinLength]、[MaxLength] 等特性就可以了。
public class RegisterForm

{

    [Required(ErrorMessage = "Please enter user id")]

    public string UserId { get; set; }

    [Required(ErrorMessage = "Please enter name")]

    public string Name { get; set; }

    [Required(ErrorMessage = "Please enter password")]

    [MinLength(6, ErrorMessage = "Password must have minimum of 6 characters")]

    public string Password { get; set; }

}
异常处理
Spring Boot 的异常处理,主要用 @RestControllerAdvice 和 ExceptionHandler
注解,如下
abstract class AppException(message: String) : RuntimeException(message) {

    abstract fun getResponse(): ResponseEntity<BaseResponseDto>

}
@RestControllerAdvice

class ControllerExceptionHandler : ResponseEntityExceptionHandler() {

    @ExceptionHandler(AppException::class)

    fun handleAppException(ex: AppException, handlerMethod: HandlerMethod): ResponseEntity<BaseResponseDto> {

        return ex.getResponse()

    }

}
在 ASP.NET Core 中,异常处理程序被注册为过滤器/中间件,我们可以创建一个异常处理类,并继承 IExceptionFilter 接口。
public class ControllerExceptionFilter : IExceptionFilter

{

    public void OnException(ExceptionContext context)

    {

        if (context.Exception is AppException exception)

        {

            context.Result = exception.GetResponse();

        }

    }

}
然后注册这个异常过滤器
var builder = WebApplication.CreateBuilder(args);

// Add services to the container.

builder.Services.AddControllers(options =>

{

    options.Filters.Add<ControllerExceptionFilter>();

});
数据访问
在 Spring Boot 中, 你可以使用 Hibernate ORM, 创建一个Repository 接口, 并继承 JpaRepository , 这样就有了开箱即用的基本查询方法,比如 findAll() 和 findById()。
您还可以在定义自定义查询方法。只要遵循严格的方法命名约定,Spring 就会构建这个存储库的实现,包括运行时的所有查询,魔法?是的!
interface IProductOrderRepository : JpaRepository<ProductOrder, String> {

    @EntityGraph(type = EntityGraph.EntityGraphType.FETCH, value = "product-order-graph")

    override fun findById(id: String): Optional<ProductOrder>

    @EntityGraph(type = EntityGraph.EntityGraphType.FETCH, value = "product-order-graph")

    fun findAllByCustomer(customer: Customer): List<ProductOrder>

    @EntityGraph(type = EntityGraph.EntityGraphType.FETCH, value = "product-order-graph")

    @Query("SELECT ord FROM ProductOrder ord JOIN OrderItem item ON item.productOrder = ord WHERE item.productId = :productId")

    fun findAllByProductId(productId: String): List<ProductOrder>

}
而在 .NET Core 中,我们可以使用官方的 Entity Framework ORM, 首先,我们需要创建一个 DB Context 类, 这是 ORM 框架用来连接数据库和运行查询的桥梁。
public class AppDbContext : DbContext

{

    public DbSet<Customer> Customer { get; set; }

    public DbSet<Product> Product { get; set; }

    public DbSet<ProductOrder> ProductOrder { get; set; }

    public DbSet<OrderItem> OrderItem { get; set; }

    public AppDbContext(DbContextOptions<AppDbContext> options) : base(options)

    {

        Customer = Set<Customer>();

        Product = Set<Product>();

        ProductOrder = Set<ProductOrder>();

        OrderItem = Set<OrderItem>();

    }

}
接下来,还需要注册上面的 DB Context,并配置数据库连接字符串
var builder = WebApplication.CreateBuilder(args);

// Add services to the container.

builder.Services.AddDbContext<AppDbContext>(options =>

{

    // Using Pomelo.EntityFrameworkCore.MySql library

    options.UseMySql(builder.Configuration.GetConnectionString("EaterMysql"), ServerVersion.Parse("8.0.21-mysql"));

});
在我们的 Repository 中,我们访问 DB 上下文中的 DbSet 字段来执行查询, 在这里,我们使用 LINQ,这是一组直接融入 C# 语言的 API,用于从各种数据源进行查询。这是我非常喜欢的一项功能,因为它提供了 Fluent API,例如 Where()、Include() 或 OrderBy(),这非常方便!
public class ProductOrderRepository : BaseRepository<ProductOrder>, IProductOrderRepository

{

    public ProductOrderRepository(AppDbContext context) : base(context)

    {

    }

    public Task<ProductOrder?> GetById(string id) => _context.ProductOrder

        .Include(o => o.Customer)

        .Include(o => o.Items)

        .Where(o => o.Id == id)

        .FirstOrDefaultAsync();

    public Task<List<ProductOrder>> GetAllByCustomer(Customer customer) => _context.ProductOrder

        .Include(o => o.Items)

        .Where(o => o.Customer == customer)

        .ToListAsync();

    public Task<List<ProductOrder>> GetAllByProductId(string productId) => _context.ProductOrder

        .Include(o => o.Customer)

        .Include(o => o.Items)

        .Where(o => o.Items.Any(item => item.ProductId == productId))

        .ToListAsync();

}
依赖注入
Spring Boot 中的依赖注入真的非常简单, 只需根据类的角色使用 @Component、@Service 或@Repository 等注解即可,在启动时,它会进行扫描,然后注册。
@Service

class ProductOrderService(

    private val customerRepository: ICustomerRepository,

    private val productOrderRepository: IProductOrderRepository,

    private val mapper: IMapper

) : IProductOrderService {

    // ...

    // ...

    // ...

}
在 .NET Core 中, 服务根据生命周期分成3中类型,单例的,范围的, 瞬时的,并且在启动时手动注册到 DI 容器中
var builder = WebApplication.CreateBuilder(args);

// Add services to the container.

// Services

builder.Services.AddSingleton<IPasswordEncoder, PasswordEncoder>();

builder.Services.AddSingleton<ITokenService, TokenService>();

builder.Services.AddScoped<IProductOrderService, ProductOrderService>();

builder.Services.AddScoped<ICustomerService, CustomerService>();

// Repositories

builder.Services.AddScoped<IProductOrderRepository, ProductOrderRepository>();

builder.Services.AddScoped<ICustomerRepository, CustomerRepository>();
身份验证和授权
在 Spring Boot 中, 首先需要添加依赖 spring-boot-starter-security, 然后,在 build.gradle 文件(或 pom.xml,如果您使用 Maven)中为 JWT 库添加以下依赖项:
implementation("io.jsonwebtoken:jjwt-api:${jjwtVersion}")

implementation("io.jsonwebtoken:jjwt-impl:${jjwtVersion}")

implementation("io.jsonwebtoken:jjwt-jackson:${jjwtVersion}")
接下来, 需要创建一个负责 JWT 令牌解析和验证的过滤器/中间件, 然后重写 doFilterInternal 方法, 编写解析和验证逻辑。
class JwtAuthenticationFilter(

    private val tokenService: ITokenService

) : OncePerRequestFilter() {

    override fun doFilterInternal(

        request: HttpServletRequest,

        response: HttpServletResponse,

        filterChain: FilterChain

    ) {

        val authorization = request.getHeader("Authorization")

        if (authorization == null || !authorization.startsWith("Bearer")) {

            return filterChain.doFilter(request, response)

        }

        val token = authorization.replaceFirst("Bearer ", "")

        val claims = try {

            tokenService.parse(token).body

        } catch (ex: JwtException) {

            SecurityContextHolder.clearContext()

            return

        }

        // Set authentication to tell Spring that the user is valid and authenticated.

        SecurityContextHolder.getContext().authentication = UsernamePasswordAuthenticationToken(claims.id, null, arrayListOf())

        filterChain.doFilter(request, response)

    }

}
要配置和强制执行身份验证,需要先创建一个继承WebSecurityConfigurerAdapter的配置类,并使用 @Configuration 注解, 在这里注册我们上面创建的 JWT 过滤器,并在configure方法中配置哪些端点应该进行身份验证。比如,我允许匿名访问客户登录和注册端点。其他所有内容都应进行身份验证
class ApiAccessDeniedHandler : AccessDeniedHandler {

    override fun handle(

        request: HttpServletRequest,

        response: HttpServletResponse,

        accessDeniedException: AccessDeniedException

    ) {

        response.status = HttpStatus.FORBIDDEN.value()

    }

}
class AuthEntryPoint : AuthenticationEntryPoint {

    override fun commence(

        request: HttpServletRequest,

        response: HttpServletResponse,

        authException: AuthenticationException

    ) {

        response.status = HttpStatus.UNAUTHORIZED.value()

    }

}
@Configuration

class SecurityConfig(

    tokenService: ITokenService

) : WebSecurityConfigurerAdapter() {

    private val jwtAuthenticationFilter = JwtAuthenticationFilter(tokenService)

    @Bean

    fun passwordEncoder(): PasswordEncoder = BCryptPasswordEncoder()

    override fun configure(http: HttpSecurity) {

        http.csrf().disable().cors().disable()

            .addFilterAfter(jwtAuthenticationFilter, UsernamePasswordAuthenticationFilter::class.java)

            .exceptionHandling()

            .accessDeniedHandler(ApiAccessDeniedHandler())

            .authenticationEntryPoint(AuthEntryPoint())

            .and()

            .sessionManagement().sessionCreationPolicy(SessionCreationPolicy.STATELESS)

            .and()

            .authorizeRequests()

            .antMatchers("/v1/customer/register", "/v1/customer/login").permitAll()

            .anyRequest().authenticated()

    }

}
在 ASP.NET Core 中实现 JWT 身份验证和授权非常简单, 首先安装Microsoft.AspNetCore.Authentication.JwtBearer` NuGet 包, 然后,在 Program.cs 文件中配置一些设置,例如密钥、颁发者和到期时间。
var builder = WebApplication.CreateBuilder(args);

// Configure JWT Authentication

builder.Services.AddAuthentication(JwtBearerDefaults.AuthenticationScheme)

    .AddJwtBearer(options =>

    {

        options.SaveToken = true;

        options.RequireHttpsMetadata = true;

        options.TokenValidationParameters = new TokenValidationParameters()

        {

            ValidateAudience = false,

            ValidIssuer = builder.Configuration["JWT:ValidIssuer"],

            IssuerSigningKey = new SymmetricSecurityKey(Encoding.UTF8.GetBytes(builder.Configuration["JWT:Secret"])),

            ClockSkew = TimeSpan.FromSeconds(30)

        };

    });

var app = builder.Build();

// Enable Authentication & Authorization

app.UseAuthentication();

app.UseAuthorization();

app.MapControllers();

app.Run();
如果需要认证,就在控制或者方法上,加上 [Authorize] 特性, 同样,可以加上 [AllowAnonymous] 代表允许匿名访问。
[Route("v1/customer")]

[ApiController]

[Authorize]

public class CustomerController : ControllerBase

{

    [HttpPost("login")]

    [AllowAnonymous]

    public async Task<AuthResultDto> Login([FromBody] LoginForm form) => await _customerService.Login(form);

    [HttpGet]

    public async Task<CustomerDto> GetProfile() => await _customerService.GetProfile();

}
性能
最后是关键的部分,性能, 这两个框架在 QPS 和 内存使用率方面的表现如何?
在这里,我做了一个负载测试,调用一个 API,通过 id 获取一个产品订单。
测试环境
CPU:Intel Core i7–8750H( 4.10 GHz),6 核 12 线程
RAM:32 GB
操作系统:Windows 11
测试设置
我使用的压力测试工具是 K6, 进行了2次测试, 因为我想看看程序预热后性能提高了多少。在每次测试中,前 30 秒将从 0 增加到 1000 个虚拟用户,然后在那里停留 1 分钟。然后再过 30 秒,测试将从 1000 用户减少到 0 用户。
我还将 Golang(使用 Gin 框架和 Gorm)添加到基准测试, 这里只是为了对比 我们都知道 Golang 非常快。

测试结果
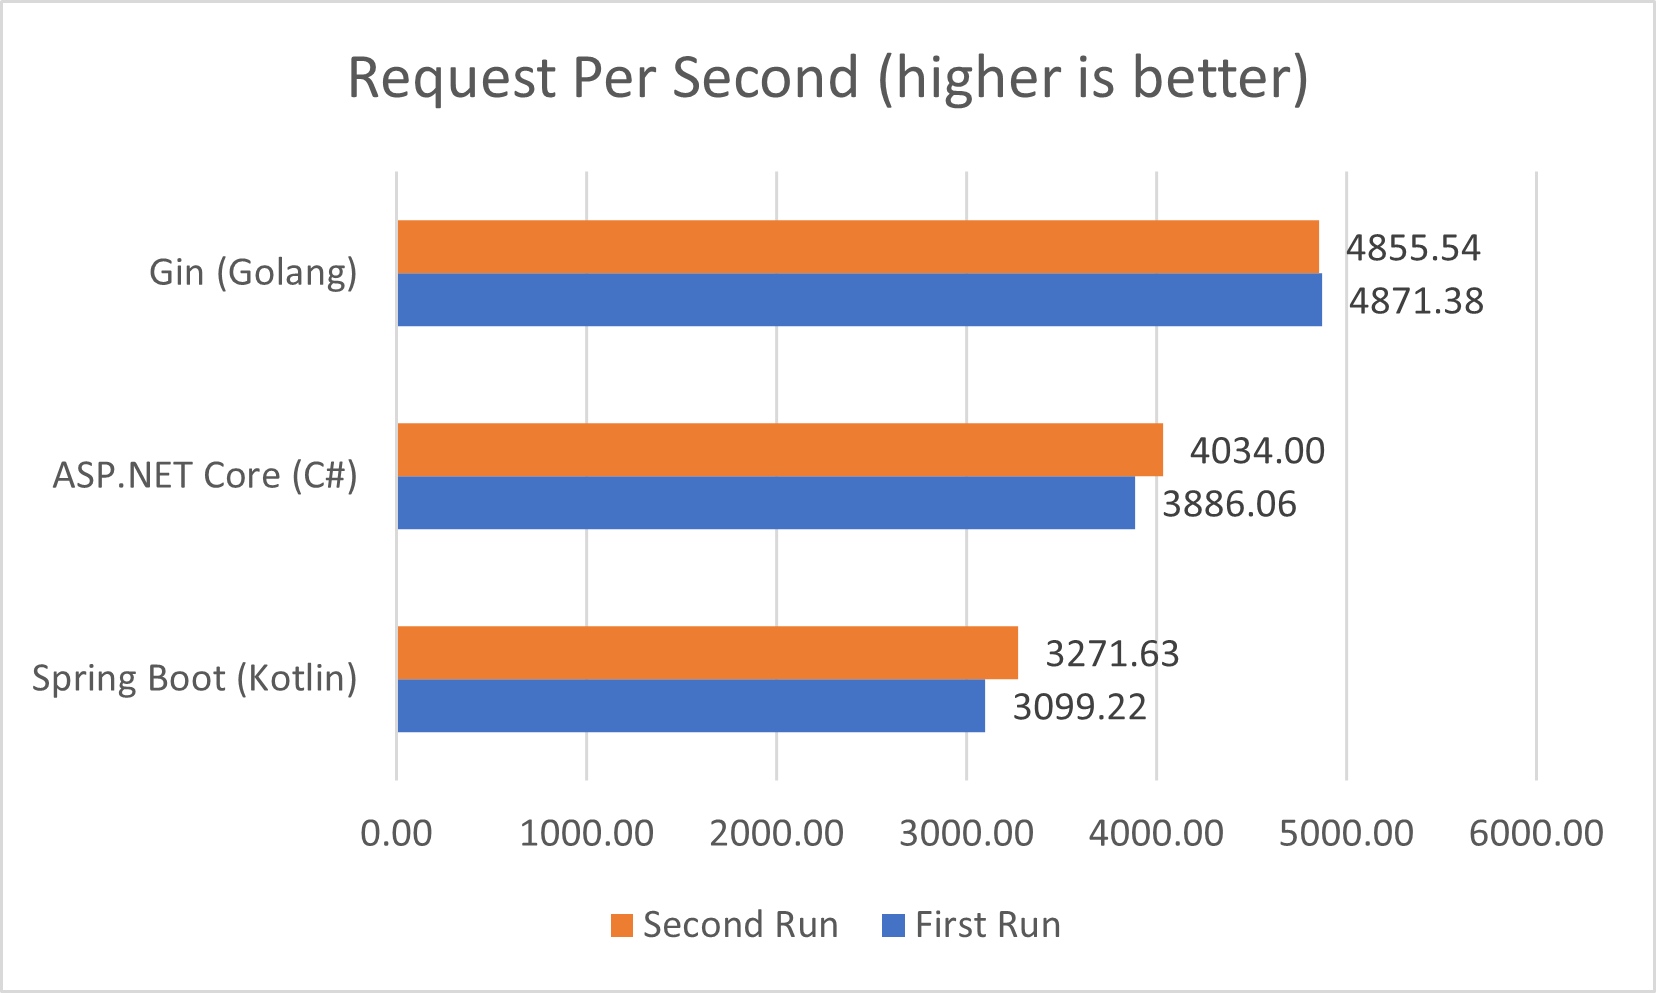
显然,Golang 是最快的,我检查了两者都执行了查询优化,确认没有 N+1 问题,所以在 qps 上 .NET Core 胜出。
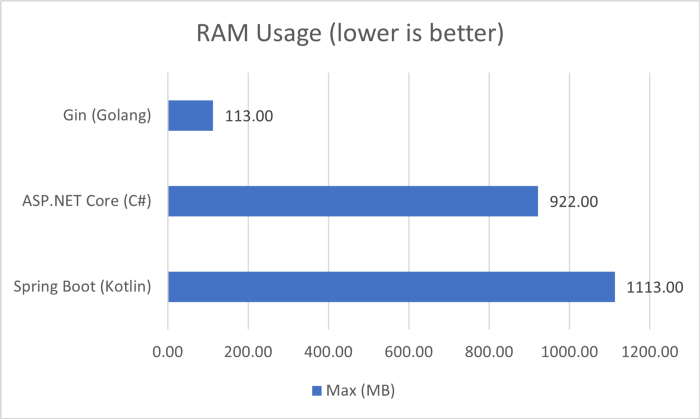
在内存使用方面,Golang 当然是最小的(只有 113 MB!),其次是 .NET Core, 最后就是超过1 GB 内存的 Spring Boot, 另外我观察到的有趣的事情是,测试完成后,Golang 和 .NET Core 的内存消耗分别减少到 10 MB 和 100 MB 左右,而 Spring Boot 保持在 1 GB 以上,直到我终止进程。
最后,Spring Boot 和 ASP.NET Core 都是非常成熟的框架,您都可以考虑使用, 希望对您有用!
![]()
巅峰对决!Spring Boot VS .NET 6的更多相关文章
- 玩转spring boot——快速开始
开发环境: IED环境:Eclipse JDK版本:1.8 maven版本:3.3.9 一.创建一个spring boot的mcv web应用程序 打开Eclipse,新建Maven项目 选择quic ...
- 【微框架】之一:从零开始,轻松搞定SpringCloud微框架系列--开山篇(spring boot 小demo)
Spring顶级框架有众多,那么接下的篇幅,我将重点讲解SpringCloud微框架的实现 Spring 顶级项目,包含众多,我们重点学习一下,SpringCloud项目以及SpringBoot项目 ...
- 玩转spring boot——开篇
很久没写博客了,而这一转眼就是7年.这段时间并不是我没学习东西,而是园友们的技术提高的非常快,这反而让我不知道该写些什么.我做程序已经有十几年之久了,可以说是彻彻底底的“程序老炮”,至于技术怎么样?我 ...
- 玩转spring boot——结合redis
一.准备工作 下载redis的windows版zip包:https://github.com/MSOpenTech/redis/releases 运行redis-server.exe程序 出现黑色窗口 ...
- 玩转spring boot——AOP与表单验证
AOP在大多数的情况下的应用场景是:日志和验证.至于AOP的理论知识我就不做赘述.而AOP的通知类型有好几种,今天的例子我只选一个有代表意义的“环绕通知”来演示. 一.AOP入门 修改“pom.xml ...
- 玩转spring boot——结合JPA入门
参考官方例子:https://spring.io/guides/gs/accessing-data-jpa/ 接着上篇内容 一.小试牛刀 创建maven项目后,修改pom.xml文件 <proj ...
- 玩转spring boot——结合JPA事务
接着上篇 一.准备工作 修改pom.xml文件 <project xmlns="http://maven.apache.org/POM/4.0.0" xmlns:xsi=&q ...
- 玩转spring boot——结合AngularJs和JDBC
参考官方例子:http://spring.io/guides/gs/relational-data-access/ 一.项目准备 在建立mysql数据库后新建表“t_order” ; -- ----- ...
- 玩转spring boot——结合jQuery和AngularJs
在上篇的基础上 准备工作: 修改pom.xml <project xmlns="http://maven.apache.org/POM/4.0.0" xmlns:xsi=&q ...
随机推荐
- zabbix之微信报警
#:先在企业微信注册一个企业微信号 #:注册好之后,进入微信 #:测试一下 #:获取access_token #:开始获取 #:获取 #:在server端安装pip root@ubuntu:~# ap ...
- vue-cli4脚手架搭建二
vue-cli4脚手架搭建一 vue create vue3 cd vue3 yarn serve http://localhost:8080/#/ main.js文件 import Vue from ...
- Spring标签库
spring提供了两个标签库文件:spring-form.tld(表单标签库,用于输出HTML表单) spring.tld(基础标签库,用于Spring数据绑定等) 使用步骤: 1,配置表单标签库, ...
- SpringIOC原理
IOC(DI):其实这个Spring架构核心的概念没有这么复杂,更不像有些书上描述的那样晦涩.java程序员都知道:java程序中的每个业务逻辑至少需要两个或以上的对象来协作完成,通常,每个对象在使用 ...
- jquery datatable使用简单示例
目标: 使用 jQuery Datatable 构造数据列表,并且增加或者隐藏相应的列,已达到数据显示要求.同时, jQuery Datatable 强大的功能支持:排序,分页,搜索等. Query ...
- Dubbo管控平台
2019年初,官方发布了Dubbo管理控制台0.1版本.结构上采取了前后端分离的方式,前端使用Vue和Vuetify分别作为Javascript框架和UI框架,后端采用Spring Boot框架 一. ...
- lucene的索引查询
package com.hope.lucene;import org.apache.lucene.document.Document;import org.apache.lucene.document ...
- 因Console.Read()导致Centos 后台运行.net core程序报错
.net 控制台程序通常用 Console.Read(),或者Console.ReadKey()让进程阻塞保持,不退出. 但在.net core 需要将程序放在后台执行时 用Console.Read( ...
- Redis cluster 集群部署和配置
目录 一.集群简介 cluster介绍 cluster原理 cluster特点 应用场景 二.集群部署 环境介绍 节点部署 启动集群 三.集群测试 一.集群简介 cluster介绍 redis clu ...
- SQLserver 2014使用Convert()函数获取时间
select convert(char(100),GetDate(),120) as Date 第3个参数就是用来设置日期类型数据的显示样式的,下面介绍几种样式的参数 SELECT CONVERT(v ...