Qt学习笔记(2)-利用StackWidget实现选项卡式页面
学习笔记第二篇,利用Qt实现选项卡式的页面,效果如图1.1-图1.3所示。程序实现的功能是通过点击状态栏实现不同页面的切换,实际上Qt中自带有Tab选项卡式的控件,本文利用StackWidge实现类似的页面切换功能。本文的开发思路以及页面代码参考了陆文周主编的《Qt5开发及实例(第3版)》(中国工信出版社)。
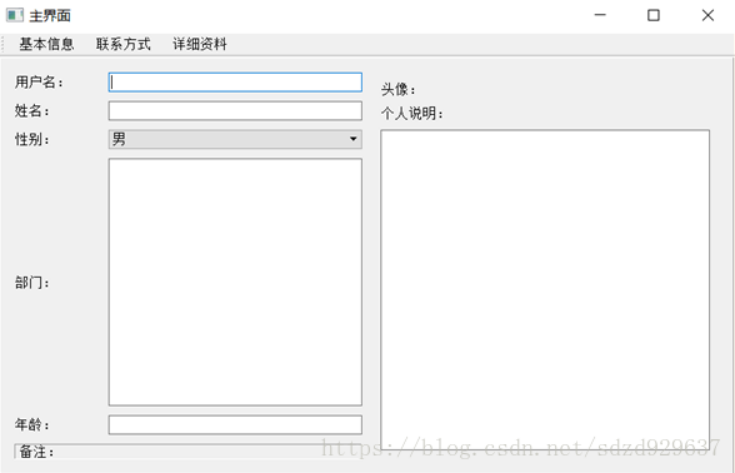
图1.1 基本信息界面
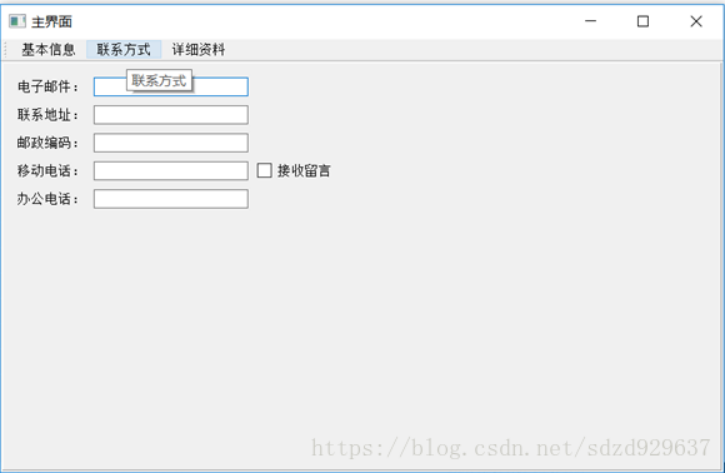
图1.2 联系方式界面
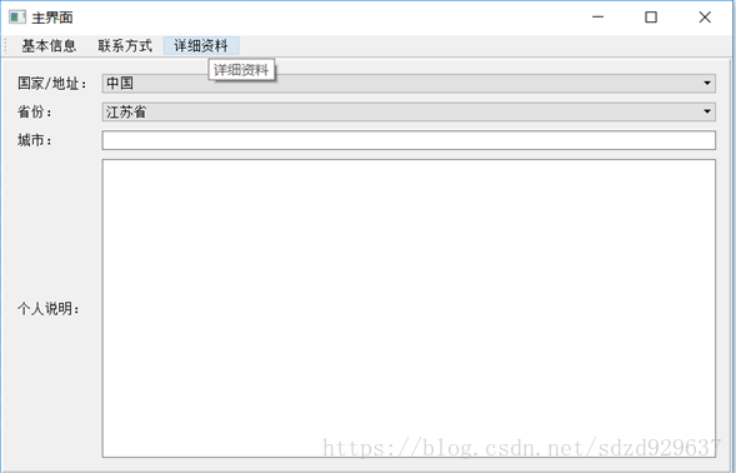
图1.3 详细资料界面
本文软件的框架如图1.4所示,下面从最下层的内容开始介绍。
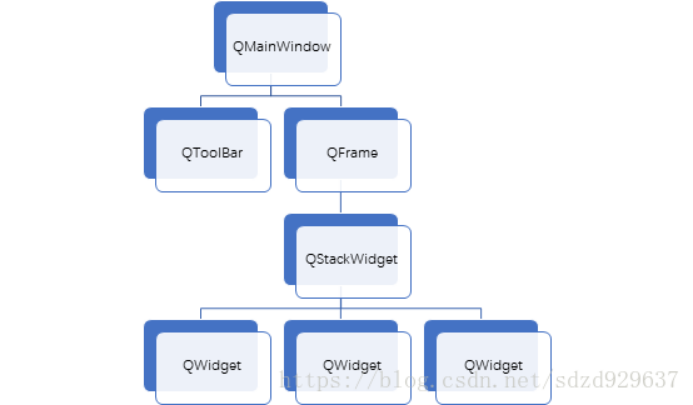
图1.4 软件开发框架
1、底层页面的构建
最底层的页面分为三个类,基本信息(BaseInfo)类,联系方式(Contact)类以及详细资料(Detail)类,三个类均继承自QWidget类。
(1)Class BaseInfo
baseinfo.h
#ifndef BASEINFO_H
#define BASEINFO_H
#include <QtCore/qglobal.h>
#if QT_VERSION >= 0x050000
#include <QtWidgets/QWidget>
#else
#include <QtGui/QWidget>
#endif
#include <QLabel>
#include <QLineEdit>
#include <QComboBox>
#include <QTextEdit>
#include <QGridLayout>
#include <QPushButton>
#include <QHBoxLayout>
#include <QVBoxLayout>
#include <QPixmap>
class BaseInfo : public QWidget
{
Q_OBJECT
public:
explicit BaseInfo(QWidget *parent = nullptr);
signals:
public slots:
private:
//左侧
QLabel *UserNameLabel; //用户名
QLabel *NameLabel; //姓名
QLabel *SexLabel; //性别
QLabel *DepartmentLabel; //部门
QLabel *AgeLabel; //年龄
QLabel *OtherLabel; //备注
QLineEdit *UserNameLineEdit;
QLineEdit *NameLineEdit;
QComboBox *SexCombox;
QTextEdit *DepartmentTextEdit;
QLineEdit *AgeLineEdit;
QGridLayout *LeftLayout;
//右侧
QLabel *HeadLabel; //右上角部分,头像
QLabel *HeadIconLabel; //头像图标
QPushButton *UpdateHeadBtn; //更新按钮
QHBoxLayout *TopRightLayout; //个人说明
QLabel *IntroductionLabel;
QTextEdit *IntroductionTextEdit;
QVBoxLayout *RightLayout;
};
#endif // BASEINFO_H
baseinfo.cpp
#include "baseinfo.h"
BaseInfo::BaseInfo(QWidget *parent) : QWidget(parent)
{
//*****左侧*****
UserNameLabel = new QLabel(tr("用户名:"));
UserNameLineEdit = new QLineEdit;
NameLabel = new QLabel(tr("姓名:"));
NameLineEdit = new QLineEdit;
SexLabel = new QLabel(tr("性别:"));
SexCombox = new QComboBox;
SexCombox->addItem(tr("男"));
SexCombox->addItem(tr("女"));
DepartmentLabel = new QLabel(tr("部门:"));
DepartmentTextEdit = new QTextEdit;
AgeLabel = new QLabel(tr("年龄:"));
AgeLineEdit = new QLineEdit;
OtherLabel = new QLabel(tr("备注:"));
OtherLabel->setFrameStyle(QFrame::Panel | QFrame::Sunken);
//左侧布局
LeftLayout = new QGridLayout();
LeftLayout->addWidget(UserNameLabel, 0, 0);
LeftLayout->addWidget(UserNameLineEdit, 0, 1);
LeftLayout->addWidget(NameLabel, 1, 0);
LeftLayout->addWidget(NameLineEdit, 1, 1);
LeftLayout->addWidget(SexLabel, 2, 0);
LeftLayout->addWidget(SexCombox, 2, 1);
LeftLayout->addWidget(DepartmentLabel, 3, 0);
LeftLayout->addWidget(DepartmentTextEdit, 3, 1);
LeftLayout->addWidget(AgeLabel, 4, 0);
LeftLayout->addWidget(AgeLineEdit, 4, 1);
LeftLayout->addWidget(OtherLabel, 5, 0, 1, 2);
LeftLayout->setColumnStretch(0, 1);
LeftLayout->setColumnStretch(1, 3);
//*****右侧*****
//右上方
HeadLabel = new QLabel(tr("头像:"));
HeadIconLabel = new QLabel;
QPixmap icon("123.png");
HeadIconLabel->setPixmap(icon);
HeadIconLabel->resize(20, 20);
UpdateHeadBtn = new QPushButton(tr("更新"));
//右上方布局
TopRightLayout = new QHBoxLayout;
TopRightLayout->setSpacing(20);
TopRightLayout->addWidget(HeadLabel);
TopRightLayout->addWidget(HeadIconLabel);
//右下方
IntroductionLabel = new QLabel(tr("个人说明:"));
IntroductionTextEdit = new QTextEdit;
//右下方布局
RightLayout = new QVBoxLayout();
RightLayout->setMargin(10);
RightLayout->addLayout(TopRightLayout);
RightLayout->addWidget(IntroductionLabel);
RightLayout->addWidget(IntroductionTextEdit);
//总布局
QGridLayout *mainLayout = new QGridLayout(this);
mainLayout->setMargin(15);
mainLayout->setSpacing(10);
mainLayout->addLayout(LeftLayout, 0, 0);
mainLayout->addLayout(RightLayout, 0, 1);
//mainLayout->setSizeConstraint(QLayout::SetFixedSize);
}
(2)Class Contact
contact.h
#ifndef CONTACT_H
#define CONTACT_H
#include <QtCore/qglobal.h>
#if QT_VERSION >= 0x050000
#include <QtWidgets/QWidget>
#else
#include <QtGui/QWidget>
#endif
#include <QLabel>
#include <QGridLayout>
#include <QLineEdit>
#include <QCheckBox>
class Contact : public QWidget
{
Q_OBJECT
public:
explicit Contact(QWidget *parent = nullptr);
signals:
public slots:
private:
QLabel *EmailLabel;
QLineEdit *EmailLineEdit;
QLabel *AddrLabel;
QLineEdit *AddrLineEdit;
QLabel *CodeLabel;
QLineEdit *CodeLineEdit;
QLabel *MoviTelLabel;
QLineEdit *MoviTelLineEdit;
QCheckBox *MoviTelCheckBox;
QLabel *ProTelLabel;
QLineEdit *ProTelLineEdit;
QGridLayout *mainLayout;
};
#endif // CONTACT_H
contact.cpp
#include "contact.h"
Contact::Contact(QWidget *parent) : QWidget(parent)
{
EmailLabel = new QLabel(tr("电子邮件:"));
EmailLineEdit = new QLineEdit;
AddrLabel = new QLabel(tr("联系地址:"));
AddrLineEdit = new QLineEdit;
CodeLabel = new QLabel(tr("邮政编码:"));
CodeLineEdit = new QLineEdit;
MoviTelLabel = new QLabel(tr("移动电话:"));
MoviTelLineEdit = new QLineEdit;
MoviTelCheckBox = new QCheckBox(tr("接收留言"));
ProTelLabel = new QLabel(tr("办公电话:"));
ProTelLineEdit = new QLineEdit;
mainLayout = new QGridLayout(this);
mainLayout->setMargin(15);
mainLayout->setSpacing(10);
mainLayout->addWidget(EmailLabel, 0, 0);
mainLayout->addWidget(EmailLineEdit, 0, 1);
mainLayout->addWidget(AddrLabel, 1, 0);
mainLayout->addWidget(AddrLineEdit, 1, 1);
mainLayout->addWidget(CodeLabel, 2, 0);
mainLayout->addWidget(CodeLineEdit, 2, 1);
mainLayout->addWidget(MoviTelLabel, 3, 0);
mainLayout->addWidget(MoviTelLineEdit, 3, 1);
mainLayout->addWidget(MoviTelCheckBox, 3, 2);
mainLayout->addWidget(ProTelLabel, 4, 0);
mainLayout->addWidget(ProTelLineEdit, 4, 1);
mainLayout->setSizeConstraint(QLayout::SetFixedSize);
}
(3)Class Detail
detail.h
#ifndef DETAIL_H
#define DETAIL_H
#include <QtCore/qglobal.h>
#if QT_VERSION >= 0x050000
#include <QtWidgets/QWidget>
#else
#include <QtGui/QWidget>
#endif
#include <QLabel>
#include <QComboBox>
#include <QLineEdit>
#include <QTextEdit>
#include <QGridLayout>
class Detail : public QWidget
{
Q_OBJECT
public:
explicit Detail(QWidget *parent = nullptr);
signals:
public slots:
private:
QLabel *NationalLabel;
QComboBox *NationalComboBox;
QLabel *ProvinceLabel;
QComboBox *ProvinceComboBox;
QLabel *CityLabel;
QLineEdit *CityLineEdit;
QLabel *IntroductLabel;
QTextEdit *IntroductTextEdit;
QGridLayout *mainLayout;
};
#endif // DETAIL_H
detail.cpp
#include "detail.h"
Detail::Detail(QWidget *parent) : QWidget(parent)
{
NationalLabel = new QLabel(tr("国家/地址:"));
NationalComboBox = new QComboBox;
NationalComboBox->insertItem(0, tr("中国"));
NationalComboBox->insertItem(1, tr("美国"));
NationalComboBox->insertItem(2, tr("英国"));
ProvinceLabel = new QLabel(tr("省份:"));
ProvinceComboBox = new QComboBox;
ProvinceComboBox->insertItem(0, tr("江苏省"));
ProvinceComboBox->insertItem(1, tr("山东省"));
ProvinceComboBox->insertItem(2, tr("浙江省"));
CityLabel = new QLabel(tr("城市:"));
CityLineEdit = new QLineEdit;
IntroductLabel = new QLabel(tr("个人说明:"));
IntroductTextEdit = new QTextEdit;
mainLayout = new QGridLayout(this);
mainLayout->setMargin(15);
mainLayout->setSpacing(10);
mainLayout->addWidget(NationalLabel, 0, 0);
mainLayout->addWidget(NationalComboBox, 0, 1);
mainLayout->addWidget(ProvinceLabel, 1, 0);
mainLayout->addWidget(ProvinceComboBox, 1, 1);
mainLayout->addWidget(CityLabel, 2, 0);
mainLayout->addWidget(CityLineEdit, 2, 1);
mainLayout->addWidget(IntroductLabel, 3, 0);
mainLayout->addWidget(IntroductTextEdit, 3, 1);
}
2、将底层页面放在QStackWidget中
新建一个Content类,继承自QFrame。在Content类中,创建一个QStackWidget对象,然后将上述三个页面插入到此对象中。
content.h
#ifndef CONTENT_H
#define CONTENT_H
#include <QtCore/qglobal.h>
#if QT_VERSION >= 0x050000
#include <QtWidgets/QWidget>
#else
#include <QtGui/QWidget>
#endif
#include <QFrame>
#include <QStackedWidget>
#include <QGridLayout>
#include "baseinfo.h"
#include "contact.h"
#include "detail.h"
class Content : public QFrame
{
Q_OBJECT
public:
explicit Content(QWidget *parent = nullptr);
QStackedWidget *stack;
BaseInfo *baseInfo;
Contact *contact;
Detail *detail;
signals:
public slots:
private:
QGridLayout *mainLayout;
};
#endif // CONTENT_H
content.cpp
这里用了一个QGridLayou布局,布局中只有一个QStackWidget。如果去掉此布局,则在主界面中的Stack页面无法随主界面变化,只能保持同一个尺寸,所以这里有必要加一个布局。
#include "content.h"
Content::Content(QWidget *parent) : QFrame(parent)
{
stack = new QStackedWidget(this); //创建一个堆栈窗口对象
stack->setFrameStyle(QFrame::Panel | QFrame::Raised); //窗口的显示风格
//插入页面
baseInfo = new BaseInfo();
contact = new Contact();
detail = new Detail();
stack->addWidget(baseInfo);
stack->addWidget(contact);
stack->addWidget(detail);
mainLayout = new QGridLayout(this);
mainLayout->setMargin(2);
mainLayout->addWidget(stack, 0, 0);
}
3、主界面的实现
这里的主界面不是指main函数,而是指QMainWindow,主界面的类为MainStack继承自QMainWindow。在主界面上主要实现的功能是状态栏和Stack界面的显示以及它们之间的连接。
mainstack.h
#ifndef MAINSTACK_H
#define MAINSTACK_H
#include <QMainWindow>
#include <QToolBar>
#include <QAction>
#include <QGridLayout>
#include "content.h"
class MainStack : public QMainWindow
{
Q_OBJECT
public:
MainStack(QWidget *parent = 0);
~MainStack();
Content *content;
QGridLayout *mainLayout;
void createAction(); //动作处理函数
void createToolBar(); //创建工具栏
private:
QToolBar *stackTool; //工具栏
QAction *openStack[3];
private slots:
void openBaseInfo(); //点击状态栏的槽函数
void openContact();
void openDtail();
};
#endif // MAINSTACK_H
mainstack.cpp
主界面的中心部件就一个,就不加布局了,所有的布局都加在上一步的QFrame中。
#include "mainstack.h"
MainStack::MainStack(QWidget *parent)
: QMainWindow(parent)
{
setWindowTitle(tr("主界面"));
setMinimumSize(800, 480);
createAction();
createToolBar();
content = new Content(this);
setCentralWidget(content); //将stack窗口设置为中心部件
//mainLayout = new QGridLayout(this);
//mainLayout->setMargin(15);
//mainLayout->setSpacing(10);
//mainLayout->addWidget(stackTool, 0, 0);
//mainLayout->addWidget(content, 1, 0);
}
MainStack::~MainStack()
{
}
//Action动作
void MainStack::createAction()
{
//转到第一个界面
openStack[0] = new QAction(tr("基本信息"), this);
openStack[0]->setShortcut(tr("Ctrl+Q"));
openStack[0]->setStatusTip(tr("界面1"));
connect(openStack[0], SIGNAL(triggered(bool)), this, SLOT(openBaseInfo()));
//转到第二个界面
openStack[1] = new QAction(tr("联系方式"), this);
openStack[1]->setShortcut(tr("Ctrl+W"));
openStack[1]->setStatusTip(tr("界面2"));
connect(openStack[1], SIGNAL(triggered(bool)), this, SLOT(openContact()));
//转到第三个界面
openStack[2] = new QAction(tr("详细资料"), this);
openStack[2]->setShortcut(tr("Ctrl+E"));
openStack[2]->setStatusTip(tr("界面3"));
connect(openStack[2], SIGNAL(triggered(bool)), this, SLOT(openDtail()));
}
//创建工具栏
void MainStack::createToolBar()
{
stackTool = addToolBar("工具栏");
stackTool->addAction(openStack[0]);
stackTool->addAction(openStack[1]);
stackTool->addAction(openStack[2]);
}
//转到界面1槽函数
void MainStack::openBaseInfo()
{
this->content->stack->setCurrentIndex(0);
}
//转到界面2槽函数
void MainStack::openContact()
{
this->content->stack->setCurrentIndex(1);
}
//转到界面3槽函数
void MainStack::openDtail()
{
this->content->stack->setCurrentIndex(2);
}
4、main函数
main函数就是显示主界面。
#include "mainstack.h"
#include <QApplication>
int main(int argc, char *argv[])
{
QApplication a(argc, argv);
MainStack w;
w.show();
return a.exec();
}
Qt学习笔记(2)-利用StackWidget实现选项卡式页面的更多相关文章
- 学习笔记:利用GDI+生成简单的验证码图片
学习笔记:利用GDI+生成简单的验证码图片 /// <summary> /// 单击图片时切换图片 /// </summary> /// <param name=&quo ...
- qt学习笔记(五) QGraphicsPixmapItem与QGraphicsScene的编程实例 图标拖动渐变效果
应大家的要求,还是把完整的project文件贴出来,大家省点事:http://www.kuaipan.cn/file/id_48923272389086450.htm 先看看执行效果,我用的群创7寸屏 ...
- 机器学习实战(Machine Learning in Action)学习笔记————09.利用PCA简化数据
机器学习实战(Machine Learning in Action)学习笔记————09.利用PCA简化数据 关键字:PCA.主成分分析.降维作者:米仓山下时间:2018-11-15机器学习实战(Ma ...
- Spring MVC 学习笔记2 - 利用Spring Tool Suite创建一个web 项目
Spring MVC 学习笔记2 - 利用Spring Tool Suite创建一个web 项目 Spring Tool Suite 是一个带有全套的Spring相关支持功能的Eclipse插件包. ...
- Qt学习笔记-Widget布局管理
Qt学习笔记4-Widget布局管理 以<C++ GUI Programming with Qt 4, Second Edition>为参考 实例:查找对话框 包含三个文件,f ...
- QT学习笔记(一)——Helloworld
QT学习笔记(一)--Helloworld 一.调试的基本方法: Log调试法 --在代码中加入一定的打印语句 --打印程序状态和关键变量的值 断点调试法: --在开发环境中的对应代码行加上断点 -- ...
- SQL反模式学习笔记19 使用*号,隐式的列
目标:减少输入 反模式:捷径会让你迷失方向 使用通配符和未命名的列能够达到减少输入的目的,但是这个习惯会带来一些危害. 1.破坏代码重构:增加一列后,使用隐式的Insert插入语句报错: 2.查询中使 ...
- qt学习笔记(七)之数据库简介(所有支持数据库类型的列表)
笔者最近用Qt写公司的考勤机.本来要求是要基于frameBuffer下用自己开发的easyGUI来进行上层应用开发,但是考虑到easyGUI提供的接口不是很多,就考虑用Qt来开发,顺带练练手. 废话不 ...
- PyQt(Python+Qt)学习随笔:利用QWidget部件的palette以及ColorGroup、colorRole局部调整部件的特定范围颜色
专栏:Python基础教程目录 专栏:使用PyQt开发图形界面Python应用 专栏:PyQt入门学习 老猿Python博文目录 在<PyQt(Python+Qt)学习随笔:QWidget部件的 ...
随机推荐
- C语言:已知三角形三边长求面积
//已知三角形三边长求面积 #include <stdio.h> #include <math.h> int main() { float a,b,c,p,s; int x=0 ...
- Java基础00-Lamda表达式30
1. Lambda表达式 Java8新特征之Lambda表达式 1.1 函数式编程思想概述 1.2 体验Lambda表达式 代码示例: 方式一就不演示了,可以去看Java基础24 方式2:匿名内部类的 ...
- python内置函数dir()
描述 dir() 函数不带参数时,返回当前范围内的变量.方法和定义的类型列表:带参数时,返回参数的属性.方法列表.如果参数包含方法__dir__(),该方法将被调用.如果参数不包含__dir__(), ...
- python + pytest基本使用方法(参数化)
import pytestimport math#pytest 参数化#'base,exponent,expected'用来定义参数的名称.# 通过数组定义参数时,每一个元组都是一条测试用例使用的测试 ...
- IDEA搭建springmvc环境之后无故出现404
其实这应该是IDEA的自身问题 打开项目结构
- Java 比较两个Word文档差异
本文介绍使用Spire.Doc for Java的比较功能来比较两个相似Word文档的差异.需要使用的版本为3.8.8或者后续发布的新版本.可下载jar包,解压将lib文件夹下的Spire.doc.j ...
- 【洛谷P2623物品选取】动态规划
分析 各种背包弄在一起. AC代码 // luogu-judger-enable-o2 #include <bits/stdc++.h> using namespace std; #def ...
- 关于 .NET 与 JAVA 在 JIT 编译上的一些差异
最近因为公司的一些原因,我也开始学习一些 JAVA 的知识.虽然我一直是以 .NET 语言为主的程序员,但是我并不排斥任何其它语言.在此并不讨论 JAVA .NET 的好坏,仅仅是对 .NET 跟 J ...
- linux统计nginx日志中请求访问量命令
Nginx 三种分配策略:轮询.权重.ip_hash(比如你登录了一个网站,登录信息已经保存到 a 机器,但当你做后续操作时的请求会到 b 机器,那么就获取不到你原来登录的信息,此时你就需要重新登录了 ...
- phpMyAdmin 4.0.x—4.6.2 远程代码执行漏洞(CVE-2016-5734)
影响范围 4.0.10.16之前4.0.x版本 4.4.15.7之前4.4.x版本 4.6.3之前4.6.x版本(实际上由于该版本要求PHP5.5+,所以无法复现本漏洞) 需要登录,且能够写入数据 p ...