.NET Core 跨平台物联网开发:上报属性(三)
系列教程目录
(一) 连接阿里云IOT
(二) 设置委托事件
(三) 上报属性
(四) SDK文档 属性、方法、委托、类
http://pan.whuanle.cn/index.php?dir=uploads/阿里云IOT/AliIOTXFclient-dll类库&response
下载三个库,头部引入 即可使用
using AliIOTXFClient;
示例下载地址
http://pan.whuanle.cn/index.php?dir=uploads/阿里云IOT/demo示例
本章示例 AliIOTXF.Three
定义产品模型-属性
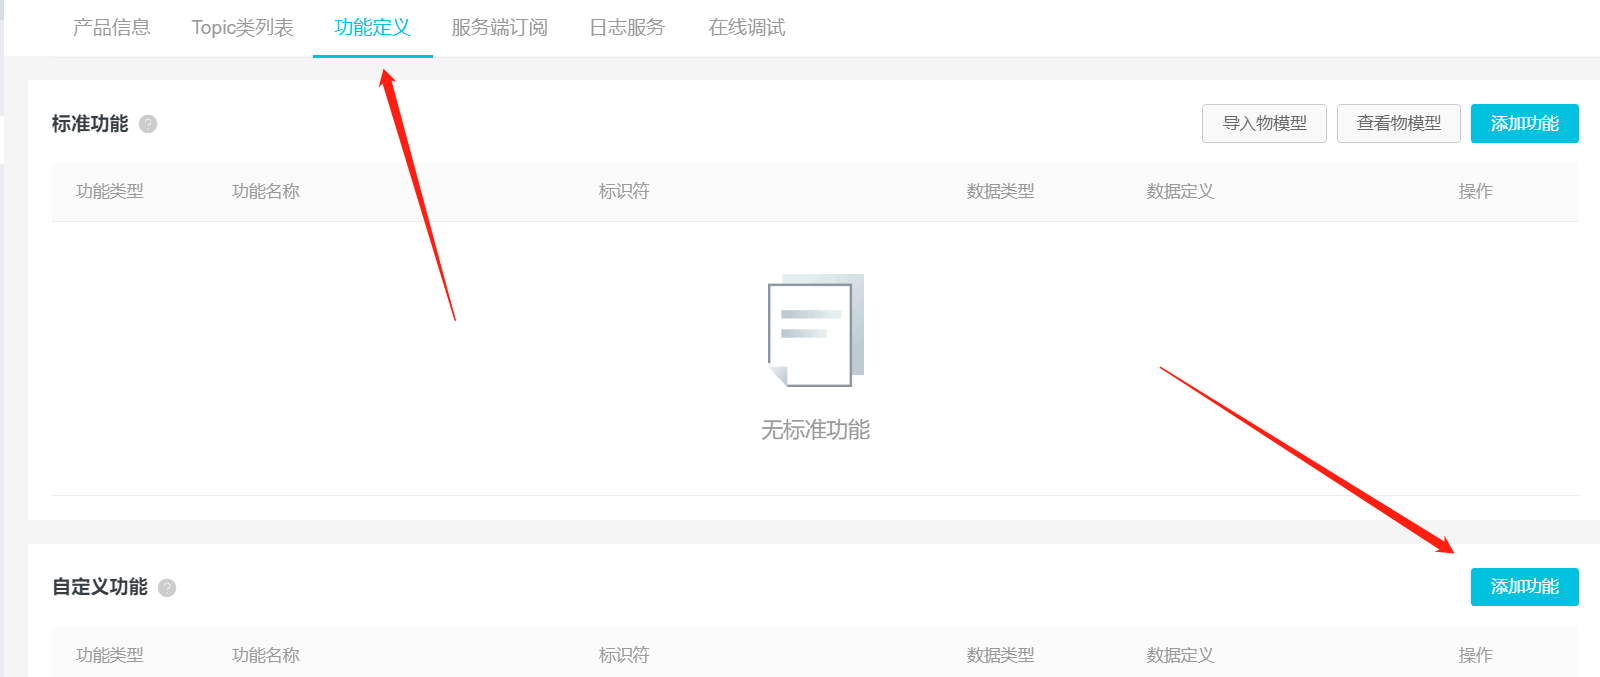
打开阿里云IOT控制台 https://iot.console.aliyun.com/product
点击产品,打开 --功能定义,然后新建自定义功能
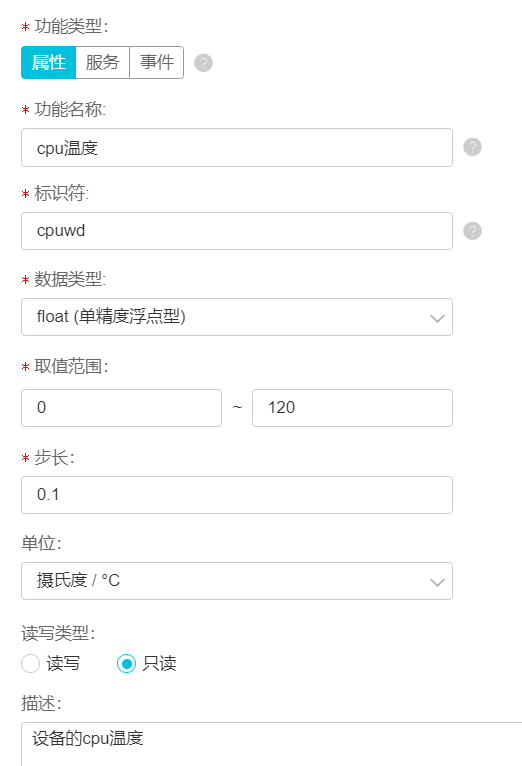
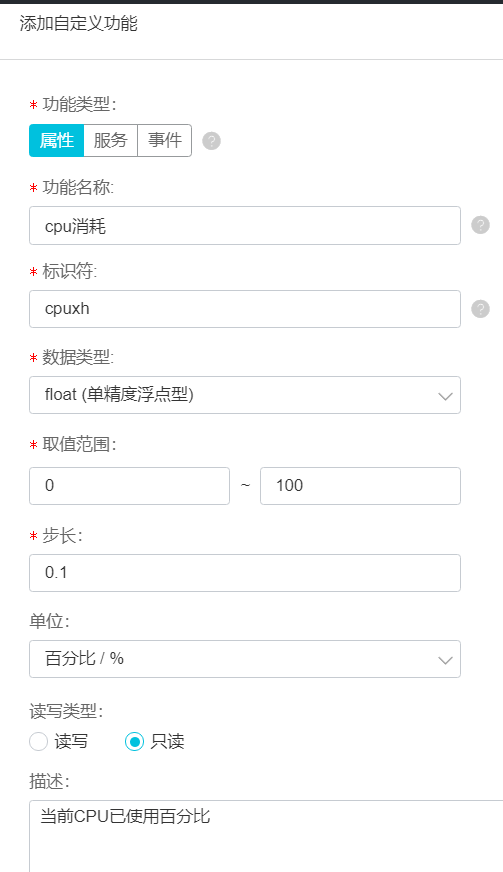
定义两个属性
注意都用小写,注意都用小写!透传数据和Json上传,都是区分大小写的。应当统一小写,避免命名冲突。尤其使用模型存储数据,有些字段会与关键字冲突,可以把字段部分大写,上传时转化为 json,字符全部转小写即可。
读写权限,只读,表示只能从客户端发送属性数据到服务器,可读可写表示服务器可以向客户端设置此属性的值。
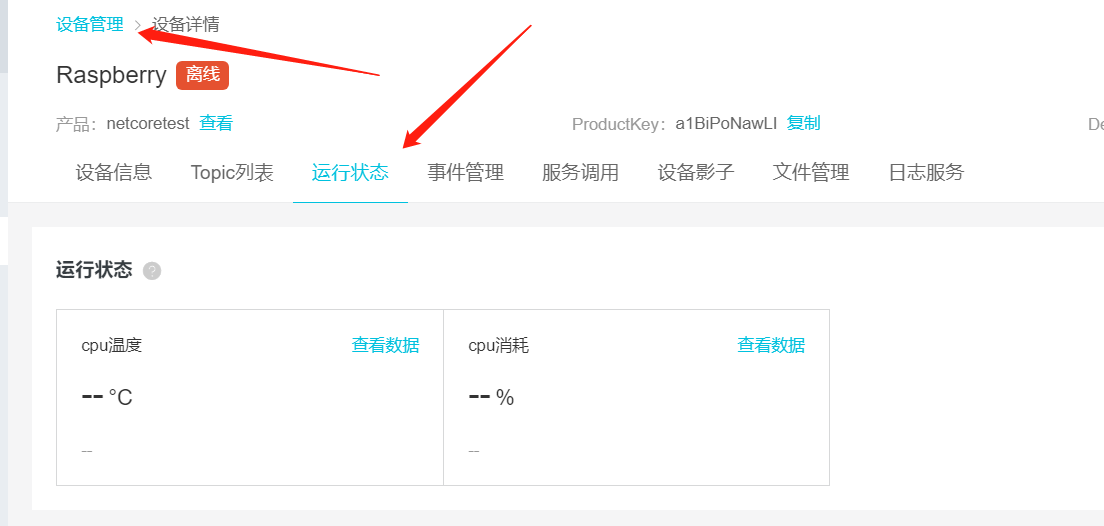
查看属性
添加好的属性,打开设备-运行状态可以看到
编写客户端设备模型
阿里云官方文档 属性、事件、服务 https://help.aliyun.com/document_detail/89301.html?spm=5176.11065259.1996646101.searchclickresult.5d587dafQbHe20
这里主要说Json上传,透传比较麻烦,但是 XF SDK 是支持的,后面补充透传方法。
设备属性上传JSON格式
{

  "id": "",

  "version": "1.0",

  "params": {

    "属性1": {

      "value": "on",

      "time":

    },

    "属性2": {

      "value": 23.6,

      "time":

    }

  },

  "method": "thing.event.property.post"

}
params 里面,放置属性,属性有两个参数,value:值,time:时间
在下面里添加一个新文件 TestModel.cs
文件内容:
 public class TestModel

    {

        public string id { get; set; }

        public string version { get; set; }

        public Params paramS { get; set; }

        public TestModel()

        {

            paramS = new Params();

        }

        public class Params

        {

            public Cpuwd cpuwd { get; set; }

            public Cpuxh cpuxh { get; set; }

            public Params()

            {

                cpuwd = new Cpuwd();

                cpuxh = new Cpuxh();

            }

            public class Cpuwd

            {

                public float value { get; set; }

                public long time { get; set; }

            }

            public class Cpuxh

            {

                public float value { get; set; }

                public long time { get; set; }

            }

        }

        public string methoD { get; set; }

    }
上面就是定义的模型,后面转为Json即可上传数据。模型根据实际情况自定义。
上一章使用的最后完整代码,我们继续使用此项目代码:
    class Program

    {

        static void Main(string[] args)

        {

            // 创建连接对象

            XFMQTT client = new XFMQTT("a1BiPoNawLI", "Raspberry");

            // 初始化客户端配置

            client.Init("2NOaBeqXcIzLQEhlJFEfKbWeug0o3m0c", "cn-shanghai");

            // 要订阅的Topic

            string[] topic = { client.CombineHeadTopic("PubData") };

            // 使用自定义的委托事件

            事件类 事件 = new 事件类();

            client.PubEventHandler += 事件.收到消息;

            client.PubedEventHandler += 事件.重复收到消息;

            client.SubedEventHandler += 事件.发布消息时;

            client.UnSubedEventHandler += 事件.发送失败;

            client.ConnectionClosedEventHandler += 事件.断开连接;

            //client.add

            // 连接服务器

            client.ConnectMqtt(topic);

            while (true)

            {

                string str = Console.ReadLine();

                // 推送内容到特定的 Topic

                client.Subscribe(client.CombineHeadTopic("SubData"), str);

            }

            Console.ReadKey();

        }

    }

    public class 事件类

    {

        public  void 收到消息(object sender, MqttMsgPublishEventArgs e)

        {

            Console.WriteLine("topic名称:" + e.Topic);

            Console.WriteLine("接收时间:" + DateTime.Now.ToLongDateString());

            Console.WriteLine("消息内容:\n" + Encoding.ASCII.GetString(e.Message));

        }

        public  void 重复收到消息(object sender, MqttMsgPublishedEventArgs e)

        {

            Console.WriteLine("接收时间: " + DateTime.Now.ToLongTimeString());

            Console.WriteLine("消息id: " + e.MessageId + "    Is Published: " + e.IsPublished);

        }

        public void 发布消息时(object sender, MqttMsgSubscribedEventArgs e)

        {

            Console.WriteLine("向服务器发送了消息");

            Console.WriteLine("发送时间: " + DateTime.Now.ToLongTimeString());

            Console.WriteLine("消息id: " + e.MessageId);

            Console.WriteLine("QOS 为 :    " + Encoding.UTF8.GetString(e.GrantedQoSLevels));

        }

        public void 发送失败(object sender, MqttMsgUnsubscribedEventArgs e)

        {

            Console.WriteLine("消息发送失败 ");

            Console.WriteLine("时间: " + DateTime.Now.ToLongTimeString());

            Console.WriteLine("失败的消息 MessageId:    " + e.MessageId);

        }

        public  void 断开连接(object sender, EventArgs e)

        {

            Console.WriteLine("日。。。连接断开了: " + DateTime.Now.ToLongTimeString());

        }

    }
删除这一行
            // 使用默认事件方法

            client.UseDefaultEventHandler();
上报属性
删除 while(true) 语句内的代码
改成
   Thread.Sleep();

                //模拟数据

                // cpu温度

                float cpuwd = (float)(new Random()).Next(, ) + (float)(new Random()).NextDouble();

                // cpu消耗

                float cpuxh = (float)(new Random()).Next(, ) + (float)(new Random()).NextDouble();

                // 模型对象

                TestModel model = new TestModel

                {

                    id = "",      //自定义

                    version = "1.0",    //固定!

                    methoD = "thing.event.property.post",    //固定!

                };

                // 数据和时间戳

                model.paramS.cpuwd.value = cpuwd;

                model.paramS.cpuwd.time = 1524448722000;

                model.paramS.cpuxh.value = cpuxh;

                model.paramS.cpuxh.time = 1524448722000;

                // 推送内容到特定的 Topic

                client.Thing_Property_Post<TestModel>(model, true);
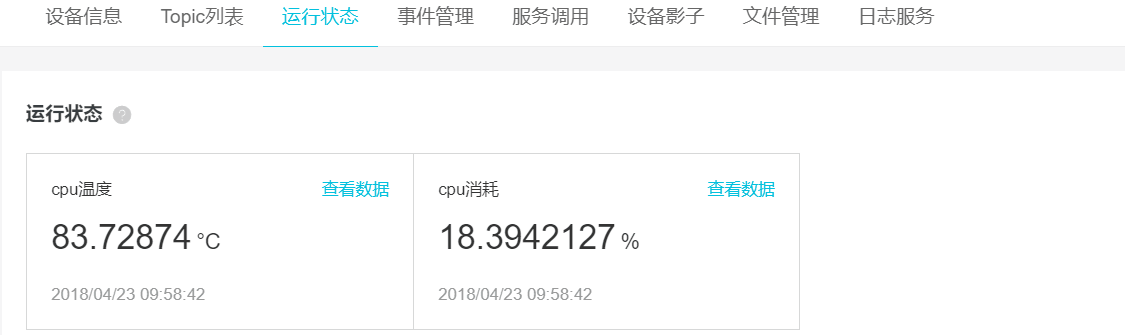
然后运行程序,查看阿里云IOT--设备--运行状态--数据变化
如果你有留意,会发现时间不是实时的。
增加一个方法获取时间戳的方法(偷别人的)
        /// <summary>

        /// 将c# DateTime时间格式转换为Unix时间戳格式

        /// </summary>

        /// <param name="time">时间</param>

        /// <returns>long</returns>

        public static long ConvertDateTimeToInt()

        {

            System.DateTime time = DateTime.Now;

            System.DateTime startTime = TimeZone.CurrentTimeZone.ToLocalTime(new System.DateTime(, , , , , , ));

            long t = (time.Ticks - startTime.Ticks) / ;   //除10000调整为13位

            return t;

        }
把 while(true)的代码修改
 while (true)

            {

                Thread.Sleep();

                //模拟数据

                // cpu温度

                float cpuwd = (float)(new Random()).Next(, ) + (float)(new Random()).NextDouble();

                // cpu消耗

                float cpuxh = (float)(new Random()).Next(, ) + (float)(new Random()).NextDouble();

                // 模型对象

                TestModel model = new TestModel

                {

                    id = "",      //自定义

                    version = "1.0",    //固定!

                    methoD = "thing.event.property.post",    //固定!

                };

                // 数据和时间戳

                model.paramS.cpuwd.value = cpuwd;

                model.paramS.cpuwd.time = ConvertDateTimeToInt();

                model.paramS.cpuxh.value = cpuxh;

                model.paramS.cpuxh.time = ConvertDateTimeToInt();

                // 推送内容到特定的 Topic

                client.Thing_Property_Post<TestModel>(model, true);

            }
再次查看数据

由于使用随机数的范围比较大,波动太大了,不太符合常规,所以数据报表不好看。这个要根据实际情况自己调整一下范围。
笔者把cpu消耗调到 40-50

完整代码如下
    class Program

    {

        static void Main(string[] args)

        {

            // 创建连接对象

            XFMQTT client = new XFMQTT("a1BiPoNawLI", "Raspberry");

            // 初始化客户端配置

            client.Init("2NOaBeqXcIzLQEhlJFEfKbWeug0o3m0c", "cn-shanghai");

            // 要订阅的Topic

            string[] topic = { client.CombineHeadTopic("PubData")};

            // 使用自定义的委托事件

            事件类 事件 = new 事件类();

            client.PubEventHandler += 事件.收到消息;

            client.PubedEventHandler += 事件.重复收到消息;

            client.SubedEventHandler += 事件.发布消息时;

            client.UnSubedEventHandler += 事件.发送失败;

            client.ConnectionClosedEventHandler += 事件.断开连接;

            //client.add

            // 连接服务器

            client.ConnectMqtt(topic);

            while (true)

            {

                Thread.Sleep();

                //模拟数据

                // cpu温度

                float cpuwd = (float)(new Random()).Next(, ) + (float)(new Random()).NextDouble();

                // cpu消耗

                float cpuxh = (float)(new Random()).Next(, ) + (float)(new Random()).NextDouble();

                // 模型对象

                TestModel model = new TestModel

                {

                    id = "",      //自定义

                    version = "1.0",    //固定!

                    methoD = "thing.event.property.post",    //固定!

                };

                // 数据和时间戳

                model.paramS.cpuwd.value = cpuwd;

                model.paramS.cpuwd.time = ConvertDateTimeToInt();

                model.paramS.cpuxh.value = cpuxh;

                model.paramS.cpuxh.time = ConvertDateTimeToInt();

                // 推送内容到特定的 Topic

                client.Thing_Property_Post<TestModel>(model, true);

            }

            Console.ReadKey();

        }

        /// <summary>

        /// 将c# DateTime时间格式转换为Unix时间戳格式

        /// </summary>

        /// <param name="time">时间</param>

        /// <returns>long</returns>

        public static long ConvertDateTimeToInt()

        {

            System.DateTime time = DateTime.Now;

            System.DateTime startTime = TimeZone.CurrentTimeZone.ToLocalTime(new System.DateTime(, , , , , , ));

            long t = (time.Ticks - startTime.Ticks) / ;   //除10000调整为13位

            return t;

        }

    }

    public class 事件类

    {

        public void 收到消息(object sender, MqttMsgPublishEventArgs e)

        {

            Console.WriteLine("topic名称:" + e.Topic);

            Console.WriteLine("接收时间:" + DateTime.Now.ToLongDateString());

            Console.WriteLine("消息内容:\n" + Encoding.ASCII.GetString(e.Message));

        }

        public void 重复收到消息(object sender, MqttMsgPublishedEventArgs e)

        {

            Console.WriteLine("接收时间: " + DateTime.Now.ToLongTimeString());

            Console.WriteLine("消息id: " + e.MessageId + "    Is Published: " + e.IsPublished);

        }

        public void 发布消息时(object sender, MqttMsgSubscribedEventArgs e)

        {

            Console.WriteLine("向服务器发送了消息");

            Console.WriteLine("发送时间: " + DateTime.Now.ToLongTimeString());

            Console.WriteLine("消息id: " + e.MessageId);

            Console.WriteLine("QOS 为 :    " + Encoding.UTF8.GetString(e.GrantedQoSLevels));

        }

        public void 发送失败(object sender, MqttMsgUnsubscribedEventArgs e)

        {

            Console.WriteLine("消息发送失败 ");

            Console.WriteLine("时间: " + DateTime.Now.ToLongTimeString());

            Console.WriteLine("失败的消息 MessageId:    " + e.MessageId);

        }

        public void 断开连接(object sender, EventArgs e)

        {

            Console.WriteLine("日。。。连接断开了: " + DateTime.Now.ToLongTimeString());

        }

    }
考虑到有些师弟在看~贴一下部分代码的解释
Random random = new Random();

int wd = random.Next(,);

简化写成

(new Random()).Next(, )
.Next(,) 生成范围内的 int 类型数值, .NextDouble() 生成 0<=n<1 的数,double类型。
time是 long int 类型,要填写 13 位时间戳。不懂请点击 https://www.jb51.net/article/149152.htm
public int Thing_Property_Post<AlinkModel>(AlinkModel model, bool isToLower = true);
Thing_Property_Post() 方法可以把属性上传到服务器,isToLwer 表示是否转为小写再上传。
注意:阿里云IOT json 区分大小写,所以建议控制台定义属性是,标识符使用小写,客户端上传json时,全部转为小写,避免出错。
三个重载方法
上传属性有三个重载方法
        public int Thing_Property_Post<AlinkModel>(AlinkModel model, bool isToLower = true);

        public int Thing_Property_Post(byte[] json);

        public int Thing_Property_Post(string json, bool isToLwer = true);
自定义属性模型,通过第一个方法可以直接转换上传,省略不必要操作。
把 json string 转byte[] ,可以通过第二个方法上传到服务器。必须注意byte[]进制问题!
如果只有json,不需要自定义模型,则使用第三种方法上传。
接收响应
根据协议,属性、事件、服务,上传或下发,另一方要进行响应。
上面的例子运行后,控制台并没有反应。
因为我们没有设置要接收响应。
修改一下订阅Topic
            // 要订阅的Topic

            string[] topic = { client.CombineHeadTopic("PubData"),client.thingModel.upTopic.post_reply };
client.thingModel.upTopic.post_reply ,一个Topic地址,由于接收发布属性后,接收服务器的响应消息。
thingModel 定义的设备属性服务事件,发送接收以及响应的Topic。这些下一章说。
服务器响应内容格式
{

  "id": "",

  "code": ,

  "data": {}

}
修改后的完整代码
    class Program

    {

        static void Main(string[] args)

        {

            // 创建连接对象

            XFMQTT client = new XFMQTT("a1BiPoNawLI", "Raspberry");

            // 初始化客户端配置

            client.Init("2NOaBeqXcIzLQEhlJFEfKbWeug0o3m0c", "cn-shanghai");

            // 要订阅的Topic

            string[] topic = { client.CombineHeadTopic("PubData"),client.thingModel.upTopic.post_reply };

            // 使用自定义的委托事件

            事件类 事件 = new 事件类();

            client.PubEventHandler += 事件.收到消息;

            client.PubedEventHandler += 事件.重复收到消息;

            client.SubedEventHandler += 事件.发布消息时;

            client.UnSubedEventHandler += 事件.发送失败;

            client.ConnectionClosedEventHandler += 事件.断开连接;

            //client.add

            // 连接服务器

            client.ConnectMqtt(topic);

            while (true)

            {

                Thread.Sleep();

                //模拟数据

                // cpu温度

                float cpuwd = (float)(new Random()).Next(, ) + (float)(new Random()).NextDouble();

                // cpu消耗

                float cpuxh = (float)(new Random()).Next(, ) + (float)(new Random()).NextDouble();

                // 模型对象

                TestModel model = new TestModel

                {

                    id = "",      //自定义

                    version = "1.0",    //固定!

                    methoD = "thing.event.property.post",    //固定!

                };

                // 数据和时间戳

                model.paramS.cpuwd.value = cpuwd;

                model.paramS.cpuwd.time = ConvertDateTimeToInt();

                model.paramS.cpuxh.value = cpuxh;

                model.paramS.cpuxh.time = ConvertDateTimeToInt();

                // 推送内容到特定的 Topic

                client.Thing_Property_Post<TestModel>(model, true);

            }

            Console.ReadKey();

        }

        /// <summary>

        /// 将c# DateTime时间格式转换为Unix时间戳格式

        /// </summary>

        /// <param name="time">时间</param>

        /// <returns>long</returns>

        public static long ConvertDateTimeToInt()

        {

            System.DateTime time = DateTime.Now;

            System.DateTime startTime = TimeZone.CurrentTimeZone.ToLocalTime(new System.DateTime(, , , , , , ));

            long t = (time.Ticks - startTime.Ticks) / ;   //除10000调整为13位

            return t;

        }

    }

    public class 事件类

    {

        public void 收到消息(object sender, MqttMsgPublishEventArgs e)

        {

            Console.WriteLine("topic名称:" + e.Topic);

            Console.WriteLine("接收时间:" + DateTime.Now.ToLongDateString());

            Console.WriteLine("消息内容:\n" + Encoding.ASCII.GetString(e.Message));

        }

        public void 重复收到消息(object sender, MqttMsgPublishedEventArgs e)

        {

            Console.WriteLine("接收时间: " + DateTime.Now.ToLongTimeString());

            Console.WriteLine("消息id: " + e.MessageId + "    Is Published: " + e.IsPublished);

        }

        public void 发布消息时(object sender, MqttMsgSubscribedEventArgs e)

        {

            Console.WriteLine("向服务器发送了消息");

            Console.WriteLine("发送时间: " + DateTime.Now.ToLongTimeString());

            Console.WriteLine("消息id: " + e.MessageId);

            Console.WriteLine("QOS 为 :    " + Encoding.UTF8.GetString(e.GrantedQoSLevels));

        }

        public void 发送失败(object sender, MqttMsgUnsubscribedEventArgs e)

        {

            Console.WriteLine("消息发送失败 ");

            Console.WriteLine("时间: " + DateTime.Now.ToLongTimeString());

            Console.WriteLine("失败的消息 MessageId:    " + e.MessageId);

        }

        public void 断开连接(object sender, EventArgs e)

        {

            Console.WriteLine("日。。。连接断开了: " + DateTime.Now.ToLongTimeString());

        }

    }
运行程序可以发现控制台会接收到服务器响应提示

.NET Core 跨平台物联网开发:上报属性(三)的更多相关文章
- .NET Core 跨平台物联网开发:SDK 属性、方法、委托、类(四)
系列教程目录 (一) 连接阿里云IOT (二) 设置委托事件 (三) 上报属性 (四) SDK文档 属性.方法.委托.类 http://pan.whuanle.cn/index.php?dir=up ...
- .NET Core 跨平台物联网开发:连接阿里云IOT(一)
系列教程目录 (一) 连接阿里云IOT (二) 设置委托事件 (三) 上报属性 (四) SDK文档 属性.方法.委托.类 http://pan.whuanle.cn/index.php?dir=up ...
- .NET Core 跨平台物联网开发:设置委托事件(二)
系列教程目录 (一) 连接阿里云IOT (二) 设置委托事件 (三) 上报属性 (四) SDK文档 属性.方法.委托.类 http://pan.whuanle.cn/index.php?dir=up ...
- .NET Core容器化开发系列(零)——计划
.NET Core相当完善的跨平台特性以及其轻量化的底层接口为我们能顺畅进行微服务开发提供了非常棒的基础. 作为支撑微服务最常见的基础技术--容器化将是本系列的核心内容. 接下来我计划用一个月左右的时 ...
- ASP.NET Core Windows服务开发技术实战演练
一.课程介绍 人生苦短,我用.NET Core!大家都知道如果想要程序一直运行在Windows服务器上,最好是把程序写成Windows服务程序:这样程序会随着系统的自动启动而启动,自动关闭而关闭,不需 ...
- 阿里云物联网 .NET Core 客户端 | CZGL.AliIoTClient:4. 设备上报属性
文档目录: 说明 1. 连接阿里云物联网 2. IoT 客户端 3. 订阅Topic与响应Topic 4. 设备上报属性 4.1 上报位置信息 5. 设置设备属性 6. 设备事件上报 7. 服务调用 ...
- [.net 面向对象程序设计深入](9).NET Core 跨平台开发环境搭建
[.net 面向对象程序设计深入](9).NET Core 跨平台开发环境搭建 1.概述 读前必备:认识.NET Core 上篇介绍了.NET 新的生态环境:包括.NET Framework..NET ...
- .NET Core跨平台:使用.NET Core开发一个初心源商城总括
1..NET Core基本介绍 a 作为一个.NET的开发者,在以前的开发中,我们开发的项目基本都是部署在windows服务器上,但是在windows服务器上的话某些比较流行的解决访问量的方案基本都是 ...
- 《ASP.NET Core跨平台开发从入门到实战》Web API自定义格式化protobuf
<ASP.NET Core跨平台开发从入门到实战>样章节 Web API自定义格式化protobuf. 样章 Protocol Buffers 是一种轻便高效的结构化数据存储格式,可以用于 ...
随机推荐
- 洛谷——P1546 最短网络 Agri-Net
P1546 最短网络 Agri-Net 题目背景 农民约翰被选为他们镇的镇长!他其中一个竞选承诺就是在镇上建立起互联网,并连接到所有的农场.当然,他需要你的帮助. 题目描述 约翰已经给他的农场安排了一 ...
- Teamviewer ubuntu 提示 TeamViewer Daemon is not running
http://blog.csdn.net/laohuang1122/article/details/12657343 Ubunut 12.04下面安装了Teamviewer,刚安装完启动是没有问题的, ...
- VMware虚拟机上安装linux和克隆
虚拟机上安装好一台linux 系统后.为了高速搭建hadoop集群.须要再安装几个linux系统,比較笨的办法能够又一次用ios 镜像文件进行安装.可是又一次安装须要又一次配置一些信息并且安装时间比較 ...
- HDU 2795 Billboard(宣传栏贴公告,线段树应用)
HDU 2795 Billboard(宣传栏贴公告,线段树应用) ACM 题目地址:HDU 2795 Billboard 题意: 要在h*w宣传栏上贴公告,每条公告的高度都是为1的,并且每条公告都要 ...
- 【Mongodb教程 第十七课 】MongoDB常用命令 数据库命令 集合操作命令
(1)数据库命令 a)添加用户 db.addUser(‘name’,’pwd’) b)删除用户 db.removeUser(‘name’) c)用户验证 db.auth(‘name’,’pwd’) d ...
- Hibernate基础-HelloWord
1. ORM :ORM (Object /Relation Mapping ): 对象/关系映射(理解) 1) ORM 主要解决对象 -关系的映射 2) .ORM的思想:将关系数据 ...
- 2 TypeScript--Hello World
安装好TypeScript后,我们来完成第一个页面--Hello World 新建index.html文件: <!DOCTYPE html> <html> <head&g ...
- 嵌入式驱动开发之--- 虚拟磁盘SBULL块设备驱动程序分析
#define SBULL_MINORS 16 /* 每个sbull设备所支持的次设备号的数量 */ #define KERNEL_SECTOR_SIZE 512 // 本地定 ...
- Xcode The identity used to sign the executable is no longer valid. 错误解决
Xcode真机调试时出现问题:Xcode The identity used to sign the executable is no longer valid. Please verify that ...
- 阿里云cenos 6.5 模板上安装 docker
本章将介绍在阿里云的 Centos6.5 模板上安装 Docker 以及在 Ubuntu 14.04 模板上安装 Docker 的过程 Centos 6.5 模板上使用Docker 首先,通过 ssh ...