
heartrbeat实现web服务器高可用
今天的内容是用heartbeat实现web服务器高可用
一、简介:
heartbeat的工作原理:heartbeat最核心的包括两个部分,心跳监测部分和资源接管部分,心跳监测可以通过网络链路和串口进行,而且支持冗余链路,它们之间相互发送报文来告诉对方自己当前的状态,如果在指定的时间内未收到对方发送的报文,那么就认为对方失效,这时需启动资源接管模块来接管运行在对方主机上的资源或者服务。
| 主机名 | ip | 系统 | 角色 |
| tiandong63 | 192.168.199.3 | rhel6.5 | NFS存储 |
| tiandong64 | 192.168.199.4 | rhel6.5 | heartbeat主节点 |
| tiandong66 | 192.168.199.6 | rhel7.4 | heartbeat从节点 |
heartbeat需要的几个包
Heartbeat-3-0-958e11be8686 # 心跳主程序包
resource-agents-3.9.6 #集群实验资源代理
Reusable-Cluster-Components-glue--0a7add1d9996 #可重复使用的群集组件
二、实战:使用heartbeat实现web服务高可用
1、拓扑图:
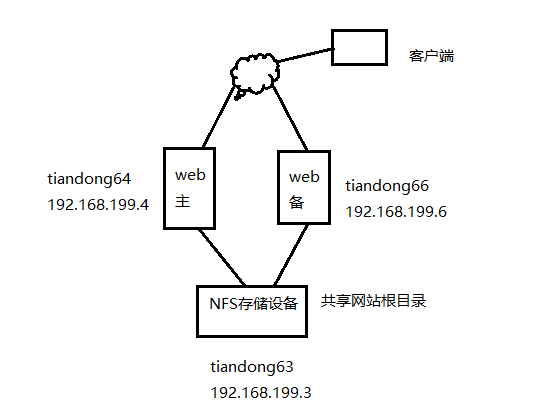
2、配置tiandong63位NFS服务器,提供存储资源:(https://www.cnblogs.com/winter1519/p/7396135.html 这里有详细的讲解,有需要的可以参考。)
[root@tiandong63 ~]# yum install nfs-utils -y
[root@tiandong63 ~]# mkdir /wwwdir
[root@tiandong63 ~]# echo 'heartbeat test' > /wwwdir/index.html
[root@tiandong63 ~]# chmod -R 777 /wwwdir/
[root@tiandong63 ~]# more /etc/exports
/wwwdir 192.168.199.0/24(rw)
[root@tiandong63 ~]# /etc/init.d/nfs start
[root@tiandong63 ~]# chkconfig nfs on
[root@tiandong64 ~]# showmount -e 192.168.199.3
Export list for 192.168.199.3:
/wwwdir 192.168.199.0/24
3、tiandong64,66测试nfs 存储挂载并安装httpd web服务器(基本操作是一致)
[root@tiandong64 ~]# showmount -e 192.168.199.3
Export list for 192.168.199.3:
/wwwdir 192.168.199.0/24
[root@tiandong64 ~]# yum install httpd -y
[root@tiandong64 ~]# mount.nfs 192.168.199.3:/wwwdir/ /var/www/html/
[root@tiandong64 ~]# df -h
Filesystem Size Used Avail Use% Mounted on
/dev/sda3 28G 2.3G 24G 9% /
tmpfs 491M 0 491M 0% /dev/shm
/dev/sda1 194M 29M 155M 16% /boot
192.168.199.3:/wwwdir/ 28G 5.5G 21G 22% /var/www/html
[root@tiandong64 ~]# /etc/init.d/httpd start
[root@tiandong64 ~]# curl 192.168.199.4
heartbeat test
卸载,关闭服务,后期这些资源通过heartbeat管理。
[root@tiandong64 ~]# umount /var/www/html/
[root@tiandong64 ~]# /etc/init.d/httpd stop
Stopping httpd: [ OK ]
[root@tiandong64 ~]# chkconfig httpd off
4、tiandong64安装heartbeat(tiandong66安装一样)
1)安装依赖包:
[root@tiandong64 ~]# yum install -y bzip2 bzip2-devel gcc gcc-c++ autoconf automake libtool e2fsprogs-devel glib2-devel libxml2 libxml2-devel libtool-ltdl-devel asciidoc libuuid-devel docbook
2)编译安装Reusable-Cluster-Components-glue--0a7add1d9996
[root@tiandong64 ~]#groupadd haclient 创建用户组
[root@tiandong64 ~]#useradd -g haclient hacluster 创建用户
[root@tiandong64 heartbeat]# cd Reusable-Cluster-Components-glue--0a7add1d9996/
[root@tiandong64 Reusable-Cluster-Components-glue--0a7add1d9996]# ./autogen.sh
[root@tiandong64 Reusable-Cluster-Components-glue--0a7add1d9996]#./configure --prefix=/usr/local/heartbeat/
[root@tiandong64 Reusable-Cluster-Components-glue--0a7add1d9996]#make && make install
3)编译安装resource-agents-3.9.6
[root@tiandong64 heartbeat]#cd resource-agents-3.9.6/
[root@tiandong64 resource-agents-3.9.6]#./autogen.sh
[root@tiandong64 resource-agents-3.9.6]#./configure --prefix=/usr/local/heartbeat --with-daemon-user=hacluster --with-daemon-group=haclient --enable-fatal-warnings=no LIBS='/lib64/libuuid.so.1'
[root@tiandong64 resource-agents-3.9.6]#make && make install
4)编译安装Heartbeat
[root@tiandong64 heartbeat]# cd Heartbeat-3-0-958e11be8686/
[root@tiandong64 Heartbeat-3-0-958e11be8686]# ./bootstrap
[root@tiandong64 Heartbeat-3-0-958e11be8686]#export CFLAGS="$CFLAGS -I/usr/local/heartbeat/include -L/usr/local/heartbeat/lib"
[root@tiandong64 Heartbeat-3-0-958e11be8686]#./configure --prefix=/usr/local/heartbeat --with-daemon-user=hacluster --with-daemon-group=haclient --enable-fatal-warnings=no LIBS='/lib64/libuuid.so.1'
[root@tiandong64 Heartbeat-3-0-958e11be8686]#make && make install
5)生成配置文件
[root@tiandong64 ~]# cd /usr/local/heartbeat/etc/ha.d/
[root@tiandong64 ha.d]# ls
harc rc.d README.config resource.d shellfuncs
[root@tiandong64 ha.d]# cp /root/heartbeat/Heartbeat-3-0-958e11be8686/doc/{authkeys,ha.cf,haresources} .
[root@tiandong64 ha.d]# ls
authkeys ha.cf harc haresources rc.d README.config resource.d shellfuncs
[root@tiandong64 ha.d]# chmod 600 authkeys
[root@tiandong64 ha.d]# mkdir -pv /usr/local/heartbeat/usr/lib/ocf/lib/heartbeat
mkdir: created directory `/usr/local/heartbeat/usr'
mkdir: created directory `/usr/local/heartbeat/usr/lib'
mkdir: created directory `/usr/local/heartbeat/usr/lib/ocf'
mkdir: created directory `/usr/local/heartbeat/usr/lib/ocf/lib'
mkdir: created directory `/usr/local/heartbeat/usr/lib/ocf/lib/heartbeat'
[root@tiandong64 ha.d]# cd !$
cd /usr/local/heartbeat/usr/lib/ocf/lib/heartbeat
[root@tiandong64 heartbeat]# pwd
/usr/local/heartbeat/usr/lib/ocf/lib/heartbeat
[root@tiandong64 heartbeat]# cp /usr/lib/ocf/lib/heartbeat/ocf-* .
[root@tiandong64 heartbeat]# ls
ocf-binaries ocf-directories ocf-rarun ocf-returncodes ocf-shellfuncs
[root@tiandong64 heartbeat]# ln -sv /usr/local/heartbeat/lib64/heartbeat/plugins/* /usr/local/heartbeat/lib/heartbeat/plugins/
`/usr/local/heartbeat/lib/heartbeat/plugins/HBauth' -> `/usr/local/heartbeat/lib64/heartbeat/plugins/HBauth'
`/usr/local/heartbeat/lib/heartbeat/plugins/HBcomm' -> `/usr/local/heartbeat/lib64/heartbeat/plugins/HBcomm'
`/usr/local/heartbeat/lib/heartbeat/plugins/quorum' -> `/usr/local/heartbeat/lib64/heartbeat/plugins/quorum'
`/usr/local/heartbeat/lib/heartbeat/plugins/tiebreaker' -> `/usr/local/heartbeat/lib64/heartbeat/plugins/tiebreaker'
[root@tiandong64 heartbeat]# chkconfig --add heartbeat
[root@tiandong64 heartbeat]# chkconfig heartbeat on
6)heartbeat配置
heartbeat的配置主要涉及到三个文件:
haresources 用来配置要让Heartbeat托管的服务
authkeys 是用来指定Heartbeat的认证方式。
ha.cf 主配置文件
(1)主配置文件
[root@tiandong64 ~]# cd /usr/local/heartbeat/etc/ha.d/
[root@tiandong64 ha.d]# grep -v '^#' ha.cf
debugfile /var/log/ha-debug #用于记录heartbeat的调试信息
logfile /var/log/ha-log #设置heartbeat的日志,这里用的是系统日志
logfacility local0 #设置heartbeat的日志,这里用的是系统日志
keepalive 2 #设定心跳(监测)时间时间为2秒
deadtime 30 #指定若备用节点在30秒内未收到主节点心跳信号,则接管主服务器资源
warntime 10 #指定心跳延迟的时间为10秒,10秒内备节点不能接收主节点心跳信号,
initdead 120 #系统启动或重启后预留的忽略时间段,取值至少为deadtime的两倍
udpport 694 #广播/单播通讯使用的Udp端口
ucast eth0 192.168.199.6 #采用网卡eth0的udp单播来组织心跳,后面跟的IP地址为双机对方IP地址
auto_failback on #定义当主节点恢复后,是否将服务自动切回(on是自动切回)
node tiandong64 #主节点名称
node tiandong66 #备用节点名称
ping 192.168.199.1 #通过ping网关检测心跳是否正常,仅用来测试网络
respawn hacluster /usr/local/heartbeat/libexec/heartbeat/ipfail #指定和heartbeat一起启动、关闭的进程
apiauth ipfail gid=haclient uid=hacluster #设置启动IPfail的用户和组
资源配置文件
(2)[root@tiandong64 ha.d]# grep -v '^#' haresources 配置资源文件
tiandong64 IPaddr::192.168.199.111/24/eth0 Filesystem::192.168.199.3:/wwwdir::/var/www/html::nfs httpd
tiandong64 主服务器主机名
IPaddr::192.168.199.111/24/eth0 #指定VIP以及绑定的网卡
Filesystem::192.168.199.3:/wwwdir::/var/www/html::nfs #指定挂载的存储
httpd #指定要启动的服务。这个服务必须是在/etc/init.d下或者/usr/local/heartbeat/etc/ha.d/resource.d目录下注:tiandong64是主服务器的主机名, tiandong66上不需要修改。这样资源默认会加一这个主机上。当tiandong64坏了,tiandong66会再接管。
(3)认证文件
[root@tiandong64 ha.d]# vim authkeys 认证文件
auth 3
#1 crc
#2 sha1 HI!
3 md5 Hello!
(4)编写httpd启动脚本
[root@tiandong64 resource.d]# pwd
/usr/local/heartbeat/etc/ha.d/resource.d
[root@tiandong64 resource.d]# vim httpd
#!/bin/bash
/etc/init.d/httpd $1
[root@tiandong64 resource.d]# chmod 755 httpd
[root@tiandong64 ~]# cd /usr/local/heartbeat/etc/ha.d/
[root@tiandong64 ha.d]# ls
authkeys ha.cf harc haresources rc.d README.config resource.d shellfuncs
(5)配置文件复制到备机上。
[root@tiandong64 ha.d]# scp authkeys ha.cf haresources 192.168.199.6:`pwd`
[root@tiandong64 resource.d]# scp httpd 192.168.199.6:`pwd`
三、测试
1、手动加载VIP:192.168.199.111到网卡eth0上面。
[root@tiandong64 resource.d]# ./IPaddr 192.168.199.111/24/eth0 start
INFO: Using calculated netmask for 192.168.199.111: 255.255.255.0
DEBUG: Using calculated broadcast for 192.168.199.111: 192.168.199.255
INFO: eval ifconfig eth0:0 192.168.199.111 netmask 255.255.255.0 broadcast 192.168.199.255
DEBUG: Sending Gratuitous Arp for 192.168.199.111 on eth0:0 [eth0]
ARPING 192.168.199.111 from 192.168.199.111 eth0
INFO: Success
INFO: Success
[root@tiandong64 resource.d]# ip a
1: lo: <LOOPBACK,UP,LOWER_UP> mtu 16436 qdisc noqueue state UNKNOWN
link/loopback 00:00:00:00:00:00 brd 00:00:00:00:00:00
inet 127.0.0.1/8 scope host lo
inet6 ::1/128 scope host
valid_lft forever preferred_lft forever
2: eth0: <BROADCAST,MULTICAST,UP,LOWER_UP> mtu 1500 qdisc pfifo_fast state UP qlen 1000
link/ether 00:0c:29:c7:20:71 brd ff:ff:ff:ff:ff:ff
inet 192.168.199.4/24 brd 192.168.199.255 scope global eth0
inet 192.168.199.111/24 brd 192.168.199.255 scope global secondary eth0:0
inet6 fe80::20c:29ff:fec7:2071/64 scope link
valid_lft forever preferred_lft forever
2、手动测试NFS挂载
[root@tiandong64 resource.d]# ./Filesystem 192.168.199.3:/wwwdir /var/www/html/ nfs start
INFO: Running start for 192.168.199.3:/wwwdir on /var/www/html
INFO: Success
INFO: Success
[root@tiandong64 resource.d]# df -h
Filesystem Size Used Avail Use% Mounted on
/dev/sda3 28G 2.3G 24G 9% /
tmpfs 491M 0 491M 0% /dev/shm
/dev/sda1 194M 29M 155M 16% /boot
192.168.199.3:/wwwdir 28G 5.5G 21G 22% /var/www/html
[root@tiandong64 resource.d]# /etc/init.d/httpd start 测试访问
[root@tiandong64 resource.d]# curl 192.168.199.4
heartbeat test
[root@tiandong64 resource.d]# ./IPaddr 192.168.199.111/24/eth0 stop
SIOCDELRT: No such process
INFO: ifconfig eth0:0 down
INFO: Success
INFO: Success
[root@tiandong64 resource.d]# ./Filesystem 192.168.199.3:/wwwdir /var/www/html/ nfs stop
INFO: Running stop for 192.168.199.3:/wwwdir on /var/www/html
INFO: Trying to unmount /var/www/html
INFO: unmounted /var/www/html successfully
INFO: Success
INFO: Success
[root@tiandong64 resource.d]# df -h
Filesystem Size Used Avail Use% Mounted on
/dev/sda3 28G 2.3G 24G 9% /
tmpfs 491M 0 491M 0% /dev/shm
/dev/sda1 194M 29M 155M 16% /boot
[root@tiandong64 resource.d]# /etc/init.d/httpd stop
[root@tiandong64 ~]# /etc/init.d/heartbeat start
Starting High-Availability services: INFO: Resource is stopped
[ OK ]
3、配置tiandong66(192.168.199.6)
[root@tiandong66 ~]# cd /usr/local/heartbeat/etc/ha.d/
[root@tiandong66 ha.d]# vim ha.cf
121 ucast ens33 192.168.199.4
[root@tiandong66 ha.d]# vim haresources
45 tiandong64 IPaddr::192.168.199.111/24/ens33 Filesystem::192.168.199.3:/wwwdir::/var/www/html::nfs httpd
[root@tiandong66 ha.d]# chmod 755 authkeys
4、两台机器启动heartbeat服务
[root@tiandong64 ~]# /etc/init.d/heartbeat start
[root@tiandong66 ~]# systemctl start heartbeat
5、查看集群
[root@tiandong64 ~]# ip a 查看VIP加载
1: lo: <LOOPBACK,UP,LOWER_UP> mtu 16436 qdisc noqueue state UNKNOWN
link/loopback 00:00:00:00:00:00 brd 00:00:00:00:00:00
inet 127.0.0.1/8 scope host lo
inet6 ::1/128 scope host
valid_lft forever preferred_lft forever
2: eth0: <BROADCAST,MULTICAST,UP,LOWER_UP> mtu 1500 qdisc pfifo_fast state UP qlen 1000
link/ether 00:0c:29:c7:20:71 brd ff:ff:ff:ff:ff:ff
inet 192.168.199.4/24 brd 192.168.199.255 scope global eth0
inet 192.168.199.111/24 brd 192.168.199.255 scope global secondary eth0:0
inet6 fe80::20c:29ff:fec7:2071/64 scope link
valid_lft forever preferred_lft forever
[root@tiandong64 ~]# df -h|tail -1 查看挂载
192.168.199.3:/wwwdir 28G 5.5G 21G 22% /var/www/html
[root@tiandong64 ~]# netstat -antup|grep httpd 查看web服务
tcp 0 0 :::80 :::* LISTEN 9286/httpd
在备机上没有这些资源。
6、故障模拟。
停止tiandong64上面的heartbeat服务
[root@tiandong64 ~]# /etc/init.d/heartbeat stop
[root@tiandong66 ~]# ip a |grep ens33
2: ens33: <BROADCAST,MULTICAST,UP,LOWER_UP> mtu 1500 qdisc pfifo_fast state UP qlen 1000
inet 192.168.199.6/24 brd 192.168.199.255 scope global ens33
inet 192.168.199.111/24 brd 192.168.199.255 scope global secondary ens33:0
[root@tiandong66 ~]# df -h|tail -1
192.168.199.3:/wwwdir 28G 5.5G 21G 22% /var/www/html
[root@tiandong66 ~]# netstat -antup|grep httpd
tcp6 0 0 :::80 :::* LISTEN 14670/httpd
恢复tiandong64上面的服务,资源有切回来了。
[root@tiandong64 ~]# /etc/init.d/heartbeat start
Starting High-Availability services: INFO: Resource is stopped
[ OK ]
[root@tiandong64 ~]# ip a
1: lo: <LOOPBACK,UP,LOWER_UP> mtu 16436 qdisc noqueue state UNKNOWN
link/loopback 00:00:00:00:00:00 brd 00:00:00:00:00:00
inet 127.0.0.1/8 scope host lo
inet6 ::1/128 scope host
valid_lft forever preferred_lft forever
2: eth0: <BROADCAST,MULTICAST,UP,LOWER_UP> mtu 1500 qdisc pfifo_fast state UP qlen 1000
link/ether 00:0c:29:c7:20:71 brd ff:ff:ff:ff:ff:ff
inet 192.168.199.4/24 brd 192.168.199.255 scope global eth0
inet 192.168.199.111/24 brd 192.168.199.255 scope global secondary eth0:1
inet6 fe80::20c:29ff:fec7:2071/64 scope link
valid_lft forever preferred_lft forever
[root@tiandong64 ~]# df -h|tail -1
192.168.199.3:/wwwdir 28G 5.5G 21G 22% /var/www/html
[root@tiandong64 ~]# netstat -antup|grep httpd
tcp 0 0 :::80 :::* LISTEN 10646/httpd
OK,heartbeat就到这里结束了,欢迎各位同学的指教。
QQ:1127000493
tiandong66配置:
[root@tiandong66 ~]# chkconfig --add heartbeat
[root@tiandong66 ~]# chkconfig heartbeat on
[root@tiandong66 ~]# cd /usr/local/heartbeat/etc/ha.d/
[root@tiandong66 ha.d]# cp /root/heartbeat/Heartbeat-3-0-958e11be8686/doc/{authkeys,ha.cf,haresources} .
[root@tiandong66 ha.d]# chmod 600 authkeys
[root@tiandong66 ha.d]# mkdir -pv /usr/local/heartbeat/usr/lib/ocf/lib/heartbeat
mkdir: 已创建目录 "/usr/local/heartbeat/usr"
mkdir: 已创建目录 "/usr/local/heartbeat/usr/lib"
mkdir: 已创建目录 "/usr/local/heartbeat/usr/lib/ocf"
mkdir: 已创建目录 "/usr/local/heartbeat/usr/lib/ocf/lib"
mkdir: 已创建目录 "/usr/local/heartbeat/usr/lib/ocf/lib/heartbeat"
[root@tiandong66 ha.d]# cd !$
cd /usr/local/heartbeat/usr/lib/ocf/lib/heartbeat
[root@tiandong66 heartbeat]# cp /usr/lib/ocf/lib/heartbeat/ocf-* .
[root@tiandong66 heartbeat]# ln -sv /usr/local/heartbeat/lib64/heartbeat/plugins/* /usr/local/heartbeat/lib/heartbeat/plugins/
"/usr/local/heartbeat/lib/heartbeat/plugins/HBauth" -> "/usr/local/heartbeat/lib64/heartbeat/plugins/HBauth"
"/usr/local/heartbeat/lib/heartbeat/plugins/HBcomm" -> "/usr/local/heartbeat/lib64/heartbeat/plugins/HBcomm"
"/usr/local/heartbeat/lib/heartbeat/plugins/quorum" -> "/usr/local/heartbeat/lib64/heartbeat/plugins/quorum"
"/usr/local/heartbeat/lib/heartbeat/plugins/tiebreaker" -> "/usr/local/heartbeat/lib64/heartbeat/plugins/tiebreaker"
[root@tiandong66 heartbeat]#
[root@tiandong66 heartbeat]# systemctl enable heartbeat
heartrbeat实现web服务器高可用的更多相关文章
- Heartbeat实现web服务器高可用
一.Heartbeat概述: Heartbeat的工作原理:heartbeat最核心的包括两个部分,心跳监测部分和资源接管部分,心跳监测可以通过网络链路和串口进行,而且支持冗余链路,它们之间相互发送报 ...
- Nginx+Keepalived实现web服务器高可用
1.Nginx 业务背景 现公司需求快速搭建web服务器,对外提供给用户web服务. 需求拆分 需要基于http协议的软件,搭建服务实现 介绍 常见用法: 1) web服务器软件 httpd http ...
- 大型网站系统架构实践(五)深入探讨web应用高可用方案
从上篇文章到这篇文章,中间用了一段时间准备,主要是想把东西讲透,同时希望大家给与一些批评和建议,这样我才能有所进步,也希望喜欢我文章的朋友,给个赞,这样我才能更有激情,呵呵. 由于本篇要写的内容有点多 ...
- Lvs+Keepalived+Bind+web构建高可用负载均衡系统
原创作品,允许转载,转载时请务必以超链接形式标明文章 原始出处 .作者信息和本声明.否则将追究法律责任.http://hatech.blog.51cto.com/8360868/1417899 --- ...
- 学习heartbeat-05 实现web服务高可用
一.环境介绍 说明:所有案例在虚拟机(VMware)上完成 操作系统:centos 6.5 64bit 高可用软件:heartbeat 3.0.4 Web应用服务器:apache httpd 2.2. ...
- Redis集群服务器-高可用调研随笔[转]
今天改了一天的Bug,本想下午开始专研Redis命令集,结果也泡汤了.只能在下班的路上考虑下Redis集群服务器的高可用方案.随笔而已,尚未成型,仅作记录. 当然,我说的可能比较片面,欢迎拍砖.斧正. ...
- django uWSGI nginx搭建一个web服务器 确定可用
网上的找了很多篇 不知道为什么不行,于是自己搭建了一个可用的Web 大家可按步骤尝试 总结下基于uwsgi+Nginx下django项目生产环境的部署 准备条件: .确保有一个能够用runserver ...
- linux RHCS集群 高可用web服务器
RHCS集群,高可用服务器 高可用 红帽集群套件,提供高可用性,高可靠性,负载均衡,快速的从一个节点切换到另一个节点(最多16个节点)负载均衡 通过lvs提供负载均衡,lvs将负载通过负载分配策略,将 ...
- 分布式架构高可用架构篇_04_Keepalived+Nginx实现高可用Web负载均衡
参考: 龙果学院http://www.roncoo.com/share.html?hamc=hLPG8QsaaWVOl2Z76wpJHp3JBbZZF%2Bywm5vEfPp9LbLkAjAnB%2B ...
随机推荐
- [NOIP10.5模拟赛]1.a题解--离散化+异或线段树
题目链接: 咕咕咕 https://www.luogu.org/problemnew/show/CF817F 闲扯 在Yali经历几天折磨后信心摧残,T1数据结构裸题考场上连暴力都TM没打满 分析 观 ...
- docker 第六篇 dockerfile
复习下镜像生成途径 Dockerfile 基于容器制作 什么是dockerfile: 用来构建镜像的源码,在配置文件中调用命令,这些命令是用来生成docker镜像的. dockerfile的语法格式: ...
- 红外 NEC编码
它是一种电磁波,可以实现数据的无线传输 它的波长范围为760nm ~ 1mm,不为人眼所见 紫外光波长为10-400nm 红外与蓝牙 红外:对准.直接.0-10米,单对单 蓝牙:10米左右,加强信号后 ...
- 2.3 使用 dom4j 对 xml文件进行 dom 解析
// 使用dom4j对XML文档进行解析 CRUD public class Demo1 { //读取XML文档中第二本书的书名 <书名>javaWEB</书名> @Test ...
- 处理Android键盘覆盖input和textarea框的问题
$(window).resize(function(){ $('input[type="text"],textarea').on('click', function () { va ...
- android提升
https://blog.csdn.net/lou_liang/article/details/82856531
- 学习elasticsearch(一)linux环境搭建(3)——head插件安装
对于5.x的es,head插件不支持 ./elasticearch-plugin install [plugin_name]方式安装. 进入正文 1.首先确保你的机器安装了python,如果没有,请看 ...
- Vue入门(二)——Demo
1.在工程目录下创建项目 右键GIT BASH 2.安装lib(建议使用淘宝镜像安装) 3.首页 App.vue <template> <el-container> <e ...
- CSS基础学习 20.CSS媒体查询
- oracle ORA-16038 ORA-00257
出现 ORA-16038时也可以参考下边的错误,好像有关联影响 出现ORA-00257错误(空间不足错误),通过查找资料,绝大部分说这是由于归档日志太多,占用了全部的硬盘剩余空间导致的,通过简单删除日 ...