剪枝在pytorch中是如何实现的?
Pytorch中剪枝源码可参考:
https://github.com/pytorch/pytorch/blob/master/torch/nn/utils/prune.py
可参考:
pytorch中函数接口:https://runebook.dev/zh-CN/docs/pytorch/-index-#nn
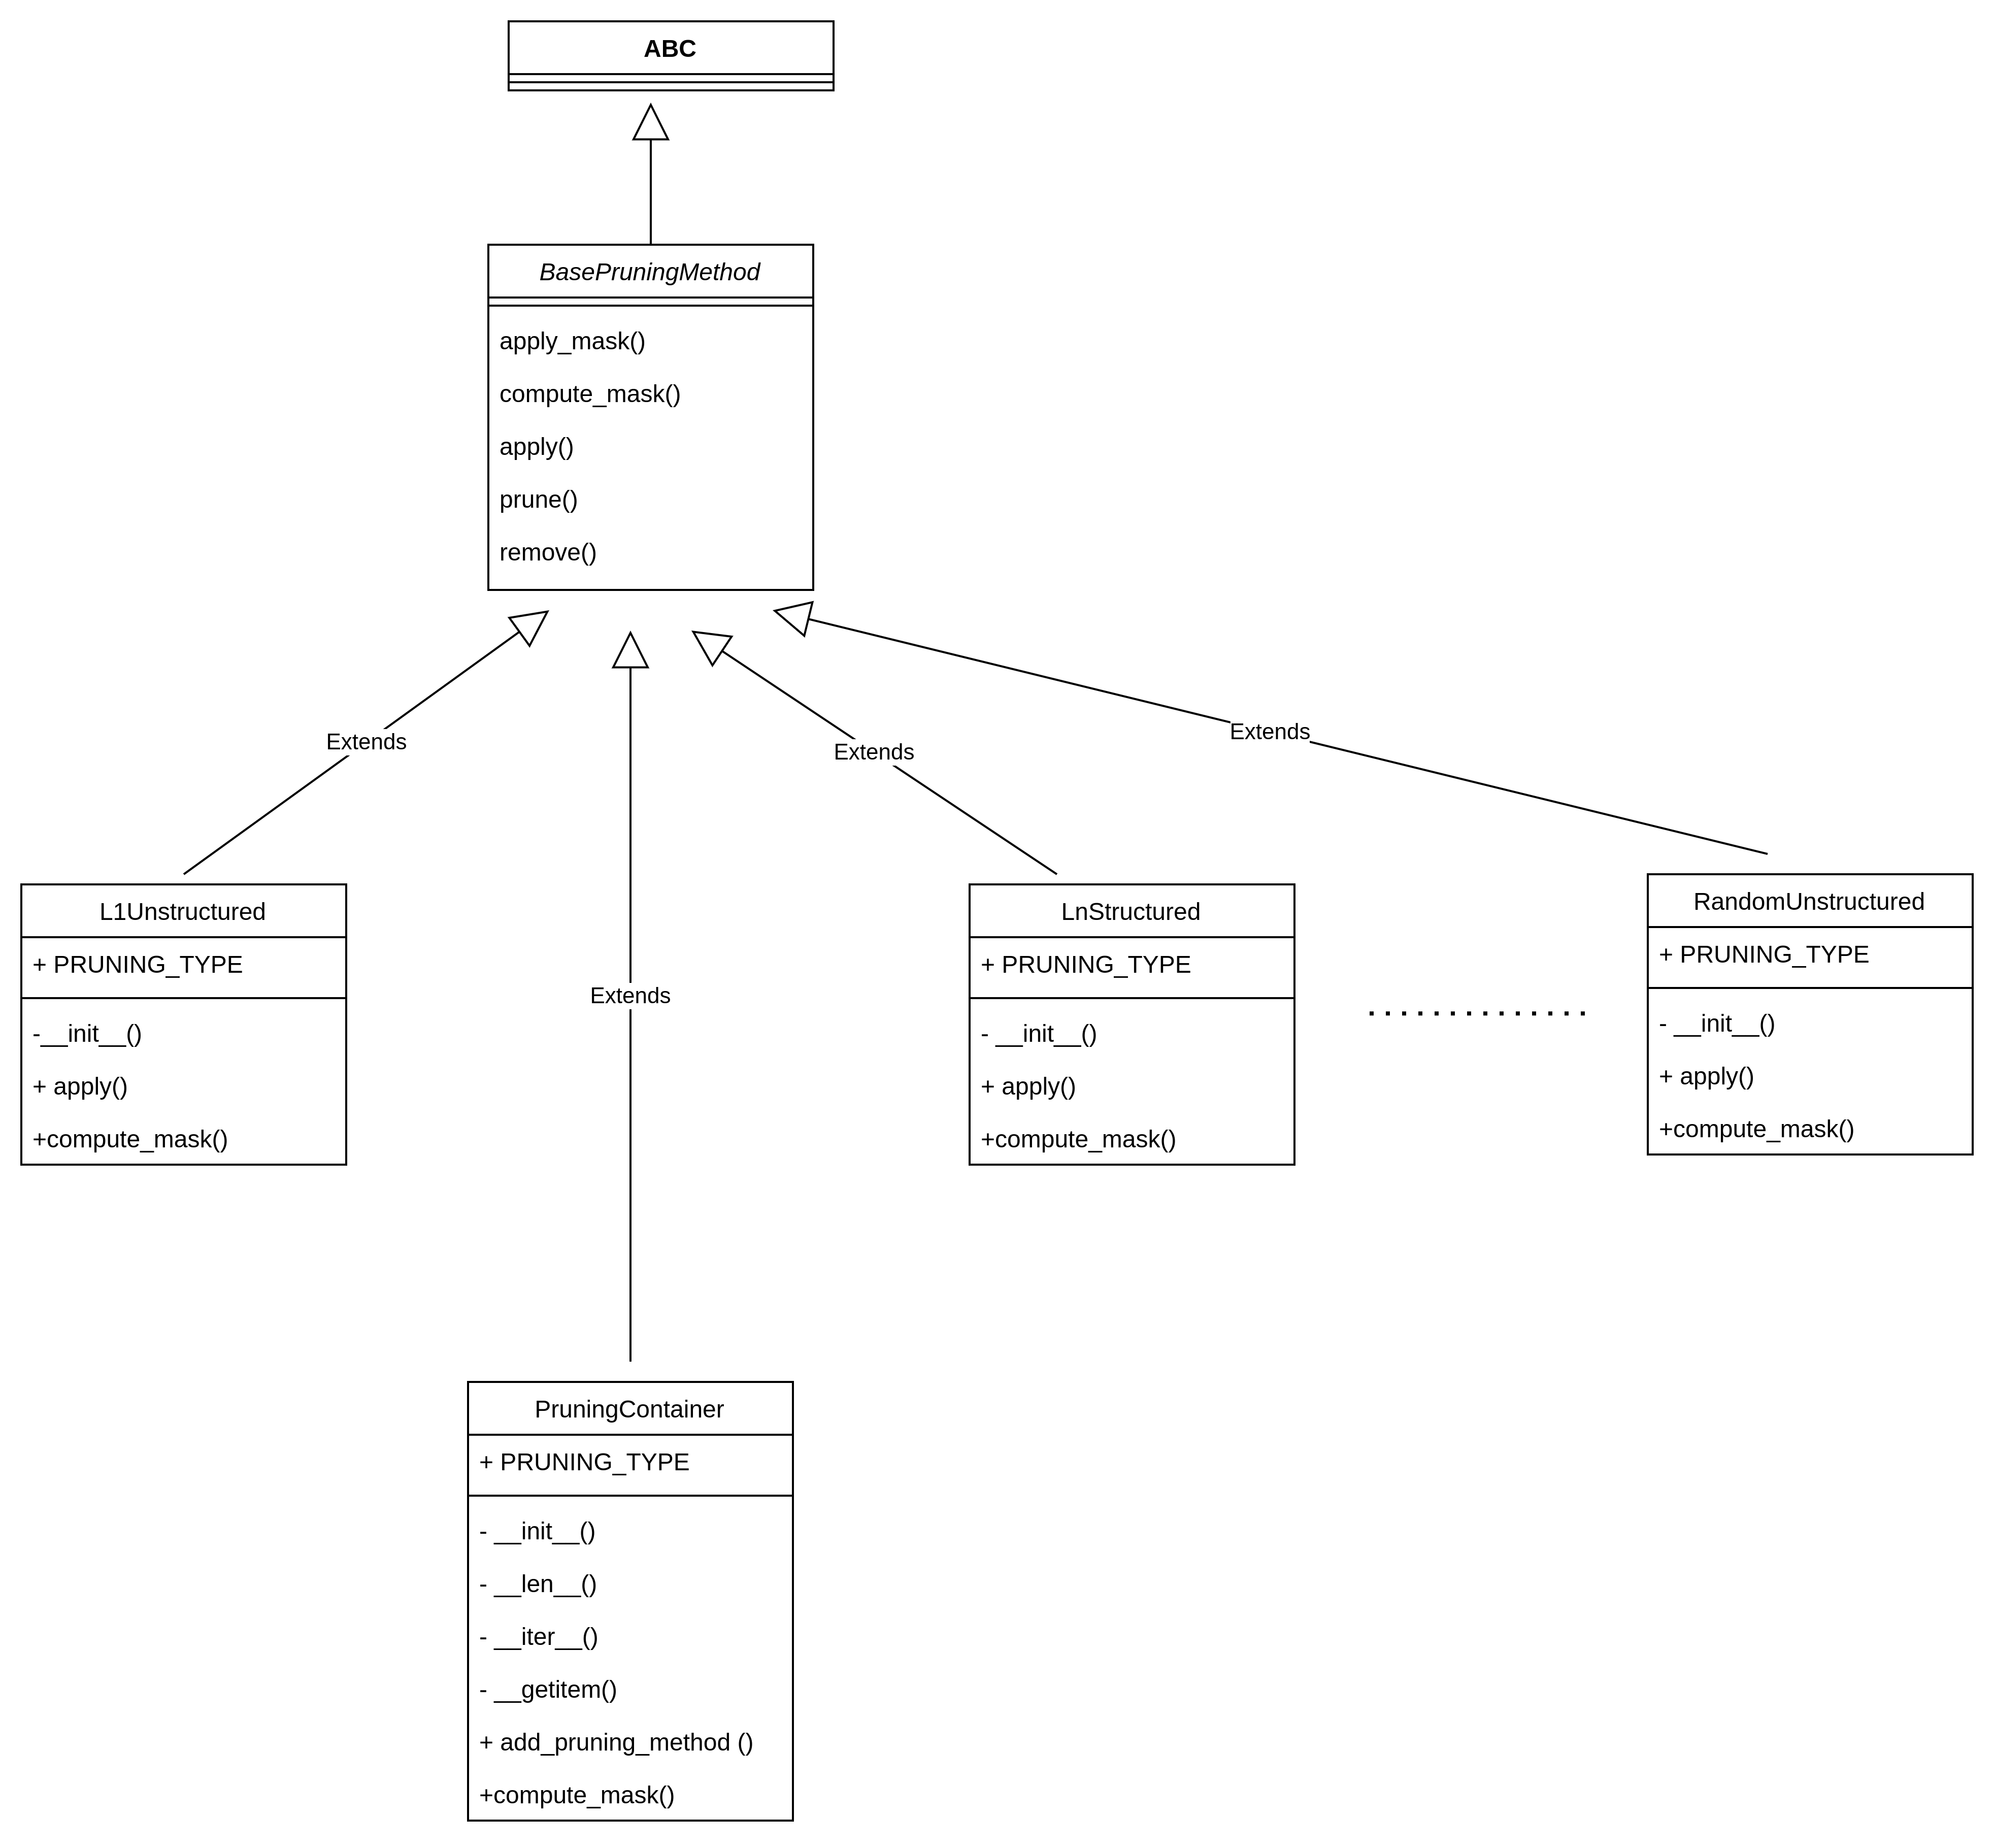
在Pytorch中的剪枝操作一文中,自定义剪枝中提到剪枝操作继承自BasePruningMethod基类 ,并且子类中需要单独实现__init__ 和 compute_mask (mask和参数所执行的逻辑操作),并指明执行哪种剪枝类型 ( global,structured, 或者 unstructured),这一讲就来看下,其中是如何实现的。
类图结构

可看到裁剪策略有L1非结构化剪枝、Ln结构化剪枝、随机非结构化剪枝、自定义剪枝等等都是继承自BasePruningMethod,另还有一个非常重要的子类:PruningContainer,为迭代修剪而持有修剪方法序列的容器。跟踪应用修剪方法的顺序,并处理连续修剪调用的组合。对于同一个module使用多个剪枝策略时,pytorch通过PruningContainer来对剪枝策略进行管理。PruningContainer本身也是继承自BasePruningMethod。同时设置前向计算的回调,便于后续训练时调用。
基类 BasePruningMethod
基类BasePruningMethod为一个抽象类,提供了剪枝方法的框架
class BasePruningMethod(ABC):

    r"""需要自己实现compute_mask和apply方法

    """

    _tensor_name: str

    def __init__(self):

        pass

    # 调用apply_mask

    def __call__(self, module, inputs):

        ...

    @abstractmethod

    def compute_mask(self, t, default_mask):

        r"""计算mask tensor,输入tensor t,输出和t相同维度的mask

        """

        pass

    def apply_mask(self, module):

        r"""简单将待剪得parameter 和  mask相乘,输入mask和原始tensor,返回剪之后的tensor.

        """

        ...

        pruned_tensor = mask.to(dtype=orig.dtype) * orig

        return pruned_tensor

    @classmethod

    def apply(cls, module, name, *args, importance_scores=None, **kwargs):

        r"""增加forward pre-hook 可以在forward()时完成original tensor

        和 pruning mask的reparametrization

        """

        def _get_composite_method(cls, module, name, *args, **kwargs):

            old_method = None

            found = 0

            # 一个module只允许一个_forward_pre_hook

            ...

            assert (

                found <= 1

            ), "Avoid adding multiple pruning hooks to the\

                same tensor {} of module {}. Use a PruningContainer.".format(

                name, module

            )

            ...

            # 创建pruning container包含多个pruning method

            # combine `methods` with `old_method`, if `old_method` exists

            ...

                    container = PruningContainer(old_method)

                    # Have the pruning method remember the name of its tensor

                    # setattr(container, '_tensor_name', name)

                    container.add_pruning_method(method)

                    method = container  # rename container --> method

            return method

        method = _get_composite_method(cls, module, name, *args, **kwargs)

        ...

        #

        # 第一次裁剪,初始化default_mask,将原param tensor移动到一个新参数name + '_orig' 并删除原来 parameter

        if not isinstance(method, PruningContainer):

            # copy `module[name]` to `module[name + '_orig']`

            module.register_parameter(name + "_orig", orig)

            # temporarily delete `module[name]`

            del module._parameters[name]

            default_mask = torch.ones_like(orig)  # temp

        # 不是第一次裁剪

        # If this is not the first time pruning is applied, all of the above

        # has been done before in a previous pruning iteration, so we're good

        # to go

        else:

            default_mask = (

                getattr(module, name + "_mask")

                .detach()

                .clone(memory_format=torch.contiguous_format)

            )

        # Use try/except 避免意外来回滚

        # 计算compute_mask 并register_forward_pre_hook

        try:

            # 依据importance_scores来compute_mask

            mask = method.compute_mask(importance_scores, default_mask=default_mask)

            # 保存 mask to `module[name + '_mask']` 缓存

            module.register_buffer(name + "_mask", mask)

            # 以及pruned tensor 存到 `module[name]` 状态

            setattr(module, name, method.apply_mask(module))

            # 通过hook,register_forward_pre_hook,关联module的pruning到的forward()中,这样推理时也可以做reparam

            module.register_forward_pre_hook(method)

        except Exception as e:

            # 删除name_orig,恢复orig

            if not isinstance(method, PruningContainer):

                orig = getattr(module, name + "_orig")

                module.register_parameter(name, orig)

                del module._parameters[name + "_orig"]

            raise e

        return method
可以看到,BasePruningMethod基类中,抽象方法compute_mask()、__init__ 需要子类进行实现,apply()方法可以调用基类的方法即可。
L1Unstructured为例
class L1Unstructured(BasePruningMethod):

    r"""非结构化,最小L1norm(绝对值)的值zero out.

    amount,要裁剪参数的比率,如果是整数,则是裁剪的参数总个数

    """

    PRUNING_TYPE = "unstructured" ##必须指明结构化还是非结构化

    def __init__(self, amount):

        # Check range of validity of pruning amount

        _validate_pruning_amount_init(amount)

        self.amount = amount

    ## 重写父类方法compute_mask

    def compute_mask(self, t, default_mask):

        ..."""  """

        # 计算要裁剪的参数个数

        nparams_toprune = _compute_nparams_toprune(self.amount, tensor_size)

        ...

        # container接口里的default_mask本地拷贝一下

        mask = default_mask.clone(memory_format=torch.contiguous_format)

        if nparams_toprune != 0:  # k=0 not supported by torch.kthvalue

            # largest=True --> top k; largest=False --> bottom k

            # 取出abs最小的那些权重序号,将对应的mask位置置为0

            topk = torch.topk(torch.abs(t).view(-1), k=nparams_toprune, largest=False)

            # topk will have .indices and .values

            mask.view(-1)[topk.indices] = 0

        return mask

    @classmethod

    def apply(cls, module, name, amount, importance_scores=None):

        r"""调用父类方法,增加forward pre-hook 方便来做reparametrization ,生成 original tensor(xxx_orig)

        和pruning mask(xxx_mask).

        输入:module,module的参数名,要剪的比率.

        """

        # 调用父类的BasePruningMethod的apply方法

        return super(L1Unstructured, cls).apply(

            module, name, amount=amount, importance_scores=importance_scores

        )
PruningContainer
PruningContainer这个类同样也是继承自BasePruningMethod类,它的作用主要是对剪枝策略进行管理。
既然是继承自BasePruningMethod类,必然要实现__init__、compute_mask,此外,该类中单独实现了add_pruning_method用于储存裁剪策略,其中slc 存放的是非结构化剪枝的元素位置/结构化剪枝中的保留通道信息
class PruningContainer(BasePruningMethod):

    """迭代迭代pruning的方法类.

    记录BasePruningMethod的序列,然后pruning时按照顺序来apply这些BasePruningMethod

    输入为:BasePruningMethod继承子类对象

    """

    def __init__(self, *args):

        self._pruning_methods: Tuple["BasePruningMethod", ...] = tuple()

        ...

                self.add_pruning_method(method)

    def add_pruning_method(self, method):

        r"""

        输入为:BasePruningMethod继承子类对象

        """

        ...

        # if all checks passed, add to _pruning_methods tuple

        self._pruning_methods += (method,)

    ...

    # 迭代多次pruning

    def compute_mask(self, t, default_mask):

        r""" new mask 根据 ``PRUNING_TYPE`` ,因为mask的地方在后续就不参与统计计算了嘛:

        * 'unstructured', 非结构化,mask基于nonmasked位置来叠加生成;

        * 'structured', 结构化,mask 根据没有zero-out的channel来叠加;

        * 'global', 非结构化,全局的,所以是根据整体的所有元素来统计.

        输入:t,待裁剪的parameter,和default_mask维度同

        default_mask,迭代剪枝当前的mask值

        返回:default_mask和对当前剪枝method获取的new_mask合成

        """

        def _combine_masks(method, t, mask):

            r"""

            Args:

                method BasePruningMethod的实例

                t (torch.Tensor): 需要剪的tensor.

                mask (torch.Tensor): 历史mask

            Returns:

                new_mask (torch.Tensor): 合并之后的新mask.

            """

            new_mask = mask  # start off from existing mask

            new_mask = new_mask.to(dtype=t.dtype)

            # slc 存放的是非结构化剪枝的元素位置/结构化剪枝中的保留通道信息

            # compute a slice of t onto which the new pruning method will operate

            if method.PRUNING_TYPE == "unstructured":

                # mask tensor上为1的地方

                # 非结构化剪枝

                slc = mask == 1

            # for struct pruning, exclude channels that have already been

            # entirely pruned

            elif method.PRUNING_TYPE == "structured":

                if not hasattr(method, "dim"):

                    raise AttributeError(

                        "Pruning methods of PRUNING_TYPE "

                        '"structured" need to have the attribute `dim` defined.'

                    )

                # find the channels to keep by removing the ones that have been

                # zeroed out already (i.e. where sum(entries) == 0)

                n_dims = t.dim()  # "is this a 2D tensor? 3D? ..."

                dim = method.dim

                # convert negative indexing

                if dim < 0:

                    dim = n_dims + dim

                # if dim is still negative after subtracting it from n_dims

                if dim < 0:

                    raise IndexError(

                        "Index is out of bounds for tensor with dimensions {}".format(

                            n_dims

                        )

                    )

                # find channels along dim = dim that aren't already tots 0ed out

                # 统计mask里是否全0,keep_channel为method设置的dim里没有全部zero-out的通道

                keep_channel = mask.sum(dim=[d for d in range(n_dims) if d != dim]) != 0

                # create slice to identify what to prune

                slc = [slice(None)] * n_dims

                slc[dim] = keep_channel

            elif method.PRUNING_TYPE == "global":

                # 非结构化剪枝

                n_dims = len(t.shape)  # "is this a 2D tensor? 3D? ..."

                slc = [slice(None)] * n_dims

            else:

                raise ValueError(

                    "Unrecognized PRUNING_TYPE {}".format(method.PRUNING_TYPE)

                )

            # compute the new mask on the unpruned slice of the tensor t

            # 具体调用每种方法的compute_mask与default_mask一起生成新的mask

            partial_mask = method.compute_mask(t[slc], default_mask=mask[slc])

            new_mask[slc] = partial_mask.to(dtype=new_mask.dtype)

            return new_mask

        # 从序列头上里取出method,_combine_masks调用该method的compute_mask

        method = self._pruning_methods[-1]

        mask = _combine_masks(method, t, default_mask)

        return mask
在compute_mask函数的实现中,非结构化剪枝时,将mask tensor上为1 的地方保存在slc,同理,对于结构化剪枝,会通过统计mask里是否全为0,并将method设置的dim里没有全部zero-out的通道保存在keep_channel,赋值给slc,然后具体调用每种方法的compute_mask与default_mask一起生成新的mask并返回。
Pruning Method
- prune(self, t, default_mask=None, importance_scores=None)
同样,该函数也为基类BasePruningMethod的类方法,通过调用调用compute_mask,返回pruned之后的tensor
def prune(self, t, default_mask=None, importance_scores=None):

        r"""调用compute_mask,返回pruned之后的tensor

        """

        ...

        return t * self.compute_mask(importance_scores, default_mask=default_mask)
- emove(self, module)
这个类方法的作用就是将参数的缓存和mask都去掉,永久化剪枝,不可逆
    def remove(self, module):

        r"""将参数的缓存和mask都去掉,永久化剪枝. parameter

         ``name+'_orig'`` 从 parameter list顺出.  ``name+'_mask'`` 从 buffers删除

         不可逆

        """

        # 是否已经设置过pruning

        assert (

            self._tensor_name is not None

        ), "Module {} has to be pruned\

            before pruning can be removed".format(

            module

        )  # this gets set in apply()

        # to update module[name] to latest trained weights

        weight = self.apply_mask(module)  # masked weights

        # 删除原来的weight,替换为apply_mask

        if hasattr(module, self._tensor_name):

            delattr(module, self._tensor_name)

        orig = module._parameters[self._tensor_name + "_orig"]

        orig.data = weight.data

        # 删除name_orig和name_mask

        del module._parameters[self._tensor_name + "_orig"]

        del module._buffers[self._tensor_name + "_mask"]

        setattr(module, self._tensor_name, orig)
剪枝在pytorch中是如何实现的?的更多相关文章
- 实践Pytorch中的模型剪枝方法
摘要:所谓模型剪枝,其实是一种从神经网络中移除"不必要"权重或偏差的模型压缩技术. 本文分享自华为云社区<模型压缩-pytorch 中的模型剪枝方法实践>,作者:嵌入式 ...
- PyTorch官方中文文档:PyTorch中文文档
PyTorch中文文档 PyTorch是使用GPU和CPU优化的深度学习张量库. 说明 自动求导机制 CUDA语义 扩展PyTorch 多进程最佳实践 序列化语义 Package参考 torch to ...
- PyTorch中ReLU的inplace
0 - inplace 在pytorch中,nn.ReLU(inplace=True)和nn.LeakyReLU(inplace=True)中存在inplace字段.该参数的inplace=True的 ...
- pytorch中tensorboardX的用法
在代码中改好存储Log的路径 命令行中输入 tensorboard --logdir /home/huihua/NewDisk1/PycharmProjects/pytorch-deeplab-xce ...
- Pytorch中RoI pooling layer的几种实现
Faster-RCNN论文中在RoI-Head网络中,将128个RoI区域对应的feature map进行截取,而后利用RoI pooling层输出7*7大小的feature map.在pytorch ...
- pytorch 中的重要模块化接口nn.Module
torch.nn 是专门为神经网络设计的模块化接口,nn构建于autgrad之上,可以用来定义和运行神经网络 nn.Module 是nn中重要的类,包含网络各层的定义,以及forward方法 对于自己 ...
- 对pytorch中Tensor的剖析
不是python层面Tensor的剖析,是C层面的剖析. 看pytorch下lib库中的TH好一阵子了,TH也是torch7下面的一个重要的库. 可以在torch的github上看到相关文档.看了半天 ...
- 交叉熵的数学原理及应用——pytorch中的CrossEntropyLoss()函数
分类问题中,交叉熵函数是比较常用也是比较基础的损失函数,原来就是了解,但一直搞不懂他是怎么来的?为什么交叉熵能够表征真实样本标签和预测概率之间的差值?趁着这次学习把这些概念系统学习了一下. 首先说起交 ...
- pytorch中如何使用DataLoader对数据集进行批处理
最近搞了搞minist手写数据集的神经网络搭建,一个数据集里面很多个数据,不能一次喂入,所以需要分成一小块一小块喂入搭建好的网络. pytorch中有很方便的dataloader函数来方便我们进行批处 ...
- (原)CNN中的卷积、1x1卷积及在pytorch中的验证
转载请注明处处: http://www.cnblogs.com/darkknightzh/p/9017854.html 参考网址: https://pytorch.org/docs/stable/nn ...
随机推荐
- autMan奥特曼机器人-内置微信如何定时给公众号发消息
autMan版本要求2.1.3以上 一.打开左侧栏的本地开发,然后从实时日志获取公众号的ID或名称 ![2024-10-23T01:45:34.png][1] 